This topic describes the elasticity of serverless instances, including scheduled policies and other important considerations.
Prerequisites
A serverless Message Queue for Apache Kafka instance is deployed and in the Running state.
Elasticity
The Standard and Professional editions of serverless Message Queue for Apache Kafka instances offer elastic scaling to handle fluctuating traffic. You can adjust the reserved production and consumption capacity by scaling up or down.
Edition | Elastic limit | Example |
Basic | Provides a 99.9% service level agreement (SLA), which is slightly lower than that of the Standard and Professional editions. The cluster uses a higher proportion of low-cost resources, such as HDDs, OSS, and Spot Instances. This edition does not support lossless auto-elasticity and requires manual scaling. It is recommended for testing or business scenarios with stable traffic. For mission-critical applications, we recommend the Standard or Professional edition. | Reserved production capacity is the message production throughput of a Message Queue for Apache Kafka cluster, measured in MB/s. By default, a cluster has three fixed replicas, and the production capacity is distributed evenly among them. Elastic limit for the Standard edition:
Elastic limit for the Professional edition:
Examples:
Use the ApsaraMQ for Kafka serverless price calculator to estimate costs: Price Calculator for Serverless Message Queue for Apache Kafka
|
Standard | Provides a 99.95% high-availability SLA. It supports lossless auto-elasticity and scheduled elasticity. This edition is recommended for production environments. | |
Professional | Provides a 99.99% high-availability SLA with 3-AZ disaster recovery. It offers higher elasticity for smaller reserved capacities, making it the recommended enterprise-grade edition. |
Scheduled policy
Target items
A scheduled elasticity policy changes the reserved production and consumption capacity on a schedule. If traffic is expected to peak above the elastic limit, we recommend configuring a scheduled task to increase capacity for these temporary spikes.
The Standard and Professional editions support scheduled elasticity policies. For more information about elastic limits, see Elasticity.
Impact
This can cause clients to briefly disconnect and reconnect, which triggers load balancing and may result in a few errors. To ensure message delivery, implement a retry mechanism on your clients.
The overall service remains available during the scaling operation.
Effective time
The service begins scaling before the scheduled start time to ensure the new capacity is ready when the period begins. Therefore, set tasks with sufficient lead time for the scaling operation to complete.
The service automatically scales down after the effective period ends.
To prevent rapid, repeated scaling, consecutive scheduled tasks must be at least 60 minutes apart.
If a task is created for a time that has already passed, a non-recurring task will not run, and a recurring task will skip that scheduled run.
When you manually scale up an instance, the new capacity must exceed that of any active scheduled policy. This action automatically disables any scheduled policy with a lower capacity target.
Create a scheduled policy
Log on to the ApsaraMQ for Kafka console. In the Resource Distribution section of the Overview page, select the region where the ApsaraMQ for Kafka instance that you want to manage resides.
On the Instances page, click the name of the instance that you want to manage.
On the Instance Details page, click the Elasticity Policy tab.
In the Scheduled Elasticity Policy section, click Add Scheduled Task. In the Create Scheduled Elasticity Policy panel, configure the following parameters and click OK.
Policy Name: Set a name for the policy.
Reserved Production Capacity: The target production capacity for the scheduled period.
Reserved Consumption Capacity: The target consumption capacity for the scheduled period.
Recurrence Rule
Non-recurring: The task runs once at a specified time. The start time must be at least 1 hour in the future and within the next 7 days. The task duration must be between 30 minutes and 7 days.
Daily: The task runs daily at a specified time. The task duration must be between 30 minutes and 12 hours.
Weekly: The task runs at a specified time on the selected days of the week. The task duration must be between 30 minutes and 12 hours.
Effective Period: Set the effective period for the reserved capacity according to the duration range specified in the recurrence rule.
ImportantTo allow scaling operations to complete, consecutive scheduled policies must be at least 60 minutes apart.
Enabled: Activates the policy immediately after it is created.
After the policy is created, you can view its details on the Elasticity Policy tab of the Instance Details page. Details include the reserved production capacity, reserved consumption capacity, effective period, and estimated scale-up time.
Enable a scheduled policy
In the Scheduled Elasticity Policy section, view the list of scheduled tasks.
In the row for the target policy, turn on the
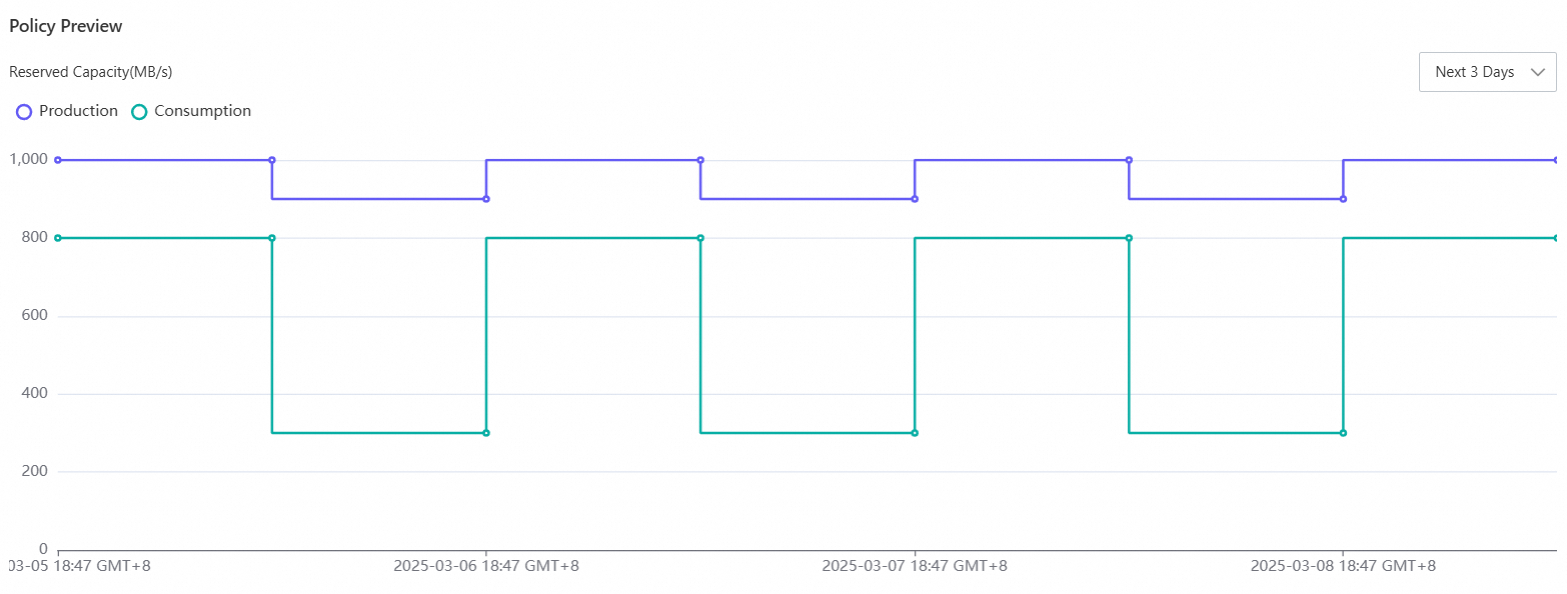
 switch in the Enabled column.
After the scheduled policy is enabled, you can view the projected reserved capacity for production and consumption for a future period (1, 2, 3, or 7 days) in the Policy Preview area.
Disable or delete a scheduled policy
In the Scheduled Elasticity Policy section, view the list of scheduled tasks.
To disable a policy, find it in the list and turn off the
 switch in the Enabled column.
To delete a scheduled policy: In the Actions column for the target policy, click Delete.