When your Kafka topics accumulate data that needs offline analytics or warehousing, you can stream it directly into MaxCompute by creating a sink connector. The connector continuously exports messages from a specified topic and writes them to a MaxCompute table, with optional time-based partitioning for efficient querying.
Prerequisites
Before you begin, make sure you have:
An ApsaraMQ for Kafka instance in a supported region
A topic on the ApsaraMQ for Kafka instance that produces the data to export
A consumer group ID on the ApsaraMQ for Kafka instance (create one or use an existing group that is not in use)
A MaxCompute project
An Alibaba Cloud AccessKey pair (AccessKey ID and AccessKey secret) with permissions to access MaxCompute
Collect the following values before you start. You need them when configuring the connector:
| Value | Description | Example |
|---|---|---|
| ApsaraMQ for Kafka instance ID | The instance that produces data | alikafka_post-cn-9hdsbdhd**** |
| Topic name | The source topic | guide-sink-topic |
| Consumer group ID | The consumer group for the connector | GID_EVENTBRIDGE_xxx |
| AccessKey ID | Credentials to access MaxCompute | LTAI5tXxx |
| AccessKey secret | Credentials to access MaxCompute | xXxXxXx |
| MaxCompute project name | The destination project | test_compute |
| MaxCompute table name | The destination table | kafka_to_maxcompute |
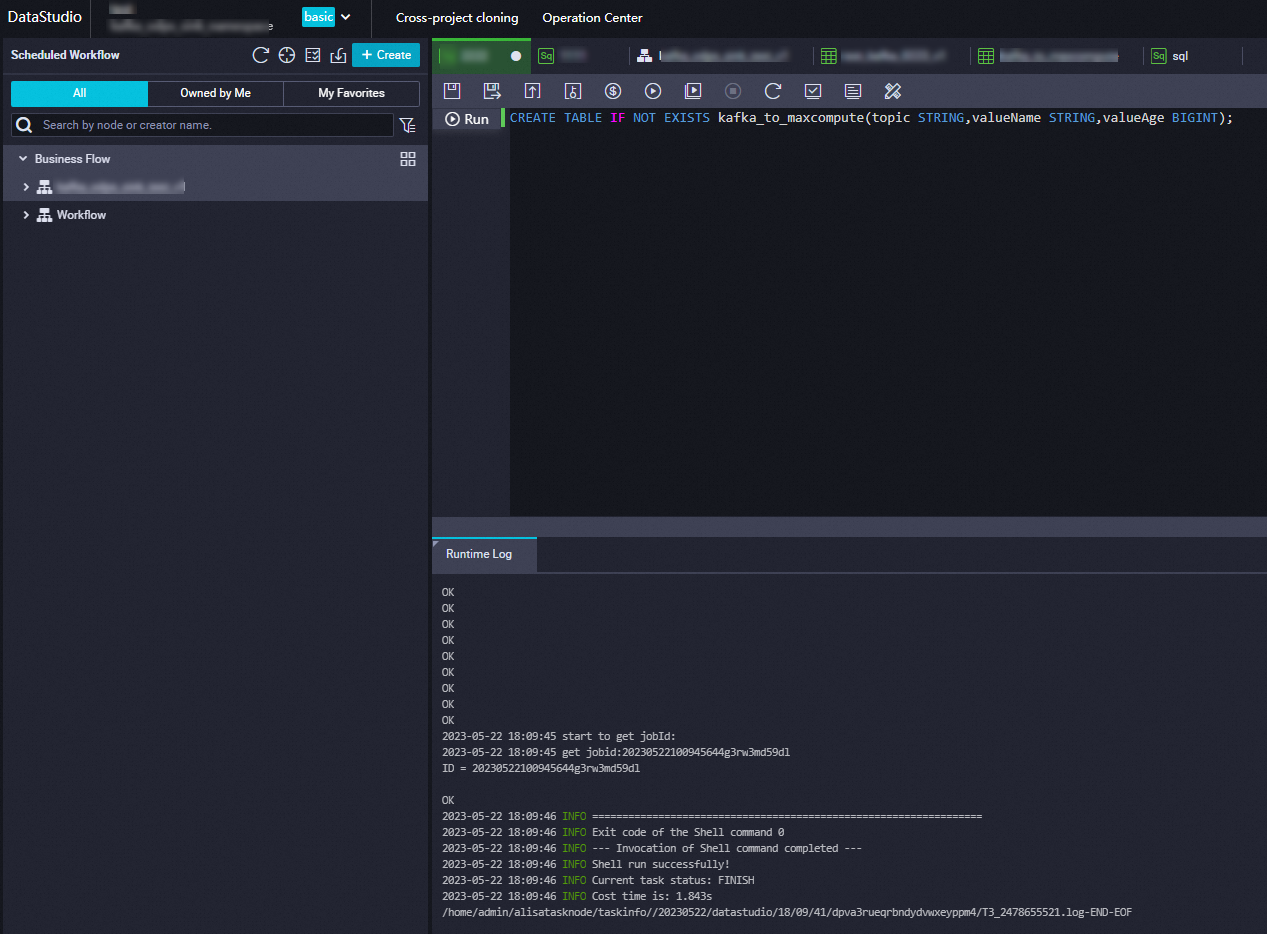
Step 1: Create a MaxCompute table
Create a destination table on the MaxCompute client. For details, see Create a table.
With partitioning -- add a partition key column named time with type STRING:
CREATE TABLE IF NOT EXISTS kafka_to_maxcompute(topic STRING, valueName STRING, valueAge BIGINT) PARTITIONED by (time STRING);Without partitioning:
CREATE TABLE IF NOT EXISTS kafka_to_maxcompute(topic STRING, valueName STRING, valueAge BIGINT);Tip: Partitioning organizes data into time-based segments, which improves query performance and reduces scan costs for large tables. Enable partitioning if you expect high data volumes or need to query by time range. Skip partitioning for small tables or when time-based filtering is not needed.
After the statement runs successfully, verify the table on the Tables page in the MaxCompute console.

Step 2: Create and start the connector
Log on to the ApsaraMQ for Kafka console. In the Resource Distribution section of the Overview page, select the region where your instance resides.
In the left-side navigation pane, choose Connector Ecosystem Integration > Tasks.
On the Tasks page, click Create Task.
On the Create Task page, enter a Task Name and Description, then configure the following sections.
Configure the source
In the Source step, set Data Provider to ApsaraMQ for Kafka and configure the following parameters. Click Next Step when finished.
| Parameter | Description | Example |
|---|---|---|
| Region | The region where the ApsaraMQ for Kafka instance resides. | China (Hangzhou) |
| ApsaraMQ for Kafka Instance | The instance ID. | alikafka_post-cn-9hdsbdhd**** |
| Topic | The source topic that produces the data to export. | guide-sink-topic |
| Group ID | The consumer group for the connector. Select Quickly Create to auto-generate a group in GID_EVENTBRIDGE_xxx format, or select Use Existing Group to choose an existing group that is not in use. Selecting a group that is already in use affects existing message subscriptions. | Use Existing Group |
| Consumer Offset | Latest Offset: start from the newest message. Earliest Offset: start from the oldest message. | Latest Offset |
| Network Configuration | Select Self-managed Internet for cross-border data transmission. Otherwise, select Basic Network. | Basic Network |
| Data Format | Encoding format for binary data from the source. Json (default): UTF-8 encoded JSON in the payload. Text: UTF-8 encoded strings. Binary: Base64 encoded strings. | Json |
| Messages | Maximum number of messages per function invocation. Messages are sent when the backlog reaches this value. Valid values: 1 to 10000. | 2000 |
| Interval (Unit: Seconds) | Time interval for invoking the function and sending aggregated messages to Function Compute. Valid values: 0 to 15. A value of 0 sends messages immediately after aggregation. | 3 |
Configure filtering and transformation
In the Filtering step, define a data pattern to filter messages. For details, see Event patterns.
In the Transformation step, specify a data cleansing method for operations such as splitting, mapping, enrichment, and dynamic routing. For details, see Use Function Compute to perform message cleansing.
Configure the sink
In the Sink step, set Service Type to MaxCompute acs.maxcompute and configure the following parameters.
| Parameter | Description | Example |
|---|---|---|
| AccessKey ID | The AccessKey ID for accessing MaxCompute. | yourAccessKeyID |
| AccessKey Secret | The AccessKey secret for accessing MaxCompute. | yourAccessKeySecret |
| MaxCompute Project Name | The name of the MaxCompute project. | test_compute |
| MaxCompute Table Name | The name of the MaxCompute table created in Step 1. | kafka_to_maxcompute |
| MaxCompute Table Input Parameter | After selecting the table, column names and types are displayed. Set the Value Extraction Rule for each column using JSONPath expressions. See Value extraction rules for details. | $.data.topic |
| Partition Dimension | Disable: no partitioning. Enable: partition data by time. If enabled, configure the Partition Value using time variables {yyyy}, {MM}, {dd}, {HH}, {mm} (case-sensitive) or constants. | Enable, {yyyy}-{MM}-{dd}.{HH}:{mm}.suffix |
| Network Configuration | VPC: deliver messages through a virtual private cloud (VPC). Internet: deliver messages over the public network. | Internet |
| VPC | The VPC ID. Required only when Network Configuration is set to VPC. | vpc-bp17fapfdj0dwzjkd**** |
| vSwitch | The vSwitch ID. Required only when Network Configuration is set to VPC. | vsw-bp1gbjhj53hdjdkg**** |
| Security Group | The security group ID. Required only when Network Configuration is set to VPC. | test_group |
Value extraction rules
Each message delivered to the connector follows the CloudEvents structure. Use JSONPath expressions to map message fields to MaxCompute table columns.
Example message:
{
  "data": {
    "topic": "t_test",
    "partition": 2,
    "offset": 1,
    "timestamp": 1717048990499,
    "headers": {
      "headers": [],
      "isReadOnly": false
    },
    "key": "MaxCompute-K1",
    "value": "MaxCompute-V1"
  },
  "id": "9b05fc19-9838-4990-bb49-ddb942307d3f-2-1",
  "source": "acs:alikafka",
  "specversion": "1.0",
  "type": "alikafka:Topic:Message",
  "datacontenttype": "application/json; charset=utf-8",
  "time": "2024-05-30T06:03:10.499Z",
  "aliyunaccountid": "1413397765616316"
}
Example extraction rules for the kafka_to_maxcompute table:
| Column | Type | Value extraction rule | Extracted value |
|---|---|---|---|
topic | STRING | $.data.topic | t_test |
valueName | STRING | $.data.value | MaxCompute-V1 |
valueAge | BIGINT | $.data.offset | 1 |
Configure the retry policy
In the Task Property section, configure the retry policy for failed event pushes and the fault-handling method. For details, see Retry policies and dead-letter queues.
Save and verify the connector status
Click Save. On the Tasks page, find the connector. When the Status column changes from Starting to Running, the connector is active and streaming data.
Step 3: Verify data delivery
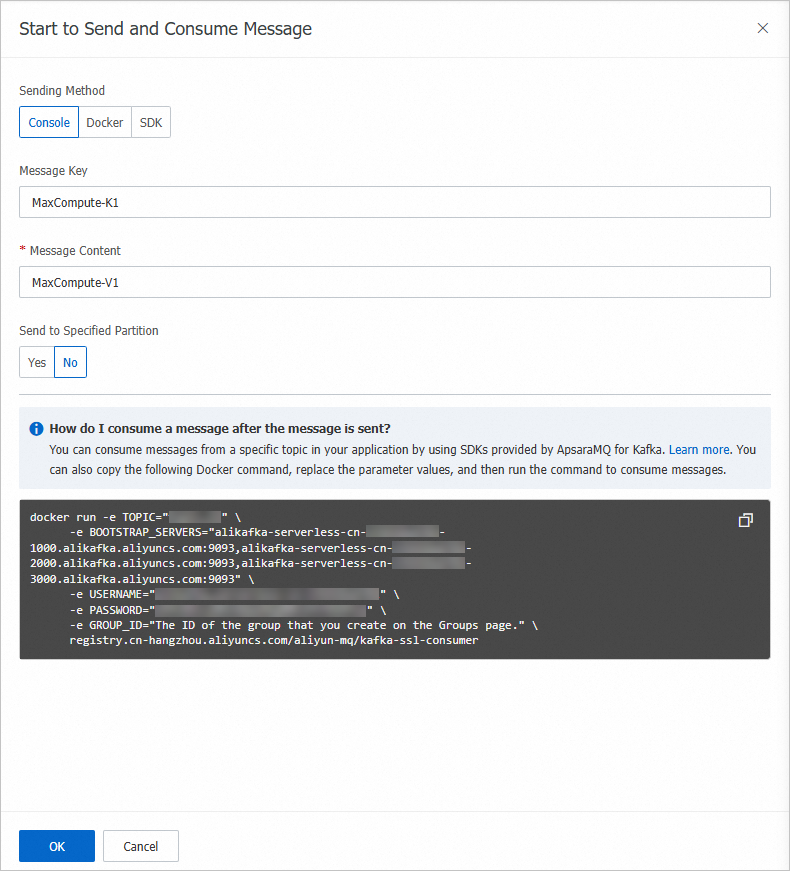
Send a test message and confirm that it arrives in the MaxCompute table.
On the Tasks page, find the connector and click the source topic name in the Event Source column.
On the Topic Details page, click Send Message.
In the Start to Send and Consume Message panel, enter a test message and click OK.
In the MaxCompute console, query the partitions to confirm data arrived:
show PARTITIONS kafka_to_maxcompute;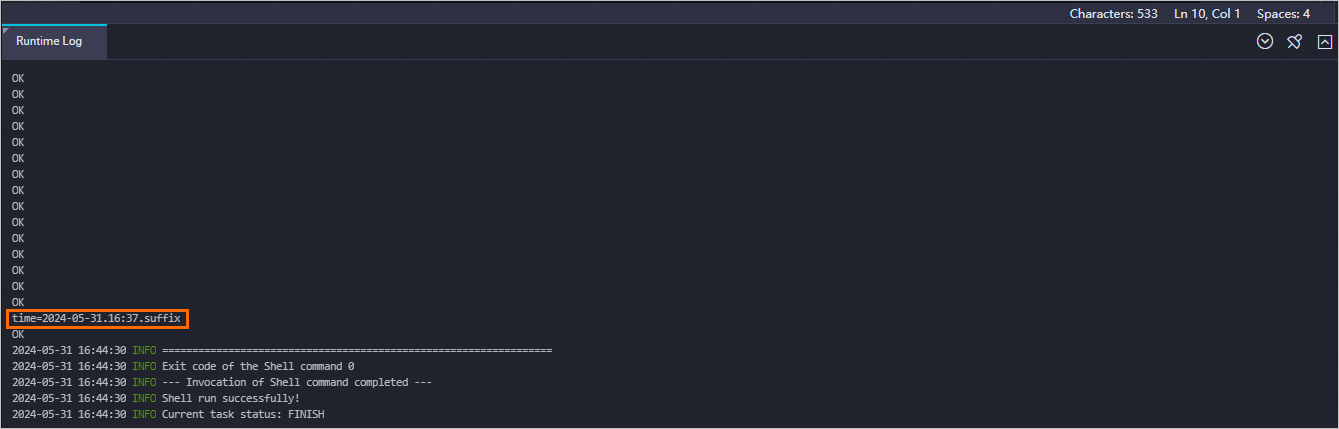
Query data in the target partition. Replace the
timevalue with the actual partition value from the previous step: If the query returns the test message data, the connector is working correctly.SELECT * FROM kafka_to_maxcompute WHERE time="2024-05-31.16:37.suffix";