This topic describes how to connect Kingdee K/3 WISE 15.0 or 15.1 in an on-premises environment to an ApsaraDB RDS for SQL Server instance. The connection process involves the following operations: Restore the backup data of the specified Kingdee K/3 WISE set of books from an Object Storage Service (OSS) bucket to an RDS instance, configure the required Elastic Compute Service (ECS) instance and RDS instance to enable distributed transactions, install the required accounting data management tool of Kingdee K/3 WISE, and configure the required database. After the connection is established, make sure that Kingdee K/3 WISE works as expected to implement transaction consistency and isolation. This helps enterprises perform cloud migration in an efficient manner.
Process
Restore data to the RDS instance: Upload a full backup file of the specified Kingdee K/3 WISE set of books to an OSS bucket. Then, restore the data from the full backup file to the RDS instance.
Enable distributed transactions: Modify the access settings of the RDS instance, ECS instance, and Windows operating system to enable required ports. This allows you to execute distributed transactions between the RDS instance and the ECS instance.
Install the required accounting data management tool and configure the required database: Install the required accounting data management tool of Kingdee K/3 WISE and configure the required database.
Preparations
Complete the full data backup of the specified Kingdee K/3 WISE set of books.
Create a Windows ECS instance. In this example, a Windows ECS instance that runs
Windows Server 2016is created. For more information, see Step 1. Create an ECS instance.Create an RDS instance that resides in the same region and virtual private cloud (VPC) as the ECS instance on which you want to install Kingdee K/3 WISE. For more information, see VPCs and vSwitches and Create an instance.
NoteThe RDS instance meets the following requirements:
The RDS instance runs SQL Server 2022 EE (Always On), SQL Server 2019 EE (Always On), SQL Server 2017 EE (Always On), SQL Server 2016 EE, SQL Server 2012 EE, SQL Server 2022 SE, SQL Server 2019 SE, SQL Server 2017 SE, SQL Server 2016 SE, SQL Server 2012 SE, or SQL Server 2008 R2 with cloud disks.
The RDS instance belongs to the general-purpose or dedicated instance family. The shared instance family is not supported.
The RDS instance uses the subscription or pay-as-you-go billing method. Serverless instances are not supported.
Restore data to the RDS instance
Step 1: Upload a full backup file of the set of books to an OSS bucket
Log on to the OSS console.
In the left-side navigation pane, click Buckets. On the Buckets page, click Create Bucket.
Configure the following parameters and retain the default values for other parameters. Then, click OK.
Parameter
Description
Bucket Name
Enter a name for the bucket.
Region
Select the region in which you want to create the bucket.
ImportantMake sure that the bucket resides in the same region as the ECS instance and RDS instance.
Storage Class
Select IA.
Redundancy Type
Select LRS.
ACL
Select Private.
Versioning
Select Off.
Encryption Method
Select None.
Real-time Log Query
Select Not Activated.
NoteFor more information, see Create buckets.
In the left-side navigation pane, click Buckets. On the page that appears, click the bucket that you created.
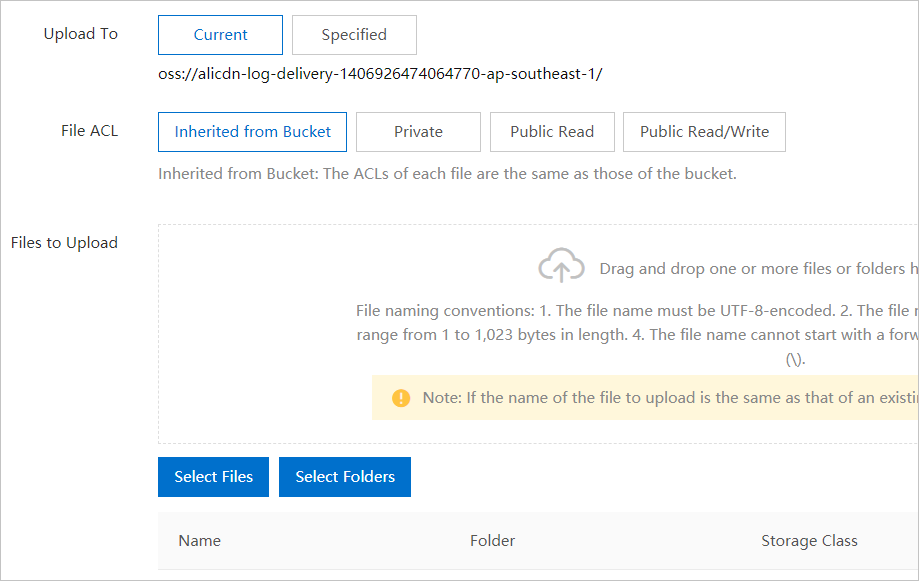
In the left-side navigation pane of the page that appears, choose . On the page that appears, click Upload Object.
Drag the full backup file that you want to upload to the Files to Upload field. Alternatively, click Select Files and select the full backup file.
NoteFor more information, see Upload objects.
Step 2: Create a privileged account for the RDS instance
Log on to the ApsaraDB RDS console and go to the Instances page. In the top navigation bar, select the region in which the RDS instance resides. Then, find the RDS instance and click the instance ID.
In the left-side navigation pane, click Accounts.
Click Create Account.
Configure the following parameters and click OK.
Parameter
Description
Database Account
Enter a username for the account. The name can be up to 50 characters in length and can contain lowercase letters, digits, and underscores (_). It must start with a lowercase letter and end with a lowercase letter or a digit.
Account Type
Specify the type of the account. Select Privileged Account. For more information, see Account permissions in an ApsaraDB RDS for SQL Server instance.
New Password
Enter a password for the account. The password must meet the following requirements:
It must be 8 to 32 characters in length.
It must contain at least three types of the following characters: uppercase letters, lowercase letters, digits, and special characters.
It can contain the following special characters: ! @ # $ % ^ & * ( ) _ + - =
Confirm Password
Enter the password for the account again.
Description
Enter a description that helps identify the account.
Step 3: Restore the full backup file from the OSS bucket to the RDS instance
The AliyunServiceRoleForDBS service-linked role is created by using your Alibaba Cloud account when you use the backup feature of ApsaraDB RDS for the first time. For more information, see How do I create a service-linked role for Data Disaster Recovery?
Log on to the ApsaraDB RDS console and go to the Instances page. In the top navigation bar, select the region in which the RDS instance resides. Then, find the RDS instance and click the instance ID.
In the left-side navigation pane of the page that appears, click Backup and Restoration. On the page that appears, click Migrate OSS Backup Data to RDS.
NoteIf you cannot find the button, check whether the SQL Server version and RDS edition of the RDS instance meet requirements. For more information, see Preparations.
Click Next twice to go to the Import Data step.
Configure the following parameters.
Parameter
Description
Database Name
Enter the name of the destination database on the RDS instance.
OSS Bucket
Select the OSS bucket in which the full backup file is stored.
OSS File
Specify the full backup file that you want to import. You can enter a prefix in the search box and click the search icon to search for the full backup file in fuzzy match mode. The system displays the name, size, and update time of each full backup file that is returned. Select the backup file that you want to migrate to the RDS instance.
Cloud Migration Method
Select Immediate Access (Full Backup).
Consistency Check Mode
Select Synchronous DBCC.
NoteIf you migrate backup data from OSS to ApsaraDB RDS for the first time, the system prompts you to authorize ApsaraDB RDS to access your resources in OSS. In this case, click Authorize and then Confirm Authorization Policy.
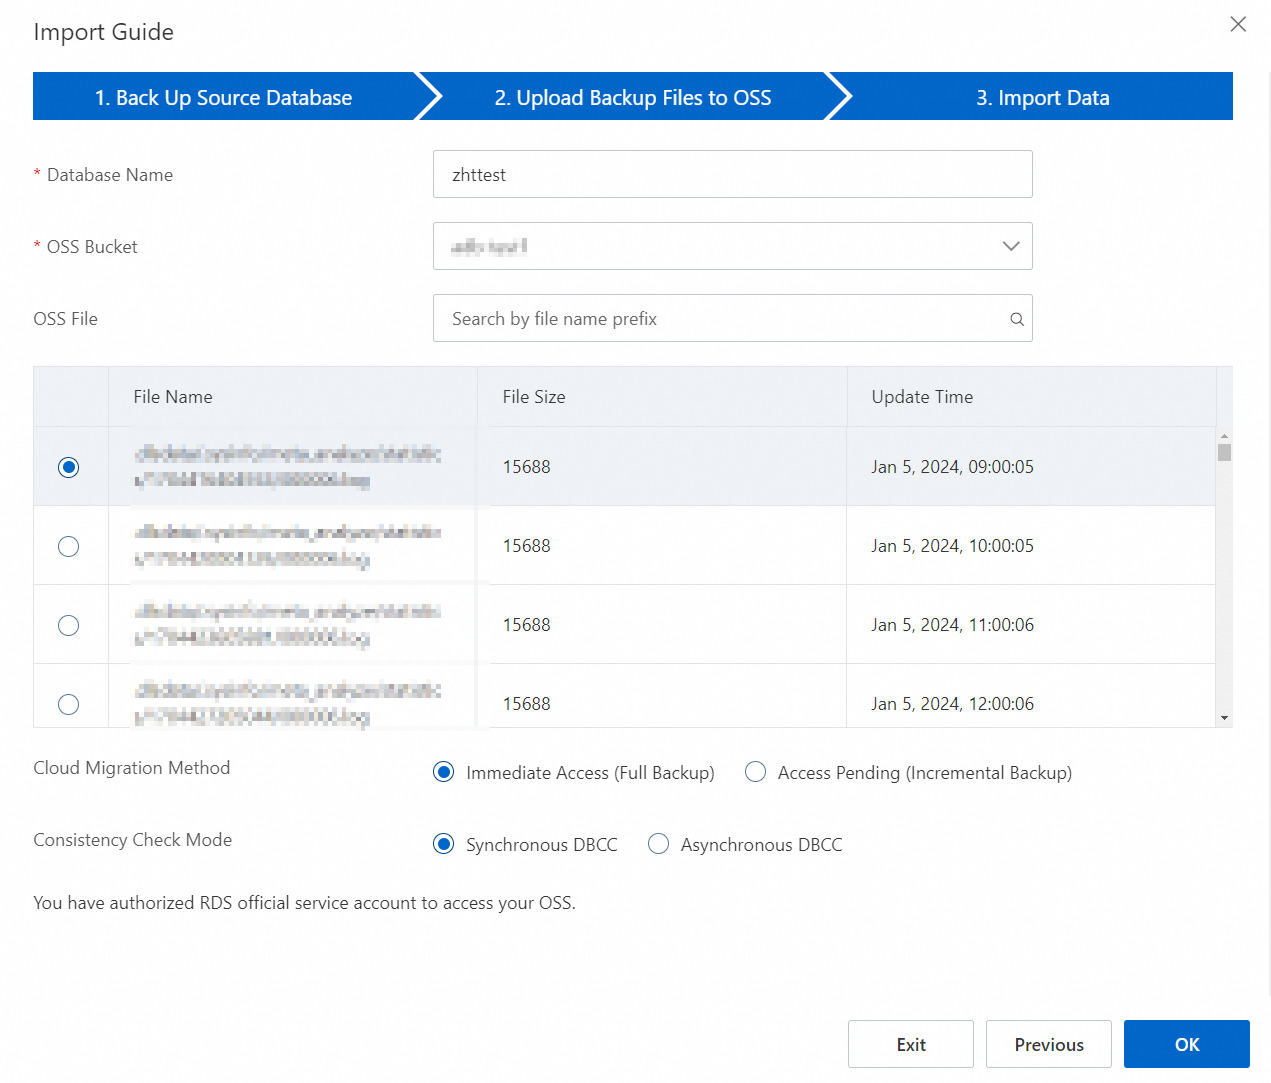
Click OK.
NoteWait until the full backup file is imported into the destination database on the RDS instance. You can click Databases in the left-side navigation pane to view the status of the destination database.
Enable distributed transactions
Step 1: Configure the RDS instance
Configure a whitelist
Configure a whitelist for your RDS instance to allow access from the IP address of a specific ECS instance to the RDS instance.
Log on to the ApsaraDB RDS console and go to the Instances page. In the top navigation bar, select the region in which the RDS instance resides. Then, find the RDS instance and click the instance ID.
In the left-side navigation pane, click Whitelist and SecGroup. On the Whitelist Settings tab of the page that appears, click Modify to the right of the IP address whitelist that is labeled
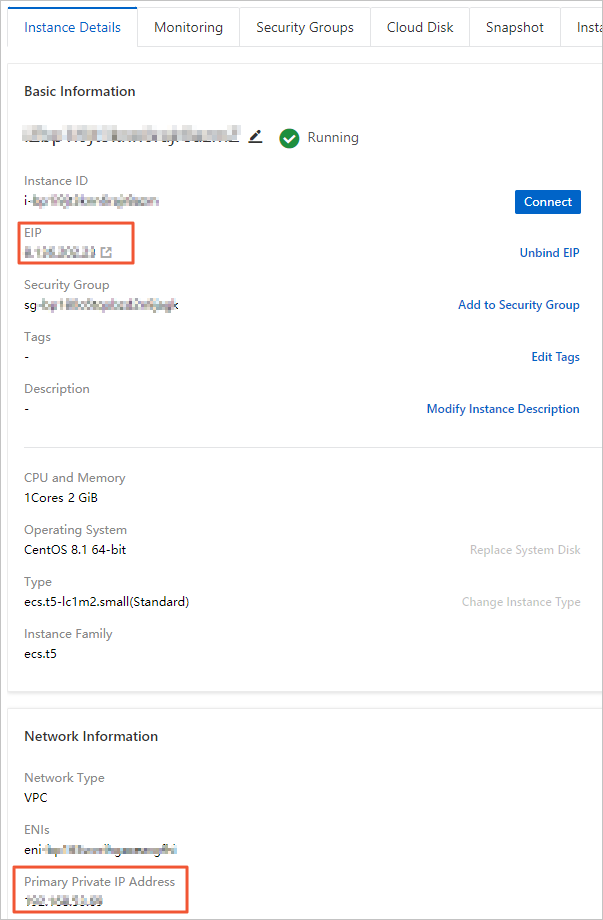
defaultand add the IP address of the ECS instance to the whitelist.NoteIf the ECS instance and RDS instance reside in the same virtual private cloud (VPC), you must enter the private IP address of the ECS instance.
If the ECS instance and RDS instance reside in different VPCs, you must enter the public IP address of the ECS instance. In addition, you must apply for a public endpoint for the RDS instance. For more information, see Apply for or release a public endpoint.
You can view the private or public IP address of the ECS instance on the Instance Details page of the ECS instance in the ECS console.
The following figure shows the page that displays the IP addresses of an ECS instance.
Click OK.
Configure a distributed transaction whitelist
Configure a distributed transaction whitelist to specify which ECS instances are allowed to participate in handling distributed transactions of the RDS instance by computer name.
In the left-side navigation pane, click Data Security. On the page that appears, click the Distributed Transaction Whitelist tab.
Click Create Whitelist. In the dialog box that appears, configure the following parameters and click OK.
Parameter
Description
Whitelist Name:
Enter a name for the whitelist. The name must be 2 to 32 characters in length. The name can contain digits, lowercase letters, and underscores (_). The name must start with a lowercase letter and end with a lowercase letter or digit.
IP Addresses
Enter a value in the format of
IP address of the ECS instance,Hostname. The IP address and the hostname are separated with a comma (,). The hostname refers to the name of the Windows computer on which the ECS instance resides. Example:192.168.1.100,k3ecstest. If you want to enter more than one entry, make sure that each entry is in a different line.To view the computer name that is specified by the Hostname parameter, open Control Panel of your computer and choose .
Step 2: Configure the ECS instance
Adjust the security group rules of the specified ECS instance and enable the required port to ensure that the network configurations for the ECS instance match the whitelist settings of the RDS instance. This helps build a secure distributed transaction environment.
Log on to the ECS console.
In the left-side navigation pane, choose .
In the top navigation bar, select the region in which the ECS instance resides.
Find the ECS instance and click the instance ID.
In the top navigation bar, click Security Groups.
Find the security group that you want to manage and click Manage Rules in the Actions column.
On the Inbound tab, click Add Rule.
Configure the required parameters and then click Save. The following table describes the parameters.
Parameter
Description
Action
Select Allow.
Priority
Retain the default value 1.
Protocol Type
Select Custom TCP.
Port Range
Enter 135.
NotePort 135 is the fixed port for the Remote Procedure Call (RPC) service.
Source
Navigate to Data Security > Distributed Transaction Whitelist in the RDS console. Copy the two IP addresses displayed there and enter them into the Source field.
 Note
NoteYou can also call the DescribeDBInstanceIpHostname operation to query the IP addresses.
Description
Enter a description. The description must be 2 to 256 characters in length, and cannot start with
http://orhttps://.Create another security group rule. This rule has the same parameter settings as the previous rule except for the Port Range parameter. Set the Port Range parameter to 1024/65535.
Step 3: Configure your Windows operating system
Configure the Windows operating system to allow distributed transactions. For example, you need to enable ports and configure host mapping settings and DTC security settings.
Log on to the ECS instance. In this example, the ECS instance runs
Windows Server 2016.Open the hosts file in the C:\Windows\System32\drivers\etc\hosts directory.
Enter the required information about the RDS instance at the end of the hosts file. You can view the required information on the Distributed Transaction Whitelist tab of the Data Security page in the ApsaraDB RDS console. The required information includes internal IP address and hostname of the ECS instance on which the RDS instance runs.
NoteYou can also call the DescribeDBInstanceIpHostname operation to query the internal IP address and hostname of the ECS instance on which the RDS instance runs.


Save the hosts file.
Open Control Panel of your computer, choose , and then double-click Component Services.
Choose .
Right-click Local DTC and select Properties.
Click the Security tab and configure the parameters.
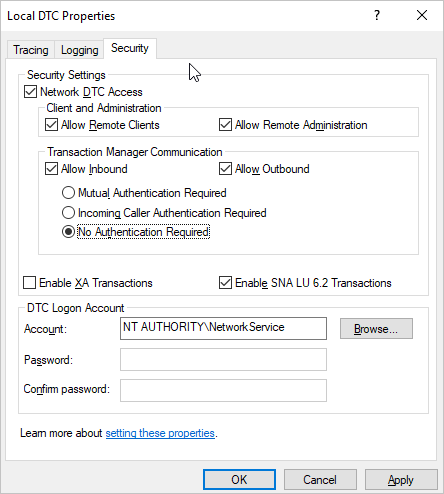
Click OK. In the MSDTC Service message, click Yes. Then, wait for the MSDTC service to restart.
Install the required accounting data management tool and configure the required database
Install the required accounting data management tool and connect Kingdee K/3 WISE to the RDS instance.
Log on to the ECS instance. In this example, the ECS instance runs
Windows Server 2016.Download the software package of the accounting data management tool that is used with Kingdee K/3 WISE 15.1 or 15.0.
NoteDifferent Kingdee K/3 WISE versions require different accounting data management tools. Only the accounting data management tools of Kingdee K/3 WISE 15.0 and 15.1 are provided.
Decompress the package and save files in the package to the following installation directory of Kingdee K/3 WISE:
K3ERP\KDSYSTEM\KDCOM.Open Kingdee K/3 WISE. In the dialog box that appears, configure the identity verification and data server information.
NoteYou must configure the internal endpoint of the RDS instance for the data server. For more information, see View and change the endpoints and port numbers.
Configure the preset connection.
Register the set of books.
Select the specified database and click All.
Log on to Kingdee K/3 WISE
After all the settings are complete, you can run distributed transactions between the ECS and RDS instances. In addition, you can then log on to and use Kingdee K/3 WISE.
References
For more information about how to configure a whitelist, see Configure an IP address whitelist.
For more information about the terms, limits, and best practices of security groups, see Security group overview.
For more information about how to back up and restore an ApsaraDB RDS for SQL Server instance, see Overview of backup methods or Methods to restore an ApsaraDB RDS for SQL Server instance.