Nacos can be integrated with API Gateway to provide the service discovery feature. This enables API Gateway to work seamlessly with microservices models, decouples business systems, and makes application programs easier to manage. API Gateway can work as the entry point for requests that are directed toward microservices systems, during which it receives, routes, and forwards client requests to ensure the secure and stable operation of microservices applications. This topic describes how API Gateway accesses backend microservices after it has Nacos integrated. This topic also describes how to create, publish, and call an API that uses Service discovery as the backend service type.
Overview
This topic consists of the following sections:
Working principle
Create a virtual private cloud (VPC) integration instance
Deploy Nacos and register a microservices application
Creates an API group
Create a backend service
Create an API
Create an application and authorize it to call the API
Debug the API
Working principle
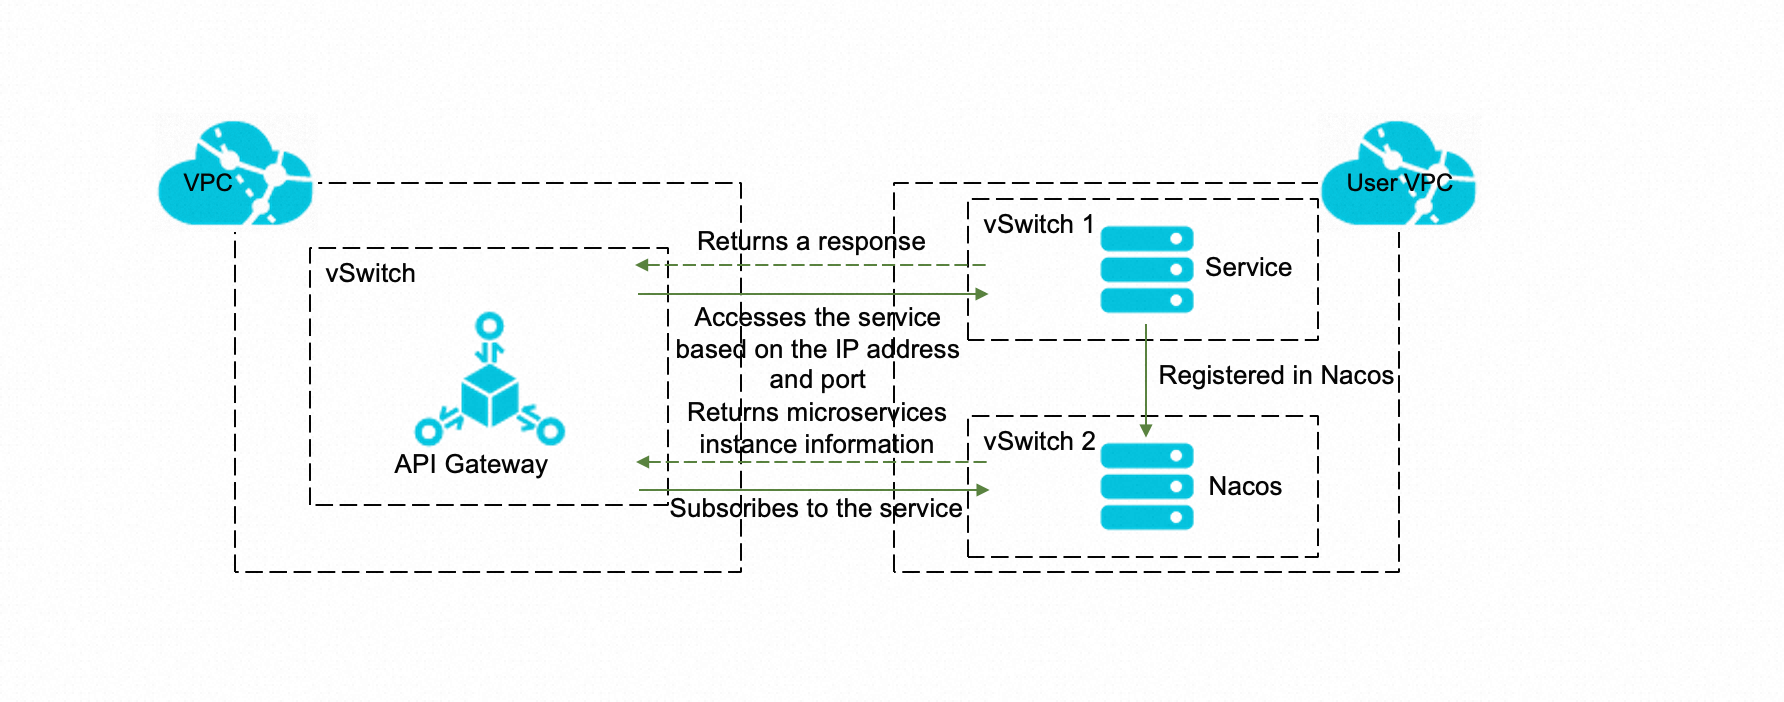
As the service registry, Nacos can receive registration requests from microservices instances and store the instance information in a registry table. API Gateway uses the service discovery feature of Nacos by subscribing to Nacos. API Gateway obtains the URLs and ports of microservices instances from Nacos, and then distributes requests to the instances based on the URLs and ports to implement dynamic routing and load balancing.
The following figure shows the working process:
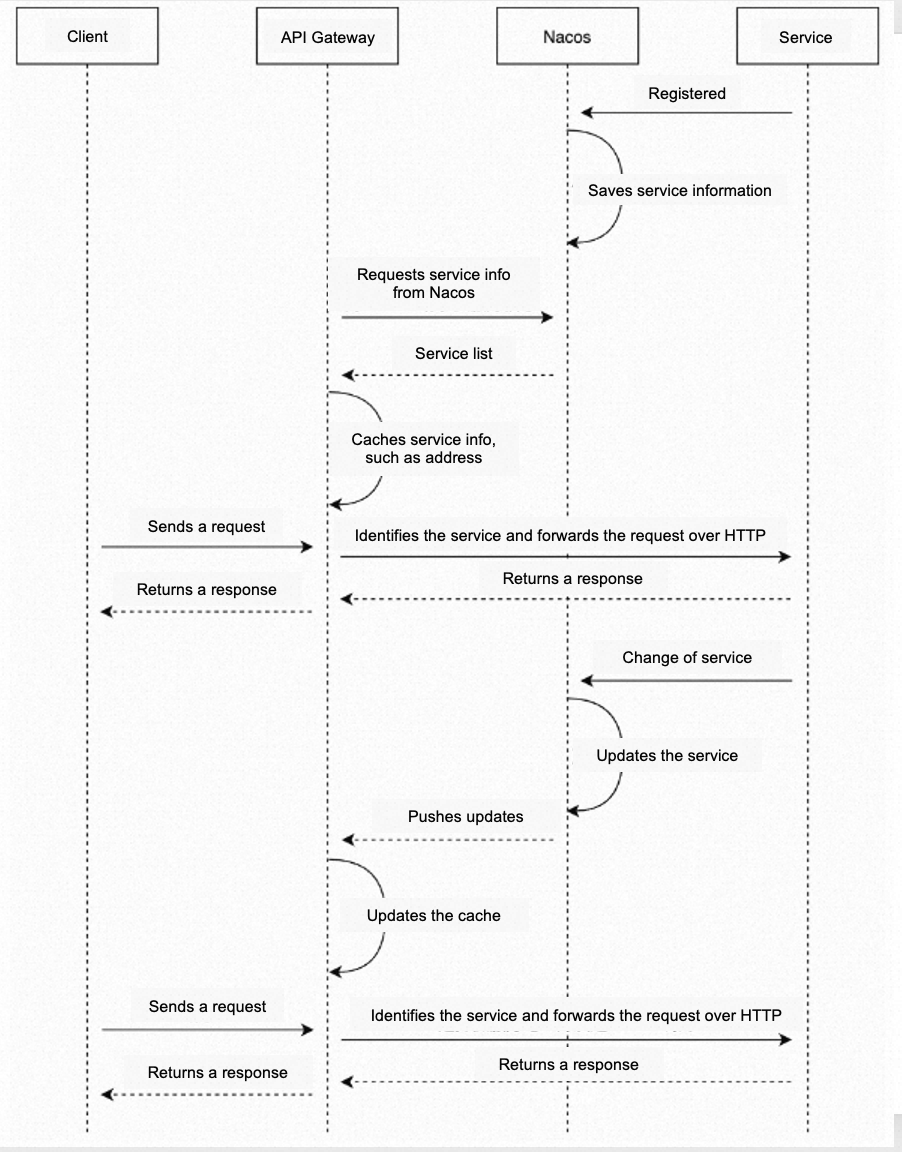
The service provider registers the microservices application with the Nacos server.
API Gateway sends a request to Nacos to obtain the information about microservices instances, including their IP addresses, ports, and weights. API Gateway caches received information to reduce communication between networks and improve the response speed.
After receiving a client request, API Gateway retrieves the URL and port information of an available microservices instance from the cache. The chance of an instance being selected is related to its weight. Then, API Gateway sends an HTTP request to the specified microservices instance based on the URL and port information and returns the received response to the client.
If the backend microservices application changes, Nacos pushes the updated information to API Gateway. API Gateway updates its cache accordingly to ensure information consistency with Nacos. Information changes may be caused by a microservices instance going offline or a new instance being added.
API Gateway routes and forwards new requests that are sent from the client based on the updated information.
API Gateway interacts with Nacos and with microservices instances over virtual private clouds (VPCs). Therefore, when you create an API, you must specify an internal endpoint as the service endpoint of Nacos. Otherwise, API Gateway returns an error message indicating that the Nacos address is invalid. Similarly, the endpoint of the microservices application registered with Nacos must also be an internal endpoint. If a public endpoint is returned as the endpoint of a backend microservices application during an API call, API Gateway fails to process the request and returns the I504IA error code. If API Gateway fails to obtain any endpoint of a backend microservices application, the I504BA error code is returned.
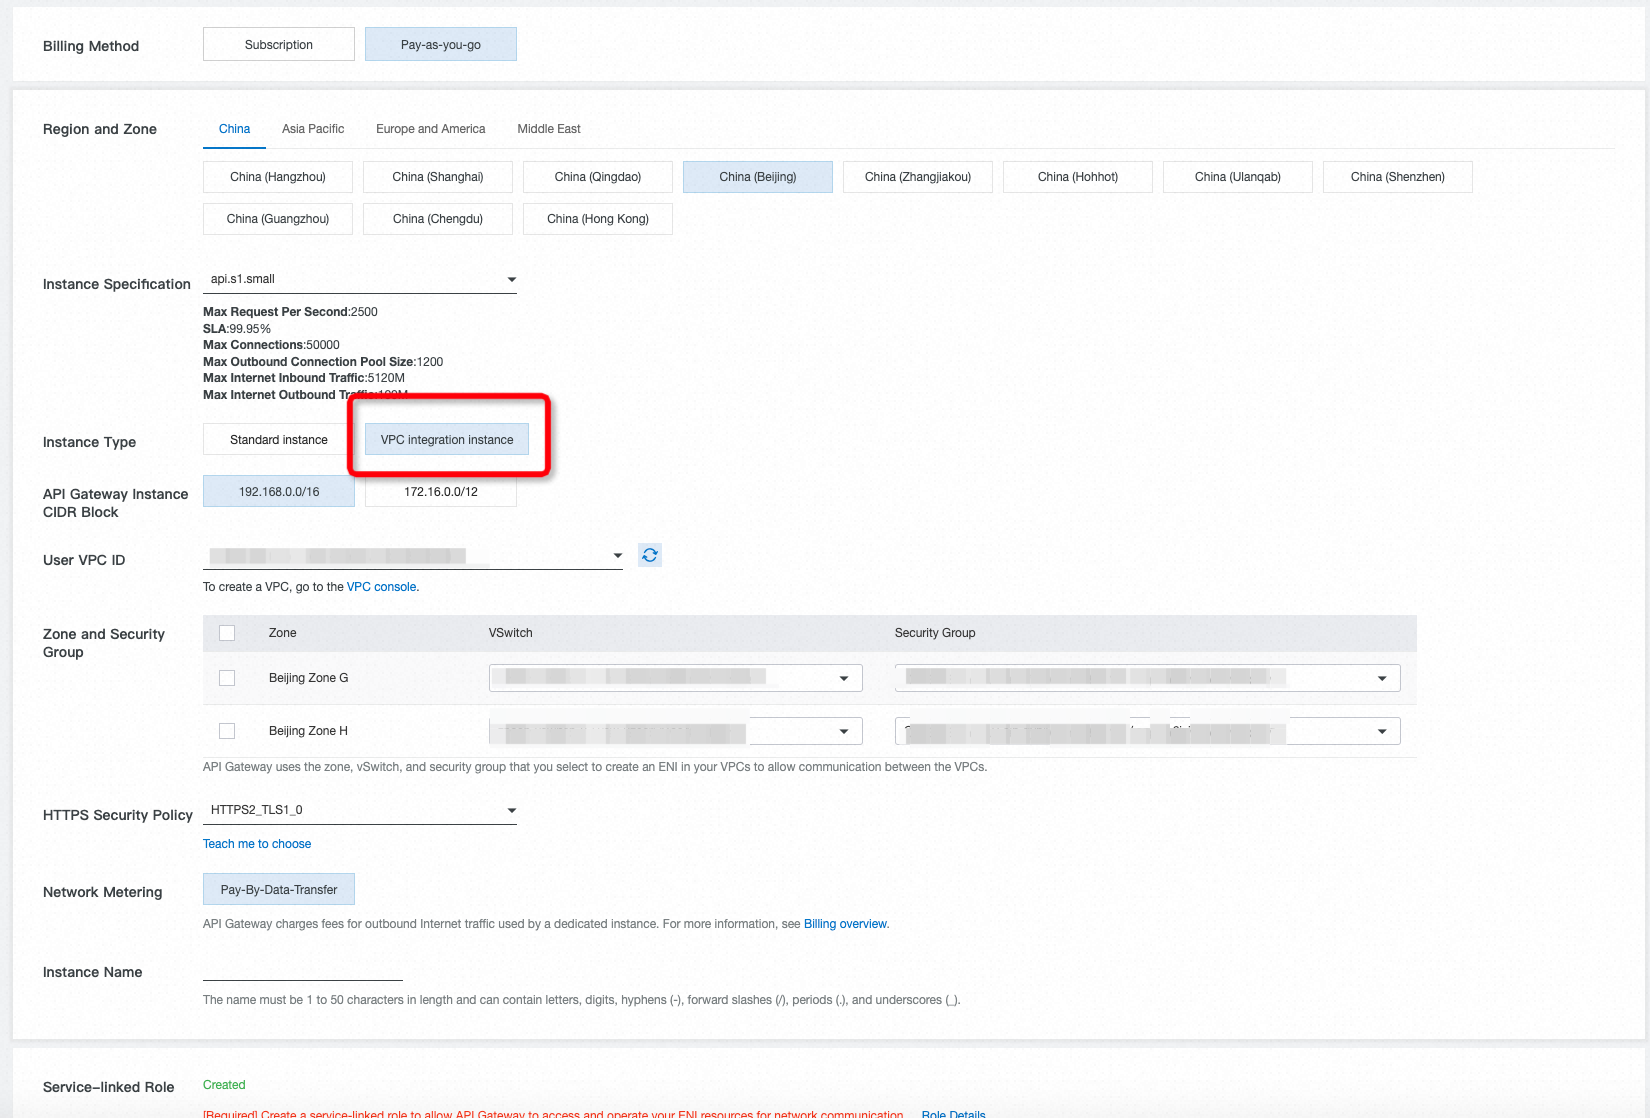
Step 1: Create a VPC integration instance
API Gateway communicates with Nacos and microservices applications registered with Nacos only over VPCs. However, conventional dedicated instances do not support custom VPC-based communication. Therefore, API Gateway provides VPC integration instances to allow direct communication with user VPCs over an internal network. For more information about how to create a VPC integration instance, see the relevant topics. When you create a VPC integration instance, you must associate your VPC with the instance. On the instance creation page, specify your VPC ID, zone, vSwitch, and security group. After the configuration is complete, API Gateway can access cloud resources by using the specified vSwitch.
Step 2: Deploy Nacos and register a microservices application
1. Deploy Nacos
You must deploy Nacos in the vSwitch specified in Step 3. You can deploy a native Nacos service on an Elastic Compute Service (ECS) instance that is created in the vSwitch specified in Step 3. In this case, you must set the endpoint of the Nacos service to a value of the following format: Internal IP address of the ECS instance:Port used for Nacos. When you create an ECS instance, you must set Network to VPC and select the same VPC, zone, and vSwitch as those in Step 3.
For more information about how to create a native Nacos service, see Quick Start for Nacos. For more information about how to create an ECS instance, see Instructions for purchase.
You can also use Alibaba Cloud Microservices Engine (MSE) to create a Nacos service. When you create the Nacos service, select VPC as the network type and select the same VPC, zone, and vSwitch as those in Step 3. After the Nacos service is created, you can view its endpoint in the instance list of the MSE console.
For more information, see Create a Nacos engine.
2. Register a microservices application
Your microservices application must be deployed in the vSwitch specified in Step 3. Otherwise, your microservices application cannot be registered with Nacos and accessed by API Gateway. You can choose to deploy the microservices application on an ECS instance. The ECS instance that is used to deploy the microservices application must reside in the vSwitch specified in step 3.
The microservices application registered with Nacos must support HTTP calls.
Step 3: Create an API group
APIs are managed in API groups. You must create an API group before you create an API. Procedure: Log on to the API Gateway console. In the left-side navigation pane, choose Manage APIs > API Groups. In the upper-right corner of the API Groups page, click Create Group. In the dialog box that appears, configure the group information. Select the VPC integration instance that you created in Step 3. You can specify a custom value for the Group Name and BasePath parameters. After the group is created, you can view the group on the API Groups page. You can click the group name to go to the Group Details page. On the Group Details page, you can perform operations such as binding a domain name, modifying basic information, and changing the instance type.
API Gateway automatically assigns a public second-level domain name to the API group. This domain name is used only for debugging and has a limit of 100 calls per day for regions outside the Chinese mainland and 1,000 calls per day for regions in the Chinese mainland. We recommend that you bind an independent domain name to your API group.
Step 4: Create a backend service
Log on to the API Gateway console. In the left-side navigation pane, choose Manage APIs > Backend Services. In the upper-right corner of the page, click Create Backend Service. In the dialog box that appears, configure the Name parameter and select Service discovery from the Type drop-down list. After the backend service is created, you can find the created backend service on the Backend Services page. You can click the service name to go to the service details page.
An API of the Service discovery type can be created only by using an existing backend service. Therefore, to create such an API, you must first create a backend service.
In this example, the RELEASE environment is selected. You must create a backend service in an environment before you can publish an API to the environment. On the right side of the page, click Create. The Define Backend Service page appears.
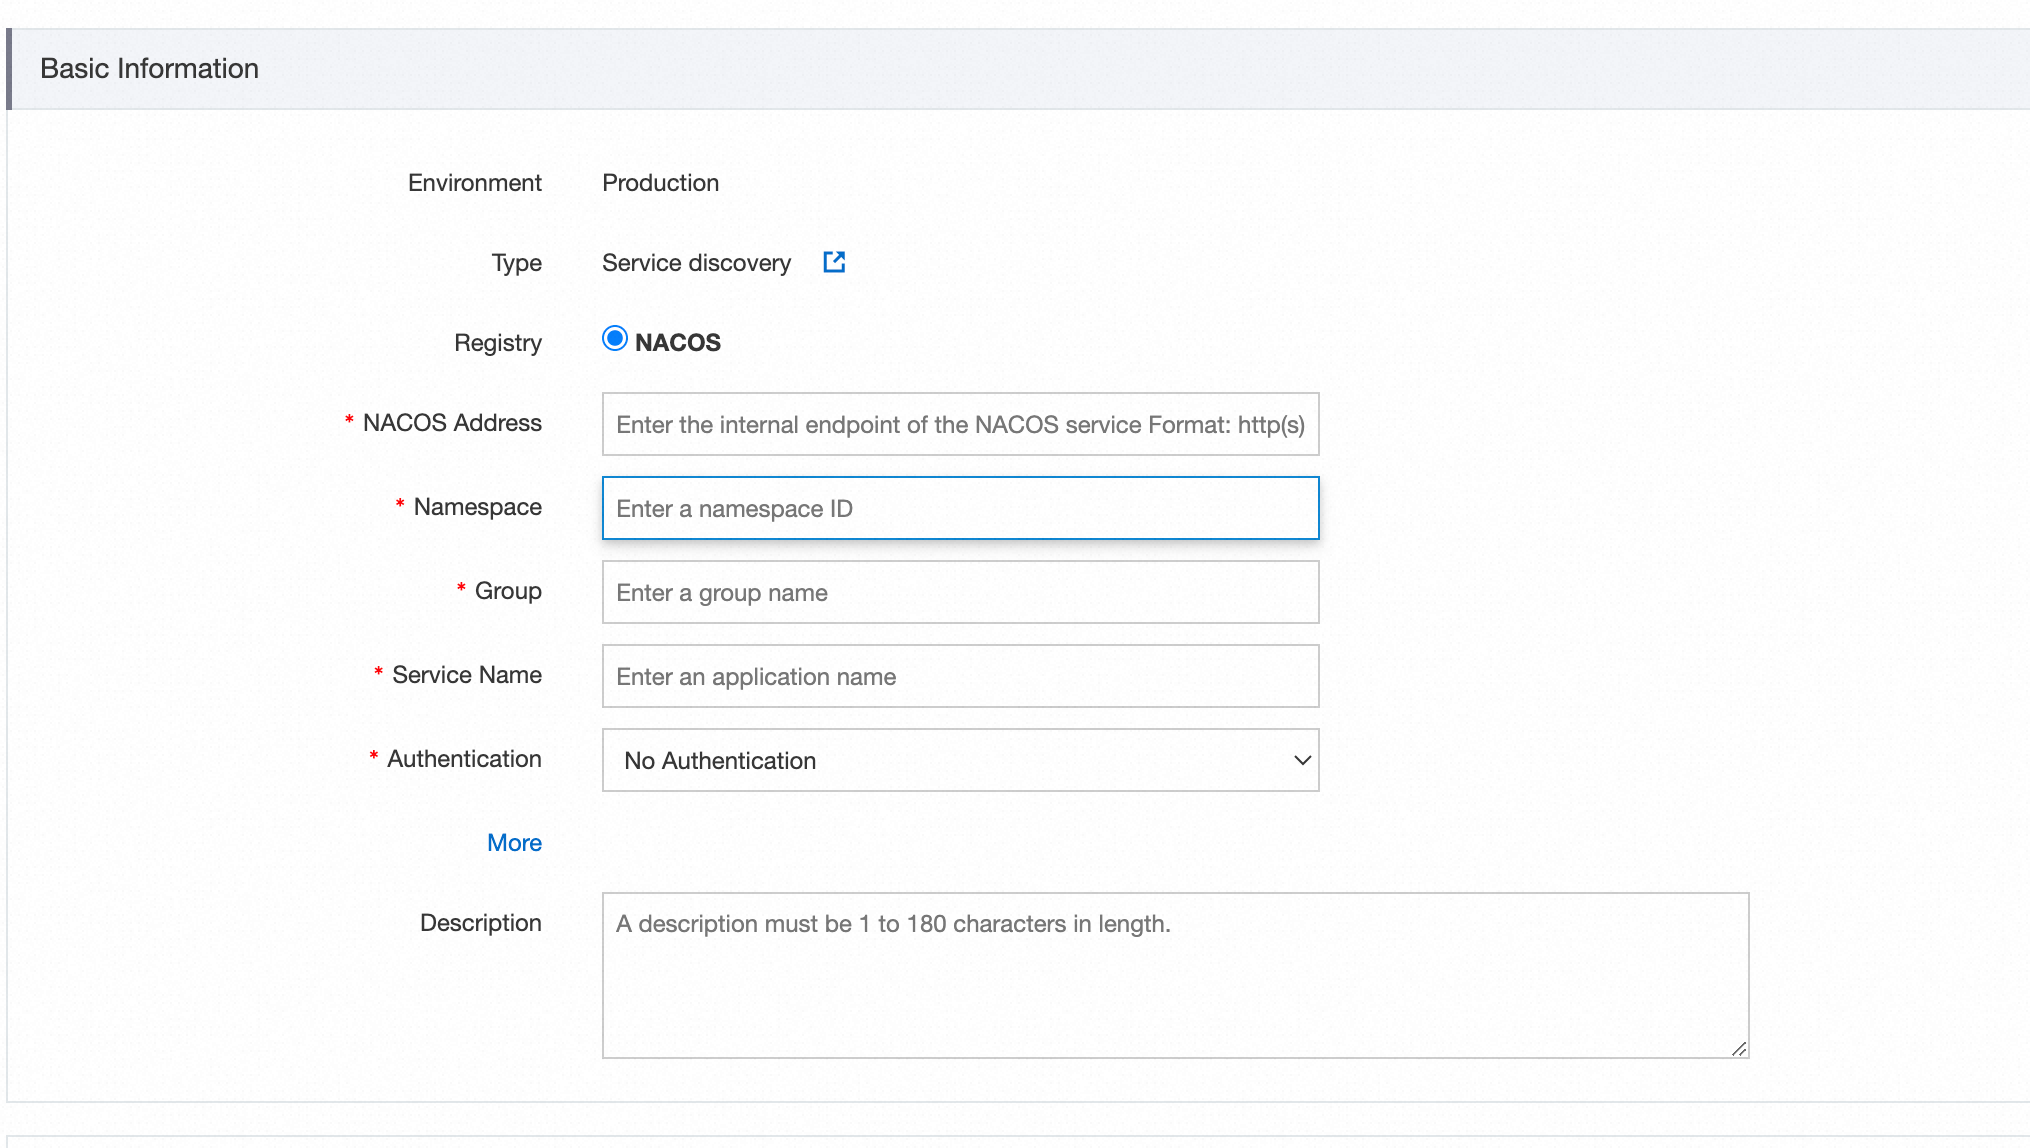
Specify parameters for Nacos and your microservices application. The following items describe the parameters:
NACOS Address: the internal endpoint of the Nacos service. This parameter is required. Refer to Step 3 to configure this parameter.
Namespace: the namespace where the microservices application resides. This parameter is required. Enter a namespace ID for this parameter.
Group: the name of the group to which the microservices application belongs. This parameter is required.
Service Name: the name of the microservices application. This parameter is required.
Authentication: the authentication method of Nacos. This parameter is required. Valid values: No Authentication, Account and Password, and Key Pair.
Cluster: the name of the cluster to which the microservices application belongs. This parameter is optional. If you want to specify multiple clusters, separate the cluster names with commas (,).
If authentication is enabled for your Nacos service, you must specify the information that your API callers must obtain to pass the authentication. If you use a native Nacos service and enabled account and password-based authentication, you must select Account and Password for the Authentication parameter and specify the account and password. If you use a Nacos service managed by MSE, you can select Key Pair for the Authentication parameter. To use key pair-based authentication, you must first create a Resource Access Management (RAM) user and grant the RAM user read-only permissions on MSE resources. Then, you must specify the AccessKey and SecretKey of the RAM user on the backend service configuration page. If authentication is not enabled for your Nacos service, you must select No Authentication.
For more information about how to enable and configure authentication for native Nacos, see Authentication. For more information about how to enable and configure Nacos authentication in MSE, see Access authentication by the Nacos client.
If the configurations of your Nacos service are changed, modify the corresponding configurations of the backend service at your earliest opportunity. Otherwise, API Gateway fails to access your microservices application.
Step 5: Create an API
Log on to the API Gateway console. In the left-side navigation pane, choose Manage APIs > Backend Services. On the Backend Services page, find the created backend service and click Create API in the Actions column.
Configure basic information for the API.
In this step, configure basic information for the API that you want to create, including the API group to which the API belongs and the name, authentication method, type, and description of the API. Select the API group that you created, and select Alibaba Cloud App for the Security Authentication parameter and Enable AppCode Authentication (Header & Query) for the AppCode Authentication parameter. You can specify a custom API name and description.
You can configure the Security Authentication and AppCode Authentication parameters based on your requirements. This topic only provides an example.
Define API requests.
In this step, you can define how a client, such as a browser, mobile app, or business system, requests your API. The parameters include the request type, protocol, request path, HTTP method, input parameter request mode, and input parameter definitions. You can specify the request path and HTTP method based on your business requirements.
Define the backend service.
In this step, you can define how API Gateway maps and processes request parameters after it receives a request. You can also specify to which backend address API Gateway connects. In this example, Use Existing Backend Service is selected for the Configuration Mode parameter and Service discovery is selected for the Backend Service Type parameter. You can set the other parameters based on your business requirements.
Define responses.
In this step, configure response information to generate API documentation. The documentation helps API callers better understand APIs. You can also specify a sample success response and a sample failure response. In this example, this step is skipped. Click Create.
Publish the API.
After the preceding configurations are saved, you must publish the API. All configurations you specify for an API can take effect only after you publish the API to an environment. In this example, the backend service is configured only in the RELEASE environment. Therefore, you can publish the API only to the RELEASE environment. If you want to publish the API to another environment, you must configure the backend service in the environment in advance. In this example, click Publish in the message that indicates successful API creation. In the Publish API dialog box, set the Stage parameter to Release, enter remarks, and then click Publish.
Step 6: Create an application and authorize it to call the API
An application is an identity that an API caller assumes to call an API. In this example, Alibaba Cloud App was selected for the Security Authentication parameter when the API was created. Therefore, after the API is published, you must create an application and authorize the application to call the API that you created. For more information, see Manage authorizations.
Step 7: Debug the API
API Gateway supports online debugging. We recommend that you use this feature to check whether an API is correctly configured before you provide this API for clients to call.
On the APIs page, click the created API. In the left-side navigation tree of the API details page, click Debug API. If you defined request parameters for the API, you can enter different values for the request parameters to check whether the API works as expected.
When you debug the API, make sure that the authorized application is used and the environment for debugging is the one in which the application is authorized to call the API. Otherwise, the debugging fails.