Manage APIs in API Gateway with Swagger
This topic describes a common practice for integrating your CI/CD process with API Gateway. This method uses Swagger as a bridge to automate creating and updating your APIs by calling the ImportSwagger OpenAPI operation.
1. Overview
API Gateway provides a comprehensive set of OpenAPI operations for management. Integrating API Gateway into a CI/CD process primarily involves encapsulating and orchestrating these management operations.
A typical CI/CD workflow for integrating API Gateway includes the following steps:
-
Step 1: Automatically obtain the Swagger definition from your backend service code.
-
Step 2: Create an API group.
-
Step 3: Import the API definition using an OpenAPI operation and deploy the API to different environments.
-
Step 4: Apply additional configurations to the API.
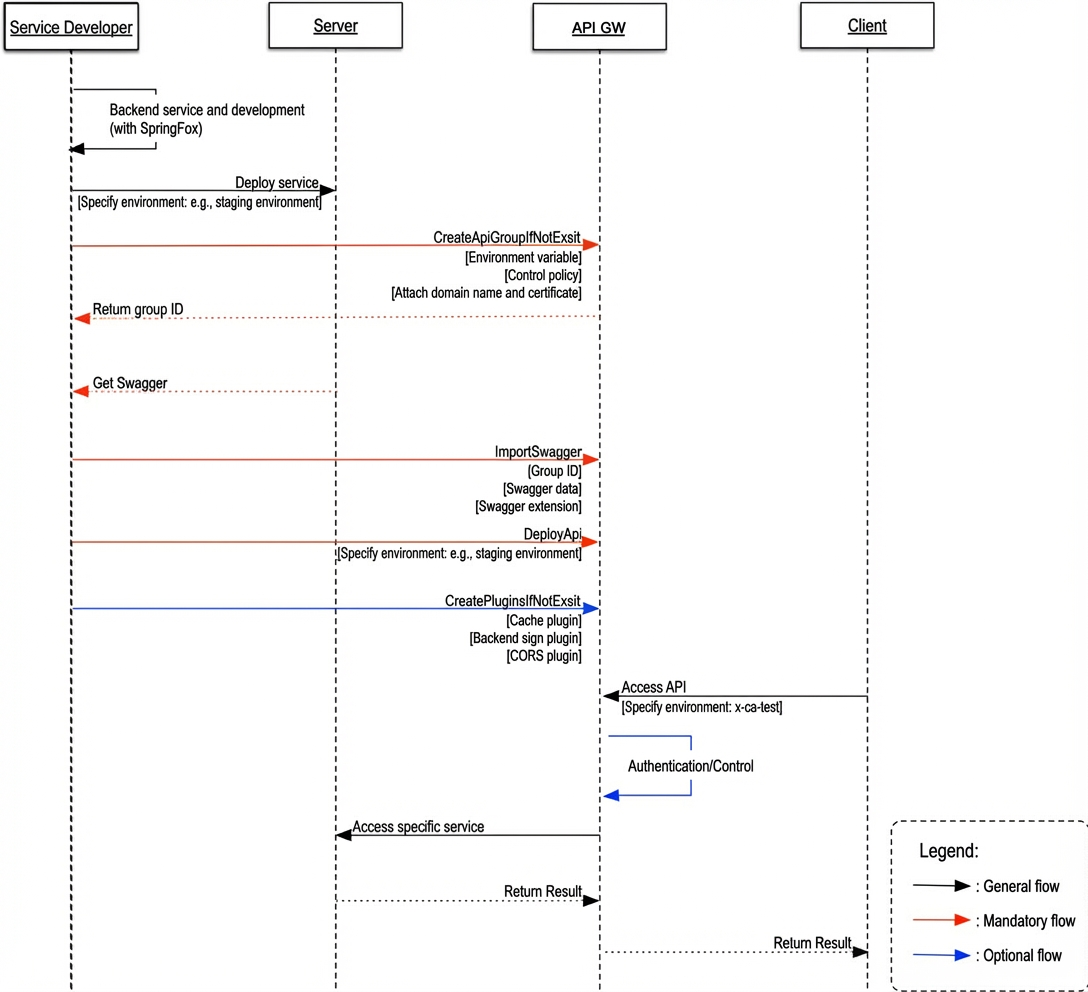
Automatically obtain a Swagger definition
During development, you can integrate an API documentation framework, such as SpringFox, into your backend service. These frameworks are typically non-intrusive to your code, making them easy to adopt. When the backend service starts, the framework provides an endpoint to fetch the Swagger definition. API Gateway accesses this endpoint to automatically obtain the definition.
Create an API group
Create an API group either manually in the API Gateway console or programmatically by calling the CreateApiGroup operation. After creating the group, you can bind a custom domain and a certificate.
Import and deploy an API
You can call the ImportSwagger operation, passing the data from the Swagger endpoint as a parameter to create the API. After creating the API in API Gateway, deploy it to the required environment. Once the API is deployed, you can access the corresponding service.
Additional configurations
To meet diverse management needs, API Gateway provides a rich set of plug-ins. These include plug-ins for throttling, IP-based access control, CORS, and JWT. You can configure plug-ins as needed to enhance the API's authentication and control capabilities.
2. Example implementation
This section explains the sample code provided. The sample code covers only a basic CI/CD scenario. You can adapt and extend it to fit your requirements.
2.1 Sample code
2.2 Related technologies
2.2.1 API Gateway links
-
Import an extended Swagger definition into API Gateway: This topic describes how to configure a Swagger file that can be imported into API Gateway. API Gateway supports extended properties in Swagger, allowing you to import both standard Swagger files and files with custom configurations.
-
Create an API by using Swagger: This topic describes the ImportSwagger operation. The main parameters of this operation are:
-
groupId: The ID of the API group for the APIs imported from the Swagger file. -
data: The content of your Swagger file. -
globalCondition: Used to add custom configurations, such as defining a custom backend service using thex-apigateway-backend-infotag.
-
2.2.2 SpringFox
To demonstrate how to easily synchronize a backend service with API Gateway using Swagger, this topic uses a sample backend service built with the SpringFox library. SpringFox is an open-source API documentation framework. It can generate a Swagger definition by adding annotations to your service's Controller interfaces and provides an endpoint to fetch the Swagger definition at runtime.
2.3 Generate a server-side Swagger definition
This example uses a Spring Boot web service to demonstrate how to generate a Swagger definition from an existing service.
2.3.1 Dependencies
<dependency>
    <groupId>io.springfox</groupId>
    <artifactId>springfox-swagger2</artifactId>
    <version>2.9.2</version>
</dependency>
2.3.2 SpringFox configuration
SpringFox is a developer-friendly framework. To integrate it, you only need to add a SpringFox configuration class without modifying your existing interfaces or model classes. After the service starts, the framework automatically parses annotations in the Spring Boot web framework to generate the service information required by Swagger. It also parses the classes referenced in the service to generate the required model information for Swagger.
SpringFox configuration items
In this example, the core settings are configured as follows:
-
Specify the documentation format (Swagger2).
-
Specify the package name used to generate the API documentation.
@Configuration
@EnableSwagger2
public class SpringFoxConfig {
    @Bean
    public Docket api() {
        return new Docket(DocumentationType.SWAGGER_2)
                .select()
                .apis(RequestHandlerSelectors.basePackage("com.example.swagger.controller"))
                .paths(PathSelectors.any())
                .build();
    }
}
Obtain the Swagger definition
To integrate with your CI/CD workflow, you need an endpoint to retrieve the Swagger content. After the service starts, you can obtain the Swagger content from the /v2/api-docs endpoint.
Access http://localhost:8080/v2/api-docs to get the JSON response for the Swagger 2.0 API documentation. The following is an example of the JSON response:
{
  "swagger": "2.0",
  "info": {
    "description": "Api Documentation",
    "version": "1.0",
    "title": "Api Documentation",
    "termsOfService": "urn:tos",
    "contact": {
    },
    "license": {
      "name": "Apache 2.0",
      "url": "http://www.apache.org/licenses/LICENSE-2.0"
    }
  },
  "host": "localhost:8080",
  "basePath": "/",
  "tags": [
    {
      "name": "user-controller",
      "description": "User Controller"
    }
  ],
  "paths": {
    "/user": {
      "get": {
        "tags": [
          "user-controller"
        ],
        "summary": "getUser",
        "operationId": "getUserUsingGET",
        "produces": [
          "*/*"
        ],
        "responses": {
          "200": {
            "description": "OK",
            "schema": {
              "$ref": "#/definitions/User"
            }
          },
2.4 Create an API group
You can create an API group in one of two ways:
2.4.1 Create in the console
You can create an API group on the API Groups page of the API Gateway console. After the group is created, you can go to its details page to view its ID and other information.
On the group details page for the CiCdGroup API group, view the basic information and record the API group ID for later use. The main configuration items on the page include:
-
Region: China (Hangzhou)
-
Public Second-level Domain: For testing only. Limited to 1,000 calls per day. For production environments, bind a custom domain.
-
Internal VPC Domain: Not enabled
-
instance type: shared instance (classic network), with a group QPS limit of 500
-
HTTPS Security Policy: HTTPS2_TLS1_0
-
Status: Normal
2.4.2 Create with an API
Call the CreateApiGroup operation provided by API Gateway to create an API group. You can also use other OpenAPI operations to perform tasks such as binding a custom domain and a certificate.
2.5 Use the ImportSwagger operation
The key to implementing a CI/CD workflow with API Gateway is to address the following questions:
-
Is there an endpoint available to fetch the Swagger definition?
-
How can a standard Swagger definition be imported into API Gateway?
As described in section 2.2.2, you can already obtain a Swagger definition that describes all the interfaces and models of the backend service. This section focuses on how to import a standard Swagger definition into API Gateway.
2.5.1 API Gateway-based Swagger extensions
To help you get started, API Gateway supports importing native Swagger files. When you use this method, API Gateway automatically creates all APIs defined in the Swagger file and sets their default backend to a mock type.
However, in real-world CI/CD scenarios, APIs created in API Gateway must route requests to your actual backend service. This requires you to configure backend service information. Native Swagger does not include this information, so API Gateway provides Swagger-based extensions.
These extensions cover configurations that are required or specific to API Gateway, such as backend service settings, backend parameter mapping, and authentication methods. These extensions can be configured globally for all APIs or individually for each API. By combining a native Swagger file with API Gateway's Swagger extensions, you can create API configurations suitable for a production environment.
This example uses only the x-aliyun-apigateway-backend extension for demonstration. In the example, the user's backend service is an HTTP service, and we assume its production domain name is www.aliyun.com. Alternatively, the backend address can be configured using an environment variable.
For information about how to configure an HTTP backend, see Import an extended Swagger definition into API Gateway. The type and address fields are required. If the backend path and method are left empty, the request path and HTTP method of the current API are used. The default timeout is 10,000 ms.
x-aliyun-apigateway-backend:
  type: HTTP
  address: 'http://www.aliyun.com'
  path: '/builtin/echo'
  method: get
  timeout: 10000
2.5.2 Import a native Swagger file
The ImportSwagger operation is the core entry point for importing native Swagger files into API Gateway. This operation has three key parameters:
-
GroupId: Specifies the API group where the APIs imported from Swagger will be stored. -
data: Specifies the content of your native Swagger file. -
globalCondition: Used to pass your custom configurations, such as a common backend service address.
Maven dependencies
<dependency>
  <groupId>com.aliyun</groupId>
  <artifactId>alibabacloud-cloudapi20160714</artifactId>
  <version>3.0.38</version>
</dependency>
Obtain the native Swagger file
As mentioned earlier, after you introduce and configure the SpringFox framework, the /v2/api-docs endpoint is automatically generated when the service starts. This endpoint is used to obtain the Swagger definition that describes the backend service.
    private String getSwaggerData(){
        HttpURLConnection connection = null;
        ...
        ...
        String result = null;
        try {
            URL url = new URL(swaggerApiDocUrl);
            connection = (HttpURLConnection) url.openConnection();
            connection.setRequestMethod("GET");
            connection.connect();
                                                ...
            ...
        } catch (Exception e) {
            e.printStackTrace();
        } finally {
                                                ...
            ...
            connection.disconnect();
        }
        return result;
    }
Configure API Gateway-based Swagger extensions
Correctly configuring Swagger extensions is a critical step in creating APIs that meet your requirements by importing a Swagger file. These API Gateway-based Swagger extensions can be passed through the globalCondition parameter of the ImportSwagger operation. The format for globalCondition is a JSON string.
-
key: The name of the API Gateway-based Swagger extension, such as
x-aliyun-apigateway-backend. -
value: The value corresponding to the Swagger extension.
In the sample code, configuring a common backend address for the API allows the imported API to access its actual backend service.
For code clarity, based on the description of the HTTP backend service in section 2.5.1, we create the SwaggerBackendInfoBase class to configure backend service information.
public class SwaggerBackendInfoBase {
    private String type;
    private String address;
    public String getType() {
        return type;
    }
    public void setType(String type) {
        this.type = type;
    }
    public String getAddress() {
        return address;
    }
    public void setAddress(String address) {
        this.address = address;
    }
}
We assign a value to the globalCondition parameter based on the user's backend service information.
            // Configure the backend service information required by API Gateway.
            SwaggerBackendInfoBase info = new SwaggerBackendInfoBase();
            info.setType("HTTP");
            info.setAddress("http://www.aliyun.com");
            // Set the backend service information for the API.
            Map<String, String> globalCondition  = new HashMap<>();
            globalCondition.put("x-aliyun-apigateway-backend", JSON.toJSONString(info));
ImportSwagger
In the previous steps, we have created the group, obtained the native Swagger definition, and created the GlobalCondition parameter. We call the ImportSwagger operation provided by API Gateway to import the API and can view the result in the API Gateway console.
The API definition details page (ID 364ea0e74bdd47b5ab05d5449232ae8a) displays the following configuration:
-
API group: CiCdGroup5, API Name: getUserUsingGET, Security Authentication: Alibaba Cloud APP, Type: Private, signature algorithm: HmacSHA256
-
Request Path:
/user, Protocol: HTTP, HTTP Method: GET, request mode: Mapped (Filter Unknown Parameters) -
Backend service type: HTTP, Backend service address:
http://www.aliyun.com/user, VPC Channel: Not used, mock: Not used, backend timeout: 10000 ms -
Response Type: JSON (application/json;charset=utf-8)
-
Request input parameters, backend service parameters, constant parameters, and custom system parameters are all empty.
2.6 Deploy the API
On the API List page, select the target API group from the API group dropdown list. Select the checkboxes next to the APIs you want to deploy, and then click Deploy at the bottom of the list to deploy the selected APIs in bulk. Deploying an API activates it.
3. Summary
This topic showed how to quickly synchronize APIs from your backend service to API Gateway. API Gateway allows you to focus on developing your backend services by offloading common cross-cutting concerns like authentication and throttling. By using the ImportSwagger operation, you can connect your backend services with API Gateway, significantly reducing the manual configuration process. This also enables the integration of API Gateway configuration and management into your CI/CD workflow.