Create and publish an API with a VPC resource as the backend service, then call the API by using an AppCode. An AppCode is automatically generated when you set the API authentication method to Alibaba Cloud App.
Prerequisites
-
A VPC environment is created. For more information, see Create a VPC with an IPv4 CIDR block and Create a VPC with an IPv6 CIDR block.
-
An Elastic Compute Service (ECS) instance is created. For more information, see Step 1: Create an ECS instance.
-
SLB and ECS instances must be created, and a service must be running in the VPC.
-
In this example, an ECS instance in a VPC runs a web service deployed with Nginx on port 80.
Process
Complete the following steps to configure API Gateway access to a VPC backend service:
Create a VPC access authorization
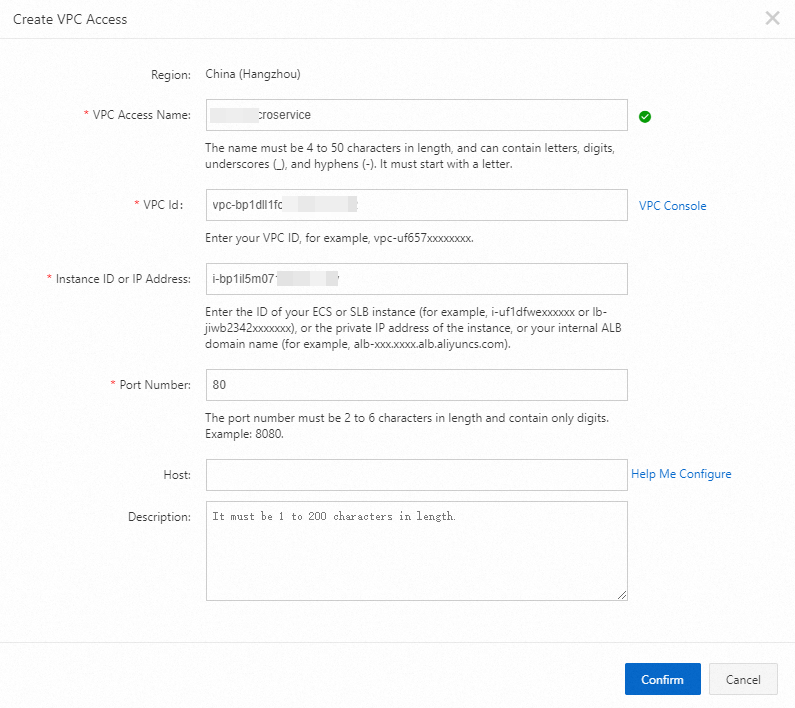
Create a VPC access authorization to allow API Gateway to access your VPC.
-
Log on to the API Gateway console. In the top navigation bar, select a region. In the navigation pane on the left, choose Manage APIs > VPCs.
-
On the VPC Access Authorizations page, click Create Authorization in the upper-right corner.
-
In the Create VPC Access dialog box, specify the VPC Access Name, VPC Id, Instance ID or IP Address, and Port Number parameters.
 Note
Note-
You can specify a domain name in the Host field to access a vhost on an SLB or ECS instance.
-
In VPC Id, enter the ID of the VPC where your backend service resides. In Instance ID or IP Address, enter the instance ID or private IP address. You can find this information in the ECS instance details.
-
For Application Load Balancer (ALB) instances, the network type must be VPC, and you cannot change the network type to Internet after you create the authorization. Otherwise, requests may fail to be sent to API Gateway, and you are responsible for the consequences.
Create an API group
APIs are organized in groups. Create an API group before you create an API.
-
Log on to the API Gateway console. In the navigation pane on the left, choose Manage APIs > API Groups. On the API Groups page, click Create Group in the upper-right corner.
-
In the Create Group dialog box, select Instances, set Group Name to
nginx-demoand BasePath to/, and then click Confirm.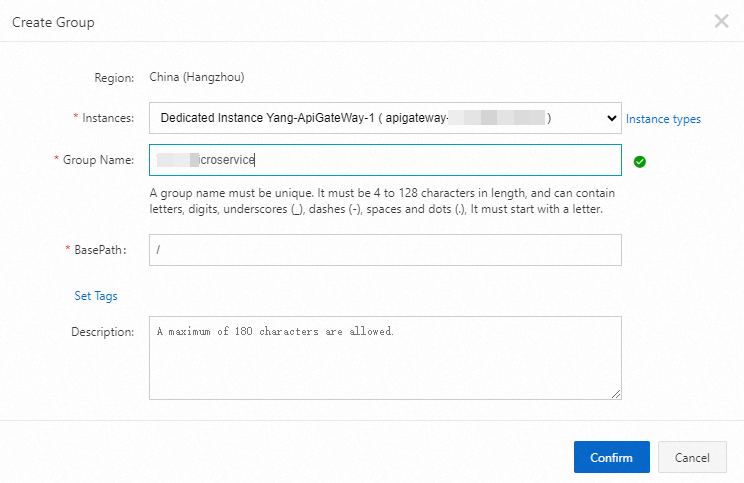
-
On the API Groups page, view the created group and click the group name to go to the Group Details page. You can perform operations such as Bind Domain Name, and Modify Basic Information.
-
API Gateway automatically assigns a public second-level domain name to the API group. This domain name is for debugging only and is limited to 100 calls per day in the China (Hong Kong) region and other regions outside the Chinese mainland, or 1,000 calls per day in regions in the Chinese mainland. Bind an independent domain name after you create an API group.
Create an API
-
Log on to the API Gateway console. In the top navigation bar, select a region. In the navigation pane on the left, choose Manage APIs > API Groups.
-
On the API Groups page, in the Actions column for the
nginx-demogroup you created, click Manage APIs. -
On the APIs page, click Create API in the upper-right corner.
-
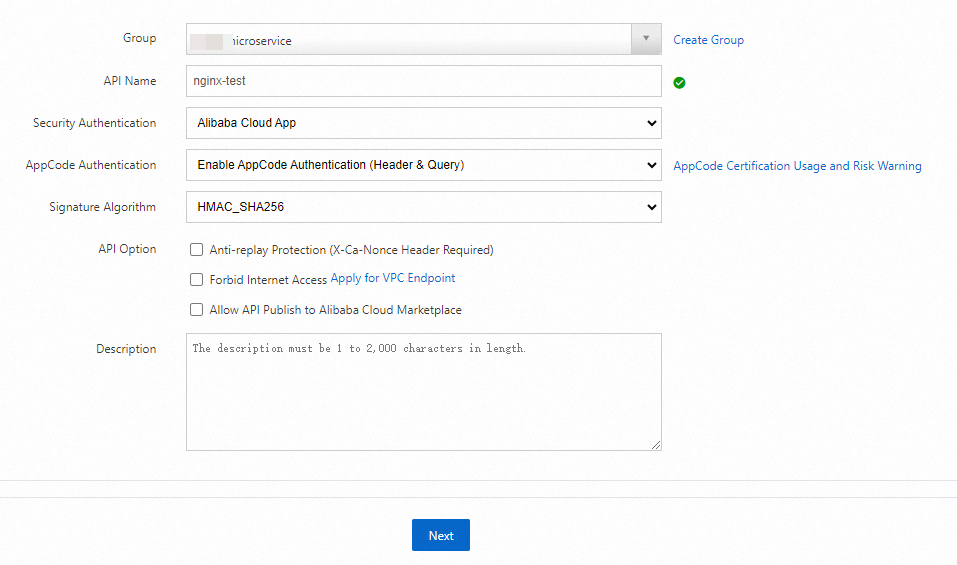
In the Basic Information step of the Create API wizard, configure the following parameters and click Next.
Parameter
Example
Group
nginx-demo
API Name
nginx-test
Security Authentication
Alibaba Cloud App
AppCode Authentication
Enable AppCode Authentication (Header & Query)
Signature Algorithm
HMAC_SHA256
-
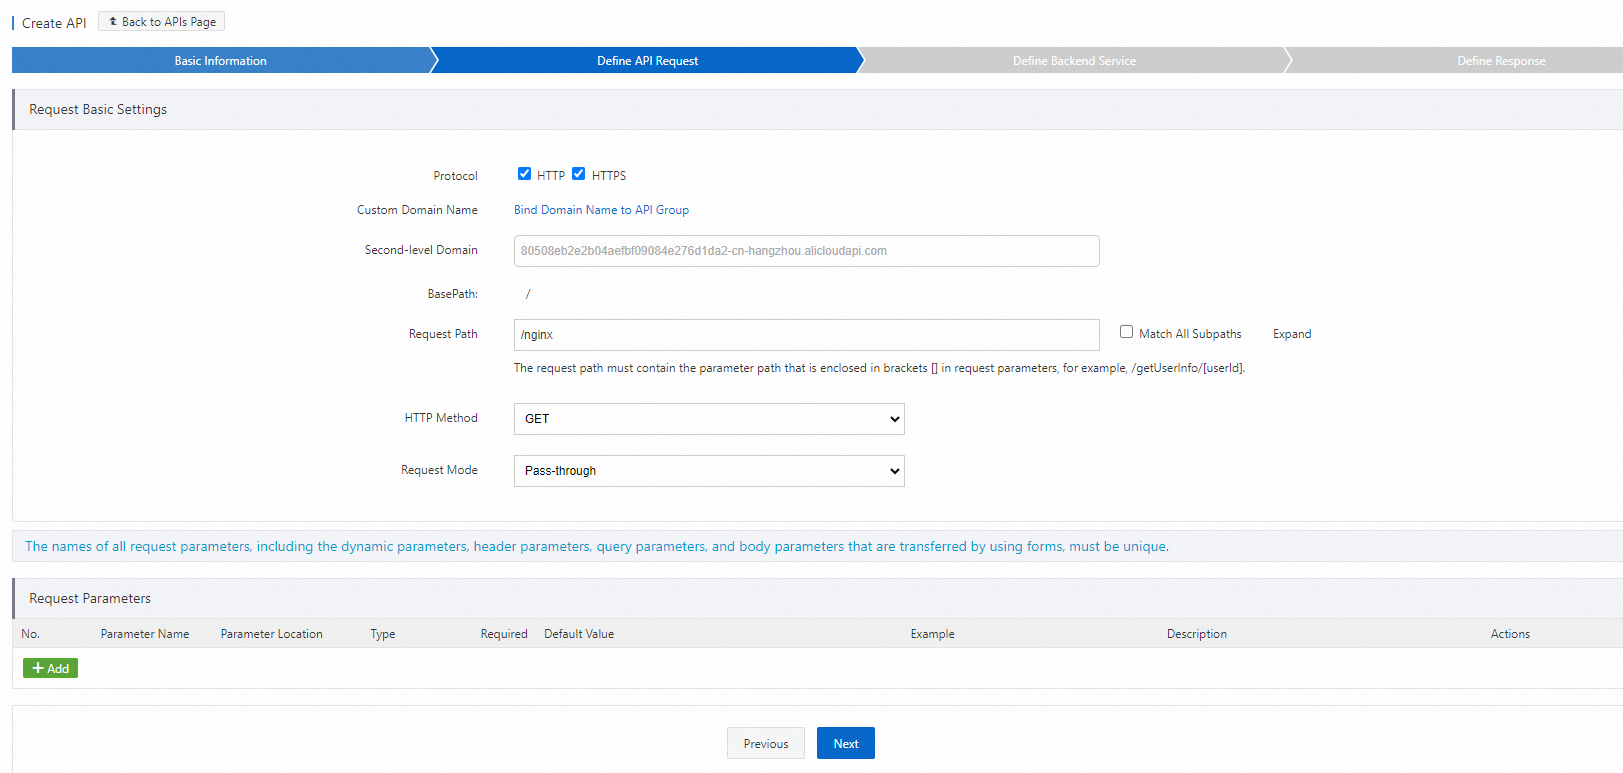
In the Define API Request step, configure the following parameters and click Next.
Parameter
Example
Protocol
HTTP and HTTPS
Request Path
/nginx
HTTP Method
GET
Request Mode
Pass-through
 Note
NoteThis step defines how clients (web browsers, mobile apps, or business systems) request the API. In this example, Request Mode is set to Pass-through, which means API Gateway forwards requests to the VPC backend service without processing them.
-
In the Define Backend Service step, configure the following parameters and click Next.
Parameter
Example
Configuration Mode
Customize Backend Service
Backend Service Type
VPC
VPC Access Name
***-microservice
Backend Request Path
/
HTTP Method
GET
Backend Service Timeout Period
10000
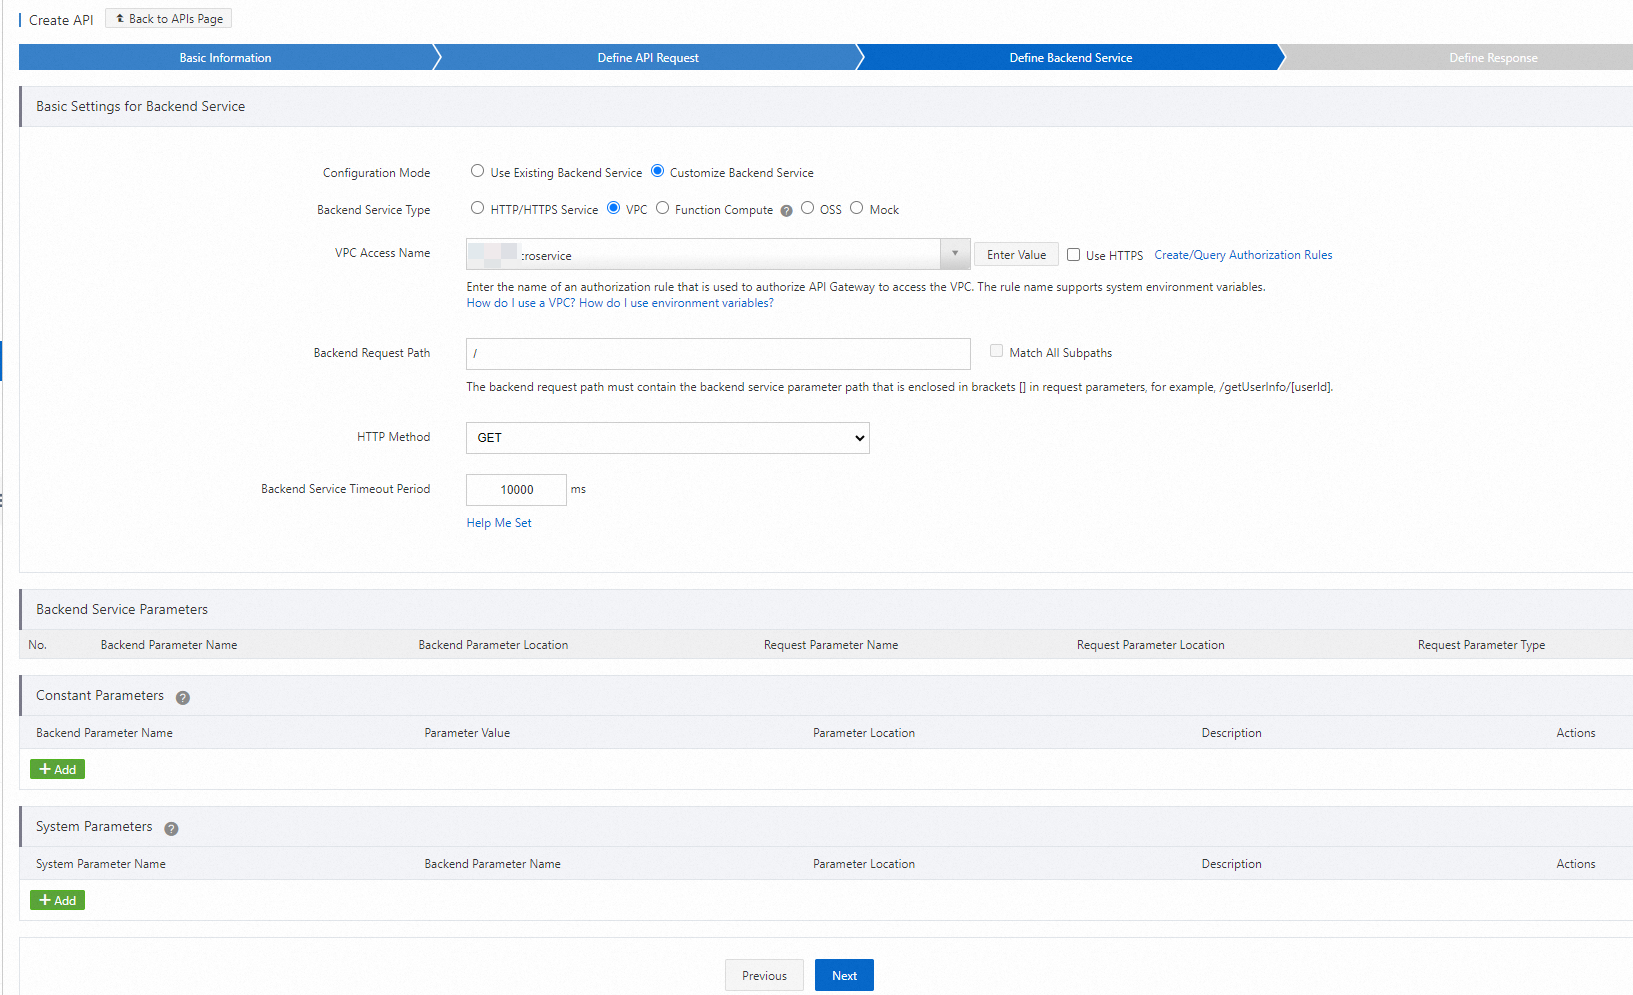 Note
NoteThis step configures the backend service type and URL. In this example, VPC is specified for Backend Service Type, the VPC access authorization you created earlier is specified for VPC Access Name, and a path is specified for Backend Request Path.
-
In the Define Response step, configure the parameters on the page as needed and then click Create.
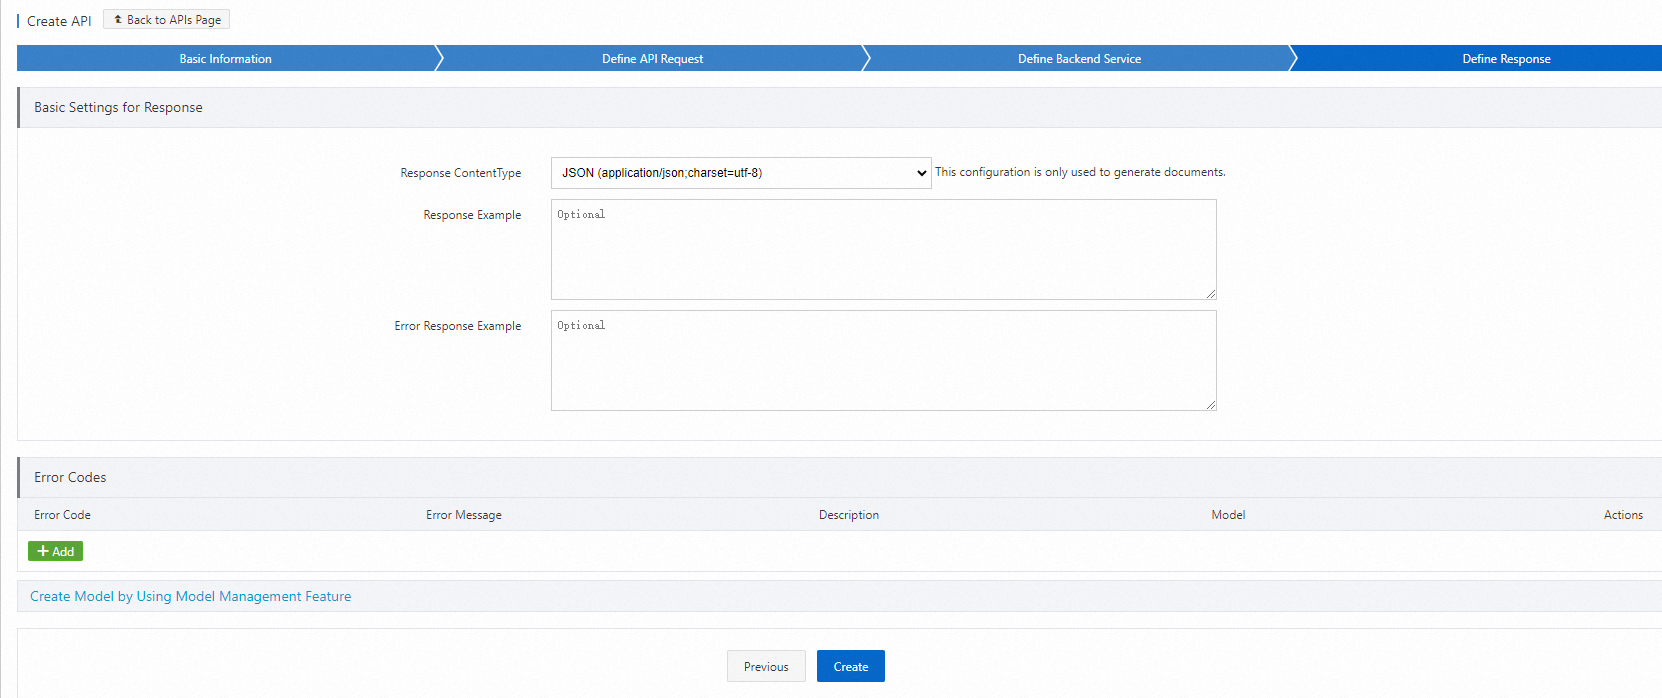 Note
NoteThis step specifies response information for API documentation. You can set Response ContentType, Response Example, and Error Response Example. This example skips these settings. Click Create.
-
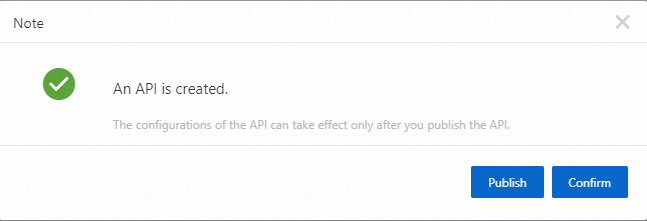
In the message that appears, click Publish.
-
In the Publish API dialog box that appears, set Environment to Release, enter remarks in the Remarks section, and then click Publish.
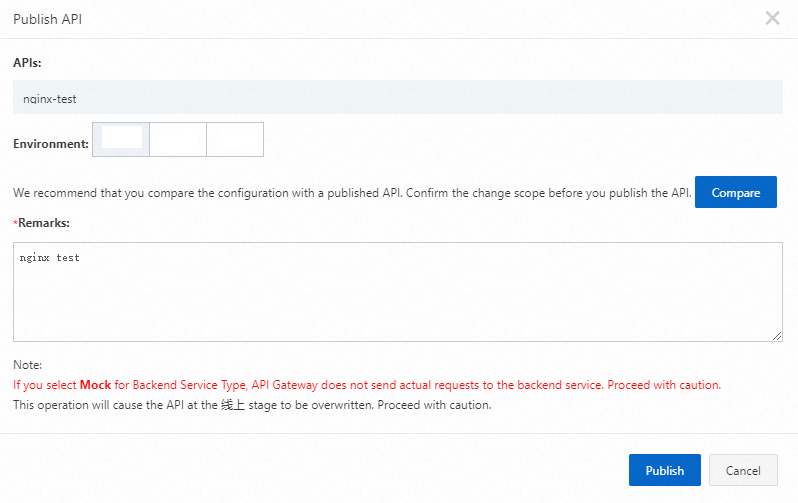 Note
NoteAPI modifications take effect only after you publish the API to the corresponding environment. API Gateway provides three environments: Release, Pre, and Test.
Create an application and authorize the application to call the API
An application is the identity used to call an API. In the Create an API step, the authentication type is set to Alibaba Cloud App. After publishing the API, create and authorize an application to call it.
Create an application
-
Log on to the API Gateway console. In the top navigation bar, select a region. In the navigation pane on the left, choose Call APIs > Apps.
-
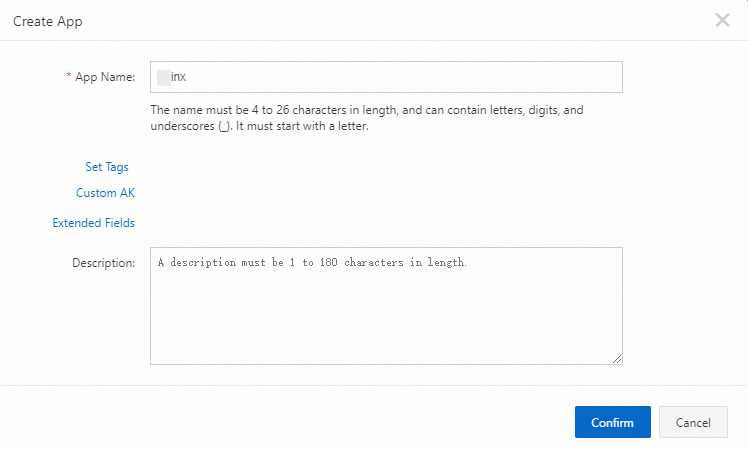
On the Apps page, click Create App in the upper-right corner.
-
In the Create App dialog box, configure the App Name parameter and click Confirm.
-
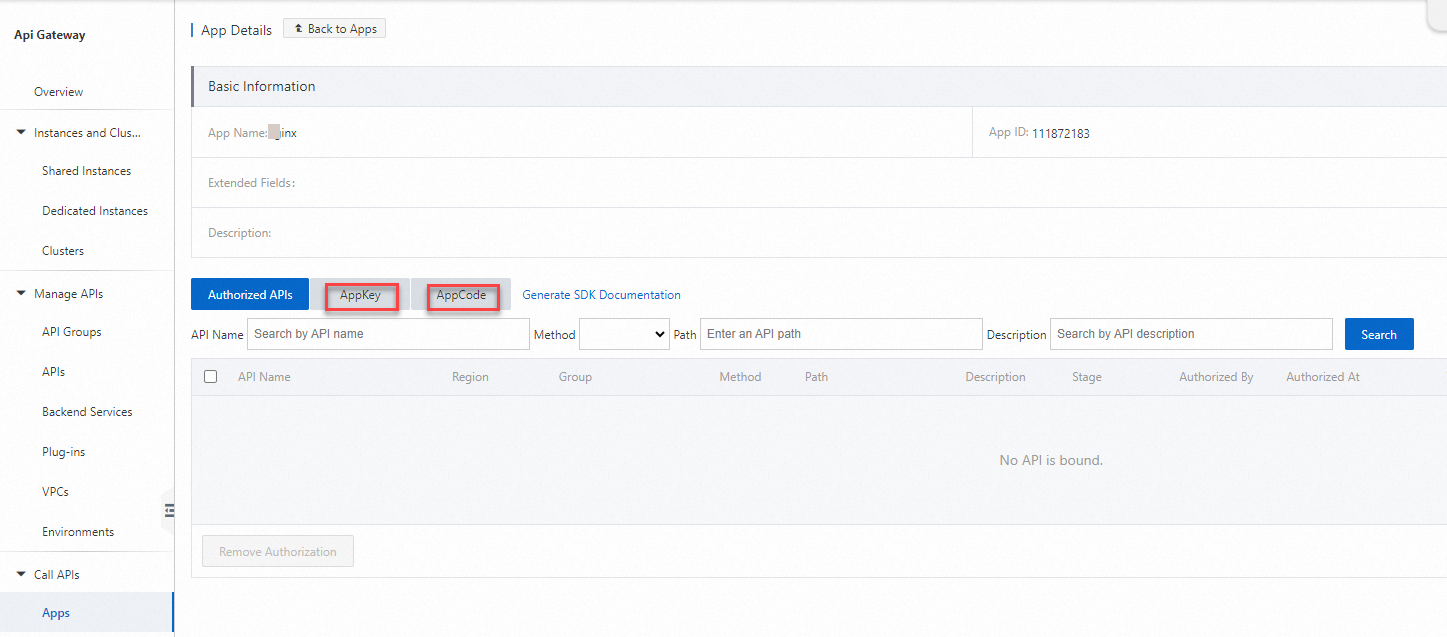
On the Apps page, click the name of the application that you created to go to the App Details page. Two authentication modes are provided for the security authentication method Alibaba Cloud App: an AppKey and AppSecret pair and an AppCode. In this example, an AppCode is used. For more information, see Call an API in simple authentication mode.
Authorize the application to call the API
-
Log on to the API Gateway console. In the top navigation bar, select a region. In the navigation pane on the left, choose Manage APIs > APIs.
-
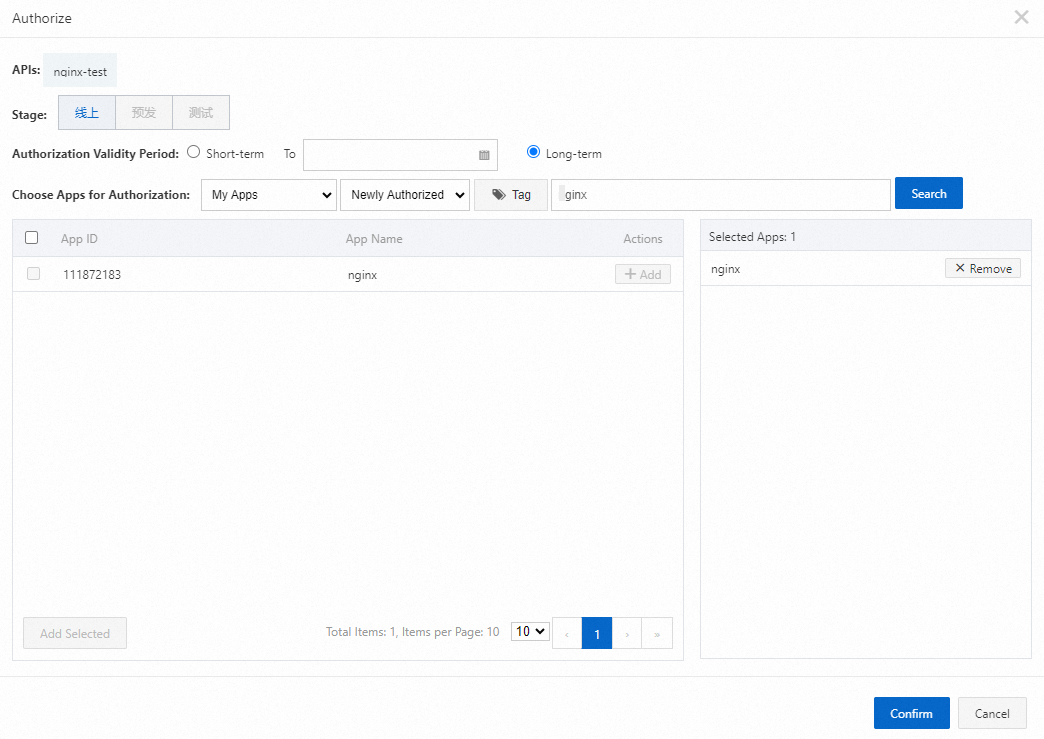
On the APIs page, find the
nginx-testAPI and in the Actions column, click > Authorize.
 -
On the Authorize page, set the Environment parameter to Release. Enter the name of the application you created in the search bar of the Choose Apps for Authorization section. In the search result, select the created application, click Add in the Actions column, and then click Confirm. A message appears to inform you that the application is authorized to call the API.
Allow the egress IP addresses of API Gateway in a security group
If the security group of your ECS instance does not allow all CIDR blocks over a specified port, add the egress IP addresses of the API Gateway instance where the API group resides to the security group.
-
Log on to the API Gateway console. In the navigation pane on the left, choose Manage APIs > API Groups. On the API Groups page, click the name of the API group that you created.
-
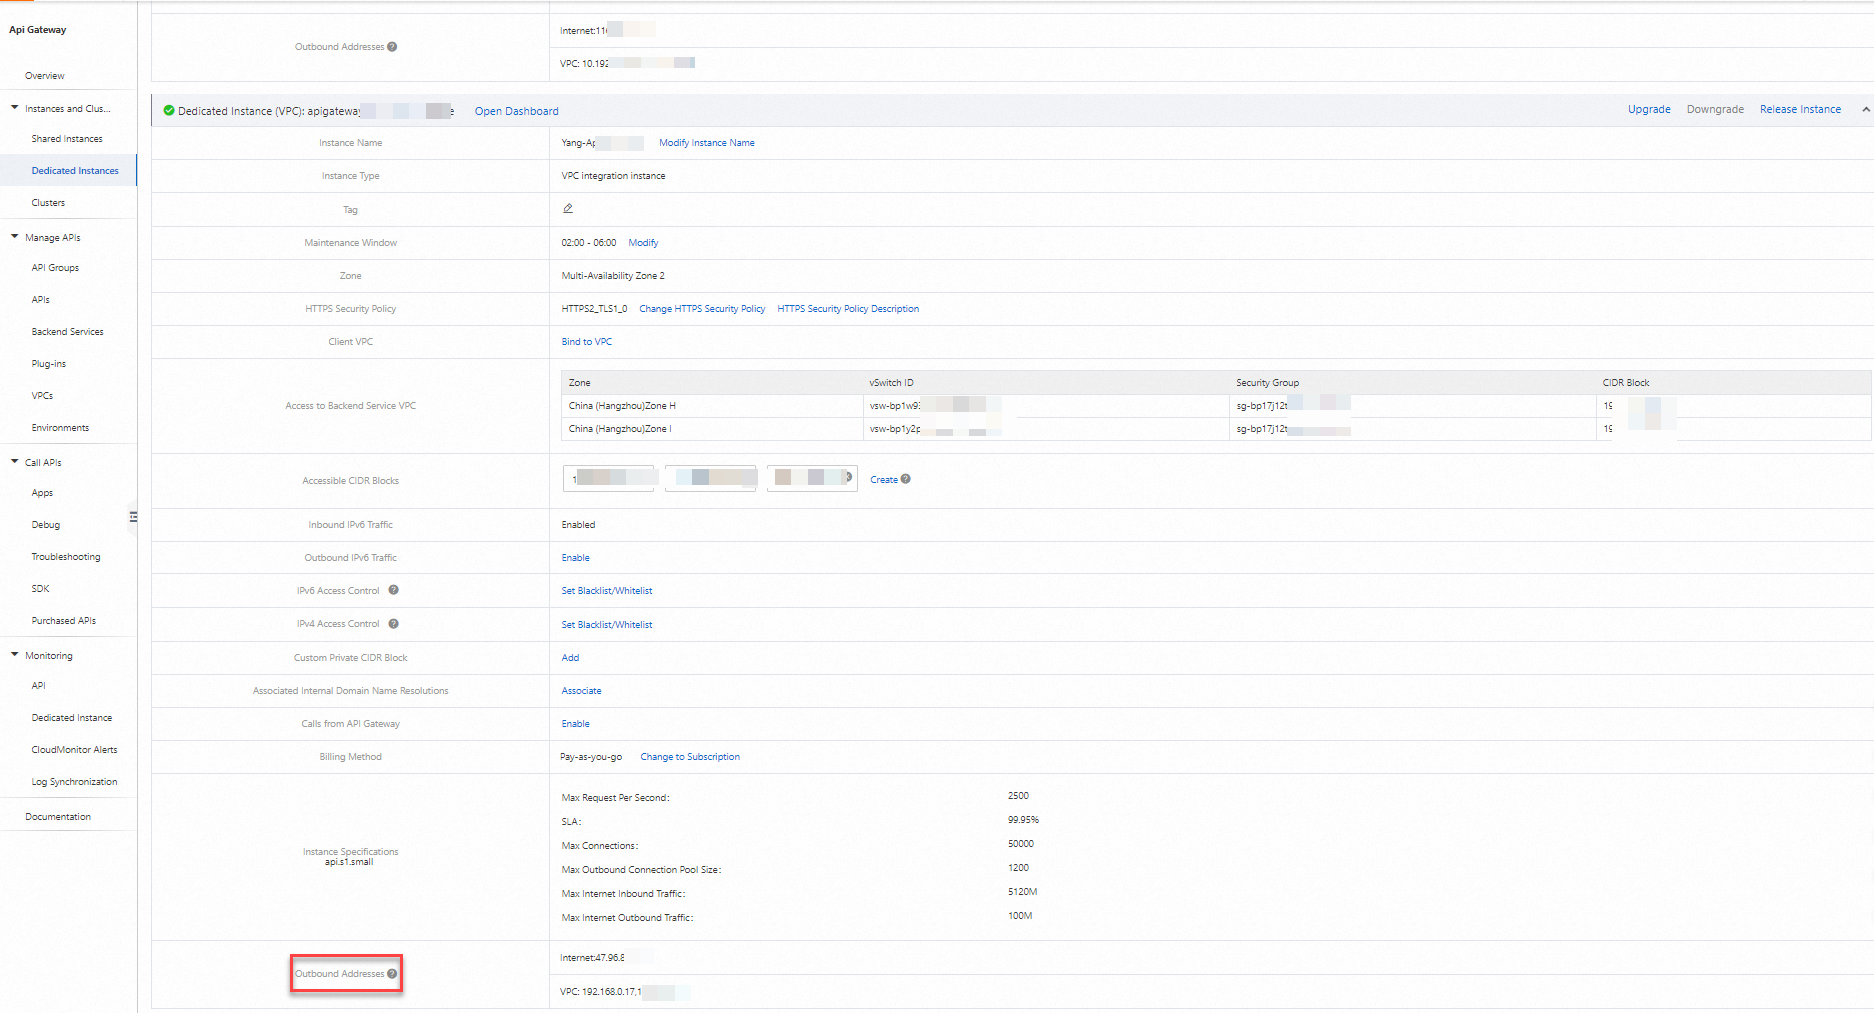
On the Group Details page, view the Instance Type parameter.
-
In the navigation pane on the left, choose Instances and Clusters > Shared Instances or Instances and Clusters > Dedicated Instances based on the instance type that you obtained. On the page that appears, scroll to the Outbound Addresses parameter of the instance based on the instance ID to view the egress IP addresses of the instance.
-
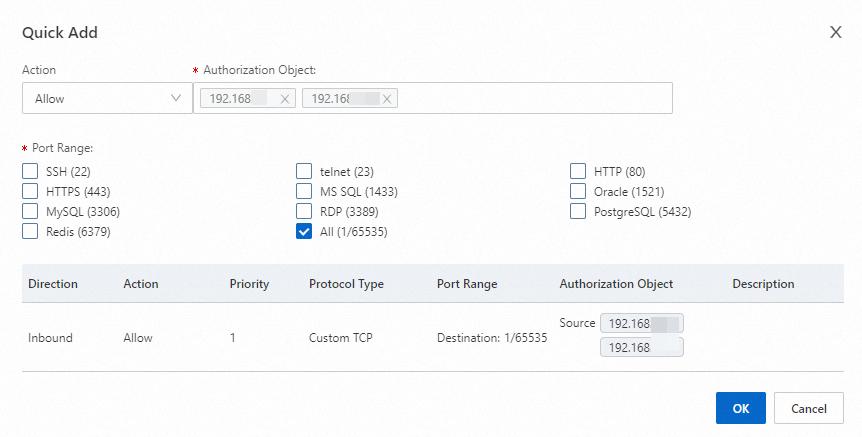
Log on to the ECS console. In the navigation pane on the left, choose Instances & Images > Instances. Click the created ECS instance to go to the details page. Click the Security Groups tab and click the security group that you want to manage. On the Security Group Details tab, click the Inbound tab and then click Quick Add. In the Quick Add dialog box, configure the egress IP addresses of API Gateway.
Debug the API
Use online debugging to verify that an API is correctly configured before calling it from clients.
-
The Debug page supports request messages of up to 512 KB. For larger messages, use an SDK to debug the API.
-
The configured instance blacklists, whitelists, and IP address-based access control plug-ins must allow 47.245.113.207.
-
You cannot use this page to debug the JWT plug-in.
-
Only public domain names are supported for debugging.
-
Log on to the API Gateway console. In the navigation pane on the left, choose Call APIs > Debug.
-
On the Debug page, select the
nginx-testAPI that you created, select Use AppCode as the Authentication Method, and then click Send Request. The response shown in the following figure indicates that the configuration is successful.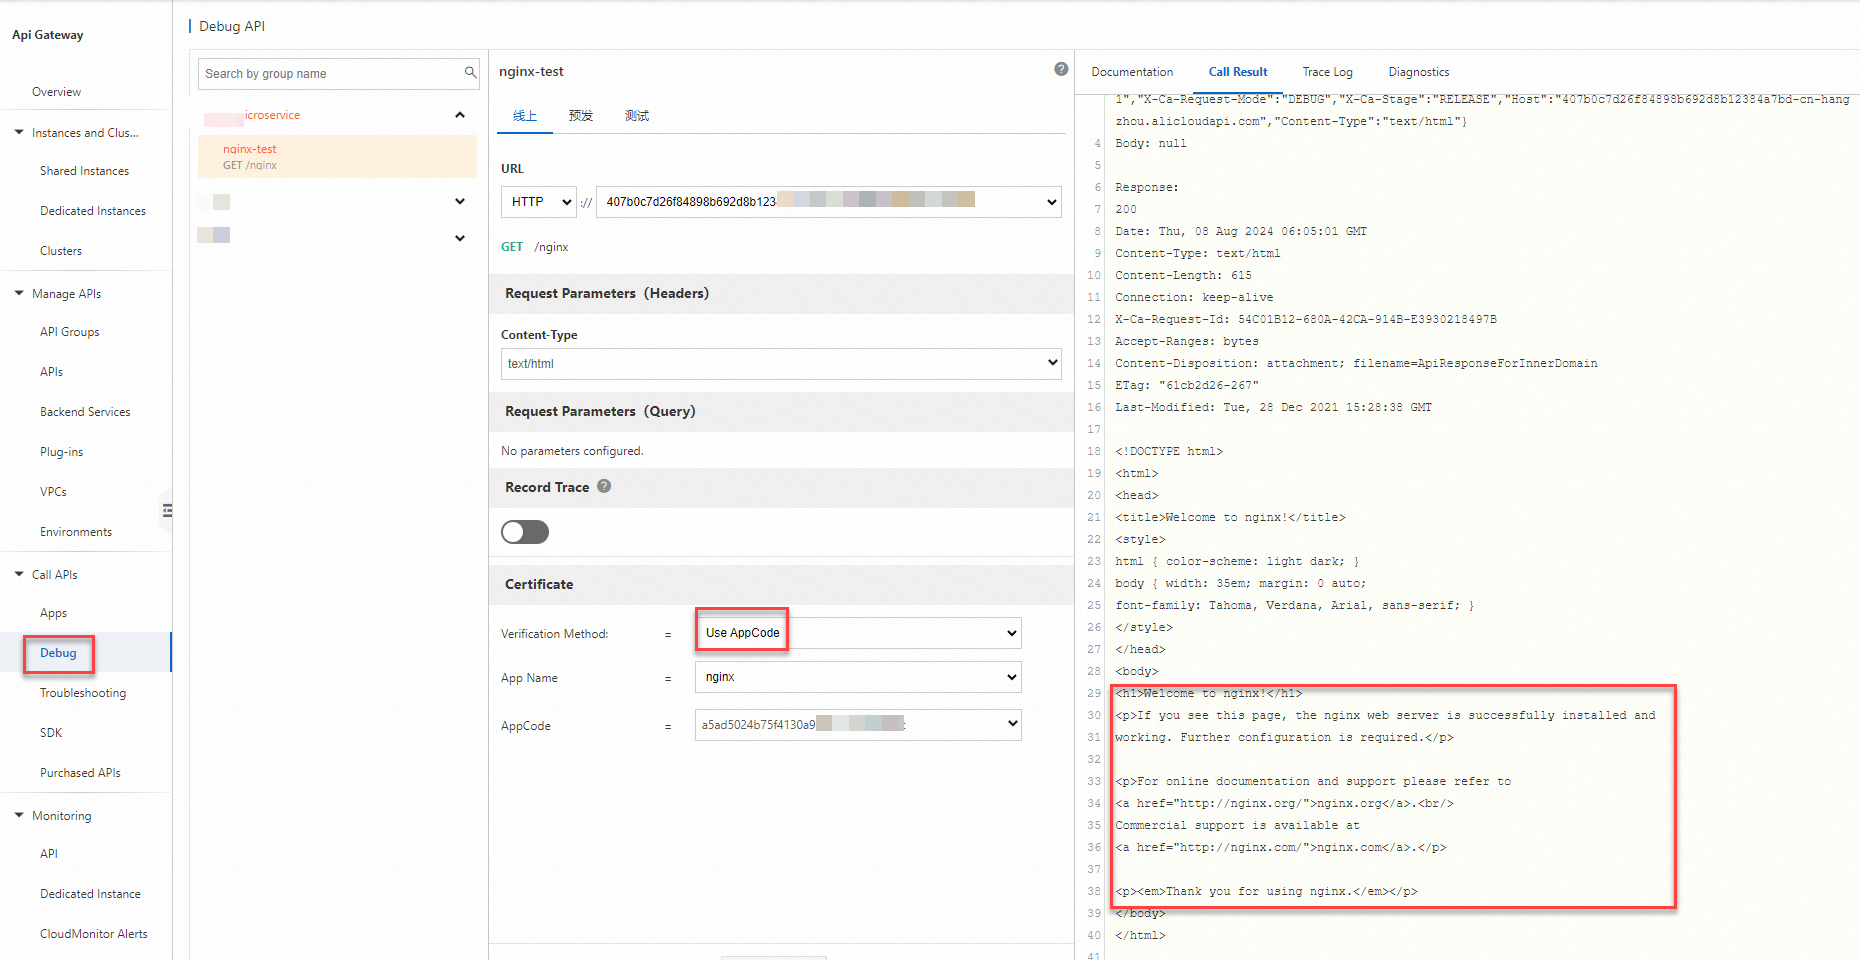
If the debugging fails, see the following documents:
Call the API
For more information, see Client-based API calls.
-
If no environment is specified for debugging, the API is debugged in the production environment by default. For more information about API environments, see Manage environments.
-
This topic focuses on getting started and does not cover backend service high availability. If you have any questions, see Use a resource in a VPC as the backend service of an API.