Deploy the Qwen-7B-Chat model on Alibaba Cloud TDX confidential computing instances. Remote attestation retrieves the decryption key, enabling hardware-level protection of AI model assets and sensitive data during inference.
Use cases
-
Compliant AI for finance and healthcare: Use confidential computing to process text containing personally identifiable information (PII) or protected health information (PHI) without exposing data during inference, meeting compliance requirements.
-
Private enterprise knowledge bases: Enhance a large language model with internal sensitive documents (financial reports, R&D materials) without exposing data as plaintext in the cloud. This solution provides hardware-level protection for both the knowledge base and the fine-tuned model.
-
Protecting commercial model assets: Prevent proprietary AI models from being illegally copied or stolen in the cloud, safeguarding core commercial assets for AI service providers.
Solution overview
What is Confidential AI
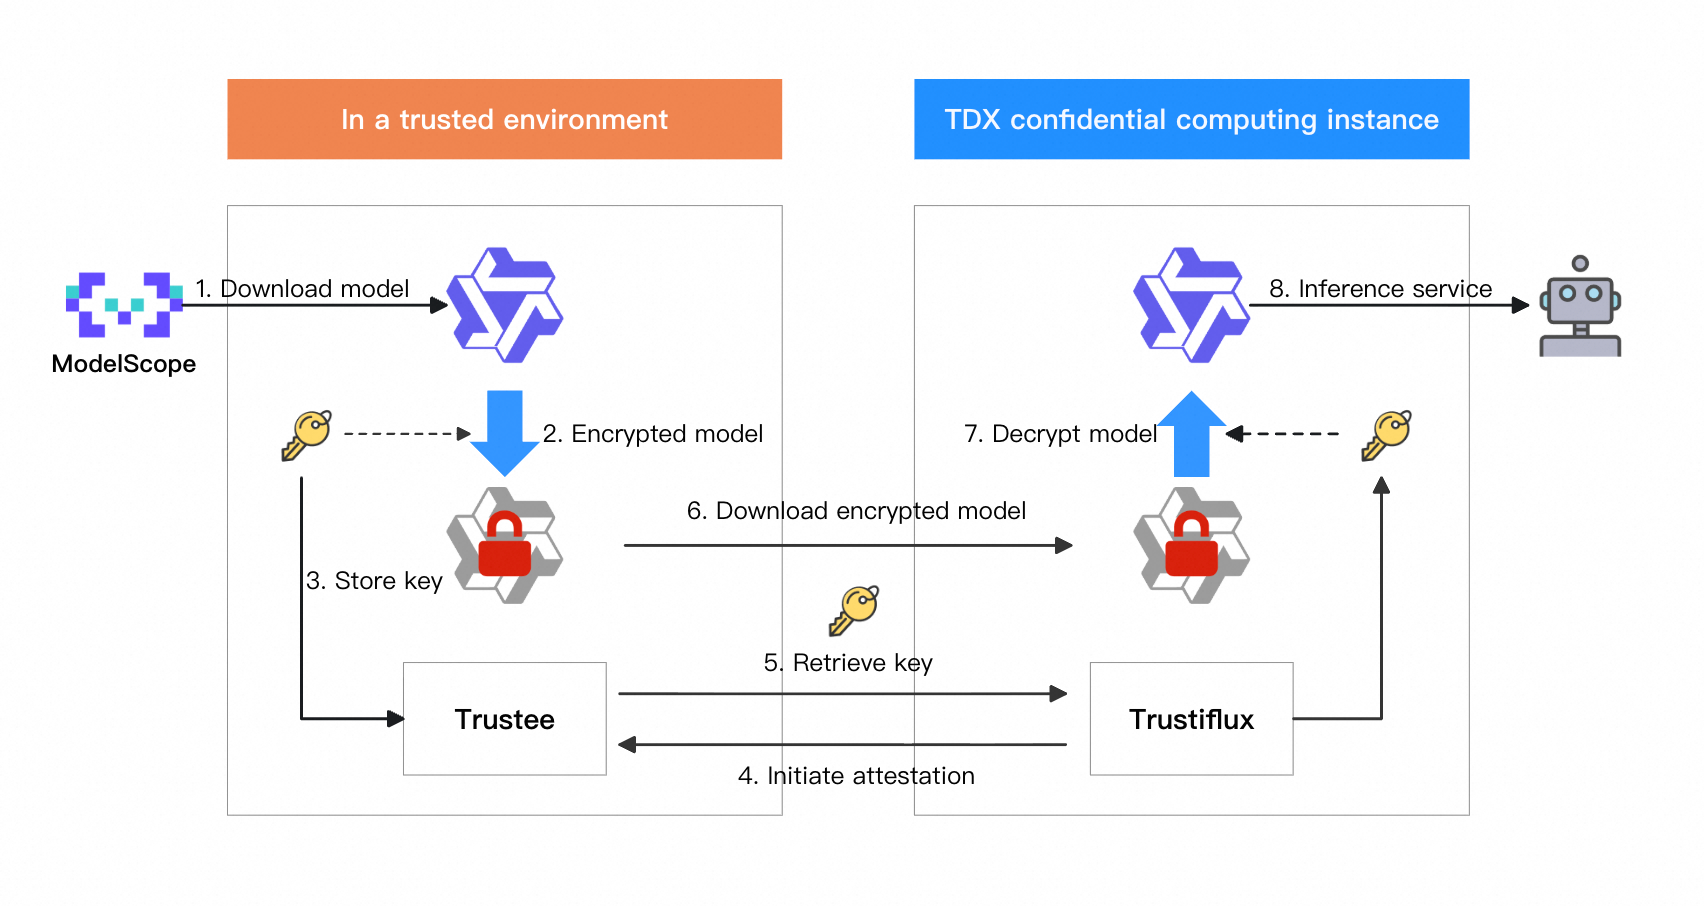
Confidential AI is an Alibaba Cloud solution for running AI tasks securely in untrusted cloud environments. It uses Intel TDX hardware to create a confidential environment for your AI models and sensitive data, providing end-to-end privacy protection.
Core components
-
Trustee: A key management service that securely stores decryption keys for AI models. Only requests that pass remote attestation can obtain a key from Trustee.
-
Trustiflux: An agent deployed inside the TDX instance. It uses remote attestation to prove to Trustee that the runtime is a genuine, untampered TDX confidential environment. Only after verification can Trustiflux obtain the key from Trustee.
Overall flow
-
In your trusted environment: Download the original AI model, encrypt the model, and then store the key in Trustee.
-
In the confidential computing environment (TDX instance):
-
Trustiflux in the TDX instance initiates remote attestation. Trustee verifies the attestation. After successful verification, Trustee sends the key to Trustiflux.
-
Trustiflux retrieves the encrypted model and uses the received key to decrypt it.
-
Load the decrypted model and start the AI inference service in the confidential environment.
-
Preparations
-
Prepare ECS resources: Create a TDX confidential computing instance with these configurations:
-
Region and Zone: China (Beijing) Zone I.
-
Instance Type: Qwen-7B-Chat requires about 30 GiB of memory. Select
ecs.g8i.4xlarge(16 vCPU, 64 GiB) or higher. -
Image: Select
Alibaba Cloud Linux 3.2104 LTS 64-bitand select the Confidential VM option. -
Public IP address: Select Assign Public IPv4 Address. Select Pay-By-Traffic with 100 Mbps peak bandwidth to speed up model downloads.
-
Data Disk: Set the system disk to at least
100 GiBfor model and related files.
-
-
Configure the security group: Allow inbound traffic on the following ports. For more information, see Manage security group rules.
-
22: For Secure Shell (SSH) remote logon. -
9090: For the temporary HTTP service that serves the encrypted model. -
7860: For the Qwen Web UI or API service. -
50005: (Optional) For Trusted Network Gateway (TNG) to ensure the channel security of inference prompts and responses.
-
Step 1: Prepare the encrypted model and key in a trusted environment
Download and encrypt the model, then store the key in Trustee. For this demo, these steps run on the same TDX instance. In production, run them in your local or another trusted environment.
-
Install basic tools
Log on to the instance as the root user and install Trustee, gocryptfs, and other dependencies.
yum install -y trustee gocryptfs tmux git git-lfs wget && git lfs install

# Start the trustee service
systemctl start trustee
-
Download the
Qwen-7B-ChatmodelThe download takes about 15-20 minutes. Run it in a
tmuxsession to prevent SSH disconnection from interrupting the download.# Create a working directory mkdir -p /cai/trustee && cd /cai/trustee # Create and enter a tmux session named qwen_clone # Note: Using tmux prevents the download from being interrupted by network issues or a closed SSH client. tmux new-session -d -s qwen_clone "git clone https://www.modelscope.cn/qwen/Qwen-7B-Chat.git qwen-7b-chat --depth=1" # Monitor the download progress # Note: After the download is complete, the process will exit and show [exited]. tmux attach -t qwen_clone
-
Model file encryption
Create an encrypted directory with
gocryptfs, then move the model files into it for automatic encryption.# Prepare directories for the encrypted data (cipher) and the plaintext mount target (plain) mkdir -p /cai/trustee/mount/{cipher,plain} # Create a password file for encryption. In a production environment, use a more secure, random password. printf '123456' > /cai/trustee/sample_password # Use the password file to initialize the gocryptfs encrypted directory cat /cai/trustee/sample_password | gocryptfs -init /cai/trustee/mount/cipher # Mount the encrypted directory to the plaintext mount target as a background process (cat /cai/trustee/sample_password | gocryptfs /cai/trustee/mount/cipher /cai/trustee/mount/plain &) && sleep 2 # Move model files to plaintext mount target for encryption mv /cai/trustee/qwen-7b-chat/ /cai/trustee/mount/plain # After the operation is complete, unmount the plaintext mount target fusermount -u /cai/trustee/mount/plainExpected result
Run
ls /cai/trustee/mount/cipherto verify encrypted file names appear instead ofqwen-7b-chat. Runls /cai/trusteeto confirm theqwen-7b-chatdirectory no longer exists.
-
Save the key to Trustee
Store the password file in the
Trusteekey repository.mkdir -p /opt/trustee/kbs/repository/cai/sample/ mv /cai/trustee/sample_password /opt/trustee/kbs/repository/cai/sample/password
-
Start the local HTTP service
Start a temporary web server to serve the encrypted model files.
# This command starts a service listening on 127.0.0.1:9090. Keep this terminal window running.
cd /cai/trustee/mount/cipher && python3 -m http.server 9090 --bind 127.0.0.1
Step 2: Decrypt and mount the model in the confidential cloud environment
-
Perform the operations in this section in a second SSH terminal window.
-
Before you begin, ensure the service started with the
python3 -m http.servercommand in Step 1 is still running in the first terminal window. Otherwise, thewgetcommand in this section will fail because it cannot find the download source.
-
Install Trustiflux
In the second terminal window, install attestation-agent, confidential-data-hub, and dependencies.
yum install -y attestation-agent confidential-data-hub gocryptfs wget
-
Perform remote attestation and obtain the key
Configure and start the attestation service, which communicates with the local Trustee (127.0.0.1). After successful verification, it retrieves and saves the model key.
The security of the key transfer is guaranteed by the KBS Attestation Protocol, a Trusted Execution Environment (TEE)-based application layer encryption protocol between Trustiflux and Trustee.
# Configure attestation-agent and confidential-data-hub to communicate with the local Trustee
sed -i "/^\[token_configs\.kbs\]$/,/^$/ s|^url = .*|url = \"http://127.0.0.1:8080\"|" \
  /etc/trustiflux/attestation-agent.toml
sed -i "/^\[token_configs\.coco_as\]$/,/^$/ s|^url = .*|url = \"http://127.0.0.1:50004\"|" \
  /etc/trustiflux/attestation-agent.toml
sed -i 's|\(url\s*=\s*"\)[^"]*|\1http://127.0.0.1:8080|' \
  /etc/trustiflux/confidential-data-hub.toml

# Start the attestation agent, then request the key resource
attestation-agent -c /etc/trustiflux/attestation-agent.toml > /dev/null 2>&1 & PID=$! && sleep 1
password=$(confidential-data-hub \
  -c /etc/trustiflux/confidential-data-hub.toml \
  get-resource \
  --resource-uri kbs:///cai/sample/password)
mkdir -p /cai/trustiflux && echo "$password" | base64 -d > "/cai/trustiflux/sample_password"
Expected result
The password file with content
123456is saved at/cai/trustiflux/sample_password.If the file is not found, verify that the local HTTP service from Step 1
-
Retrieve and decrypt the model
# Use wget to recursively download the encrypted model files exposed in Step 1.5
wget -c --tries=30 --timeout=30 --waitretry=15 \
  -r -np -nH --cut-dirs=0 -R "index.html*" \
  --progress=dot:giga --show-progress \
  -P /cai/trustiflux/mount/cipher \
  http://127.0.0.1:9090


# Create a plaintext mount target
mkdir -p /cai/trustiflux/mount/plain

# Use the key obtained through remote attestation to mount the downloaded encrypted model directory to the plaintext mount target
gocryptfs -debug -passfile /cai/trustiflux/sample_password /cai/trustiflux/mount/cipher /cai/trustiflux/mount/plain
Expected result
The terminal outputs
Filesystem mounted and ready. Runls /cai/trustiflux/mount/plainto see the decryptedqwen-7b-chatdirectory.If
wgetreturns a "Connection refused" error when downloading the encrypted model, verify that the local HTTP service from Step 1
Step 3: Start and access the Qwen inference service
Perform the operations in this section in a third SSH terminal window.
-
Prepare the Python environment and dependencies
In the third terminal window, create and activate a Conda Python environment.
# Download and install Miniconda
wget https://repo.anaconda.com/miniconda/Miniconda3-py39_23.11.0-2-Linux-x86_64.sh
bash Miniconda3-py39_23.11.0-2-Linux-x86_64.sh -b -p $HOME/miniconda

# Activate the Conda environment
source $HOME/miniconda/bin/activate

# Create and activate a dedicated Python 3.10 environment
conda create -n pytorch_env python=3.10 -y
conda activate pytorch_env
Expected result
The text
(pytorch_env)appears before the terminal prompt.
-
Start the service using one of the following methods
-
To call the model programmatically through an API, choose Start the OpenAI-compatible API service.
-
To interact with the model through a graphical interface, choose Start the Web UI service.
-
To chat with the model directly in the server terminal, choose Start the command-line interactive chat.
Start the OpenAI-compatible API service
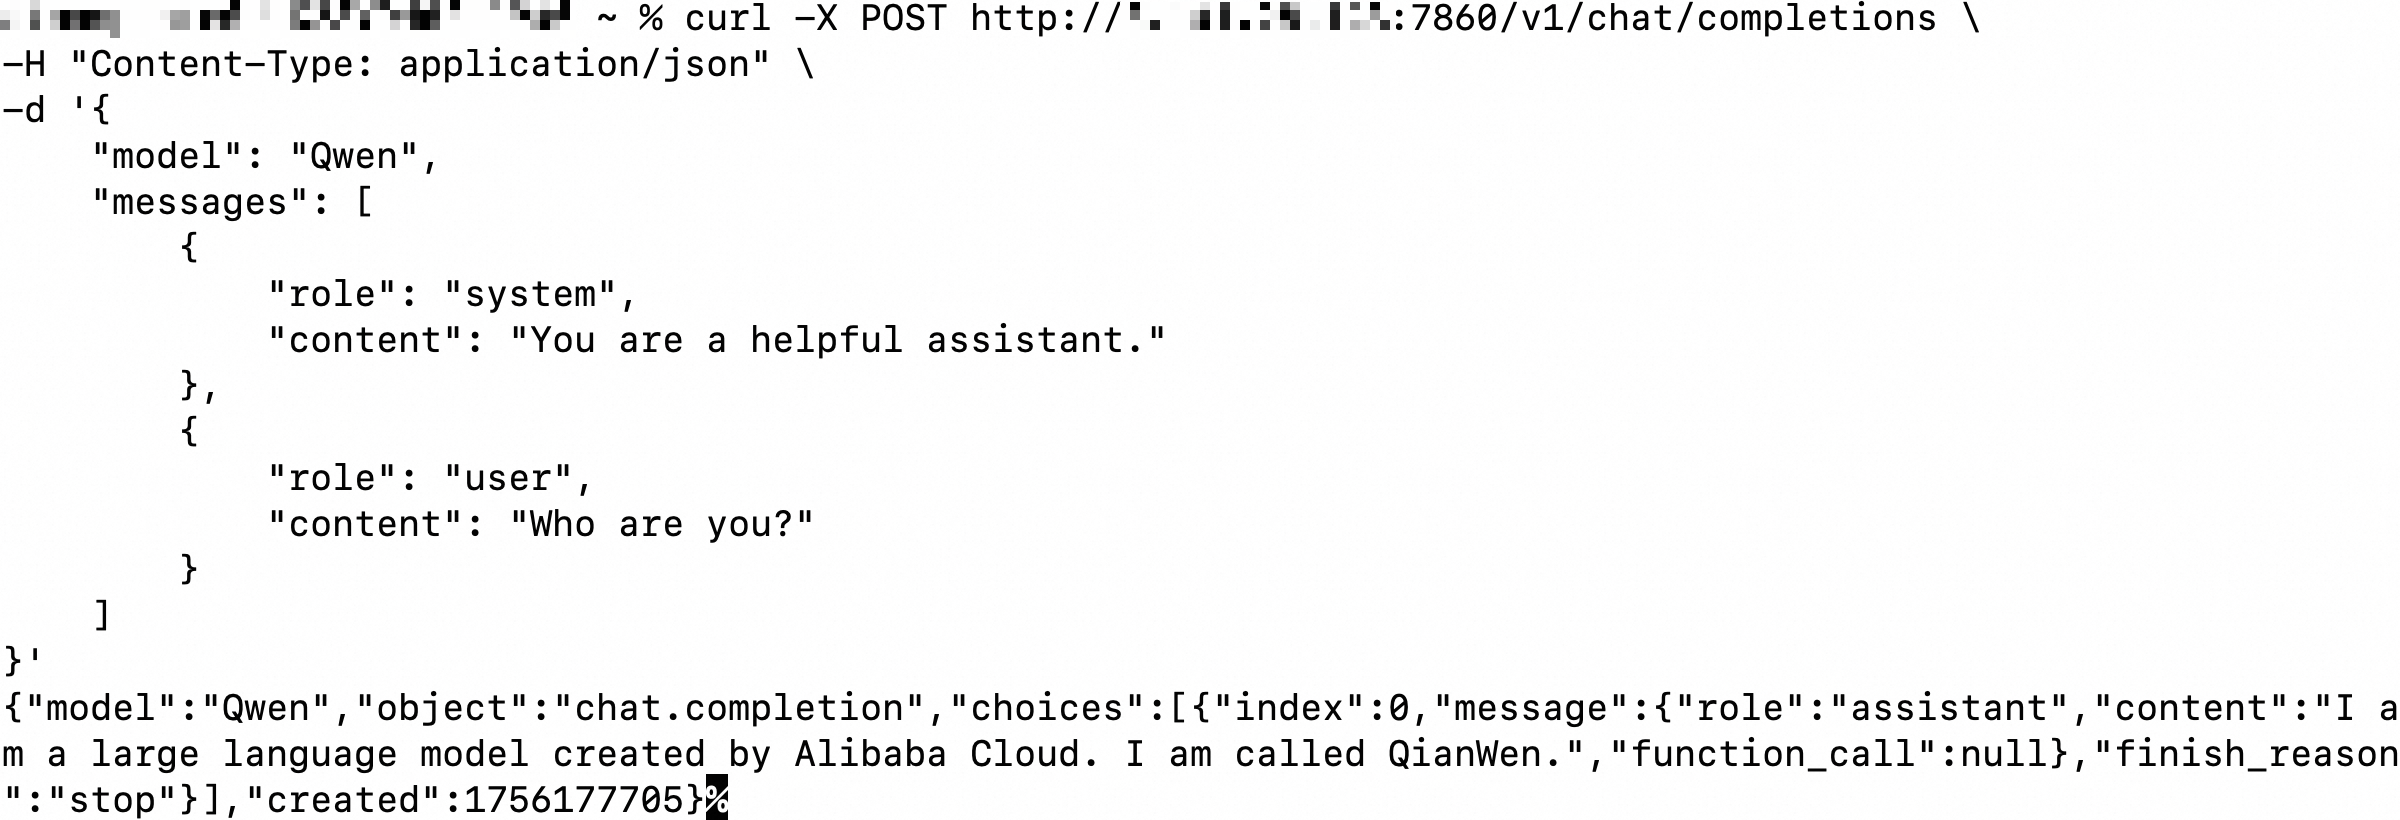
# Activate the dedicated Python 3.10 environment
source $HOME/miniconda/bin/activate
conda activate pytorch_env

cd /cai/trustiflux
git clone https://github.com/QwenLM/Qwen.git
cd Qwen
pip3 install torch torchvision torchaudio --index-url https://download.pytorch.org/whl/cpu
pip3 install -r requirements.txt && pip3 install fastapi uvicorn "openai<1.0" pydantic sse_starlette
python openai_api.py -c ../mount/plain/qwen-7b-chat --cpu-only --server-name 0.0.0.0 --server-port 7860
How to access: On any terminal that can access the public IP address of the ECS instance, use the
curlcommand to make a call.This topic uses a local terminal as an example.
curl -X POST http://<Public IP address of the TDX instance>:7860/v1/chat/completions \
-H "Content-Type: application/json" \
-d '{
    "model": "Qwen",
    "messages": [
        {
            "role": "system",
            "content": "You are a helpful assistant."
        },
        {
            "role": "user",
            "content": "Who are you?"
        }
    ]
}'
The output is shown in the following figure.
Start the Web UI service
# Activate the dedicated Python 3.10 environment
source $HOME/miniconda/bin/activate
conda activate pytorch_env

cd /cai/trustiflux
git clone https://github.com/QwenLM/Qwen.git
cd Qwen
pip3 install torch torchvision torchaudio --index-url https://download.pytorch.org/whl/cpu
pip3 install -r requirements.txt && pip3 install -r requirements_web_demo.txt
python3 web_demo.py -c ../mount/plain/qwen-7b-chat --cpu-only --server-name 0.0.0.0 --server-port 7860
How to access: In your local browser's address bar, enter
http://<Public IP address of the ECS instance>:7860.Start the command-line interactive chat
# Activate the dedicated Python 3.10 environment
source $HOME/miniconda/bin/activate
conda activate pytorch_env

cd /cai/trustiflux
git clone https://github.com/QwenLM/Qwen.git
cd Qwen
pip3 install torch torchvision torchaudio --index-url https://download.pytorch.org/whl/cpu
pip3 install -r requirements.txt
python3 cli_demo.py -c ../mount/plain/qwen-7b-chat --cpu-only
How to access: After startup, enter your question directly at the
User>prompt in the terminal. The following figure shows an example.
-
Step 4: (Optional) Enhance channel security with TNG
Use Trusted Network Gateway (TNG) for end-to-end encryption between the client and the confidential cloud environment, preventing inference prompts and responses from being intercepted during transmission.
This example shows how to interact with the model through an API. Before you begin, make sure the OpenAI-compatible API service from Step 3 is running.
-
Deploy TNG on the server (TDX instance)
Open a fourth terminal window on the TDX instance and run:
yum install -y trusted-network-gateway
tng launch --config-content '{
  "add_egress": [{
    "netfilter": { "capture_dst": { "port": 7860 }, "capture_local_traffic": true, "listen_port": 40001 },
    "attest": { "aa_addr": "unix:///run/confidential-containers/attestation-agent/attestation-agent.sock" }
  }]
}'
-
Deploy TNG on the client (local machine)
Download and run TNG on your local machine:
More TNG versions
Local machine is x86_64
# x86_64
wget https://github.com/inclavare-containers/TNG/releases/download/v2.2.4/tng-v2.2.4.x86_64-unknown-linux-gnu.tar.gz
tar -zxvf tng-v2.2.4.x86_64-unknown-linux-gnu.tar.gz && chmod +x tng

./tng launch --config-content '{
  "add_ingress": [{
    "http_proxy": { "proxy_listen": { "host": "127.0.0.1", "port": 41000 } },
    "verify": { "as_addr": "http://<Public IP address of the TDX instance>:50005", "policy_ids": [ "default" ] }
  }]
}'
Local machine is aarch64
# aarch64
wget https://github.com/inclavare-containers/TNG/releases/download/v2.2.4/tng-v2.2.4.aarch64-unknown-linux-gnu.tar.gz
tar -zxvf tng-v2.2.4.aarch64-unknown-linux-gnu.tar.gz && chmod +x tng

./tng launch --config-content '{
  "add_ingress": [{
    "http_proxy": { "proxy_listen": { "host": "127.0.0.1", "port": 41000 } },
    "verify": { "as_addr": "http://<Public IP address of the TDX instance>:50005", "policy_ids": [ "default" ] }
  }]
}'
-
Access the service through the TNG proxy
Open a new local terminal, configure the HTTP proxy, and interact with the model through the encrypted channel:
# Temporarily set an environment variable to configure the HTTP proxy
export http_proxy=http://127.0.0.1:41000

# Interact with the model through the API
curl -X POST http://<Public IP address of the TDX instance>:7860/v1/chat/completions \
-H "Content-Type: application/json" \
-d '{
    "model": "Qwen",
    "messages": [
        {
            "role": "system",
            "content": "You are a helpful assistant."
        },
        {
            "role": "user",
            "content": "Who are you?"
        }
    ]
}'
FAQ
Error during trustee installation: "Error: Transaction test error"
Cause: Existing SGX or TDX dependencies on the system conflict with Trustee.
Solution: Run yum remove libsgx-dcap-default-qpl libsgx-dcap-quote-verify, then retry the installation.
wget fails to download the encrypted model with a "Connection refused" error
Cause: The python3 -m http.server service that was started in Step 1 has stopped.
Solution: Return to the first terminal window and verify the service is running. If stopped, go to the /cai/trustee/mount/cipher directory and restart it.
Cannot access the Web UI in a browser (http://<Public IP address of the ECS instance>:7860)
Causes and troubleshooting:
-
Security group rule: Verify that the security group allows inbound traffic on TCP port 7860 from the internet.
-
Service listening address: Make sure the startup command includes
--server-name 0.0.0.0. -
Service status: In the third terminal window, verify that the
web_demo.pyprocess is still running correctly.
Error when getting the key file: {code: 111, kind: ConnectionRefused, message: "Connection refused"}
Cause 1: Run systemctl status trustee to check the Trustee service. If the status is inactive, the service is not running.
Solution: Run systemctl start trustee to start the service.
Cause 2: The default remote attestation policy is too strict, causing TDX environment verification to fail.
Solution: (Development and staging only) Run sed -i 's/^default allow = false$/default allow = true/' /opt/trustee/kbs/policy.rego to temporarily allow verification to succeed.