Service Mesh (ASM) supports connections to one or more Consul service registries to help you migrate microservices to ASM. This topic describes how to connect an ASM instance to one or more Consul service registries.
Prerequisites
The version of your ASM instance is v1.7.5.31-g28ec7490-aliyun or later.
One or more Consul service registries are deployed. For more information, see Installing Consul on Kubernetes.
A Container Service for Kubernetes (ACK) cluster is added to your ASM instance, and the pods of the ACK cluster can access a Consul server. For example, the Consul server is installed in the same ACK cluster as the pods, or the Consul server provides a public endpoint or an accessible internal endpoint. In these cases, the pods can access the Consul server.
Sample services including Web and Web2 and a built-in Consul service are registered in the Consul service registries. For more information about how to register services in Consul, see Services.
Background information
After you connect an ASM instance to Consul service registries, services inside the ASM instance can call services outside the ASM instance when you migrate microservices to the ASM instance. However, services inside the ASM instance are not automatically registered in the Consul service registries after the ASM instance is connected to the Consul service registries. To ensure that services outside the ASM instance can call services inside the ASM instance, you must manually register services inside the ASM instance in the Consul service registries.
Step 1: Obtain the information required to configure ASM-se-syncer
View the ID of the ASM instance that you want to connect to Consul service registries.
Log on to the ASM console. In the left-side navigation pane, choose .
On the Mesh Management page, view the ID of the ASM instance that you want to manage in the Name/ID column.
View the region ID of the cluster that is added to the ASM instance.
Log on to the ACK console. In the left-side navigation pane, click Clusters.
On the Clusters page, find the cluster that you want to manage and click its name. In the left-side pane, click Cluster Information.
On the Clusters page, view the region of the cluster that is added to the ASM instance in the Region column. For example, if the region of the cluster is China (Beijing), the region ID of the cluster is cn-beijing. For more information about regions, see Supported regions.
View the AccessKey ID and AccessKey secret of your account. For more information, see Create an AccessKey pair.
Step 2: Install ASM-se-syncer
Use kubectl to connect to the ACK cluster. For more information, see Obtain the kubeconfig file of a cluster and use kubectl to connect to the cluster.
Install Helm on your computer. For more information, see Helm.
NoteAfter you use kubectl to connect to the ACK cluster, the Helm client automatically uses the kubeconfig file to connect to the cluster.
Download and decompress the asm-se-syncer file to your computer.
Open the values.yaml file in the asm-se-syncer folder, add the obtained ID of the ASM instance, the region ID of the cluster, the AccessKey ID, and the AccessKey secret to the values.yaml file, specify the parameters that are described in the following table, and then save the values.yaml file.
[
  {
    "name": "consul-test",
    "prefix": "consul-",
    "type": "consul",
    "endpoint": "http://consul-server.consul:8500",
    "toNamespace": "default"
  }
]
Parameter
Description
nameThe name of the service registry. The name must be unique.
prefixThe prefix for the names of the service entries that are generated after service registration.
typeThe type of the service registry. Set this parameter to consul.
endpointThe endpoint of the service registry.
toNamespaceThe namespace in which the generated service entries reside. If the specified namespace does not exist, a namespace is automatically created.
If you want to connect an ASM instance to multiple Consul service registries, add the relevant ASM instance ID, cluster region ID, AccessKey ID, and AccessKey secret to the values.yaml file, specify the parameters of each service registry, and then save the values.yaml file.
[
  {
    "name": "consul-test01",
    "prefix": "consul01-",
    "type": "consul",
    "endpoint": "http://consul-server01.consul:8500",
    "toNamespace": "default"
  },
  {
    "name": "consul-test02",
    "prefix": "consul02-",
    "type": "consul",
    "endpoint": "http://consul-server02.consul:8500",
    "toNamespace": "default"
  }
]
Run the following command to install ASM-se-syncer:
helm install -f values.yaml se-syncer ./After ASM-se-syncer is installed, your ASM instance is automatically connected to Consul service registries, and the asm-serviceregistry-syncer Deployment is automatically installed in the ACK cluster that is added to the ASM instance. In addition, all services that are registered in the Consul service registries are synchronized to your ASM instance.
Step 3: Check the connection between your ASM instance and Consul service registries
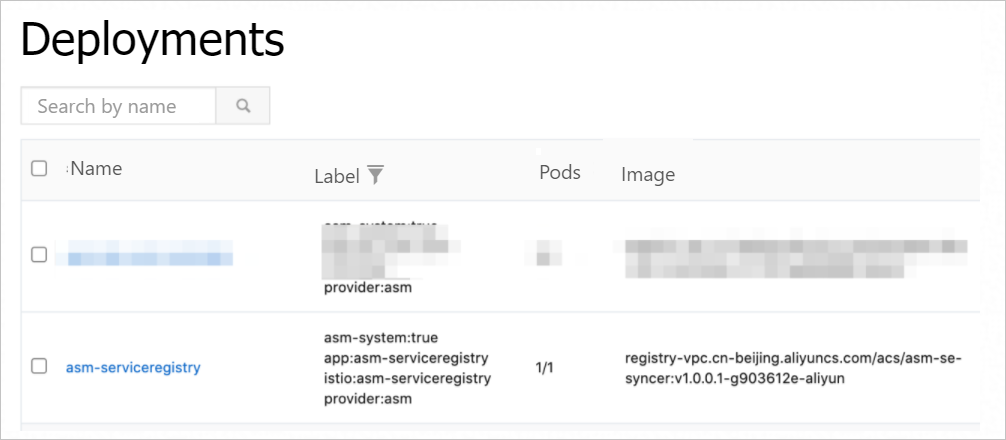
Check whether the asm-serviceregistry-syncer Deployment is installed.
Log on to the ACK console. In the left-side navigation pane, click Clusters.
On the Clusters page, find the cluster that you want to manage and click its name. In the left-side pane, choose .
On the Deployments page, check whether the asm-serviceregistry-syncer Deployment exists.
Check the synchronization of service entries.
Log on to the ASM console. In the left-side navigation pane, choose .
On the Mesh Management page, click the name of the ASM instance. In the left-side navigation pane, choose .
On the External Service(ServiceEntry) page, check whether the three services that are registered in the Consul service registries are synchronized to your ASM instance.
NoteOn the External Service(ServiceEntry) page, Consul services are named in the following format: [Prefix specified in Step 2]-[Name of the registered service in Consul].
On the External Service(ServiceEntry) page, the name of the namespace in which Consul services reside is the value of the
toNamespaceparameter specified in Step 2.
FAQ
How do I call a Consul service?
After you add the cluster in which a Consul service resides to the data plane, you can call the Consul service by using the following two methods:
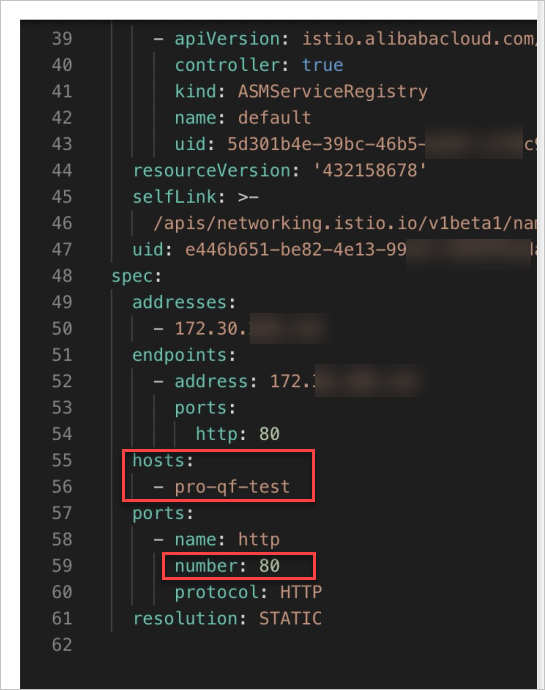
Method 1: Enable the DNS proxy feature and use the hostname and port number in the service entry that corresponds to the Consul service to call the Consul service.
Enable the DNS proxy feature. For more information, see Use the DNS proxy feature in an ASM instance.
Obtain the hostname and port number that are used to call the Consul service.
Log on to the ASM console. In the left-side navigation pane, choose .
On the Mesh Management page, click the name of the ASM instance. In the left-side navigation pane, choose .
On the External Service(ServiceEntry) page, find the service entry that you want to view and click YAML in the Actions column.
In the Edit dialog box, obtain the hostname and port number. Then, use a URL in the http://<Hostname>:<Port number> format to call the Consul service.
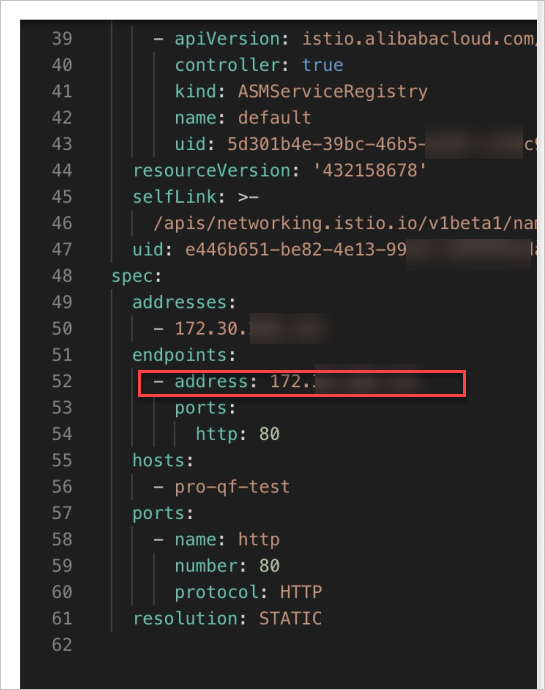
Method 2: Use the endpoint in the service entry that corresponds to the Consul service to call the Consul service.
Log on to the ASM console. In the left-side navigation pane, choose .
On the Mesh Management page, click the name of the ASM instance. In the left-side navigation pane, choose .
On the External Service(ServiceEntry) page, find the service entry that you want to view and click YAML in the Actions column.
In the Edit dialog box, obtain the endpoint of the service. Then, use a URL in the http://<Endpoint> format to call the Consul service.
How do I synchronize services between Consul and Istio?
After you register a service in Consul, the service is automatically synchronized to Istio as a service entry. If you update or delete the service, the service entry in Istio is also updated or deleted.
How do I close the connection between an ASM instance and Consul service registries?
Run the following command to uninstall ASM-se-syncer:
helm uninstall se-syncer