Service Mesh has DNS proxy caching capabilities. When Service Mesh receives DNS queries from applications, the Sidecar proxy transparently intercepts them and provides resolution capabilities. This topic describes how to enable and use the DNS proxy feature in ASM.
Prerequisites
An ASM instance of version 1.8.3.17 or later is created. For more information, see Create an ASM instance.
The cluster is added to the ASM instance. For more information, see Add a cluster to an ASM instance.
Sidecar is injected into the default namespace. For more information, see Enable automatic Sidecar injection.
Background information
An ACK cluster deploys a DNS service by default to provide domain name resolution for workloads, allowing applications running in the Kubernetes cluster to use DNS resolution to discover other services in the cluster.
The DNS server runs in each Kubernetes cluster, and each pod uses the internal DNS server for domain name resolution. By default, DNS requests are not intercepted by the Sidecar proxy, and each application attempts to resolve DNS names before opening connections to other services. After the DNS proxy feature is enabled in ASM, when DNS queries are received from applications, the Sidecar proxy transparently intercepts them and provides resolution capabilities, accelerating domain name resolution.
Enable the DNS proxy feature
Scenario 1: Enable the DNS proxy feature globally
Log on to the ASM console. In the left-side navigation pane, choose .
On the Mesh Management page, click the name of the ASM instance. In the left-side navigation pane, choose .
On the Global tab, click DNS Proxy Feature, turn on the Enable DNS Proxy Feature switch, and then click Update Settings.
Restart the pod to apply the DNS configuration to the application.
Log on to the ACK console. In the left-side navigation pane, click Clusters.
On the Clusters page, find the cluster that you want to manage and click its name. In the left-side pane, choose .
On the Pods page, click Operation in the column of the target pod.
In the Prompt dialog box, click OK.
Wait for a while. The configuration takes effect after the container restarts.
Scenario 2: Enable the DNS proxy feature for a specific namespace
Log on to the ASM console. In the left-side navigation pane, choose .
On the Mesh Management page, click the name of the ASM instance. In the left-side navigation pane, choose .
On the Sidecar Proxy Configuration page, click the Namespace tab.
Select a Namespace, click DNS Proxy Feature, select Enable DNS Proxy Feature, turn on the switch on the right, and then click Update Settings.
Restart the pod to apply the DNS configuration to the application.
Log on to the ACK console. In the left-side navigation pane, click Clusters.
On the Clusters page, find the cluster that you want to manage and click its name. In the left-side pane, choose .
On the Pods page, click Operation in the column of the target pod.
In the Prompt dialog box, click OK.
Wait for a while. The configuration takes effect after the container restarts.
Scenario 3: Enable the DNS proxy feature for a specific pod
You need to add annotations to the pod's YAML file to enable the DNS proxy feature for a specific pod.
Log on to the ACK console. In the left-side navigation pane, click Clusters.
On the Clusters page, find the cluster that you want to manage and click its name. In the left-side pane, choose .
On the Stateless page, in the Operation column on the right side of the target application, select .
In the Edit YAML dialog box, add the following annotations under the spec parameter, and then click Update.
annotations:
  proxy.istio.io/config: |
    proxyMetadata:
      ISTIO_META_DNS_CAPTURE: "true"
      ISTIO_META_DNS_AUTO_ALLOCATE: "true"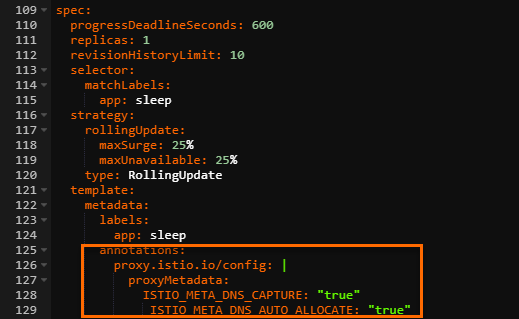
Restart the pod to apply the DNS configuration to the application.
Log on to the ACK console. In the left-side navigation pane, click Clusters.
On the Clusters page, find the cluster that you want to manage and click its name. In the left-side pane, choose .
On the Pods page, click Operation in the column of the target pod.
In the Prompt dialog box, click OK.
Wait for a while. The configuration takes effect after the container restarts.
Use the DNS proxy feature
Step 1: Create an external service
Use an external service to add aliyun.com to the service registry maintained within Service Mesh.
Log on to the ASM console.
In the left-side navigation pane, choose .
On the Mesh Management page, find the ASM instance that you want to configure. Click the name of the ASM instance or click Manage in the Actions column.
On the details page of the ASM instance, choose . On the page that appears, click Create from YAML.
On the Create page, select a Namespace, select any Scenario Template, copy the following service content to the text box, and then click Create.
apiVersion: networking.istio.io/v1beta1
kind: ServiceEntry
metadata:
 name: test1-mydnsproxying
spec:
 hosts:
 - aliyun.com
 location: MESH_EXTERNAL
 ports:
 - number: 443
   name: https
   protocol: TLS
 resolution: DNS
Step 2: Deploy a sample application
Obtain the KubeConfig file of the cluster and connect to the cluster by using kubectl.
Use the following content to create a file named sleep.yaml.
Run the following command to deploy the Sleep application.
kubectl apply -f sleep.yamlRun the following command to check whether the Sleep pod is successfully started.
kubectl get pod |grep sleepExpected output:
NAME                       READY   STATUS    RESTARTS   AGE
sleep-66cd8f684f-nxw8v     2/2     Running   0          16m
Step 3: Enable the DNS proxy feature for the Sleep container
Log on to the ACK console. In the left-side navigation pane, click Clusters.
On the Clusters page, find the cluster that you want to manage and click its name. In the left-side pane, choose .
On the Stateless page, in the Actions column on the right side of the target application, select .
In the Edit YAML dialog box, add the following annotations under the spec parameter, and then click Update.
annotations:
  proxy.istio.io/config: |
    proxyMetadata:
      ISTIO_META_DNS_CAPTURE: "true"
      ISTIO_META_DNS_AUTO_ALLOCATE: "true"
Restart the pod to apply the DNS configuration to the application.
Log on to the ACK console. In the left-side navigation pane, click Clusters.
On the Clusters page, find the cluster that you want to manage and click its name. In the left-side pane, choose .
On the Pods page, click Operation in the column of the target pod.
In the Prompt dialog box, click OK.
Wait for a while. The configuration takes effect after the container restarts.
Step 4: Verify whether the DNS proxy feature is successfully used
View the logs of the istio-init container.
Log on to the ACK console. In the left-side navigation pane, click Clusters.
On the Clusters page, find the cluster that you want to manage and click its name. In the left-side pane, choose .
On the Pods page, click the name of the Sleep container.
On the container details page, click the Logs tab and set Container to istio-init.
You can see the following logs.
-A OUTPUT -p udp --dport 53 -d 192.168.0.10/32 -j REDIRECT --to-port 15053
-A ISTIO_OUTPUT -p tcp --dport 53 -d 192.168.0.10/32 -j REDIRECT --to-ports 15053
The Sidecar proxy intercepts all DNS queries from the application container in the same way it intercepts other types of traffic through iptables rules. Istio adds additional iptables rules to redirect all DNS packets on port 53 (TCP and UDP) sent to the Kubernetes DNS service (such as the CoreDNS service) to port 15053.
View the ports that the pilot-agent process listens on.
In the left-side navigation pane of the details page, choose .
On the Pods page, click Operation Terminal in the istio-proxy column of the Sleep container, and then click .
Run the following command in the istio-proxy container to view the ports that the pilot-agent process listens on.
netstat -anp |grep 15053Expected output:
tcp        0      0 127.0.0.1:15053         0.0.0.0:*               LISTEN      1/pilot-agent
udp        0      0 127.0.0.1:15053         0.0.0.0:*                           1/pilot-agent
DNS queries are redirected to the pilot-agent process running in the Sidecar proxy container. You can see that this process is listening on port 15053.
Access aliyun.com.
In the left-side navigation pane of the details page, choose .
On the Pods page, click Operations in the column to the right of the Sleep container, and then click Terminal. Click sleep.
Run the following command in the Sleep container to access aliyun.com.
curl -v https://aliyun.comExpected output:
*   Trying 240.240.**.**:443...
* Connected to aliyun.com (240.240.**.**) port 443 (#0)
You can see that the returned address is 240.240.**.**, which is a virtual IP automatically assigned by Service Mesh, not the actual public IP address. Service Mesh uses iptables to intercept requests to kube-dns and routes them to the Sidecar Proxy running in the pod. When the application pod resolves aliyun.com to a virtual IP and sends a request, the virtual IP is replaced with the actual public IP address resolved in the Sidecar Proxy.
Enable debug logs for the DNS proxy
After you enable debug logs for the DNS proxy and pilot-agent, pilot-agent records each DNS query from the application container.
Log on to the ACK console. In the left-side navigation pane, click Clusters.
On the Clusters page, find the cluster that you want to manage and click its name. In the left-side pane, choose .
On the Stateless page, in the Actions column on the right side of the target application, select .
In the Edit YAML dialog box, add the following annotations under the spec parameter, and then click Update.
annotations:
  sidecar.istio.io/agentLogLevel: "dns:debug"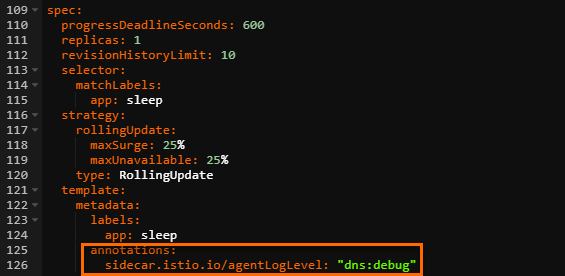
Run the following command in the cluster to view the debug logs.
kubectl logs -n default sleep-85fdfd8896-2ctq4 -c istio-proxy | grep debugYou can see
found=truein the logs, which indicates that the DNS query found the domain name in the local registry and will resolve it.