Background
During model iteration and deployment, you often need to confirm that new or modified features work as expected. Sometimes, a feature changes online, but the model's final output score does not change. This makes it difficult to determine the feature's effectiveness. This document describes a systematic method for analyzing and verifying that a model correctly receives and processes features.
Prerequisites
A model service for sorting is deployed, for example, on PAI-EAS.
A PAI-Rec engine service is deployed. The engine or AB test configuration is set up to call the model service and use the target feature.
Verify that features are effective
The core method is to capture a live request, save its feature data locally, modify specific feature values, and then send the request again. You can observe the changes to the feature before it enters the model to determine whether it is processed correctly.
Step 1: Capture feature data from an online request
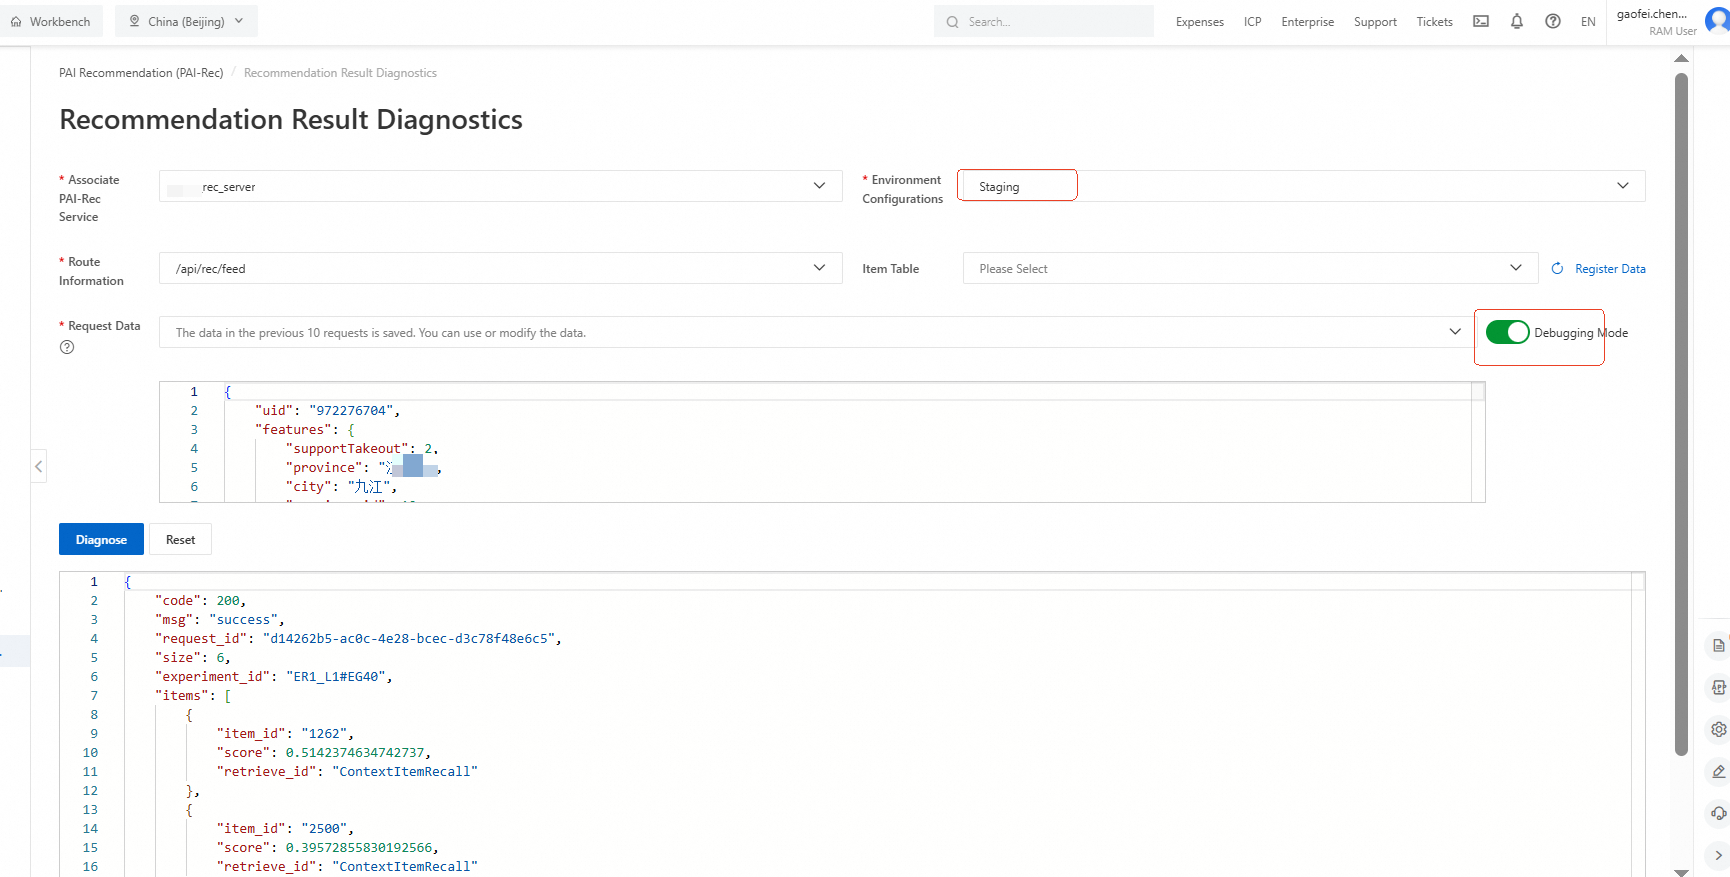
Send a debug request to the recommendation engine service. Log on to the PAI-Rec console. In the navigation pane on the left, click Troubleshooting Tools > Recommendation Diagnosis. Select the environment, enable debug mode, and click Diagnose to send the request.
Ensure that the request is routed to the model service that you want to verify, for example, using a user whitelist or setting the traffic to 100%. When the model service receives a debug request, it automatically saves the feature data from the engine in Protobuf (PB) format to the service's mounted directory.
Locate and download the feature file. Go to the PAI-EAS console and find the corresponding model service instance.
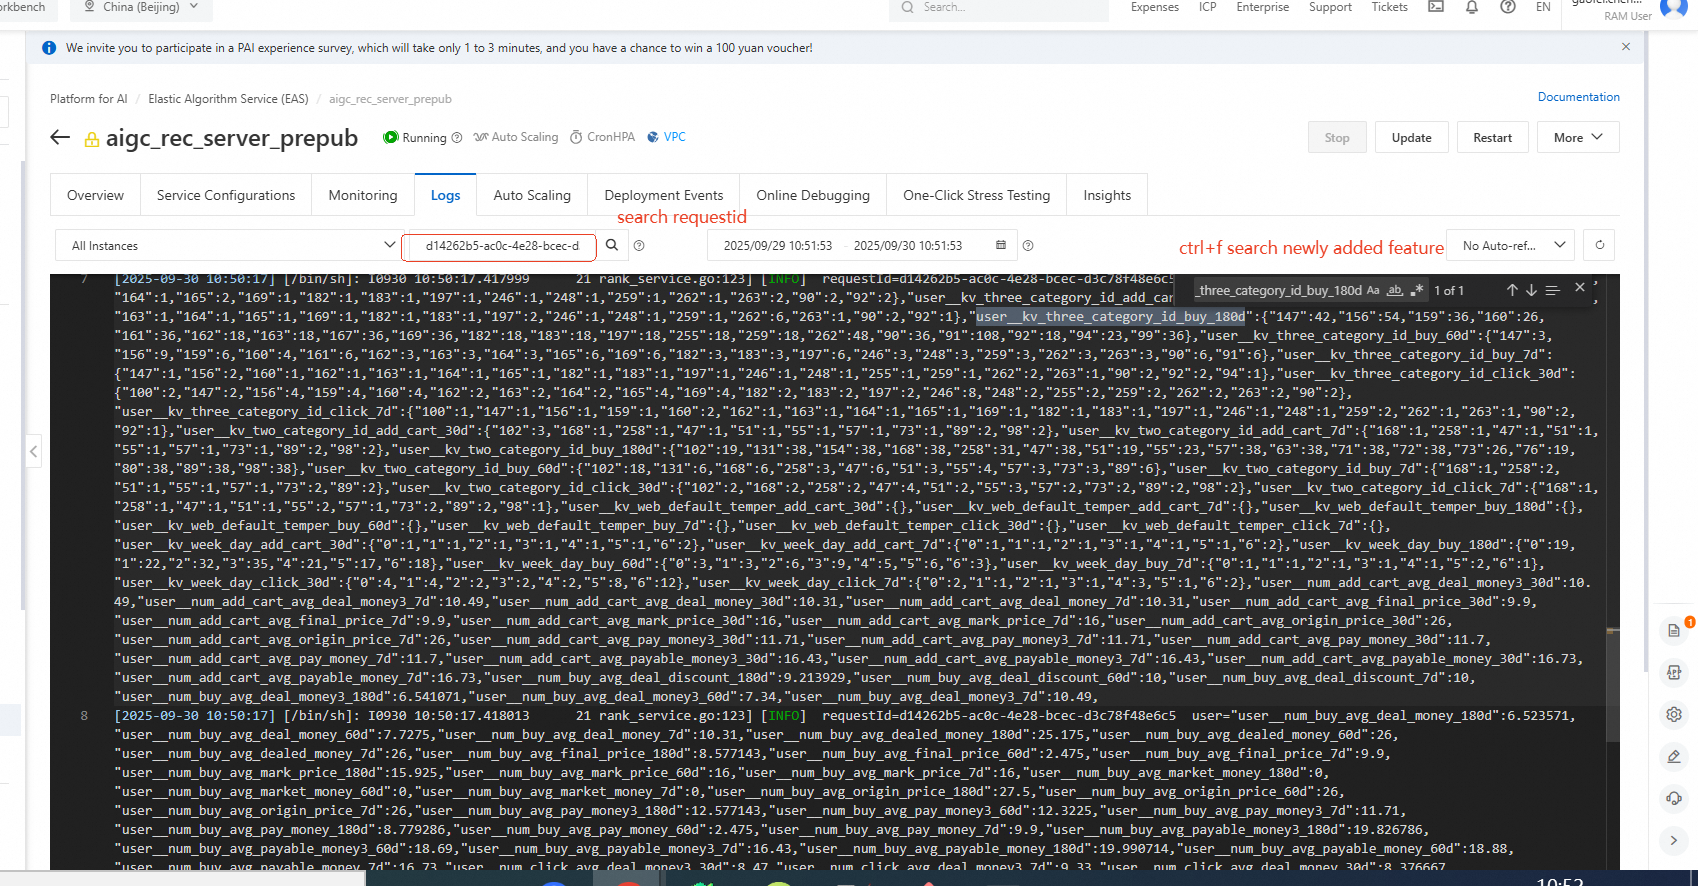
View the request in the EAS console. Open the relevant EAS model service. On the Logs page, search for the debug request by its request ID to view the corresponding feature names.
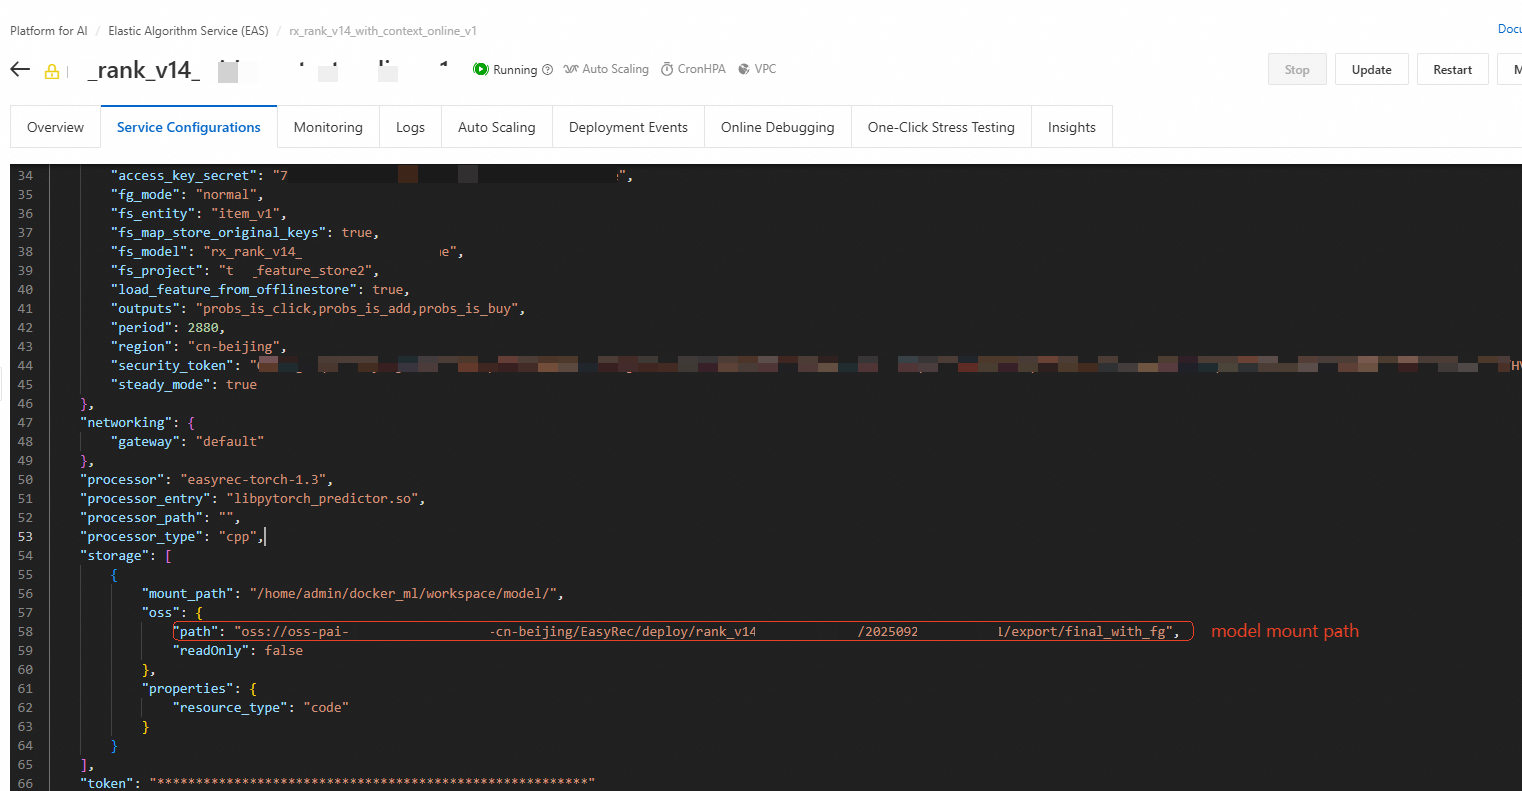
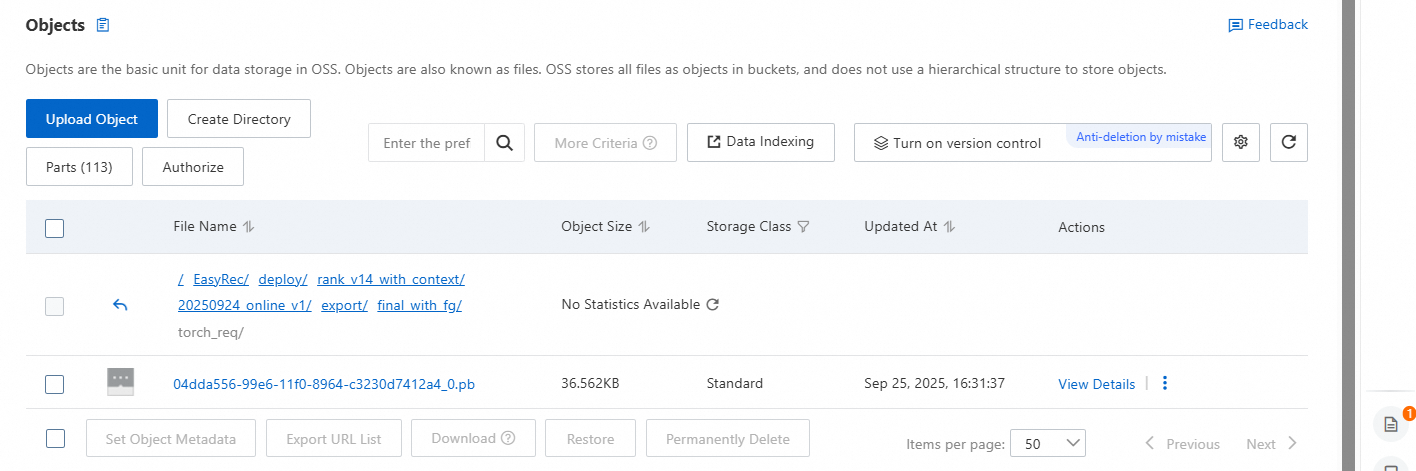
Download the feature file. If searching by request ID does not provide enough information for your analysis, you can find the model's mount path and download the feature file in PB format.
Step 2: Local analysis and controlled experiment
Use the following Python script to parse the downloaded PB file, modify features, and send another request to the model to observe internal data changes.
Execute the following analysis script.
## pip install -U eas-prediction --user to install the eas_prediction package
from eas_prediction import PredictClient
from eas_prediction.torchrec_request import TorchRecRequest
from eas_prediction.torchrec_predict_pb2 import PBRequest
from google.protobuf import text_format

def read_pb_and_request_and_save(path, str_path, client, req):
    with open(path, 'rb') as f:
        pb_data = f.read()
    pb_req = PBRequest()
    pb_req.ParseFromString(pb_data)
    req.request_data = pb_req
    resp = client.predict(req)
    print(resp)
    with open(str_path,'w',encoding='utf-8') as f:
        f.write(str(pb_req))

def predict_new_pb(str_path,debug_feature_path,client,req):
    with open(str_path, 'r', encoding='utf-8') as f:
        pb_data = f.read()
    pb_req = PBRequest()
    text_format.Merge(pb_data, pb_req)
    req.request_data = pb_req
    req.set_debug_level(2)
    resp = client.predict(req)
    with open(debug_feature_path, 'w', encoding='utf-8') as f:
        f.write(str(resp))

if __name__ == '__main__':
    path = 'torch_req/on_line.pb'  # Path to the downloaded local PB file
    str_path = 'torch_req/on_line.txt'  # Path to save the string parsed from the local PB file
    debug_feature_path = 'torch_req/on_score.txt' # Path to save the raw features (all features before FG) and generated features (all features after FG) from the request
    # Model URL configuration
    client = PredictClient('173xxxx.cn-beijing.pai-eas.aliyuncs.com', '{model_name}')
    # Model token
    client.set_token('eas_token==')
    client.init()
    req = TorchRecRequest()
    # 1. First, call read_pb_and_request_and_save to send a request and save the PB file as a string.
    # 2. Modify the features that you want to change.
    # 3. Comment out read_pb_and_request_and_save and run predict_new_pb.
    read_pb_and_request_and_save(path,str_path,client,req)
    # predict_new_pb(str_path,debug_feature_path,client,req)
Generate the readable feature file on_line.txt. Configure
pathandstr_path, and then callread_pb_and_request_and_save. This generates anon_line.txtfile that contains all the request features in a clear, readable format.Modify features and conduct a controlled experiment. Open the
on_line.txtfile, find the feature you are interested in, and manually modify its value. For example, you can change a numerical feature from0.1to0.9, or replace an ID feature with another value. The retrieved collection often contains many items. You can reduce the number of items and modify the features for only a few of them.Obtain the debug output. Save the modified
on_line.txtfile, and then run thepredict_new_pbfunction in the script. Remember to comment outread_pb_and_request_and_save. This function sends another request to the model using your modified features and saves detailed debug information, includingraw_featuresandgenerate_features, toon_score.txt.
Result validation. Open the
on_score.txtfile to view two sets of key information:raw_features: The original features received by the model service. These features have been pre-processed (for example, through table lookups or concatenation) but have not been encoded by the Feature Generation (FG) operator.generate_features: The features that are encoded by the FG operator and finally input into the model for scoring.
Use the following checks to confirm that the feature is effective:
Check
raw_features: Confirm that your modified feature and its new value appear correctly inraw_features. This confirms that the feature was successfully passed to the model service.Check
generate_features: Observe how the feature appears ingenerate_featuresafter FG encoding. If your modification (for example, from0.1to0.9) causes a change in the corresponding embedding ID or numerical value ingenerate_features, then the online processing logic for the feature is working correctly.
Troubleshooting: Feature changes but model score does not
If you confirm that generate_features changes along with your modifications but the final model score remains the same, this usually means that the feature's weight in the model is almost zero. This is a model performance issue, not an engineering pipeline issue.
However, if you modify raw_features but generate_features remains unchanged even after multiple attempts, the problem is likely that the processing logic of the online FG operator is not working as expected. You can perform offline validation:
Find the FG configuration file: In your model project, find the FG encoder feature configuration file used for fine-grained sorting.
Simulate offline execution: Use a tool such as
pyfgto perform the FG transformation locally. Use the feature values observed inraw_featuresas input.Compare the results: Compare the output from the offline
pyfgtool with the onlinegenerate_featuresvalues.If they match: The online FG logic correctly executed your configuration.
If they do not match: This indicates a discrepancy between the online and offline environments that requires further investigation.