Container Registry Enterprise Edition integrates two scan engines to detect security vulnerabilities in your container images before they reach production. This topic describes how to scan a single image, configure batch scanning rules, view scan results, and fix detected vulnerabilities.
Overview
ACR scans container images for system vulnerabilities, application vulnerabilities, baseline configuration risks, and malicious samples. Scanning is triggered automatically when an image is pushed to a repository, or manually on demand.
ACR supports two scan engines. Use the following table to select the engine that fits your requirements.
Only images stored in Container Registry Enterprise Edition instances can be scanned. Personal Edition instances are not supported.
Prerequisites
Before you begin, verify that the following requirements are met:
-
You have a Container Registry Enterprise Edition instance.
-
(Security Center engine only) You have a virtual private cloud (VPC) configured. The Security Center engine routes traffic through the VPC during scanning.
-
(Security Center engine only, first-time use) You have accessed the Security Center console at least once. On first access, Security Center automatically creates the AliyunServiceRoleForSas service-linked role.
-
(Security Center engine only) You have authorized Container Registry to call Security Center API operations using the AliyunContainerRegistryAccessingSASRole RAM role. See Activate the Security Center scan engine for details.
Limits
Trivy scan engine: The recommended maximum size for a single image layer is no more than 3 GB. If a layer exceeds this size, the scan may fail. Use the Security Center scan engine for images with layers larger than 3 GB.
Scan a single image
To scan a single container image, perform the following steps:
Log on to the Container Registry console.
In the top navigation bar, select a region.
In the left-side navigation pane, click Instances.
On the Instances page, click the Enterprise Edition instance that you want to manage.
In the left-side navigation pane of the management page of the Enterprise Edition instance, choose .
-
In the upper-right corner of the Image Scanning page, confirm that the active scan engine is the one you want to use. To switch engines, click Switch and select the desired engine.
-
In the left-side navigation pane of the instance management page, choose Repository > Repositories.
-
On the Repositories page, click the name of the target repository.
-
In the left-side navigation pane of the repository management page, click Tags. Find the image tag that you want to scan and click Security Scan in the Actions column.
The scan starts immediately. When the Status column shows Completed, the scan is finished. Click the link in the Security Scan column to view the results.
Scan a group of images
Use scan rules to apply the same scan configuration to multiple images in a namespace or repository. Scan rules also support automatic notifications when vulnerabilities are detected.
Setting up batch scanning involves four steps: selecting a scan engine, creating a scan rule, running a scan, and viewing results.
-
Step 1: Select a scan engine.
-
To use the Trivy Scan Engine, no additional setup is required. Proceed to Step 2: Create a scan rule.
-
To use the Security Center Scan Engine, continue with the activation steps below.
Activate the Security Center scan engine (first-time setup):
If you have already purchased a Security Center scan engine, it appears automatically on the Image Scanning page. No further steps are required — proceed to Step 2: Create a scan rule.
If you have not yet purchased the Security Center scan engine, perform the following steps:
-
Click here to open the Cloud Resource Access Authorization page.
-
On the Cloud Resource Access Authorization page, click Agree to Authorization.
-
On the Image Scanning page, click Upgrade Security Center Scan Engine Now in the Scan Information section.
-
Set the Security Scan parameter to Security Center Scan Engine, configure other parameters as needed, click Buy Now, and complete the payment.
Return to the Image Scanning page. Confirm that Security Center Scan Engine is now shown in the upper-right corner.
NoteTo enable image synchronization after purchasing the Security Center scan engine, click Settings in the Scan Information section, select Sync in the Tips dialog box, and then click OK. After synchronization is enabled, Container Registry automatically notifies Security Center when instances are deleted, images are pushed or pulled, or image repositories are deleted.
-
-
Step 2: Create a scan rule.
-
In the Scan Rules section of the Image Scanning page, click Create Rule.
-
In the Scan Rules step of the Create Rule wizard, enter a name in the Rule Name field, configure the Scope, and click Next.
You can configure the scan scope in one of two ways:
-
By namespace: Set Scope to namespace and enter a regular expression for the image tag filter.
-
By repository: Set Scope to Repository, select a namespace from the Namespace drop-down list and a repository from the Repository drop-down list, then enter a regular expression for the image tag filter.
-
-
Optional: In the Event Notification step, configure a notification method for scan alerts.
Notification method Required information DingTalk Webhook URL and secret token of the DingTalk chatbot HTTP HTTP URL HTTPS HTTPS URL -
Click Next to complete the wizard and save the scan rule.
-
-
Step 3: Run a scan manually.
After the scan rule is saved, you can trigger a scan immediately.
-
In the Scan Rules section of the Image Scanning page, find the rule you created and click Scan in the Actions column.
-
In the Task List section, monitor the task. When the Status column shows Completed, the scan is finished.
NoteImages are also scanned automatically when they are pushed to a repository. Manual scanning is optional.
-
-
Step 4: View scan results.
-
In the Task List section of the Image Scanning page, find the completed task and click View Task in the Actions column.
-
On the Task Details page, click View Details in the Actions column.
The Security Scan page opens and displays the detected vulnerabilities for that image.
NoteIf the scan rule covers multiple images, the Task Details page lists a separate entry for each image. Click View Details for each entry to review results individually.
-
View scan results
After a scan completes, navigate to the Security Scan page to review findings. The results interface differs by engine.
Trivy scan engine results
On the Security Scan page, view detected system and application vulnerabilities. By default, results are sorted by severity in the following order: Unknown, Low, Medium, High.
Due to limitations of the Trivy scan engine, the exact file locations of some system and application vulnerabilities may not be identified.
Security Center scan engine results
On the Security Scan page, click the System Vulnerabilities, Application Vulnerabilities, Baseline Risks, or Malicious Samples tab to view the corresponding findings. By default, results on each tab are sorted by severity in the following order: Unknown, Low, Medium, High.
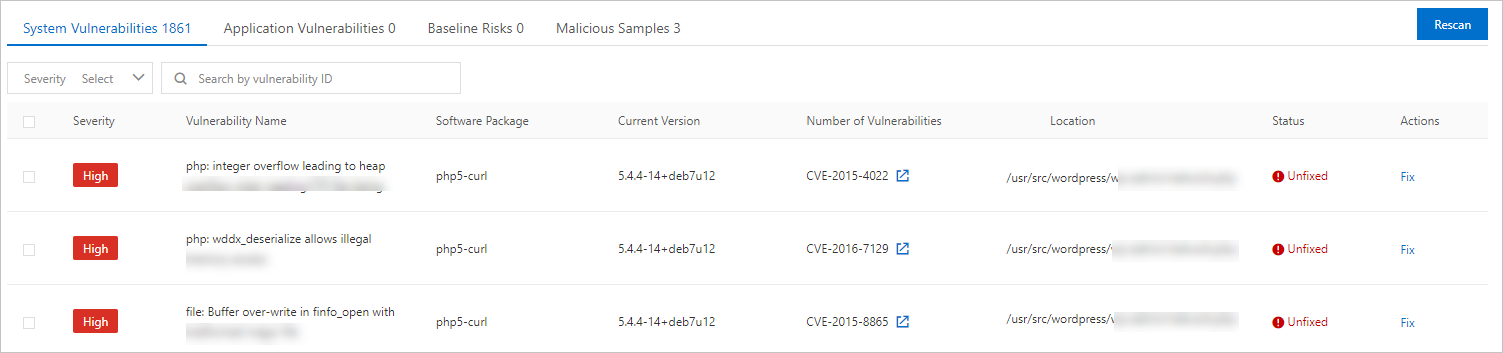
Fix system vulnerabilities
Applies to: Security Center scan engine only. The Trivy scan engine does not support one-click vulnerability fixes.
The Security Center scan engine provides an automated fix action for detected system vulnerabilities. To fix a vulnerability, perform the following steps:
On the Security Scan page, find the vulnerability that you want to fix and click Fix in the lower part of the page. In the Fix dialog box, set whether the fixed image overwrites the original image and click Fix Now.
After the fix operation completes, wait 10 minutes and then check the Tags page. A fixed image is automatically created with the same name as the original image plus the suffix _fixd. For example, if the original image is named myapp:1.0, the fixed image is named myapp:1.0_fixd.
After the image is fixed, the _fixd suffix is appended to the original name of the image. After verifying the fix, update any deployment configurations that reference the original image tag to point to the new _fixd image.
References
GetRepoTagScanStatus API — Query the scan status of a container image tag programmatically. Use this API to integrate image scan gating into CI/CD pipelines.