Container Registry integrates with EventBridge to send notifications when image-related events occur. You can configure event rules to receive alerts via DingTalk, HTTP, or HTTPS when image synchronization, image builds, image scans, delivery chain execution, or image signing completes.
Prerequisites
Before you begin, ensure that you have:
-
A Container Registry Enterprise Edition instance. For more information, see Create a Container Registry Enterprise Edition instance.
-
EventBridge activated. For more information, see Activate EventBridge and grant permissions to a RAM user.
Limitations
-
The event notification feature is not available in the China East 1 Finance, China East 2 Finance, China South 1 Finance, China North 2 Ali Gov 1, and UK (London) regions.
-
Each region supports a maximum of 10 event rules, counted separately in Container Registry and EventBridge. If you reach the limit, delete unused rules before creating new ones.
-
DingTalk chatbots have a rate limit of 20 messages per minute. If notifications exceed this limit, the chatbot is throttled for 10 minutes.
-
Event traces can only be queried by event ID within 3 days of the event occurring.
Supported event types
| Event type | Trigger condition |
|---|---|
cr:Artifact:SynchronizationCompleted |
Image synchronization succeeds, fails, or is canceled |
cr:Artifact:BuildCompleted |
Image build succeeds, fails, or is canceled |
cr:Artifact:ScanCompleted |
Image scan succeeds or fails |
cr:Artifact:DeliveryChainCompleted |
Delivery chain processing succeeds, fails, is canceled, or is denied |
cr:Artifact:SigningCompleted |
Image signing succeeds or fails |
Step 1: Create a DingTalk chatbot
Skip this step if you use HTTP or HTTPS notifications.
-
Open the DingTalk group chat where you want to receive notifications, and click the
 icon in the upper-right corner.
 -
In the Group Settings panel, click Group Assistant.
-
In the Group Assistant dialog box, click Add robot, then click the
 icon next to Add robot.
 -
In the ChatBot dialog box, click Custom.
-
In the Robot details dialog box, click Add.
-
In the Add robot panel, enter a chatbot name, select Sign and Read and agree to "DingTalk Custom Robot Service Terms of Service", then click Complete. Click Complete again.
-
In the ChatBot dialog box, click the
icon next to the chatbot you created. -
In the Settings dialog box, copy the webhook address and signing key, then click Complete.
Step 2: Create an event rule
-
Log on to the Container Registry console.
-
In the top navigation bar, select a region.
-
In the left-side navigation pane, click Instances.
-
On the Instances page, click the Enterprise Edition instance you want to manage.
-
In the left-side navigation pane of the instance details page, choose Instances > Event Notification.
-
On the Event Rules tab, click Create Rule.
-
In the Event Scope step, configure the following parameters and click Next.
Parameter Description Rule name A name for the event rule. Event type The event that triggers notifications. Select one from the supported event types. For image scan events, select cr:Artifact:ScanCompleted, then select Scanned.Effective scope The scope within which the rule applies: Instance (all image tags matching a regular expression in the instance), Namespace (image tags in a selected namespace matching a regular expression), or Repository (image tags in a selected namespace and repository matching a regular expression). -
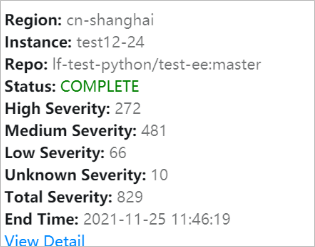
In the Event Notification step, select a notification type and click Save. After saving, an event rule with the same name is automatically created in the default EventBridge event bus using the default DingTalk notification template. When an image scan succeeds, the DingTalk group receives a notification similar to the following:
-
DingTalk: Enter the webhook address and signing key from Step 1.
-
HTTP: Enter the HTTP endpoint URL.
-
HTTPS: Enter the HTTPS endpoint URL.
-
If you modify an event rule in EventBridge and then modify the same rule in Container Registry, the Container Registry configuration overwrites the EventBridge configuration. For example, if you update the notification template in EventBridge and then update the effective scope in Container Registry, the Container Registry default template overwrites your EventBridge customization.
View event traces
To troubleshoot event delivery, view the event trace in EventBridge.
-
Log on to the Container Registry console.
-
In the top navigation bar, select a region.
-
In the left-side navigation pane, click Instances.
-
On the Instances page, click the Enterprise Edition instance you want to manage.
-
In the left-side navigation pane of the instance details page, choose Instances > Event Notification.
-
On the Event Notification page, click the Event History tab, then click View Details in the Actions column for the event you want to investigate.
-
In the EventBridge console, on the Query by Event ID tab, click Event Trace in the Actions column. The Event Trace dialog box shows details about event receipt and delivery.
Event traces can only be queried by event ID within 3 days of the event occurring.
What's next
To update event rule settings such as the notification type, modify the event rule directly in EventBridge. For more information, see Modify event targets.