This topic describes how to use Harbor's remote replication to synchronize images from a self-managed Harbor to a Container Registry Enterprise Edition instance for geo-disaster recovery.
If you do not want to use Harbor's remote replication for synchronization, or if you need faster synchronization, see Migrate a self-managed Harbor to Container Registry Enterprise Edition in 10 minutes.
Prerequisites
Create a Container Registry Enterprise Edition instance. For more information, see Create an Enterprise Edition instance.
Procedure
Synchronize images from Harbor to Container Registry
If Harbor is deployed in an on-premises data center, first connect the data center to the VPC. For more information, see Access an Enterprise Edition instance across regions or from a data center.
Step 1: Create a namespace
Log on to the Container Registry console.
In the top navigation bar, select a region.
In the left-side navigation pane, click Instances.
On the Instances page, click the target Enterprise Edition instance.
On the management page of the Enterprise Edition instance, choose .
On the Namespace page, click Create Namespace.
In the Create Namespace sidebar, set the Namespace name, and On or Off Automatically Create Repository. Click Confirm.
Parameter
Description
Namespace
Enter the name of the Harbor project to synchronize. Example: test-project.
Automatically Create Repository
Select On.
NoteIf you select Off, you must create the corresponding repository in Container Registry Enterprise Edition before you synchronize images.
Step 2: Configure a destination registry in Harbor
Log on to Harbor.
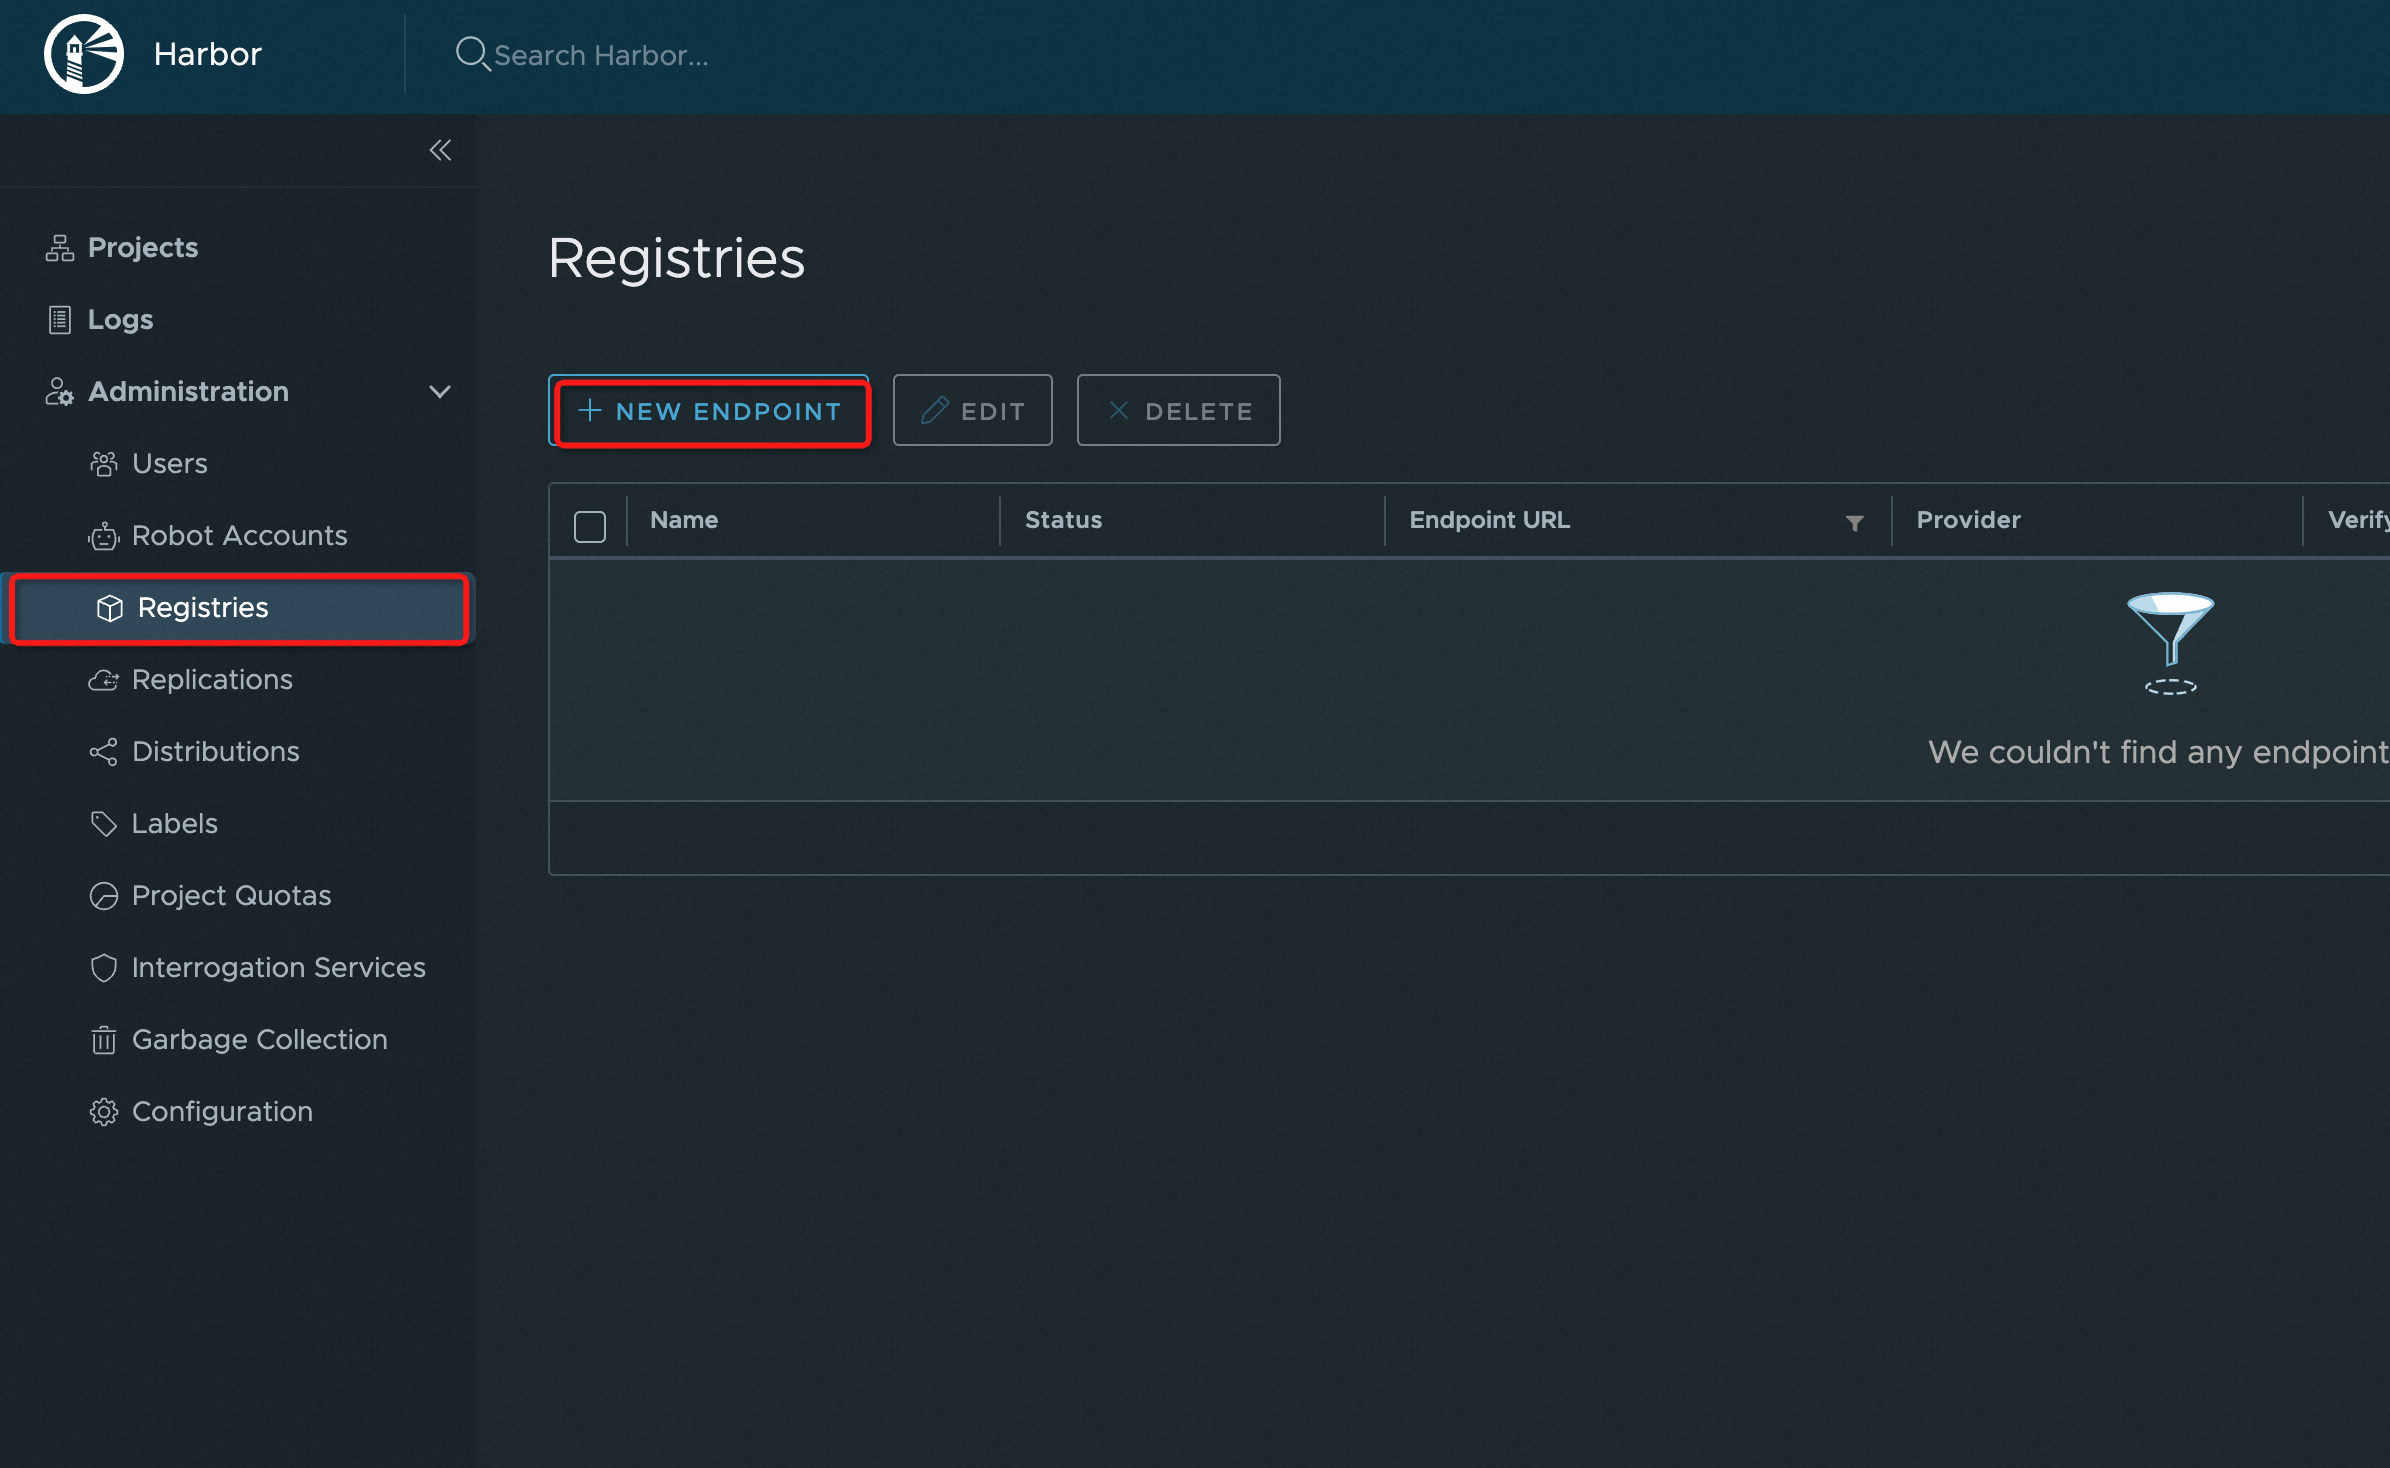
In the navigation pane on the left, choose .
On the Repository page, click NEW ENDPOINT.
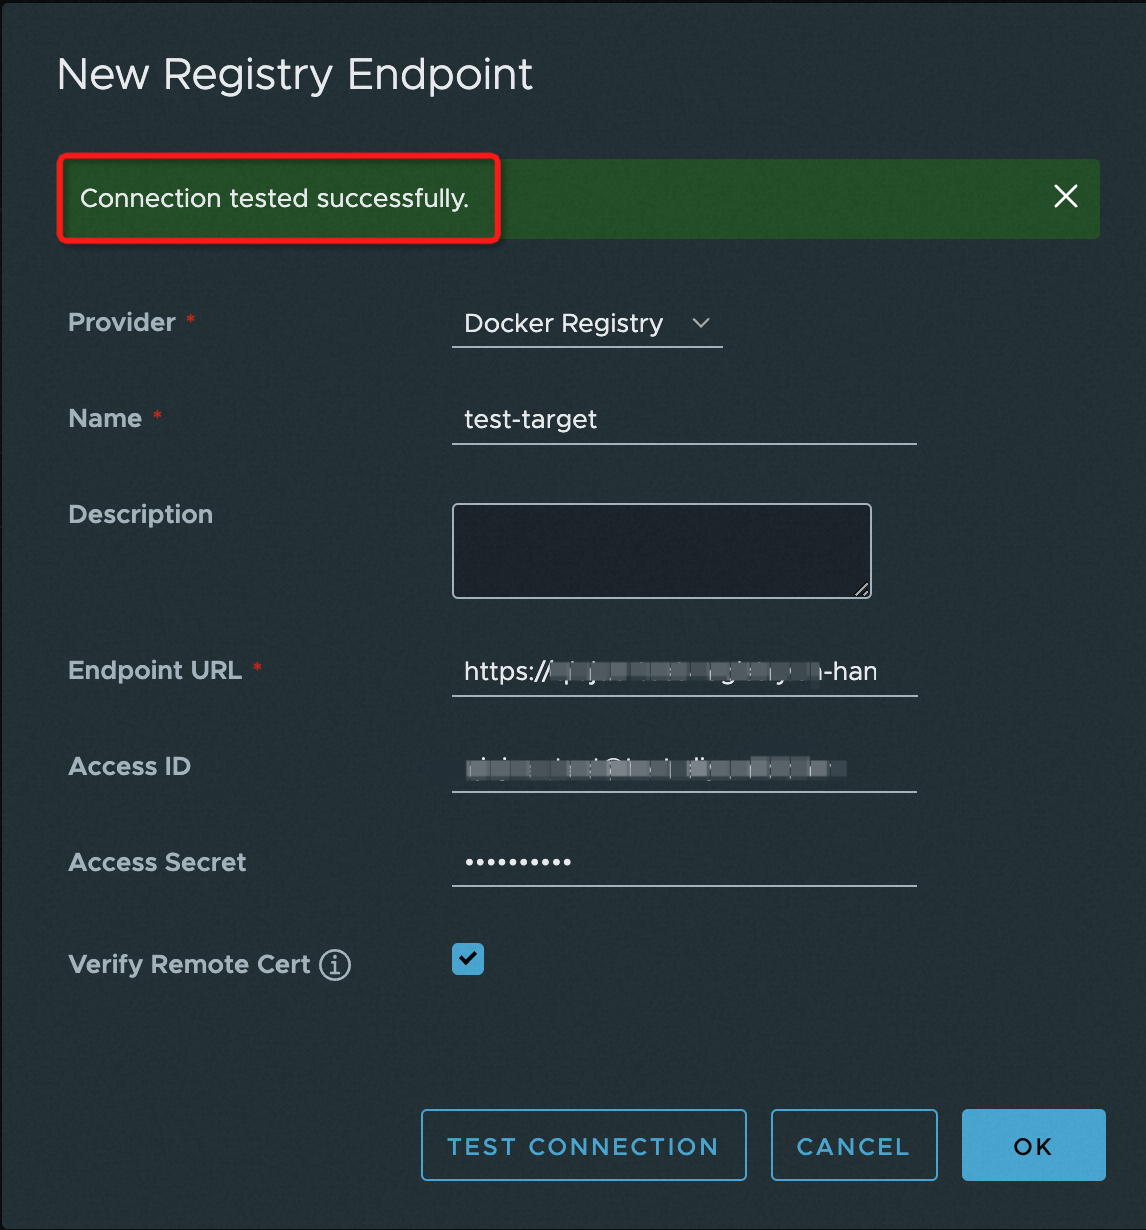
In the New Endpoint dialog box, configure the parameters.
Parameter
Description
Provisioner
Select Docker Registry.
Endpoint Name
Enter a custom name.
Description
Enter a custom description.
Endpoint URL
Enter the endpoint URL of the destination Container Registry Enterprise Edition instance. Make sure that access control is enabled. For more information, see Configure access control over a VPC and Configure access control over the internet.
VPC:
Example:
https://<instance-name>-registry-vpc.cn-qingdao.cr.aliyuncs.com.internet:
Example:
https://<instance-name>-registry.cn-qingdao.cr.aliyuncs.com.
Access ID
The username for your Alibaba Cloud account.
Password
Your Container Registry login password. For more information, see Use a permanent password.

After you configure the parameters, click Test Connection. If the Connection tested successfully message appears, click Confirm.
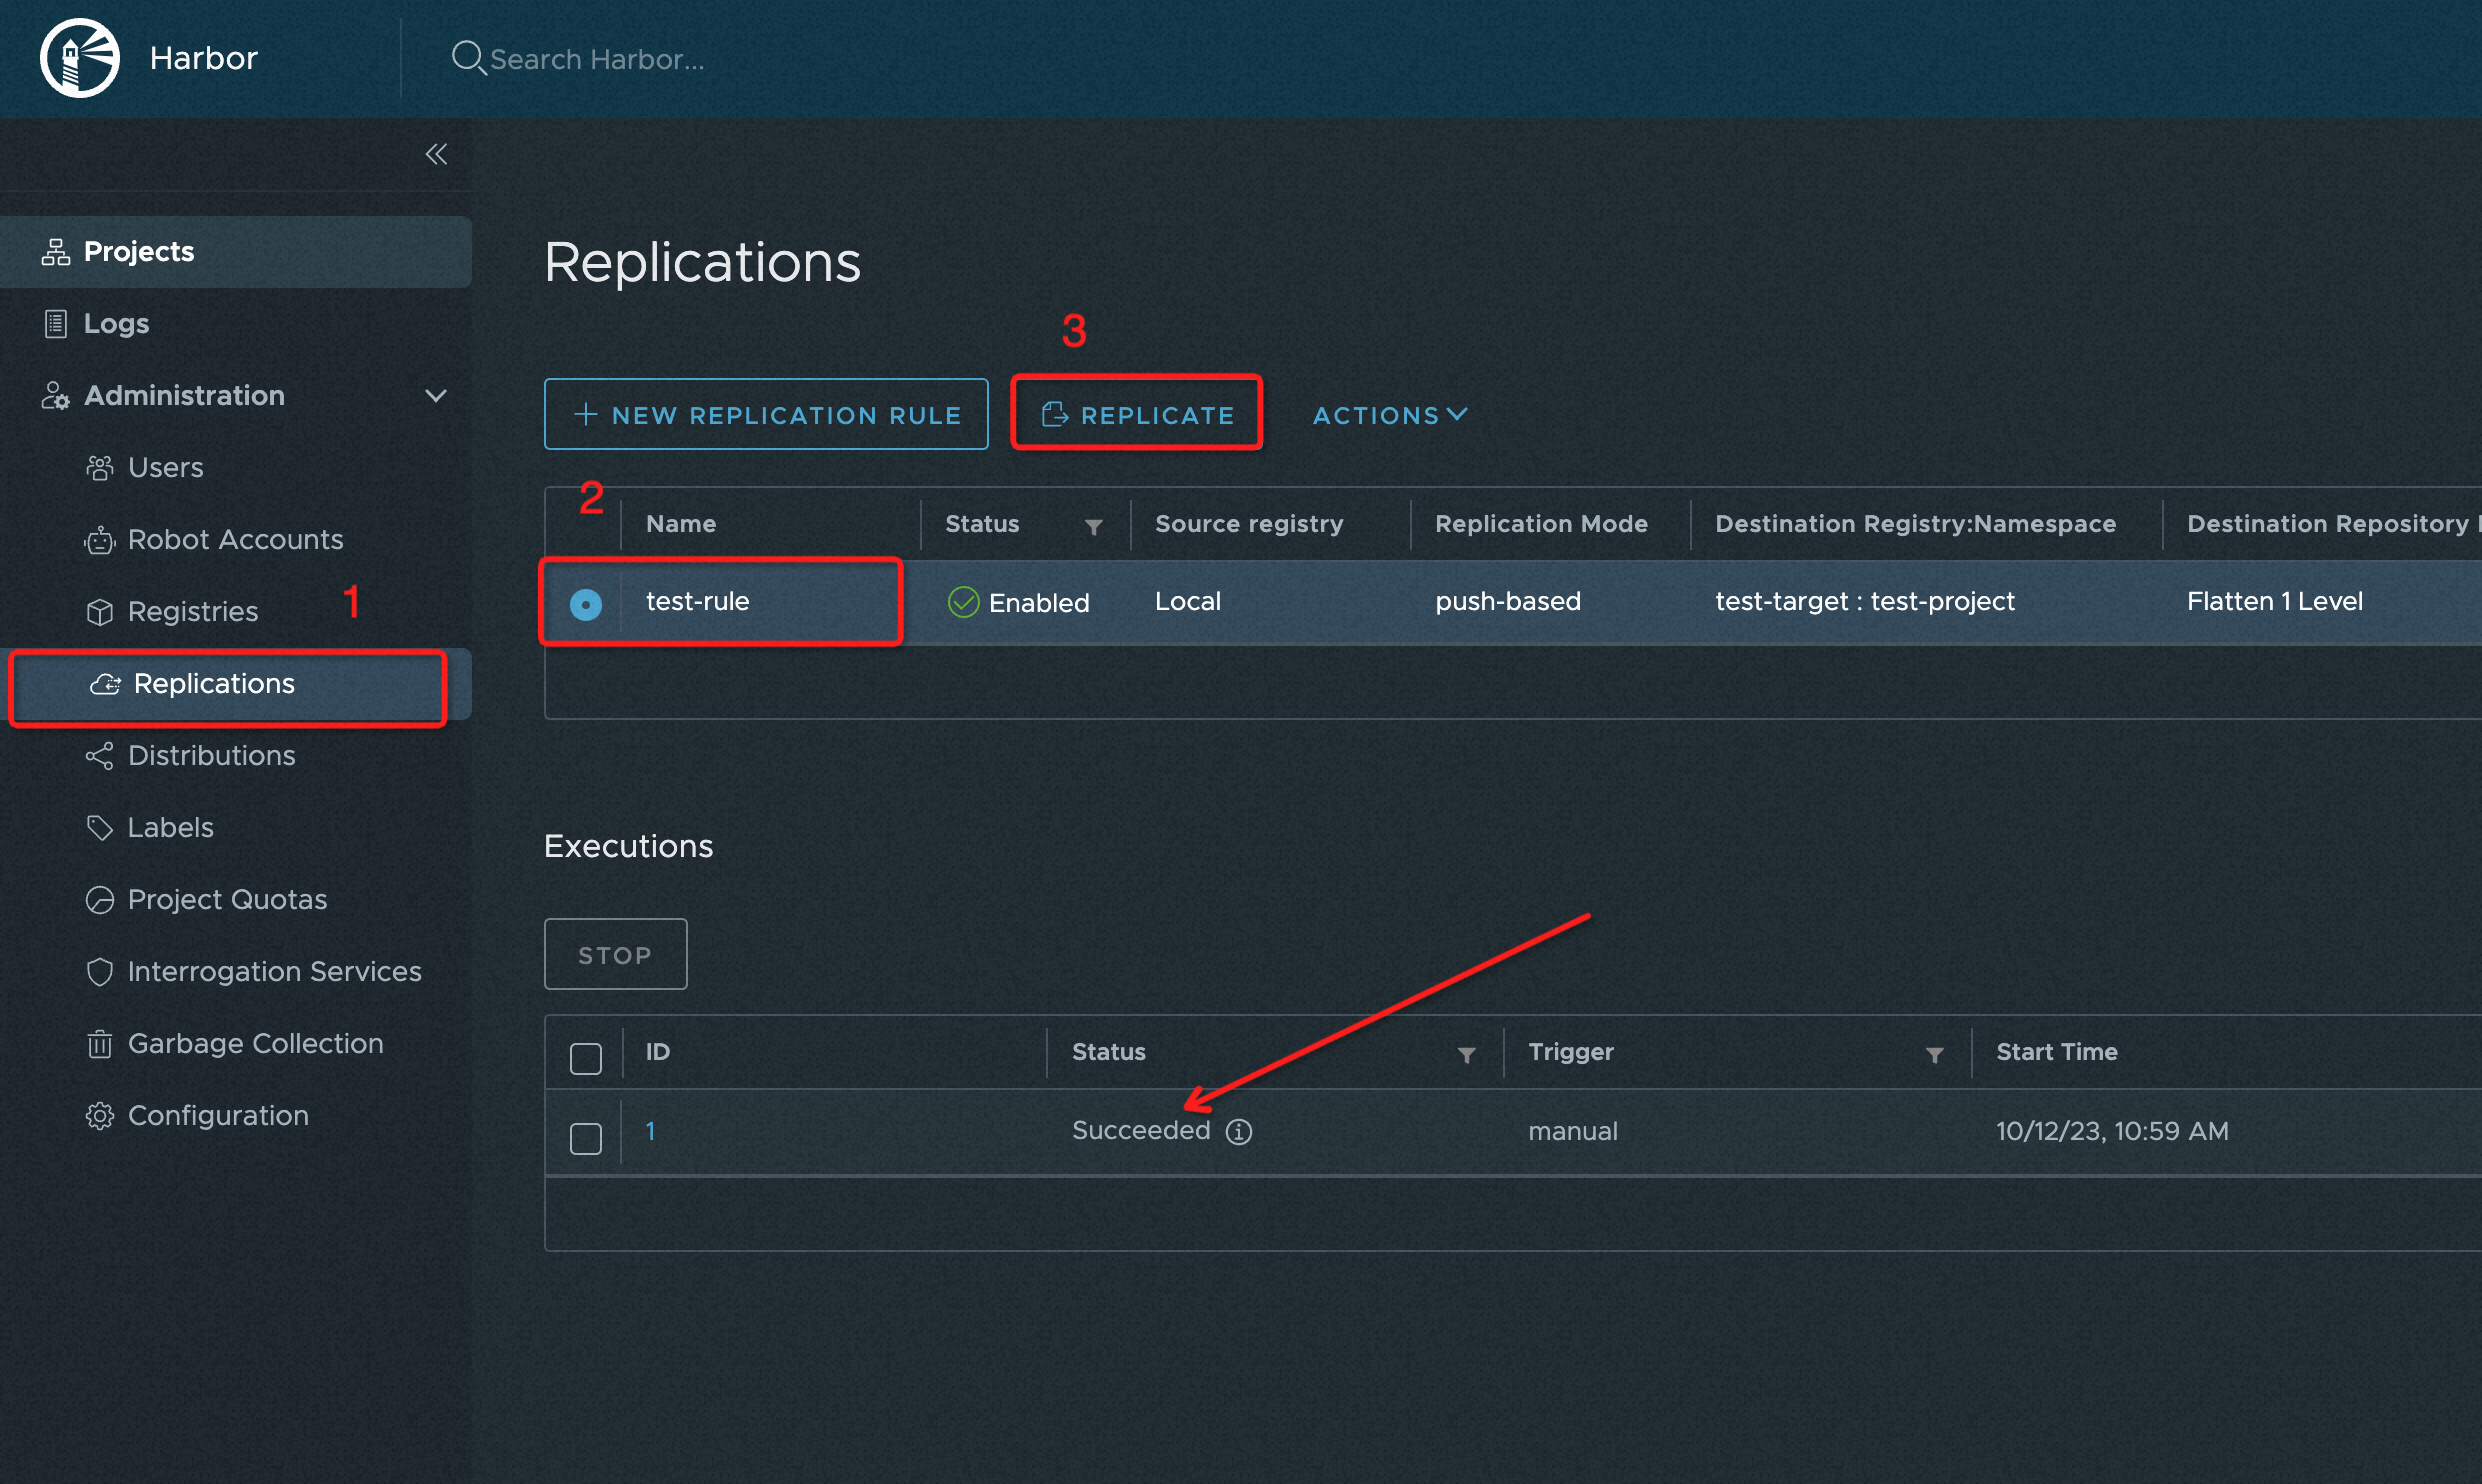
Step 3: Configure a replication rule
Log on to Harbor.
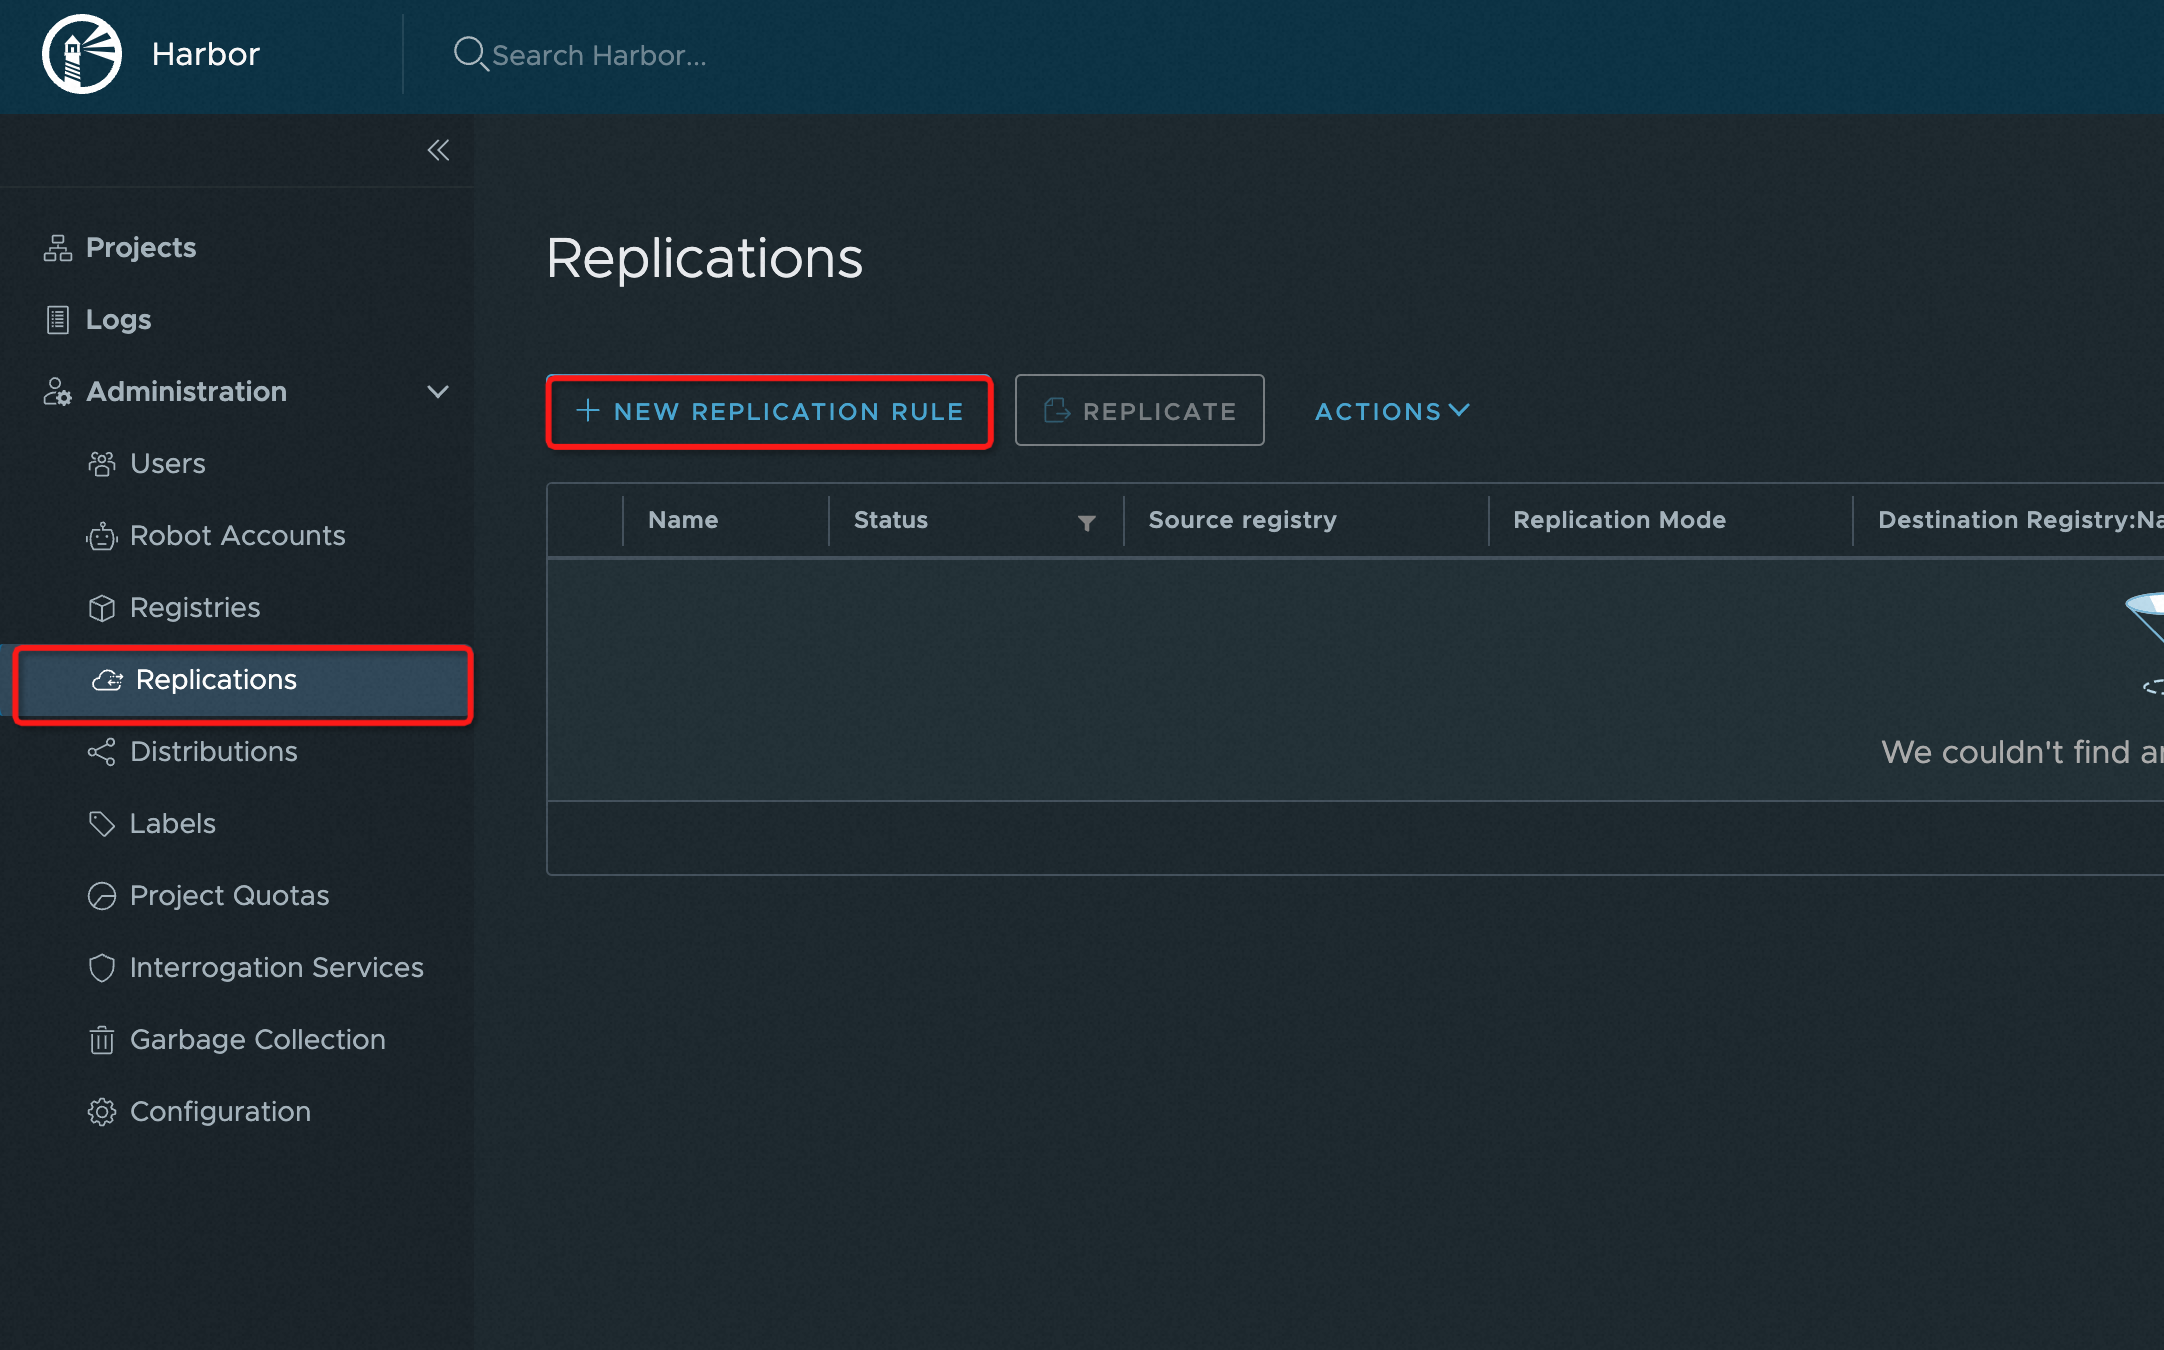
In the navigation pane on the left, choose System Management > Replications.
On the Replications page, click Create Rule.
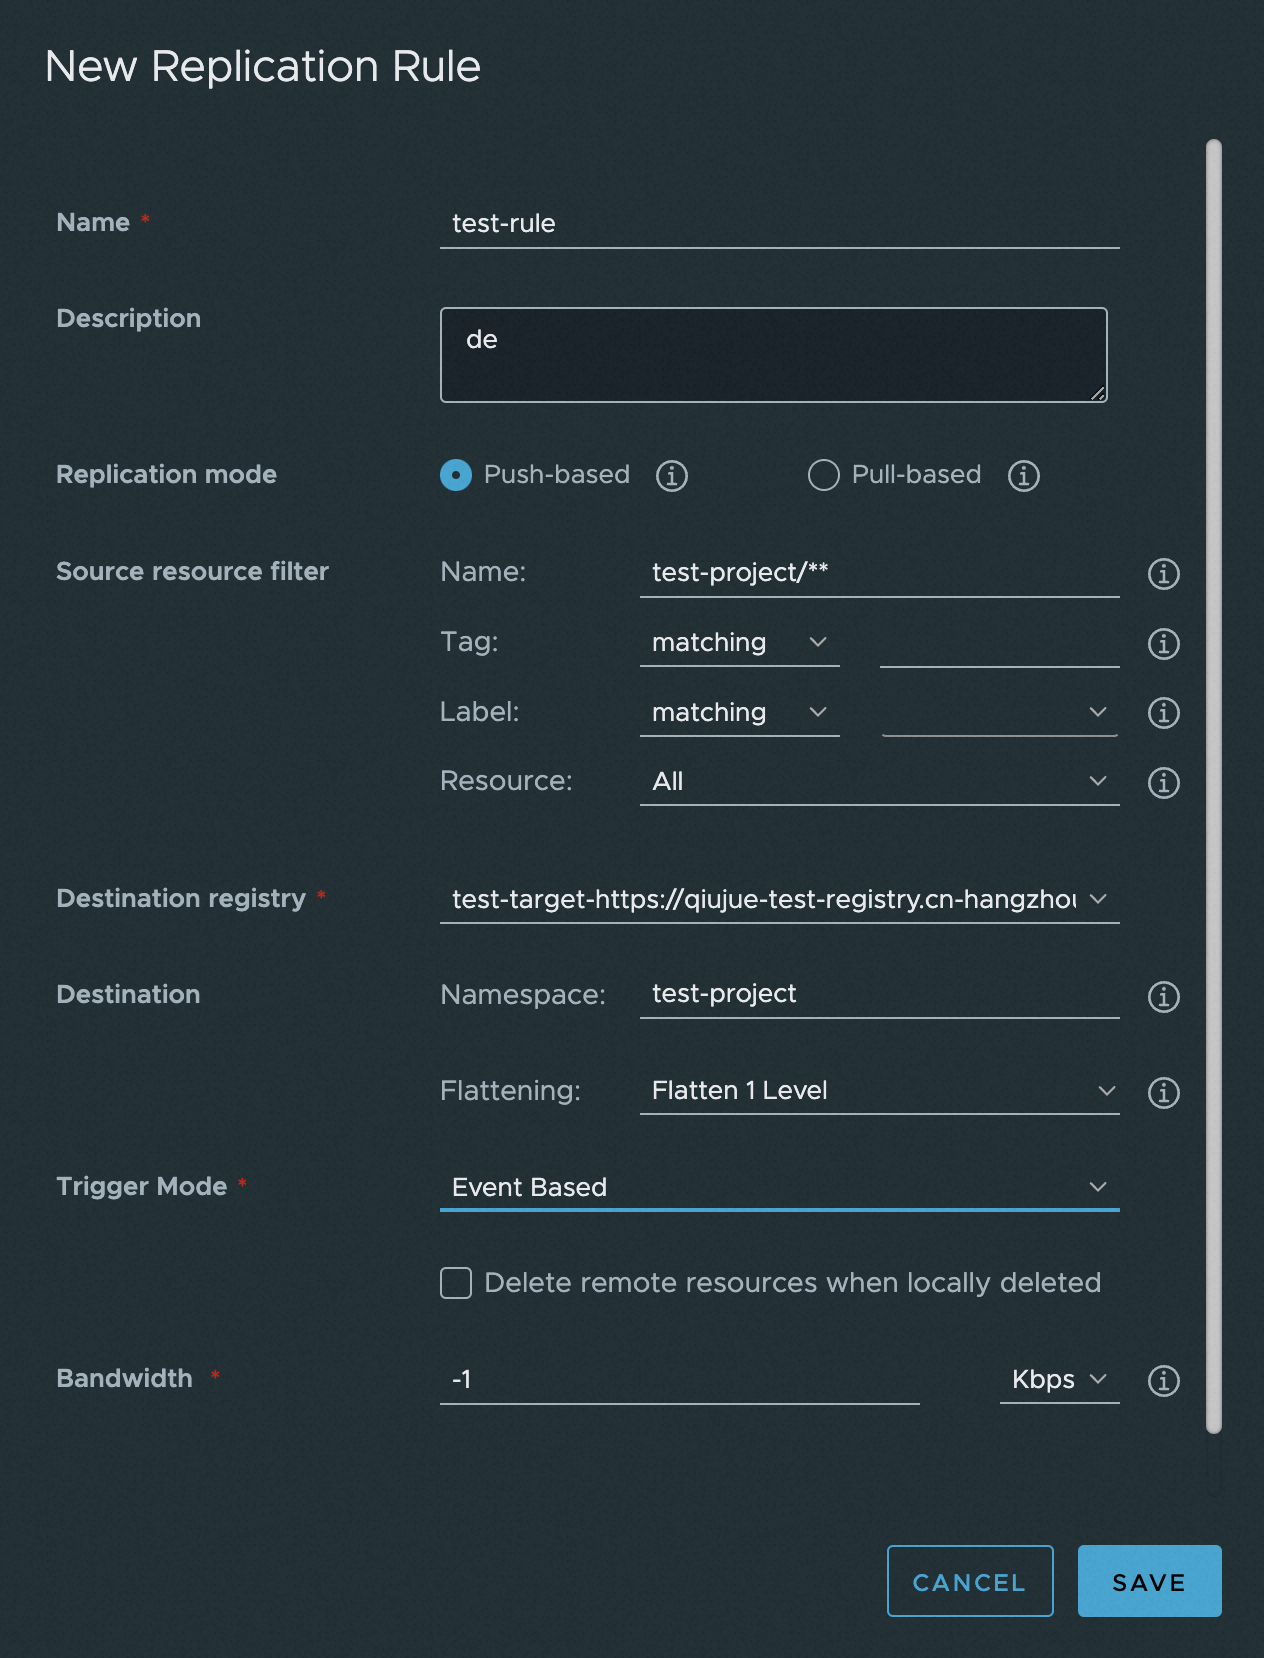
In the Create Rule dialog box, configure the parameters. Click Save.
Parameter
Description
Name
Enter a custom name.
Description
Enter a custom description.
Replication mode
Select Push-based.
Source resource filter
Filters the source resources to be synchronized. You can configure this parameter based on the prompts in the Harbor UI. By default, all resources are synchronized.
Target
Select the destination that you created in Step 2.
Target
For Namespace, enter the namespace on the target ACR. Repository flattening reduces the directory levels of a repository when you copy an image. We recommend that you select Replace 1 level. For example:
harbor-project/nginx -> acr-ns/nginx.Trigger Mode
Select a custom mode. We recommend that you select Event-driven Operations to synchronize image changes from Harbor.
Bandwidth
Limits the maximum network bandwidth for synchronization. The default value is -1, which indicates no limit.
On the Replications page, select the rule that you created and click Copy. This manually synchronizes existing images to the Container Registry Enterprise Edition instance. Replication is complete when the job status changes to Succeeded. Subsequent changes in the source repository are then automatically synchronized to the Container Registry Enterprise Edition instance based on the event-driven trigger.
Configure a custom domain name for disaster recovery
This feature lets you add a custom domain name and an SSL certificate to an instance, allowing you to access it over HTTPS using that domain name.
Choose a disaster recovery solution based on your network environment:
Solution 1: Harbor on Alibaba Cloud, access via internet
This section uses an example in which a Container Registry Enterprise Edition instance is in the China (Hangzhou) region and a Harbor instance is in the China (Zhangjiakou) region. Both instances are configured with the same domain name and use PrivateZone. For more information about how to configure PrivateZone, see Access a Container Registry Enterprise Edition instance by using a custom domain name.
The following table describes the basic information about the Container Registry Enterprise Edition instance and the Harbor instance.
Instance ID | Public domain name | Associated VPC | Custom domain name |
ACR-A | a-registry.cn-hangzhou.cr.aliyuncs.com | vpc-aaaaa | cross-region.registry.io |
Harbor-B | - | vpc-bbbbb | cross-region.registry.io |
If the Harbor instance in the China (Zhangjiakou) region fails, preventing you from pushing or pulling images, you can switch over to the Container Registry Enterprise Edition instance by modifying the PrivateZone DNS record. Follow these steps:
Log on to the Alibaba Cloud DNS console.
In the navigation pane on the left, click Private Zone.
On the Authoritative Zone tab, search for the zone name
cross-region.registry.io(the custom domain name of the instance). Two zones will appear. Click the zone that is associated with thevpc-bbbbbVPC.On the Resolution settings tab, find the target record and click Modify in the Actions column.
In the Modify Record panel, set the parameters and click Confirm.
Parameter
Description
Record Type
Select CNAME.
Hostname
Set this parameter to @.
Record Value
a-registry.cn-hangzhou.cr.aliyuncs.com(the public domain name of the Container Registry instance)TTL
Retain the default value.
Solution 2: External Harbor, access via internet
Set the custom domain name of the Container Registry Enterprise Edition instance to the domain name used by your self-managed Harbor (for example, www.ha****.com). For more information, see Access a Container Registry Enterprise Edition instance by using a custom domain name.
If your self-hosted Harbor instance fails and you cannot push or pull images, modify the DNS record for the domain name www.harbor.com to resolve to the public IP address of the Container Registry Enterprise Edition instance. This allows you to access the instance over the internet.
Solution 3: External Harbor, access via VPC
If your self-managed Harbor fails and you cannot push or pull images, first obtain the IP address of the Container Registry Enterprise Edition instance. Then, configure routing rules and DNS records to point the domain name used by your self-managed Harbor (for example, www.harbor.com) to the IP address of the Container Registry Enterprise Edition instance. This allows you to access the Container Registry Enterprise Edition instance over the VPC. For more information, see Access an Enterprise Edition instance across regions or from a data center.