Fluid is an open source, Kubernetes-native distributed dataset orchestrator and accelerator for data-intensive applications in cloud-native scenarios, such as big data applications and AI applications. In addition to storage and cache systems, Fluid also provides the ThinRuntime CustomResourceDefinition (CRD). You can use the ThinRuntime CRD to describe a custom storage system and connect the system to Fluid. In this topic, Minio is used as an example to demonstrate how to use Fluid in a registered cluster to manage and access data stored in Minio.
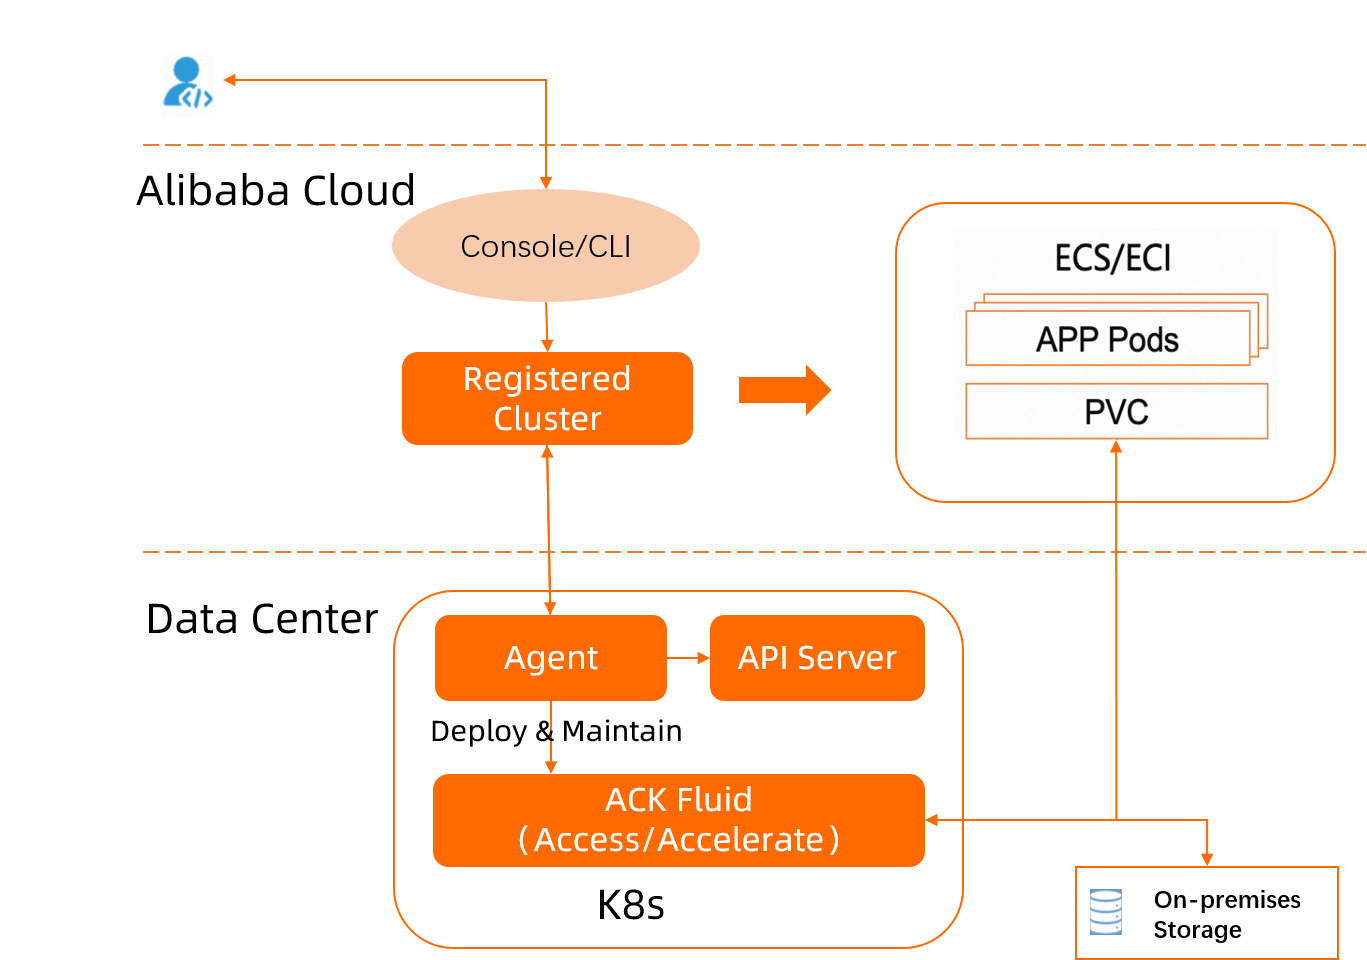
How it works
The following figure shows how Fluid is used to manage and access on-premises storage.
Prerequisites
An external cluster is registered with Container Service for Kubernetes (ACK) through a registered cluster. For more information, see Create an ACK One registered cluster.
A kubectl client is connected to the registered cluster. For more information, see Get a cluster kubeconfig and connect to the cluster using kubectl.
Step 1: Install ack-fluid
Use onectl
Install onectl on your on-premises machine. For more information, see Use onectl to manage registered clusters.
Run the following command to install ack-fluid:
onectl addon install ack-fluid --set pullImageByVPCNetwork=falsepullImageByVPCNetwork: optional. This parameter specifies whether to pull the component image through a virtual private cloud (VPC).Expected output:
Addon ack-fluid, version **** installed.
Use the console
Log on to the ACK console. In the left-side navigation pane, choose .
On the App Catalog tab, find and click ack-fluid.
In the upper-right part of the page, click Deploy.
In the Deploy panel, specify Cluster, keep the default settings for Namespace and Release Name, and then click Next.
Set Chart Version to the latest version, configure component parameters, and then click OK.
Step 2: Deploy Minio in the registered cluster
Create a file named minio.yaml and add the following content to the file:
apiVersion: v1
kind: Service
metadata:
  name: minio
spec:
  type: ClusterIP
  ports:
    - port: 9000
      targetPort: 9000
      protocol: TCP
  selector:
    app: minio
---
apiVersion: apps/v1  # Use apps/v1beta2 for Kubernetes versions earlier than 1.9.0 and use extensions/v1beta1 for Kubernetes versions earlier than 1.8.0.
kind: Deployment
metadata:
  name: minio
spec:
  selector:
    matchLabels:
      app: minio
  strategy:
    type: Recreate
  template:
    metadata:
      labels:
        app: minio
    spec:
      containers:
      - name: minio
        image: bitnami/minio
        env:
        # The AccessKey ID and AccessKey secret that are used to access Minio.
        - name: MINIO_ROOT_USER
          value: "minioadmin"
        - name: MINIO_ROOT_PASSWORD
          value: "minioadmin"
        - name: MINIO_DEFAULT_BUCKETS
          value: "my-first-bucket:public"
        ports:
        - containerPort: 9000
          hostPort: 9000
Run the following command to deploy Minio in the cluster:
kubectl create -f minio.yamlIn the preceding Minio configuration, the Minio username and password are both minioadmin. When Minio starts up, it creates a bucket named
my-first-bucketby default.Run the following command to store sample files in the my-first-bucket bucket:
kubectl exec -it minio-69c555f4cf-np59j -- bash -c "echo fluid-minio-test > testfile"

kubectl exec -it minio-69c555f4cf-np59j -- bash -c "mc cp ./testfile local/my-first-bucket/"

kubectl exec -it  minio-69c555f4cf-np59j -- bash -c "mc cat local/my-first-bucket/testfile"
fluid-minio-test
Step 3: Prepare a container image that contains the Minio FUSE client
Fluid passes the runtime parameters required by FUSE in the ThinRuntime and the mount target parameters in the Dataset to the pod of ThinRuntime FUSE. You need to run a parameter parsing script in the containers to parse the runtime parameters and then pass the parsing result to the FUSE client. The FUSE client will mount the FUSE file system to the containers. Therefore, when you use the ThinRuntime CRD to describe a storage system, you need to use a container image that contains the following program and script:
FUSE client: In this example, a goofys client that is compatible with Simple Storage Service (S3) is connected to the Minio storage system and used to mount the storage system.
Runtime parameter parsing script required by the FUSE client: You can create a Python script named fluid-config-parse.py based on the following content:
import json

with open("/etc/fluid/config.json", "r") as f:
    rawStr = f.read()
print(rawStr)

script = """
#!/bin/sh
set -ex
export AWS_ACCESS_KEY_ID=`cat $akId`
export AWS_SECRET_ACCESS_KEY=`cat $akSecret`

mkdir -p $targetPath

exec goofys -f --endpoint "$url" "$bucket" $targetPath
"""

obj = json.loads(rawStr)

with open("mount-minio.sh", "w") as f:
    f.write("targetPath=\"%s\"\n" % obj['targetPath'])
    f.write("url=\"%s\"\n" % obj['mounts'][0]['options']['minio-url'])
    if obj['mounts'][0]['mountPoint'].startswith("minio://"):
      f.write("bucket=\"%s\"\n" % obj['mounts'][0]['mountPoint'][len("minio://"):])
    else:
      f.write("bucket=\"%s\"\n" % obj['mounts'][0]['mountPoint'])
    f.write("akId=\"%s\"\n" % obj['mounts'][0]['options']['minio-access-key'])
    f.write("akSecret=\"%s\"\n" % obj['mounts'][0]['options']['minio-access-secret'])

    f.write(script)
The Python script performs the following operations:
The script reads the JSON strings in the
/etc/fluid/config.jsonfile. Fluid stores the parameters required by the FUSE client in the/etc/fluid/config.jsonfile that is mounted to the FUSE containers.The script parses the JSON strings to obtain the parameters required by the FUSE client. In the preceding example, the
url,bucket,minio-access-key, andminio-access-secretparameters are obtained.The script then passes these parameters to the mount-minio.sh file.
Use the following Dockerfile to build an image.
In this example, an image that contains the goofys client, such as cloudposse or goofys, is used as the Dockerfile base image.
FROM cloudposse/goofys

RUN apk add python3 bash

COPY ./fluid-config-parse.py /fluid-config-parse.py
Run the following command to build an image and push the image to an image repository:
IMG_REPO=<your image repo>
docker build -t $IMG_REPO/fluid-minio-goofys:demo .
docker push $IMG_REPO/fluid-minio-goofys:demo
Step 4: Create a ThinRuntimeProfile
A ThinRuntimeProfile is a cluster-level Fluid CRD. It describes the basic configuration of a storage system to be connected to Fluid, including the container image information and pod Spec. Before you create a Fluid Dataset CustomResource (CR) and a ThinRuntime CR to mount the Minio storage system, you need to create a ThinRuntimeProfile CR.
Create file named profile.yaml and add the following content to the file:
apiVersion: data.fluid.io/v1alpha1
kind: ThinRuntimeProfile
metadata:
  name: minio-profile
spec:
  fileSystemType: fuse
  fuse:
    image: $IMG_REPO/fluid-minio-goofys
    imageTag: demo
    imagePullPolicy: IfNotPresent
    command:
    - sh
    - -c
    - "python3 /fluid-config-parse.py && chmod u+x ./mount-minio.sh && ./mount-minio.sh"
Run the following command to create a ThinRuntimeProfile:
kubectl create -f profile.yaml
Step 5: Create a Dataset and a ThinRuntime
Run the following command to store the credentials used to access Minio in a Secret:
kubectl create secret generic minio-secret --from-literal=minio-access-key=minioadmin --from-literal=minio-access-secret=minioadminCreate a file named dataset.yaml and add the following content to the file.
The YAML file creates a Dataset CR and a ThinRuntime CR to mount the Minio storage system.
apiVersion: data.fluid.io/v1alpha1
kind: Dataset
metadata:
  name: minio-demo
spec:
  mounts:
  - mountPoint: minio://my-first-bucket   # minio://<bucket name>
    name: minio
    options:
      minio-url: http://minio:9000  # minio service <url>:<port>
    encryptOptions:
      - name: minio-access-key
        valueFrom:
          secretKeyRef:
            name: minio-secret
            key: minio-access-key
      - name: minio-access-secret
        valueFrom:
          secretKeyRef:
            name: minio-secret
            key: minio-access-secret
---
apiVersion: data.fluid.io/v1alpha1
kind: ThinRuntime
metadata:
  name: minio-demo
spec:
  profileName: minio-profile
Resource
Parameter
Description
Example
Dataset
mountPoint
The bucket that you want to access.
my-frist-bucket
minio-url
The URL that is used to access Minio in the registered cluster.
http://minio:9000
ThinRuntime
profileName
The ThinRuntimeProfile that you created.
minio-profile
Run the following command to deploy the Dataset CR and ThinRuntime CR:
kubectl create -f dataset.yamlRun the following command to query the status of minio-demo:
kubectl get dataset minio-demoExpected output:
NAME         UFS TOTAL SIZE   CACHED   CACHE CAPACITY   CACHED PERCENTAGE   PHASE   AGE
minio-demo                    N/A      N/A              N/A                 Bound   2m18s
The Phase field of the Dataset in the output displays Bound. This means that the Dataset is mounted and can be accessed.
Step 6: Create a pod to access the data stored in the Minio storage system
Create a file named pod.yaml and add the following content to the file.
The pod is used to access the data stored in Minio.
apiVersion: v1
kind: Pod
metadata:
  name: test-minio
  # If you want to deploy the pod on an elastic container instance, you need to add the following labels to the pod:
  # labels:
    # alibabacloud.com/eci: true
    # alibabacloud.com/fluid-sidecar-target: "eci"
spec:
  containers:
    - name: nginx
      image: nginx:latest
      command: ["bash"]
      args:
      - -c
      - ls -lh /data && cat /data/testfile && sleep 3600
      volumeMounts:
        - mountPath: /data
          name: data-vol
  volumes:
    - name: data-vol
      persistentVolumeClaim:
        claimName: minio-demo
Run the following command to deploy the pod:
kubectl create -f pod.yamlRun the following command to query the data access result:
kubectl logs test-minioExpected output:
total 512
-rw-r--r-- 1 root root 17 Dec 15 07:58 testfile
fluid-minio-test
The output indicates that the pod named test-minio can access the data stored in the Minio storage system.
(Optional) Step 7: Clear the environment
If you no longer need to access the on-premises storage, run the following commands to clear the environment:
kubectl delete -f pod.yaml
kubectl delete -f dataset.yaml
kubectl delete -f profile.yaml
kubectl delete -f minio.yaml