When data-intensive workloads — such as AI/ML training or big data analytics — run on a registered Kubernetes cluster, they repeatedly fetch large datasets from Object Storage Service (OSS) over the network, causing high latency and idle compute. Fluid is an open source, Kubernetes-native distributed dataset orchestrator and accelerator that solves this by layering a distributed cache (powered by JindoRuntime) between your pods and OSS, so that each file is fetched from OSS only once and all subsequent reads are served from the local node cache. Fluid enables the observability, auto scaling, and portability of datasets by managing and scheduling JindoRuntime. JindoRuntime is the execution engine of JindoFS developed by the Alibaba Cloud E-MapReduce (EMR) team. It is based on C++ and provides dataset management and caching with support for OSS.
This topic shows you how to install Fluid in a registered cluster, mount an OSS bucket as a persistent volume claim (PVC), and verify that JindoFS caching reduces data access time from 62 seconds to 3 seconds.
How it works
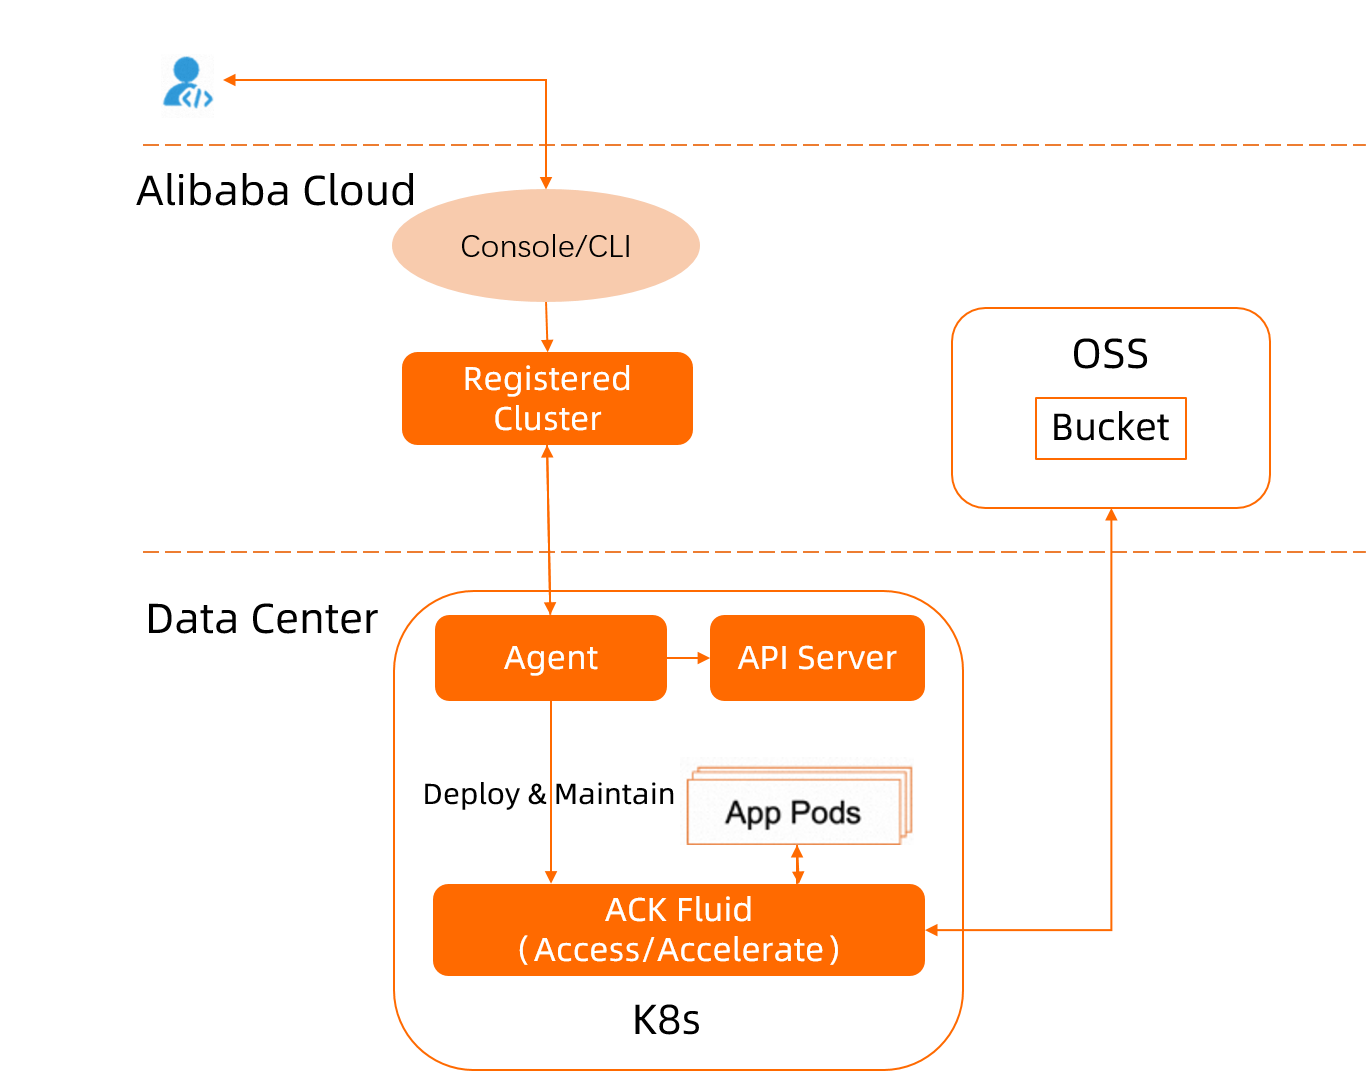
You upload a source dataset to an OSS bucket. Fluid creates a Dataset custom resource (CR) that describes the OSS mount point, and a JindoRuntime CR that launches a JindoFS cluster on your registered cluster nodes. Applications access data through a PVC backed by JindoFS. After the first read, all subsequent reads are served from the local node cache instead of OSS.
Key components:
| Component | Role |
|---|---|
| Dataset CR | Describes the dataset location (OSS mount point) and credentials |
| JindoRuntime CR | Launches the JindoFS cluster (master, worker, fuse pods) that provides the cache layer |
| PVC | The volume your application mounts to read cached data |
Prerequisites
Before you begin, make sure you have:
-
An external cluster registered with Container Service for Kubernetes (ACK). See Create a registered cluster.
-
A kubectl client connected to the registered cluster. See Obtain the kubeconfig file of a cluster and use kubectl to connect to the cluster.
-
OSS activated and a bucket created. See Activate OSS and Create a bucket.
Step 1: Install the ack-fluid add-on
Install ack-fluid using onectl (recommended for CLI users) or the ACK console (recommended if you prefer a guided UI).
Use onectl
-
Install onectl on your on-premises machine. See Use onectl to manage registered clusters.
-
Run the following command to install the ack-fluid add-on:
onectl addon install ack-fluid --set pullImageByVPCNetwork=falseSet
pullImageByVPCNetworktotrueto pull the component image through a virtual private cloud (VPC). The parameter is optional and defaults tofalse. Expected output:Addon ack-fluid, version **** installed.
Use the console
-
Log on to the ACK console. In the left-side navigation pane, choose Marketplace > Marketplace.
-
On the App Catalog tab, find and click ack-fluid.
-
In the upper-right corner, click Deploy.
-
In the Deploy panel, select your Cluster, keep the default values for Namespace and Release Name, and then click Next.
-
Set Chart Version to the latest version, configure the component parameters, and then click OK.
Step 2: Prepare data
-
Download a test dataset:
wget https://archive.apache.org/dist/spark/spark-3.0.1/spark-3.0.1-bin-hadoop2.7.tgz -
Upload the dataset to your OSS bucket using ossutil. See Install ossutil.
Step 3: Add labels to nodes
Run the following command to add the demo-oss=true label to all nodes in the external Kubernetes cluster. The label constrains which nodes the JindoRuntime master and worker components are scheduled on.
kubectl label node <node-name> demo-oss=trueStep 4: Create a Dataset CR and a JindoRuntime CR
-
Create a file named
mySecret.yamlwith the following content:apiVersion: v1 kind: Secret metadata: name: mysecret stringData: fs.oss.accessKeyId: <your-access-key-id> fs.oss.accessKeySecret: <your-access-key-secret>The secret stores the AccessKey ID and AccessKey secret used to access OSS. Create this secret before creating the Dataset CR. Kubernetes automatically encrypts secrets to avoid exposing sensitive data in plaintext.
-
Deploy the secret:
kubectl create -f mySecret.yaml -
Create a file named
resource.yamlwith the following content:-
Dataset: describes the dataset stored in the OSS bucket and its underlying file system (UFS).
-
JindoRuntime: launches a JindoFS cluster to provide caching services.
apiVersion: data.fluid.io/v1alpha1
kind: Dataset
metadata:
  name: hadoop
spec:
  mounts:
    - mountPoint: oss://<oss-bucket>/<bucket-dir>  # UFS path to mount; omit the endpoint here
      options:
        fs.oss.endpoint: <oss-endpoint>             # Public or private endpoint of the OSS bucket
      name: hadoop
      path: "/"
      encryptOptions:
        - name: fs.oss.accessKeyId
          valueFrom:
            secretKeyRef:
              name: mysecret
              key: fs.oss.accessKeyId
        - name: fs.oss.accessKeySecret
          valueFrom:
            secretKeyRef:
              name: mysecret
              key: fs.oss.accessKeySecret
---
apiVersion: data.fluid.io/v1alpha1
kind: JindoRuntime
metadata:
  name: hadoop
spec:
  # Pin all JindoRuntime components to the labeled nodes in the external cluster
  master:
    nodeSelector:
      demo-oss: "true"
  worker:
    nodeSelector:
      demo-oss: "true"
  fuse:
    nodeSelector:
      demo-oss: "true"
  replicas: 2          # Number of workers in the JindoFS cluster
  tieredstore:
    levels:
      - mediumtype: HDD  # Cache type: HDD, SSD, or MEM
        path: /mnt/disk1  # Cache path; only one path is allowed (if MEM, also used for logs)
        quota: 100G       # Maximum cache size
        high: "0.99"      # Upper storage watermark: start eviction above this ratio
        low: "0.8"        # Lower storage watermark: stop eviction below this ratio
The file defines two resources:
-
-
Create the Dataset CR and the JindoRuntime CR:
kubectl create -f resource.yaml -
Verify the Dataset CR:
kubectl get dataset hadoopExpected output:
NAME UFS TOTAL SIZE CACHED CACHE CAPACITY CACHED PERCENTAGE PHASE AGE hadoop 210MiB 0.00B 100.00GiB 0.0% Bound 1h -
Verify the JindoRuntime CR:
kubectl get jindoruntime hadoopExpected output:
NAME MASTER PHASE WORKER PHASE FUSE PHASE AGE hadoop Ready Ready Ready 4m45s -
Verify the PV and PVC:
kubectl get pv,pvcExpected output:
NAME                      CAPACITY   ACCESS MODES   RECLAIM POLICY   STATUS   CLAIM            STORAGECLASS   REASON   AGE
persistentvolume/hadoop   100Gi      RWX            Retain           Bound    default/hadoop                           52m

NAME                           STATUS   VOLUME   CAPACITY   ACCESS MODES   STORAGECLASS   AGE
persistentvolumeclaim/hadoop   Bound    hadoop   100Gi      RWX                           52m
The Dataset and JindoRuntime CRs are created and ready.
Step 5: Verify the acceleration service
Create a containerized application that reads the same dataset twice and compare the read times to confirm that JindoFS caching is working.
-
Create a file named
app.yaml:apiVersion: v1 kind: Pod metadata: name: demo-app spec: containers: - name: demo image: fluidcloudnative/serving volumeMounts: - mountPath: /data name: hadoop volumes: - name: hadoop persistentVolumeClaim: claimName: hadoop -
Deploy the pod:
kubectl create -f app.yaml -
Check the size of the test file:
kubectl exec -it demo-app -- bash
du -sh /data/spark-3.0.1-bin-hadoop2.7.tgz
Expected output:
209.7M /data/spark-3.0.1-bin-hadoop2.7.tgz -
Time the first read:
time cp /data/spark-3.0.1-bin-hadoop2.7.tgz /testExpected output:
real    1m2.374s
user    0m0.000s
sys     0m0.256s
The first read takes about 62 seconds. This is expected: the data is not yet cached, so JindoFS fetches it from OSS over the network.
-
Confirm that the data is now fully cached:
kubectl get dataset hadoopExpected output:
NAME UFS TOTAL SIZE CACHED CACHE CAPACITY CACHED PERCENTAGE PHASE AGE hadoop 209.74MiB 209.74MiB 100.00GiB 100.0% Bound 1h -
Delete and recreate the pod to eliminate the OS page cache, so the second read reflects only JindoFS cache performance:
kubectl delete -f app.yaml && kubectl create -f app.yaml -
Time the second read:
kubectl exec -it demo-app -- bash
time cp /data/spark-3.0.1-bin-hadoop2.7.tgz /test
Expected output:
real    0m3.454s
user    0m0.000s
sys     0m0.268s
The second read takes 3 seconds — about one-eighteenth of the first read — because the data is served from the local JindoFS cache instead of OSS.
(Optional) Step 6: Clean up
Run the following commands to remove the JindoRuntime, application, and dataset when you no longer need the acceleration service.
-
Delete the JindoRuntime and application:
kubectl delete jindoruntime hadoop -
Delete the dataset:
kubectl delete dataset hadoop