Use the AMC command line interface to promote existing single-cluster applications into ACK One fleet management and distribute them to multiple clusters.
How it works
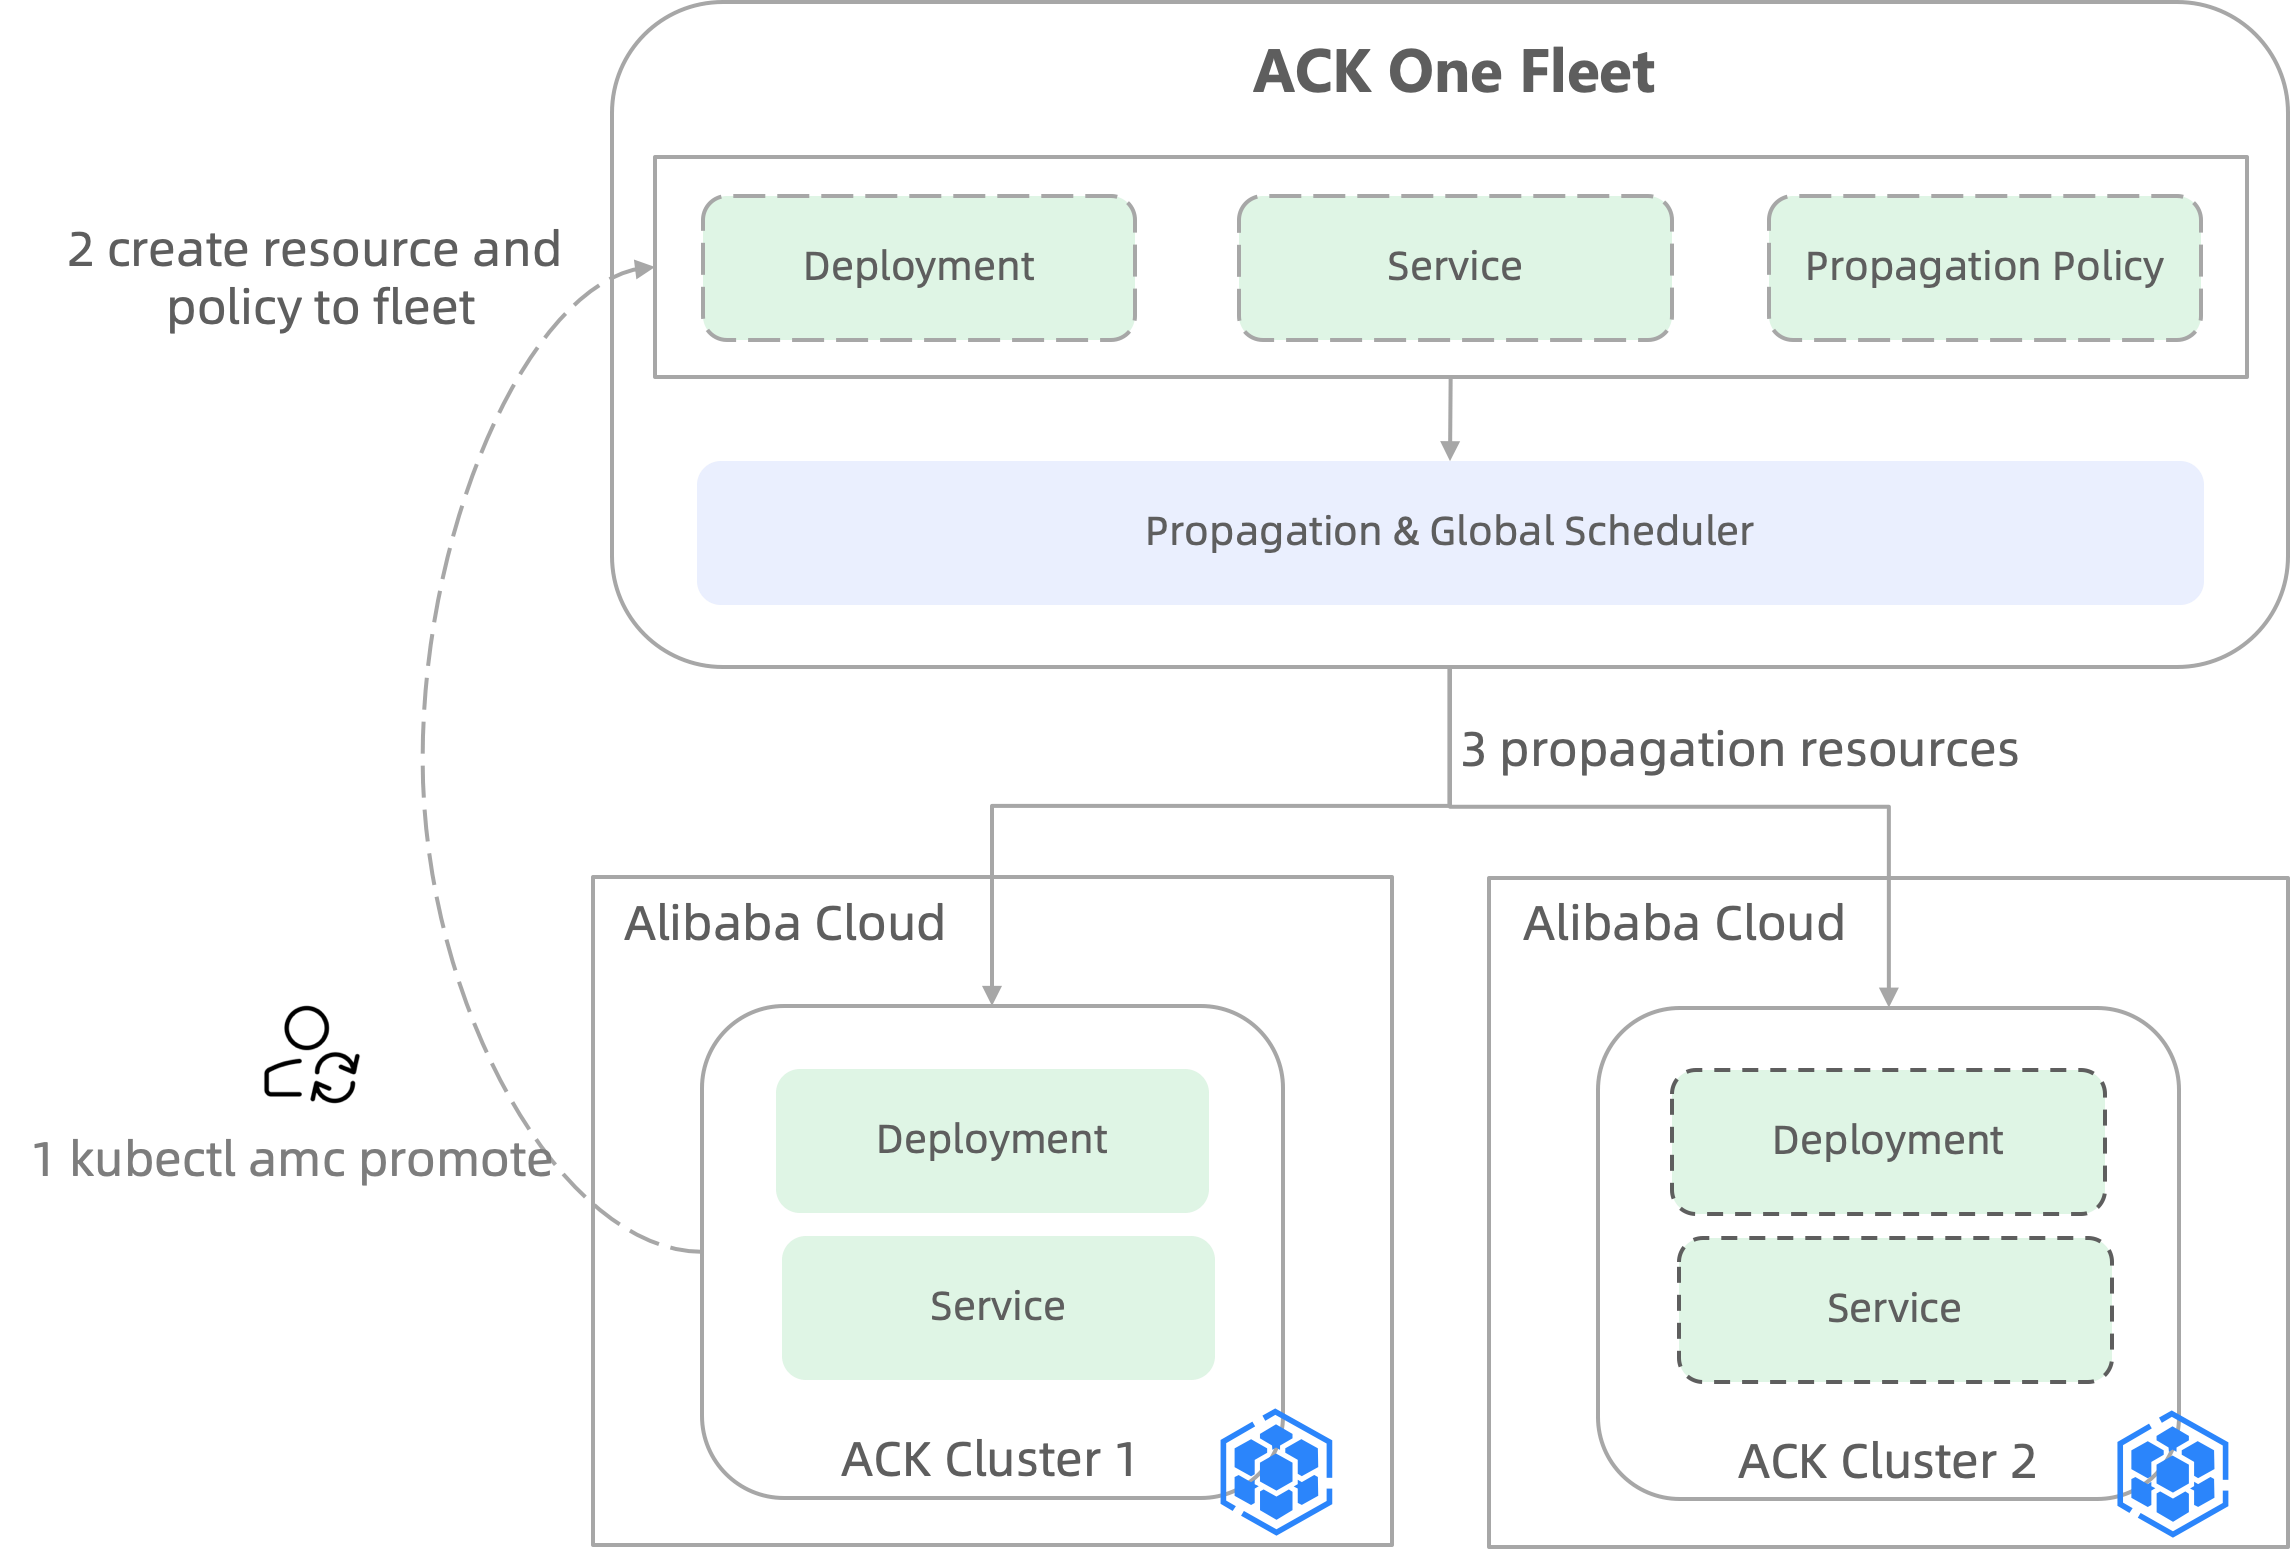
Run
kubectl amc promoteto sync selected resources from a source cluster to the fleet.The fleet creates the resources and automatically generates a PropagationPolicy. The policy includes the clusters specified by
--target-clustersand the source cluster (cluster-1).The fleet distributes the resources to each target cluster. All resources in cluster-1 and the target clusters are then managed by the fleet.
Prerequisites
Before you begin, ensure that you have:
Multiple clusters associated with the fleet. See Manage associated clusters.
The
AliyunAdcpFullAccesspermission granted to a Resource Access Management (RAM) user. See Grant permissions to a RAM user.The kubeconfig file for the fleet instance, obtained from the ACK One console, and a working
kubectlconnection to the fleet.The latest AMC command line interface installed. See Install the latest AMC command line interface.
Step 1: Create a namespace in the fleet and target clusters
Resources can only be distributed to a namespace that already exists in both the fleet and all target clusters. If the namespace already exists everywhere, skip this step.
In this example, the resources belong to the gateway-demo namespace.
Using the fleet kubeconfig, create the
gateway-demonamespace in the fleet.kubectl create ns gateway-demoSave the following YAML to a file named
web-demo-ns-policy.yaml.apiVersion: policy.one.alibabacloud.com/v1alpha1 kind: ClusterPropagationPolicy metadata: name: web-demo-ns-policy spec: resourceSelectors: - apiVersion: v1 kind: Namespace name: gateway-demo placement: clusterAffinity: clusterNames: - ${cluster1_id} # Replace with your cluster ID - ${cluster2_id} # Replace with your cluster ID replicaScheduling: replicaSchedulingType: DuplicatedUsing the fleet kubeconfig, apply the manifest to create the
ClusterPropagationPolicyand distribute the namespace.kubectl apply -f web-demo-ns-policy.yaml
Step 2: Promote resources to the fleet
Use kubectl amc promote to bring single-cluster resources under fleet management and distribute them to target clusters.
Check the current state of the resources. The output shows that
service1andweb-demoexist only in thegateway-demonamespace of cluster-1.ADOPTION: Nmeans the resources are not yet managed by a PropagationPolicy in the ACK One fleet.
kubectl amc -ngateway-demo get svc -M
kubectl amc -ngateway-demo get deployment -M
Expected output:
NAME       CLUSTER    CLUSTER_ALIAS   TYPE        CLUSTER-IP      EXTERNAL-IP   PORT(S)   AGE    ADOPTION
service1   c8xxxxxx   cluster-1       ClusterIP   192.168.**.**   <none>        80/TCP    104m   N

NAME       CLUSTER    CLUSTER_ALIAS   READY   UP-TO-DATE   AVAILABLE   AGE    ADOPTION
web-demo   c8xxxxxx   cluster-1       2/2     2            2           104m   N
Run the promote commands to place the resources under fleet management and distribute them to cluster-2. Replace
${cluster1_id}and${cluster2_id}with your actual cluster IDs. To distribute to more than one target cluster, use comma-separated IDs:${cluster2_id},${cluster3_id}.kubectl amc promote service service1 -ngateway-demo -m ${cluster1_id} --target-clusters ${cluster2_id} kubectl amc promote deployment web-demo -ngateway-demo -m ${cluster1_id} --target-clusters ${cluster2_id}Expected output:
ResourceTemplate (gateway-demo/service1) is created successfully
PropagationPolicy (gateway-demo/service1-67676f499c) is created successfully
Resource "/v1, Resource=services"(gateway-demo/service1) is promoted successfully

ResourceTemplate (gateway-demo/web-demo) is created successfully
PropagationPolicy (gateway-demo/web-demo-6675b99c65) is created successfully
Resource "apps/v1, Resource=deployments"(gateway-demo/web-demo) is promoted successfully
Verify the result.
ADOPTION: Yconfirms that both resources are now managed by the ACK One fleet.service1andweb-demoare now distributed to cluster-2 and managed as a multi-cluster deployment.
kubectl amc -ngateway-demo get svc -M
kubectl amc -ngateway-demo get deployment -M
Expected output:
NAME       CLUSTER    CLUSTER_ALIAS   TYPE        CLUSTER-IP       EXTERNAL-IP   PORT(S)   AGE     ADOPTION
service1   cfxxxxxx   cluster-2       ClusterIP   192.168.**.***   <none>        80/TCP    19s     Y
service1   c8xxxxxx   cluster-1       ClusterIP   192.168.**.**    <none>        80/TCP    5h58m   Y

NAME       CLUSTER    CLUSTER_ALIAS   READY   UP-TO-DATE   AVAILABLE   AGE    ADOPTION
web-demo   c8xxxxxx   cluster-1       2/2     2            2           6h1m   Y
web-demo   cfxxxxxx   cluster-2       2/2     2            2           24s    Y
Modify the default distribution policy
By default, kubectl amc promote creates a Duplicated PropagationPolicy (replicaSchedulingType: Duplicated), which replicates the full application to each target cluster. To view the generated policy:
kubectl get pp -ngateway-demo xx -oyamlExpected output:
apiVersion: policy.one.alibabacloud.com/v1alpha1
kind: PropagationPolicy
metadata:
  ...
spec:
  ...
  placement:
    clusterAffinity:
      ...
    replicaScheduling:
      replicaSchedulingType: Duplicated # Default: full replica in each cluster
To use static or dynamic replica weights instead, add --auto-create-policy=false to the promote command to skip automatic policy creation, then manually configure the desired policy. For more information, see Distribution policies and differentiation policies.
What's next
Distribution policies and differentiation policies — configure static or dynamic replica weights across clusters.
Manage associated clusters — add more clusters to the fleet.