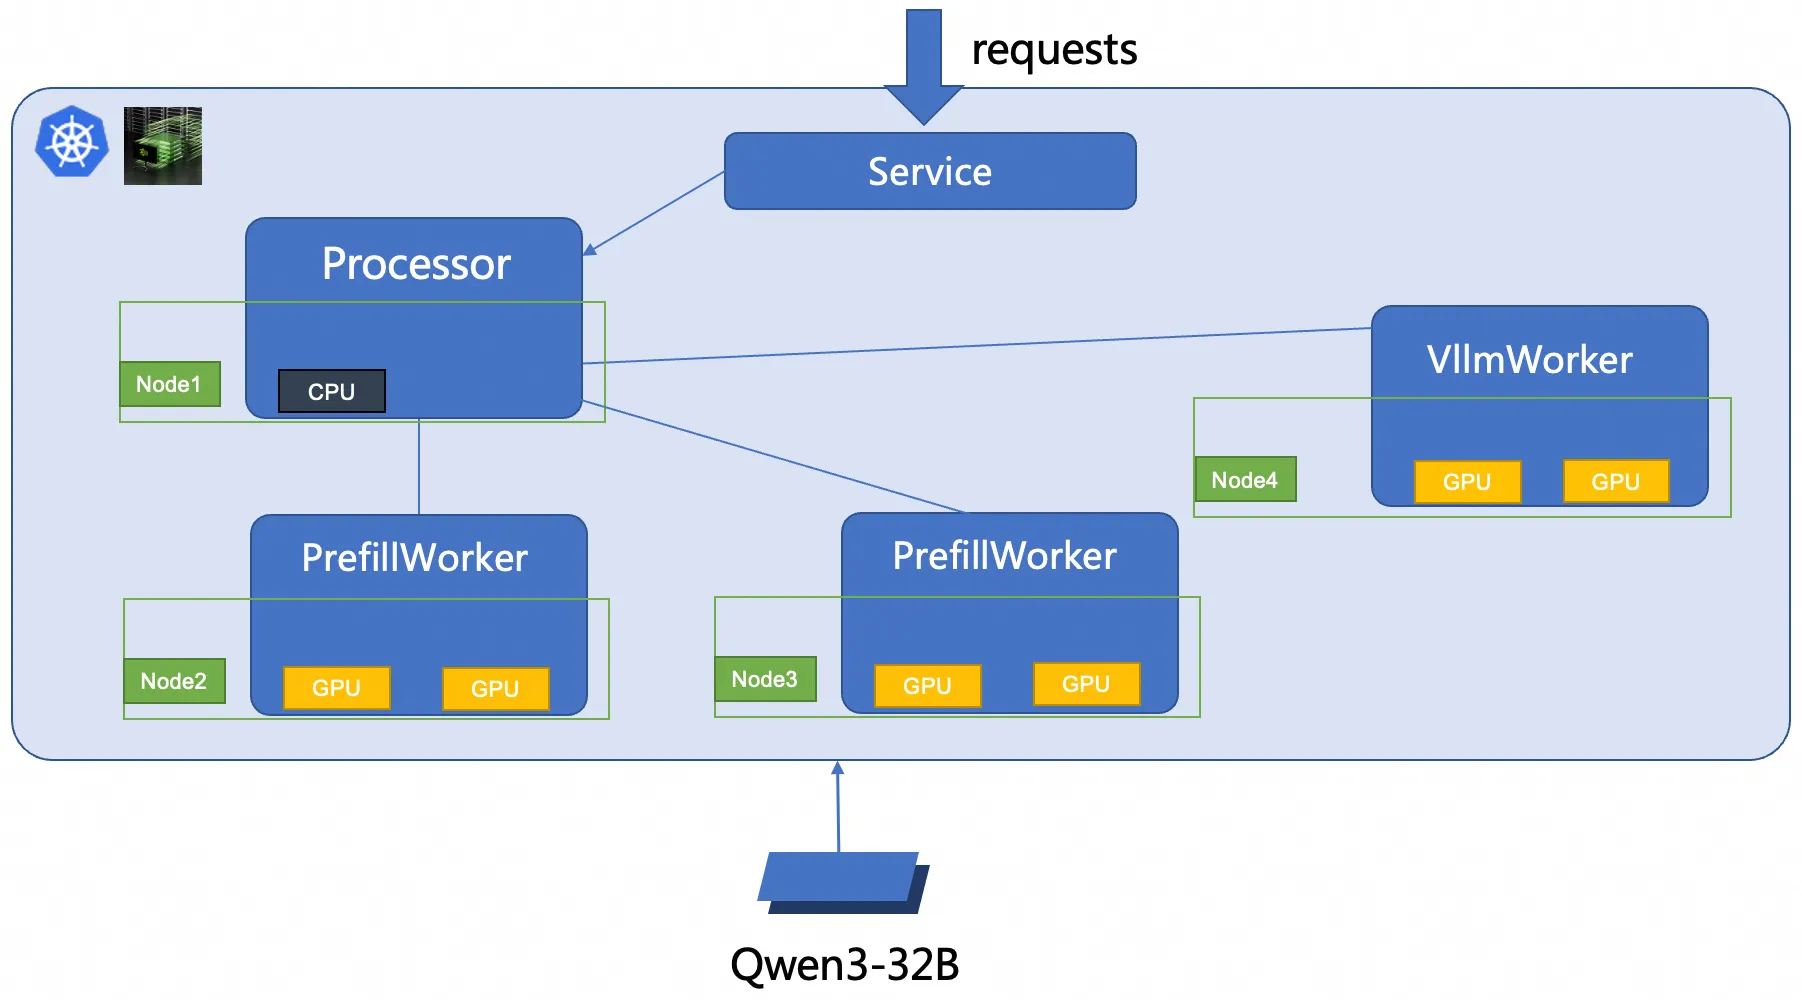
Deploy Qwen3-32B on ACK with a 2-prefill, 1-decode Dynamo topology managed by RoleBasedGroup (RBG).
Background
When to use PD disaggregation
PD disaggregation improves performance for workloads with long input prompts, latency-sensitive decode, or high throughput targets. For short prompts and low concurrency, aggregated deployment may suffice.
Qwen3-32B
Qwen3-32B is a 32.8-billion-parameter dense model from the Qwen series with a native 32K-token context window (extendable to 131K via YaRN) and 100+ language support. It supports thinking and non-thinking modes and excels at logical reasoning, code generation, multi-turn dialog, and tool use.
See the Qwen blog, GitHub repository, and documentation.
Dynamo
Dynamo is a high-throughput, low-latency inference framework from NVIDIA for serving large language models (LLMs) in multi-node, distributed environments.
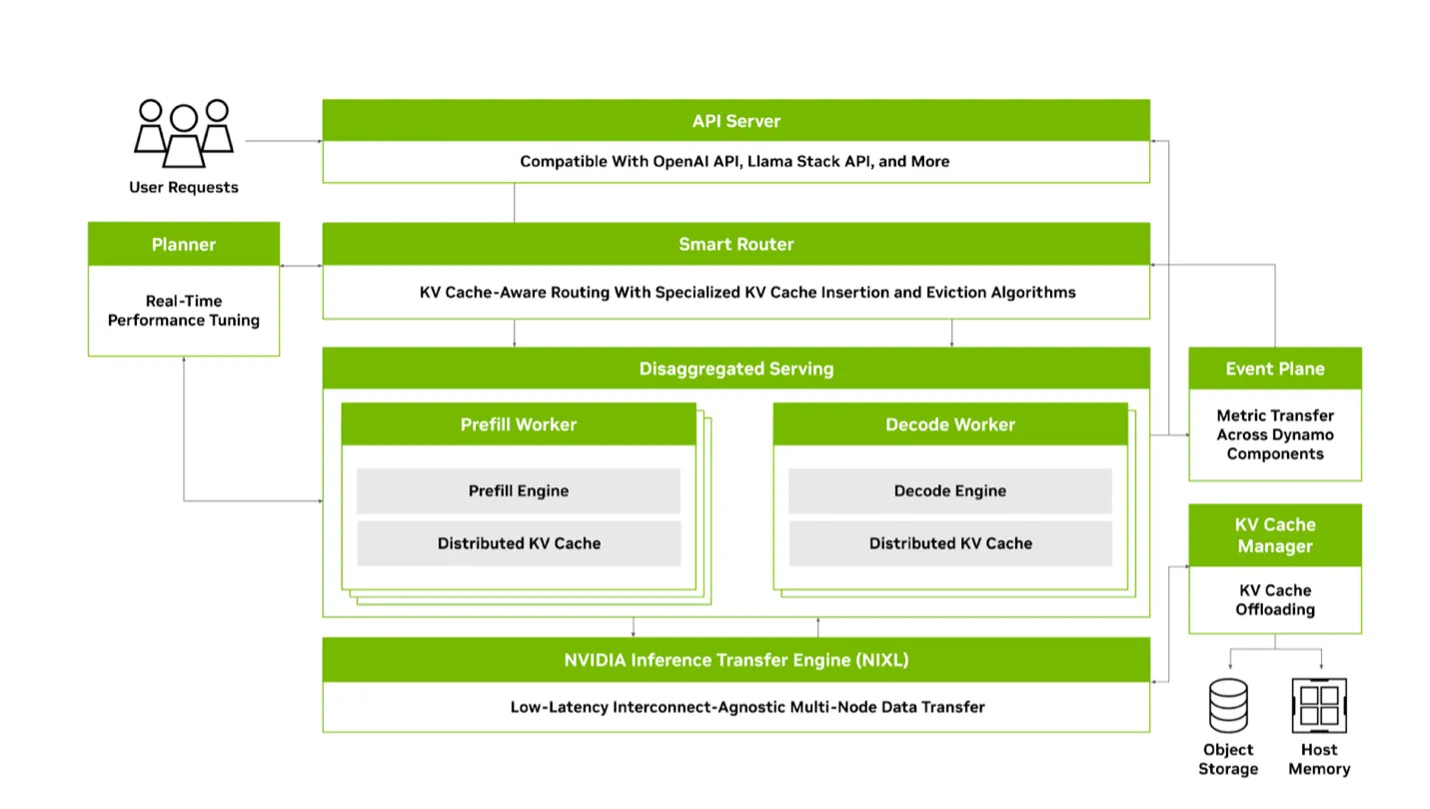
Key capabilities:
-
Engine-agnostic: Supports TensorRT-LLM, vLLM, and SGLang as inference backends.
-
PD disaggregation: Decouples compute-intensive prefill from memory-bound decode, reducing latency and improving throughput.
-
Dynamic GPU scheduling: Adjusts resource allocation based on real-time load.
-
KV cache routing: Routes requests to nodes holding the relevant KV cache to avoid recomputation.
-
Accelerated KV transfer: Uses NIXL (NVIDIA Inference Xfer Library) for low-overhead KV cache transfers between nodes.
-
KV cache offloading: Extends effective cache capacity by spilling to memory, local disk, or cloud storage.
-
Rust core with Python interface: Delivers maximum runtime performance while remaining extensible via Python.
-
Fully open source: Follows a transparent, open source-first development philosophy.
See the Dynamo GitHub and Dynamo documentation.
Prefill/decode disaggregation
LLM inference has two stages with conflicting resource profiles:
-
Prefill: Processes the full input prompt in parallel to produce the initial KV cache. Compute-intensive; runs once per request.
-
Decode: Generates tokens autoregressively, repeatedly reading model weights and KV cache from GPU memory. Memory-bound.

When both stages share the same GPU, continuous batching intermixes prefill and decode work. Because their compute demands differ sharply, resource contention spikes decode latency and raises the average time per output token (TPOT).
PD disaggregation solves this by routing prefill and decode to separate GPU pools, each tuned for its stage's resource profile, eliminating contention and lowering TPOT.
RoleBasedGroup
RoleBasedGroup (RBG) is an open-source Kubernetes workload type developed by the ACK team to simplify large-scale deployment and operations of PD-disaggregated inference services (RBG GitHub).
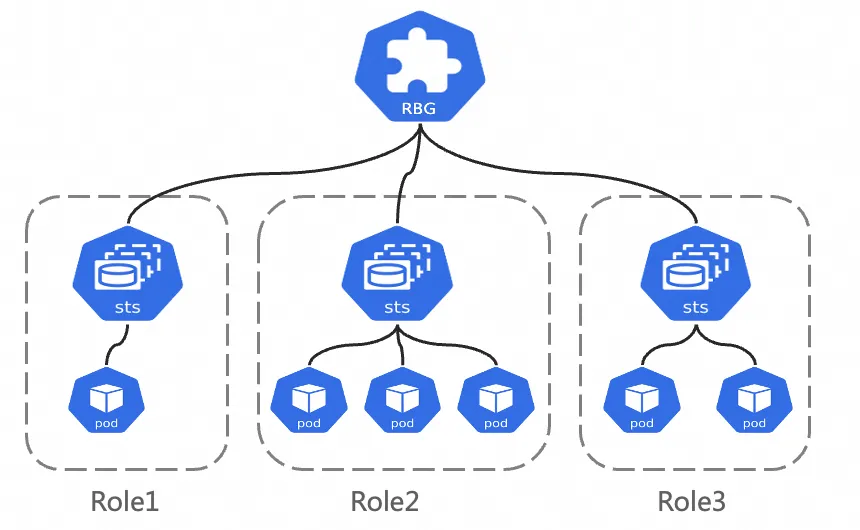
An RBG consists of named roles, each backed by a StatefulSet, Deployment, or LWS. Key features include:
-
Flexible role definition: Define any number of roles with explicit startup-order dependencies and role-level elastic scaling.
-
Built-in service discovery: Automatic discovery within the group, supporting multiple restart policies, rolling updates, and gang scheduling.
Prerequisites
Before you begin, ensure that you have:
-
An ACK managed cluster (Kubernetes 1.22+) with at least 6 GPUs (≥32 GB GPU memory each). Add GPU nodes as needed.
Recommended:
ecs.ebmgn8is.32xlarge. See ECS Bare Metal Instance families for all supported types. -
The ack-rbgs component is installed. Log on to the Container Service Management Console, go to Cluster List, click the target cluster, and install ack-rbgs via Helm. Skip Application Name and Namespace, click Next, click Yes in the Confirm dialog box to accept defaults (name:
ack-rbgs, namespace:rbgs-system). Select the latest chart version and click OK.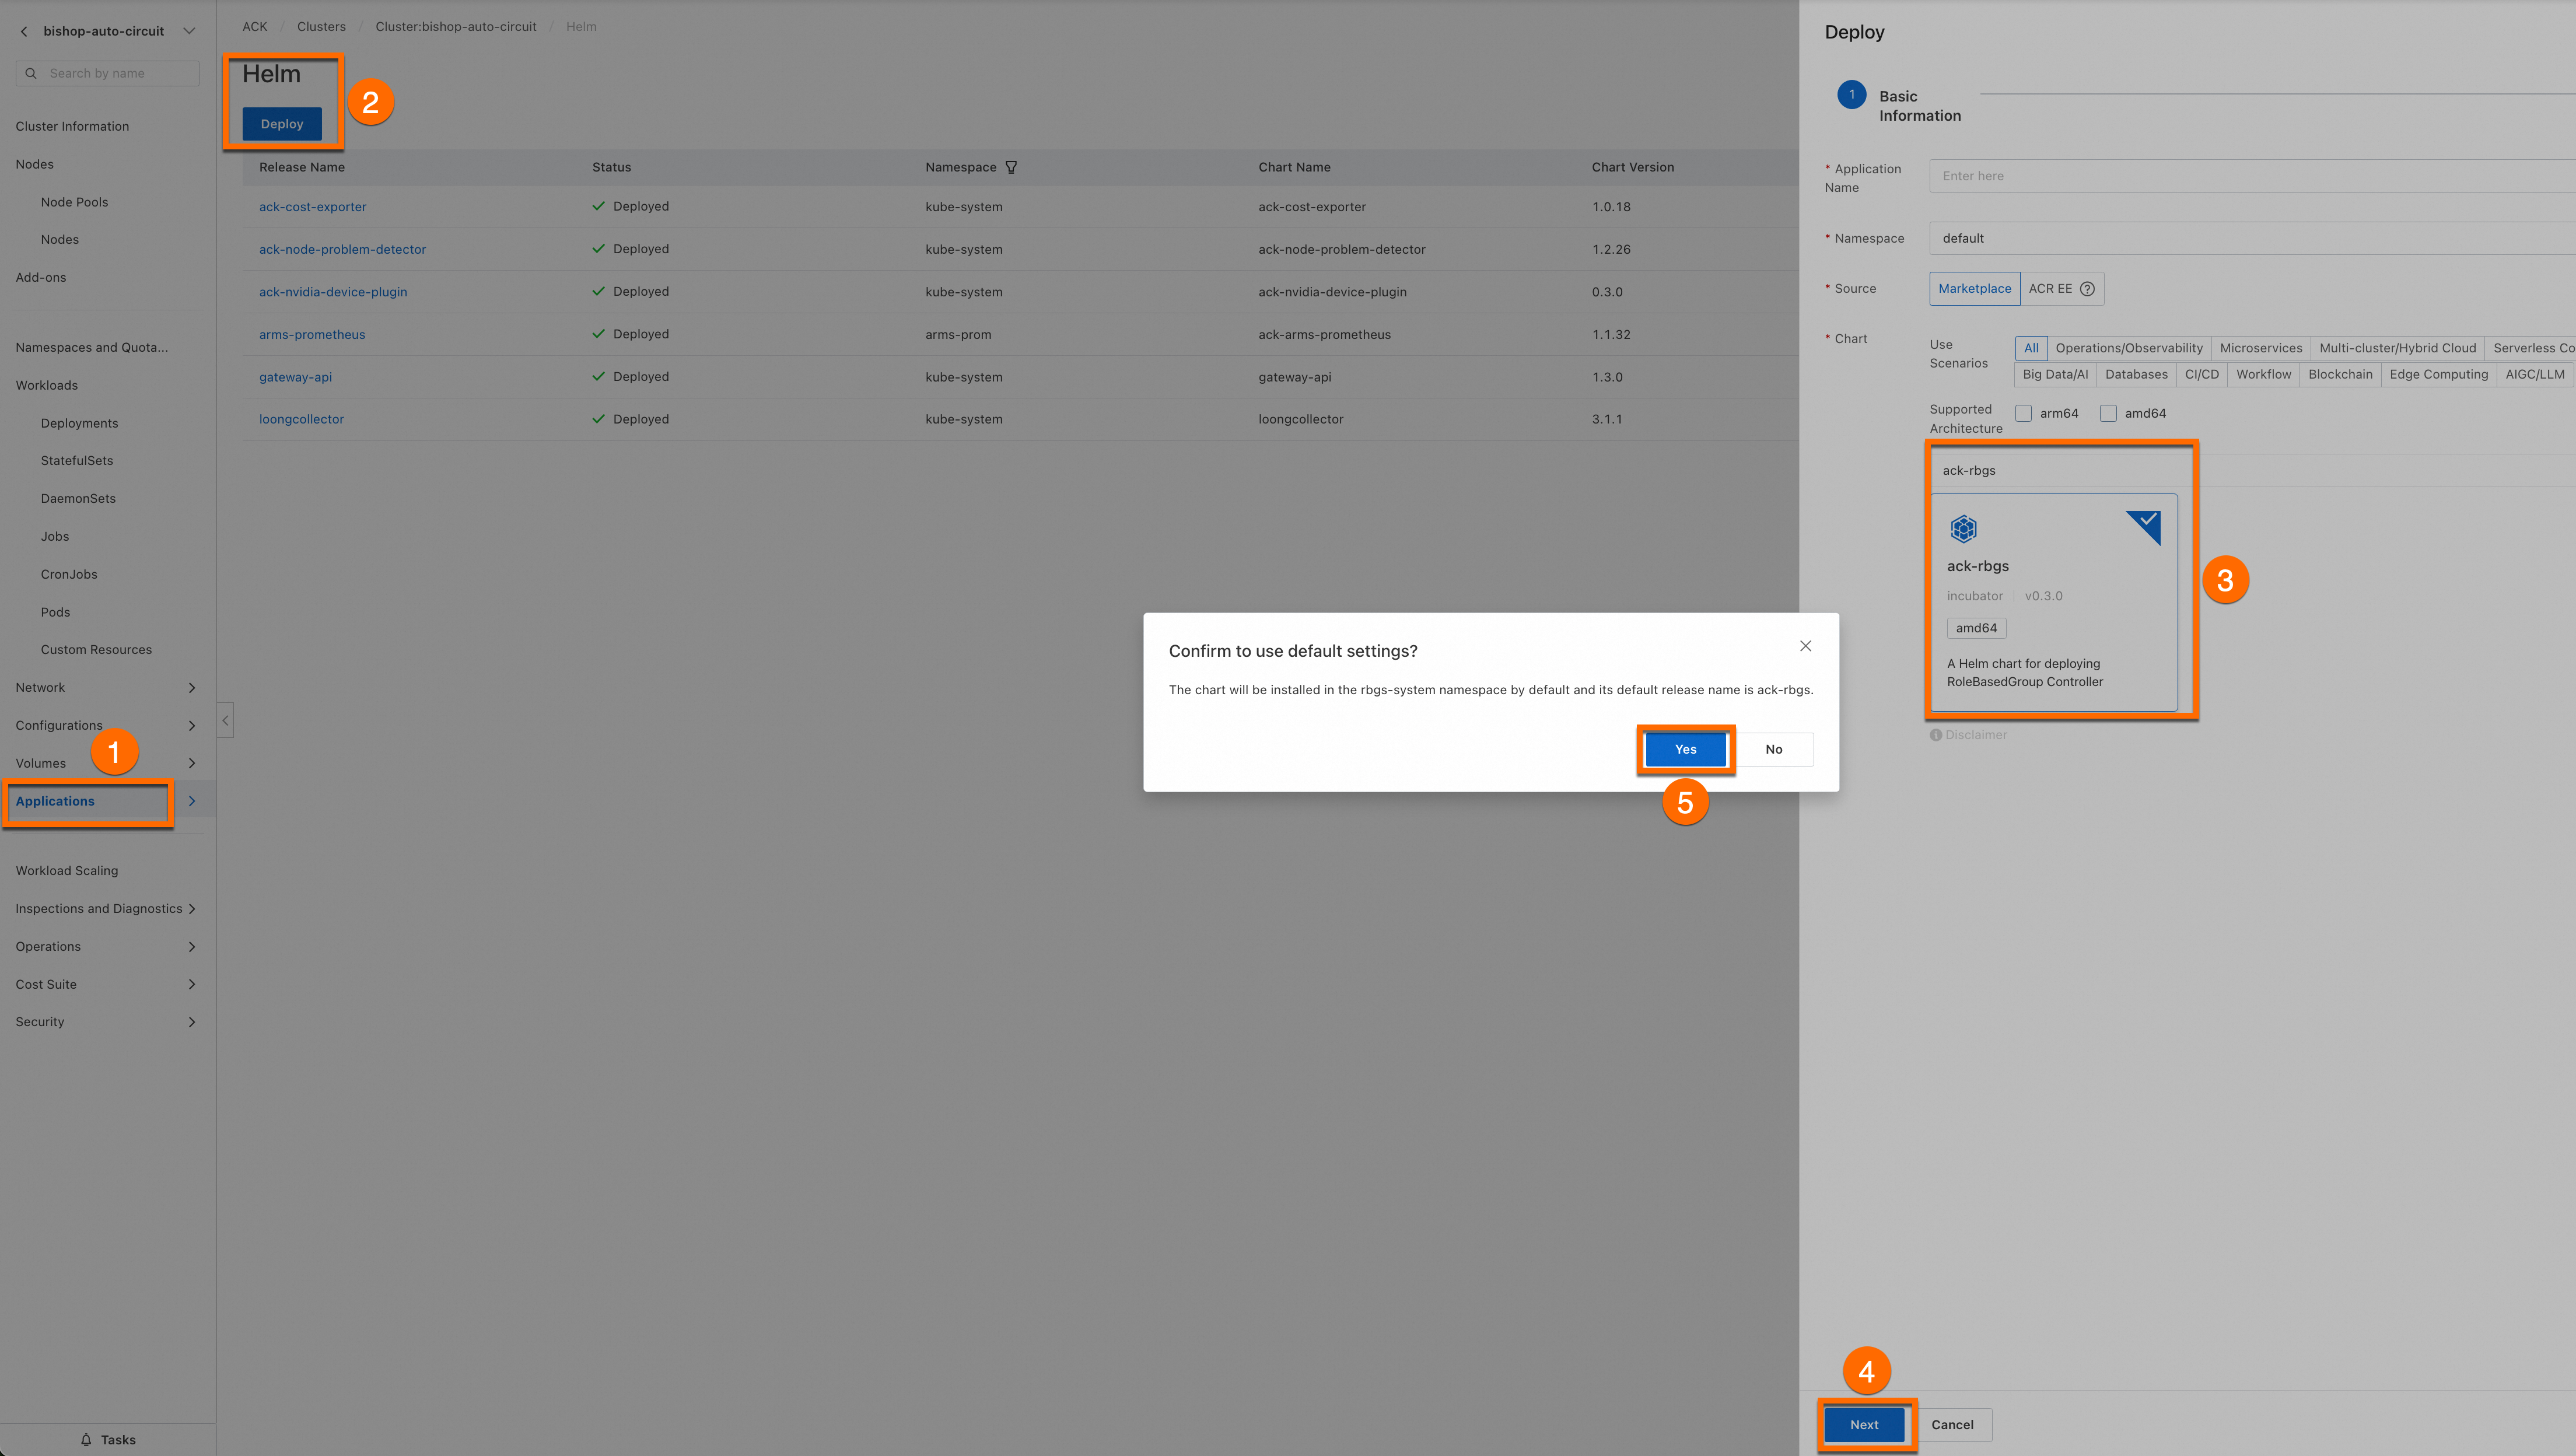
How it works
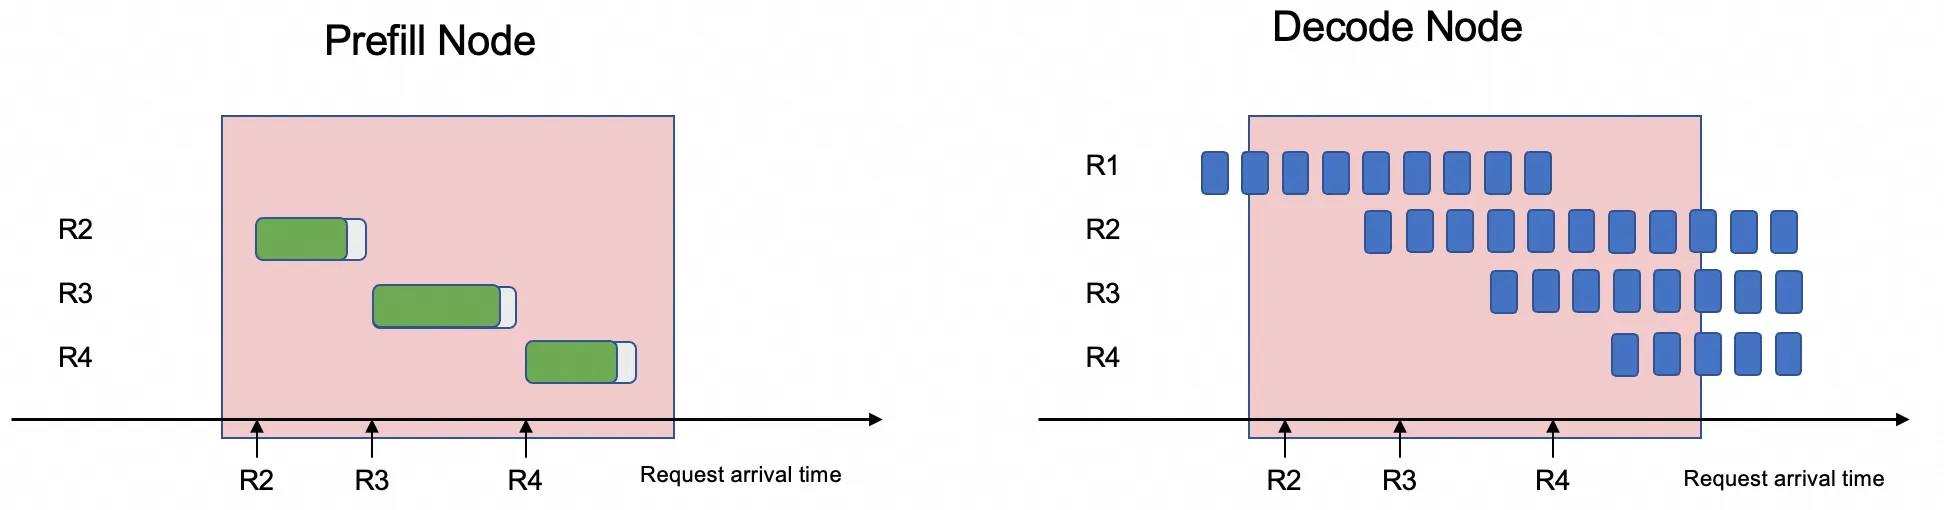
Request lifecycle in the Dynamo PD disaggregation architecture:
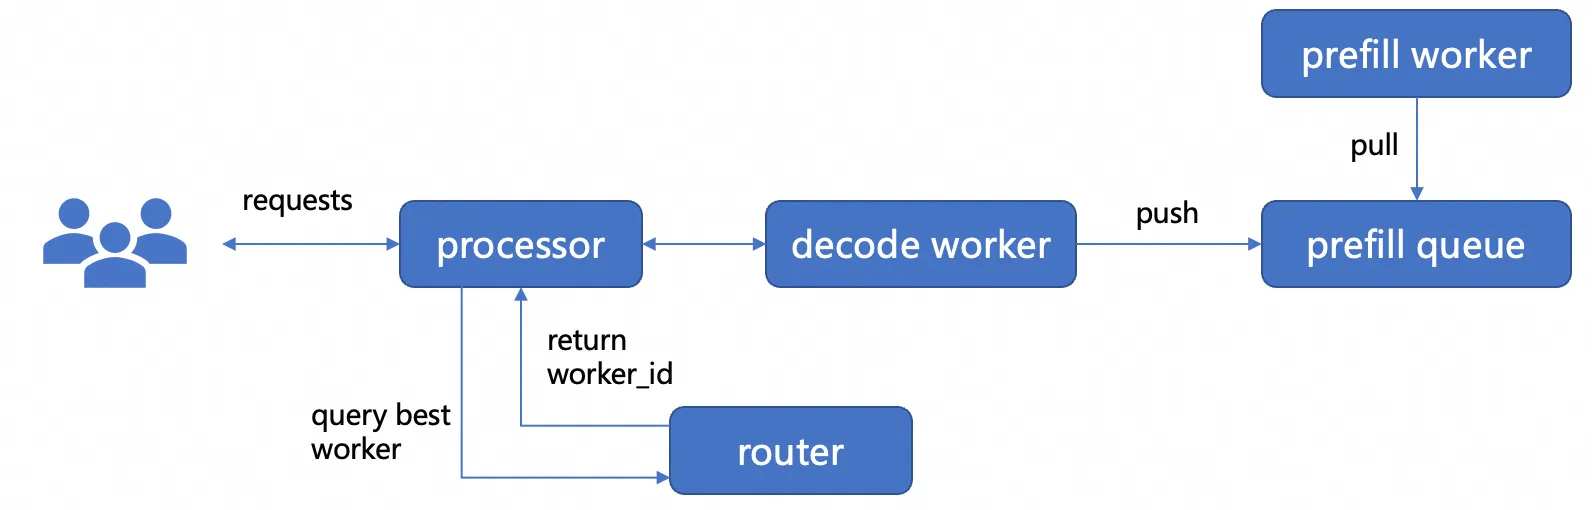
-
A request arrives at the processor, whose router selects an available decode worker and forwards the request.
-
The decode worker decides whether to prefill locally or offload to a remote prefill worker. In disaggregated mode, it enqueues a prefill request.
-
A prefill worker dequeues and runs prefill.
-
The prefill worker transfers the KV cache to the decode worker via NIXL, which then generates tokens.
Two external services underpin this flow:
-
etcd — used for service discovery. NIXL registers with etcd so that workers can locate each other across nodes.
-
NATS — used as the message bus between prefill and decode workers.
Deploy the inference service
This example deploys a 2P1D topology (2 prefill workers, 1 decode worker) with Tensor Parallelism (TP) size 2 per role.
Step 1: Prepare the Qwen3-32B model files
-
Download the Qwen3-32B model from ModelScope.
If
git-lfsis not installed, useyum install git-lfs,apt-get install git-lfs, or another method from Installing Git Large File Storage.git lfs install GIT_LFS_SKIP_SMUDGE=1 git clone https://www.modelscope.cn/Qwen/Qwen3-32B.git cd Qwen3-32B/ git lfs pull -
Upload the model files to OSS. Log on to the OSS console and note your bucket name. Create a bucket if needed. Then run:
See Install ossutil.
ossutil mkdir oss://<your-bucket-name>/Qwen3-32B ossutil cp -r ./Qwen3-32B oss://<your-bucket-name>/Qwen3-32B -
Create a persistent volume (PV) named
llm-modeland a persistent volume claim (PVC) to mount the model (Create a PV and a PVC). Choose one of the following methods. Option A: Use the ACK console (see the steps below). Option B: Use kubectl. Createllm-model.yamlwith the following content and apply it.-
Create a PV. Log on to the ACK console. Go to your cluster and choose Volumes > Persistent Volumes. Click Create and fill in the fields:
Parameter Value PV Type OSS Volume Name llm-modelAccess Certificate Your AccessKey ID and AccessKey secret for the OSS bucket Bucket ID The OSS bucket you created OSS Path /Qwen3-32B -
Create a PVC. Go to Volumes > Persistent Volume Claims. Click Create and fill in the fields:
Parameter Value PVC Type OSS Name llm-modelAllocation Mode Existing Volumes Existing Volumes Click Select PV and select the PV you just created
apiVersion: v1
kind: Secret
metadata:
  name: oss-secret
stringData:
  akId: <your-oss-ak>       # AccessKey ID for the OSS bucket
  akSecret: <your-oss-sk>   # AccessKey secret for the OSS bucket
---
apiVersion: v1
kind: PersistentVolume
metadata:
  name: llm-model
  labels:
    alicloud-pvname: llm-model
spec:
  capacity:
    storage: 30Gi
  accessModes:
    - ReadOnlyMany
  persistentVolumeReclaimPolicy: Retain
  csi:
    driver: ossplugin.csi.alibabacloud.com
    volumeHandle: llm-model
    nodePublishSecretRef:
      name: oss-secret
      namespace: default
    volumeAttributes:
      bucket: <your-bucket-name>       # OSS bucket name
      url: <your-bucket-endpoint>      # e.g., oss-cn-hangzhou-internal.aliyuncs.com
      otherOpts: "-o umask=022 -o max_stat_cache_size=0 -o allow_other"
      path: <your-model-path>          # e.g., /Qwen3-32B/
---
apiVersion: v1
kind: PersistentVolumeClaim
metadata:
  name: llm-model
spec:
  accessModes:
    - ReadOnlyMany
  resources:
    requests:
      storage: 30Gi
  selector:
    matchLabels:
      alicloud-pvname: llm-model
kubectl create -f llm-model.yaml -
Step 2: Install etcd and NATS
Both services must run before the inference service starts. etcd handles service discovery for NIXL; NATS provides the message bus between prefill and decode workers.
-
Create
etcd.yamlwith the following content.Deploy etcd.
kubectl apply -f etcd.yaml -
Create
nats.yamlwith the following content.Deploy NATS.
kubectl apply -f nats.yaml
Step 3: Deploy the Dynamo PD-disaggregated inference service
-
Create
dynamo-configs.yamlto store the Dynamo graph definition and model configuration.kubectl apply -f dynamo-configs.yaml -
Build or pull the Dynamo runtime container image with vLLM as the backend (Dynamo community).
-
Create
dynamo.yamlto define the RBG. Replace theimageplaceholders with your Dynamo runtime image address.Deploy the service.
kubectl apply -f ./dynamo.yaml
Step 4: Verify the deployment
Monitor pod startup
GPU worker pods take time to pull the image and load model weights. Track progress:
kubectl get pods -l rolebasedgroup.workloads.x-k8s.io/name=dynamo-pd -wWait until all pods show Running and all containers are Ready. The sequence is:
| Pod status | What it means |
|---|---|
Pending |
Waiting for GPU node scheduling or image pull |
Init:0/N |
Init containers running (for example, model pre-checks) |
ContainerCreating |
Image pulled; container starting |
Running 0/1 (not ready) |
Container started; readiness probe not yet passing |
Running 1/1 (ready) |
Container healthy; ready to serve requests |
If a pod stays in Pending for more than a few minutes, check events with kubectl describe pod <pod-name>.
Send a test request
-
Forward the inference service port to your local machine.
ImportantPort forwarding via
kubectl port-forwardis for development and debugging only. Use Ingress management for production access.kubectl port-forward svc/dynamo-service 8000:8000Expected output:
Forwarding from 127.0.0.1:8000 -> 8000 Forwarding from [::1]:8000 -> 8000 -
Send a chat completion request to the model.
curl http://localhost:8000/v1/chat/completions \
  -H "Content-Type: application/json" \
  -d '{"model": "qwen", "messages": [{"role": "user", "content": "Let'\''s test it"}], "stream": false, "max_tokens": 30}'
Expected response:
{"id":"31ac3203-c5f9-4b06-a4cd-4435a78d3b35","choices":[{"index":0,"message":{"content":"<think>\nOkay, the user sent 'Let's test it'. I need to confirm their intent first. They might be testing my response speed or functionality, or maybe they want to","refusal":null,"tool_calls":null,"role":"assistant","function_call":null,"audio":null},"finish_reason":"length","logprobs":null}],"created":1753702438,"model":"qwen","service_tier":null,"system_fingerprint":null,"object":"chat.completion","usage":null}A JSON response with
"object": "chat.completion"confirms the service is running.
Next steps
-
Configure auto scaling for LLM inference services — Scale pods with Horizontal Pod Autoscaler (HPA) and ack-alibaba-cloud-metrics-adapter based on GPU, CPU, and memory utilization to handle traffic spikes and reduce idle costs.
-
Accelerate model loading with Fluid distributed caching — Fluid caches model files across cluster nodes for near-local read speeds, reducing pod startup latency caused by OSS network I/O.