ExternalDNS synchronizes DNS records for Services and Ingresses in your cluster to external DNS services, enabling access to in-cluster network resources through public DNS. This topic explains how to deploy and use ExternalDNS in an ACK cluster.
ExternalDNS supports only Services of the LoadBalancer type and Ingresses. Other Service types are not supported.
Before you begin
Before you begin, ensure that you have:
-
An ACK cluster
-
A domain name registered in Alibaba Cloud DNS that has passed identity verification
-
Access to the ACK console and the RAM console
Step 1: Configure RAM permissions
Grant the required Resource Access Management (RAM) permissions to the worker RAM role of your ACK cluster.
Log on to the ACK console. In the left navigation pane, click Clusters.
On the Clusters page, click the name of your cluster. In the left navigation pane, click Cluster Information.
-
On the Cluster Information page, click the Basic Information tab. Click the link next to Worker RAM Role to navigate to the RAM console and create a permission policy.
-
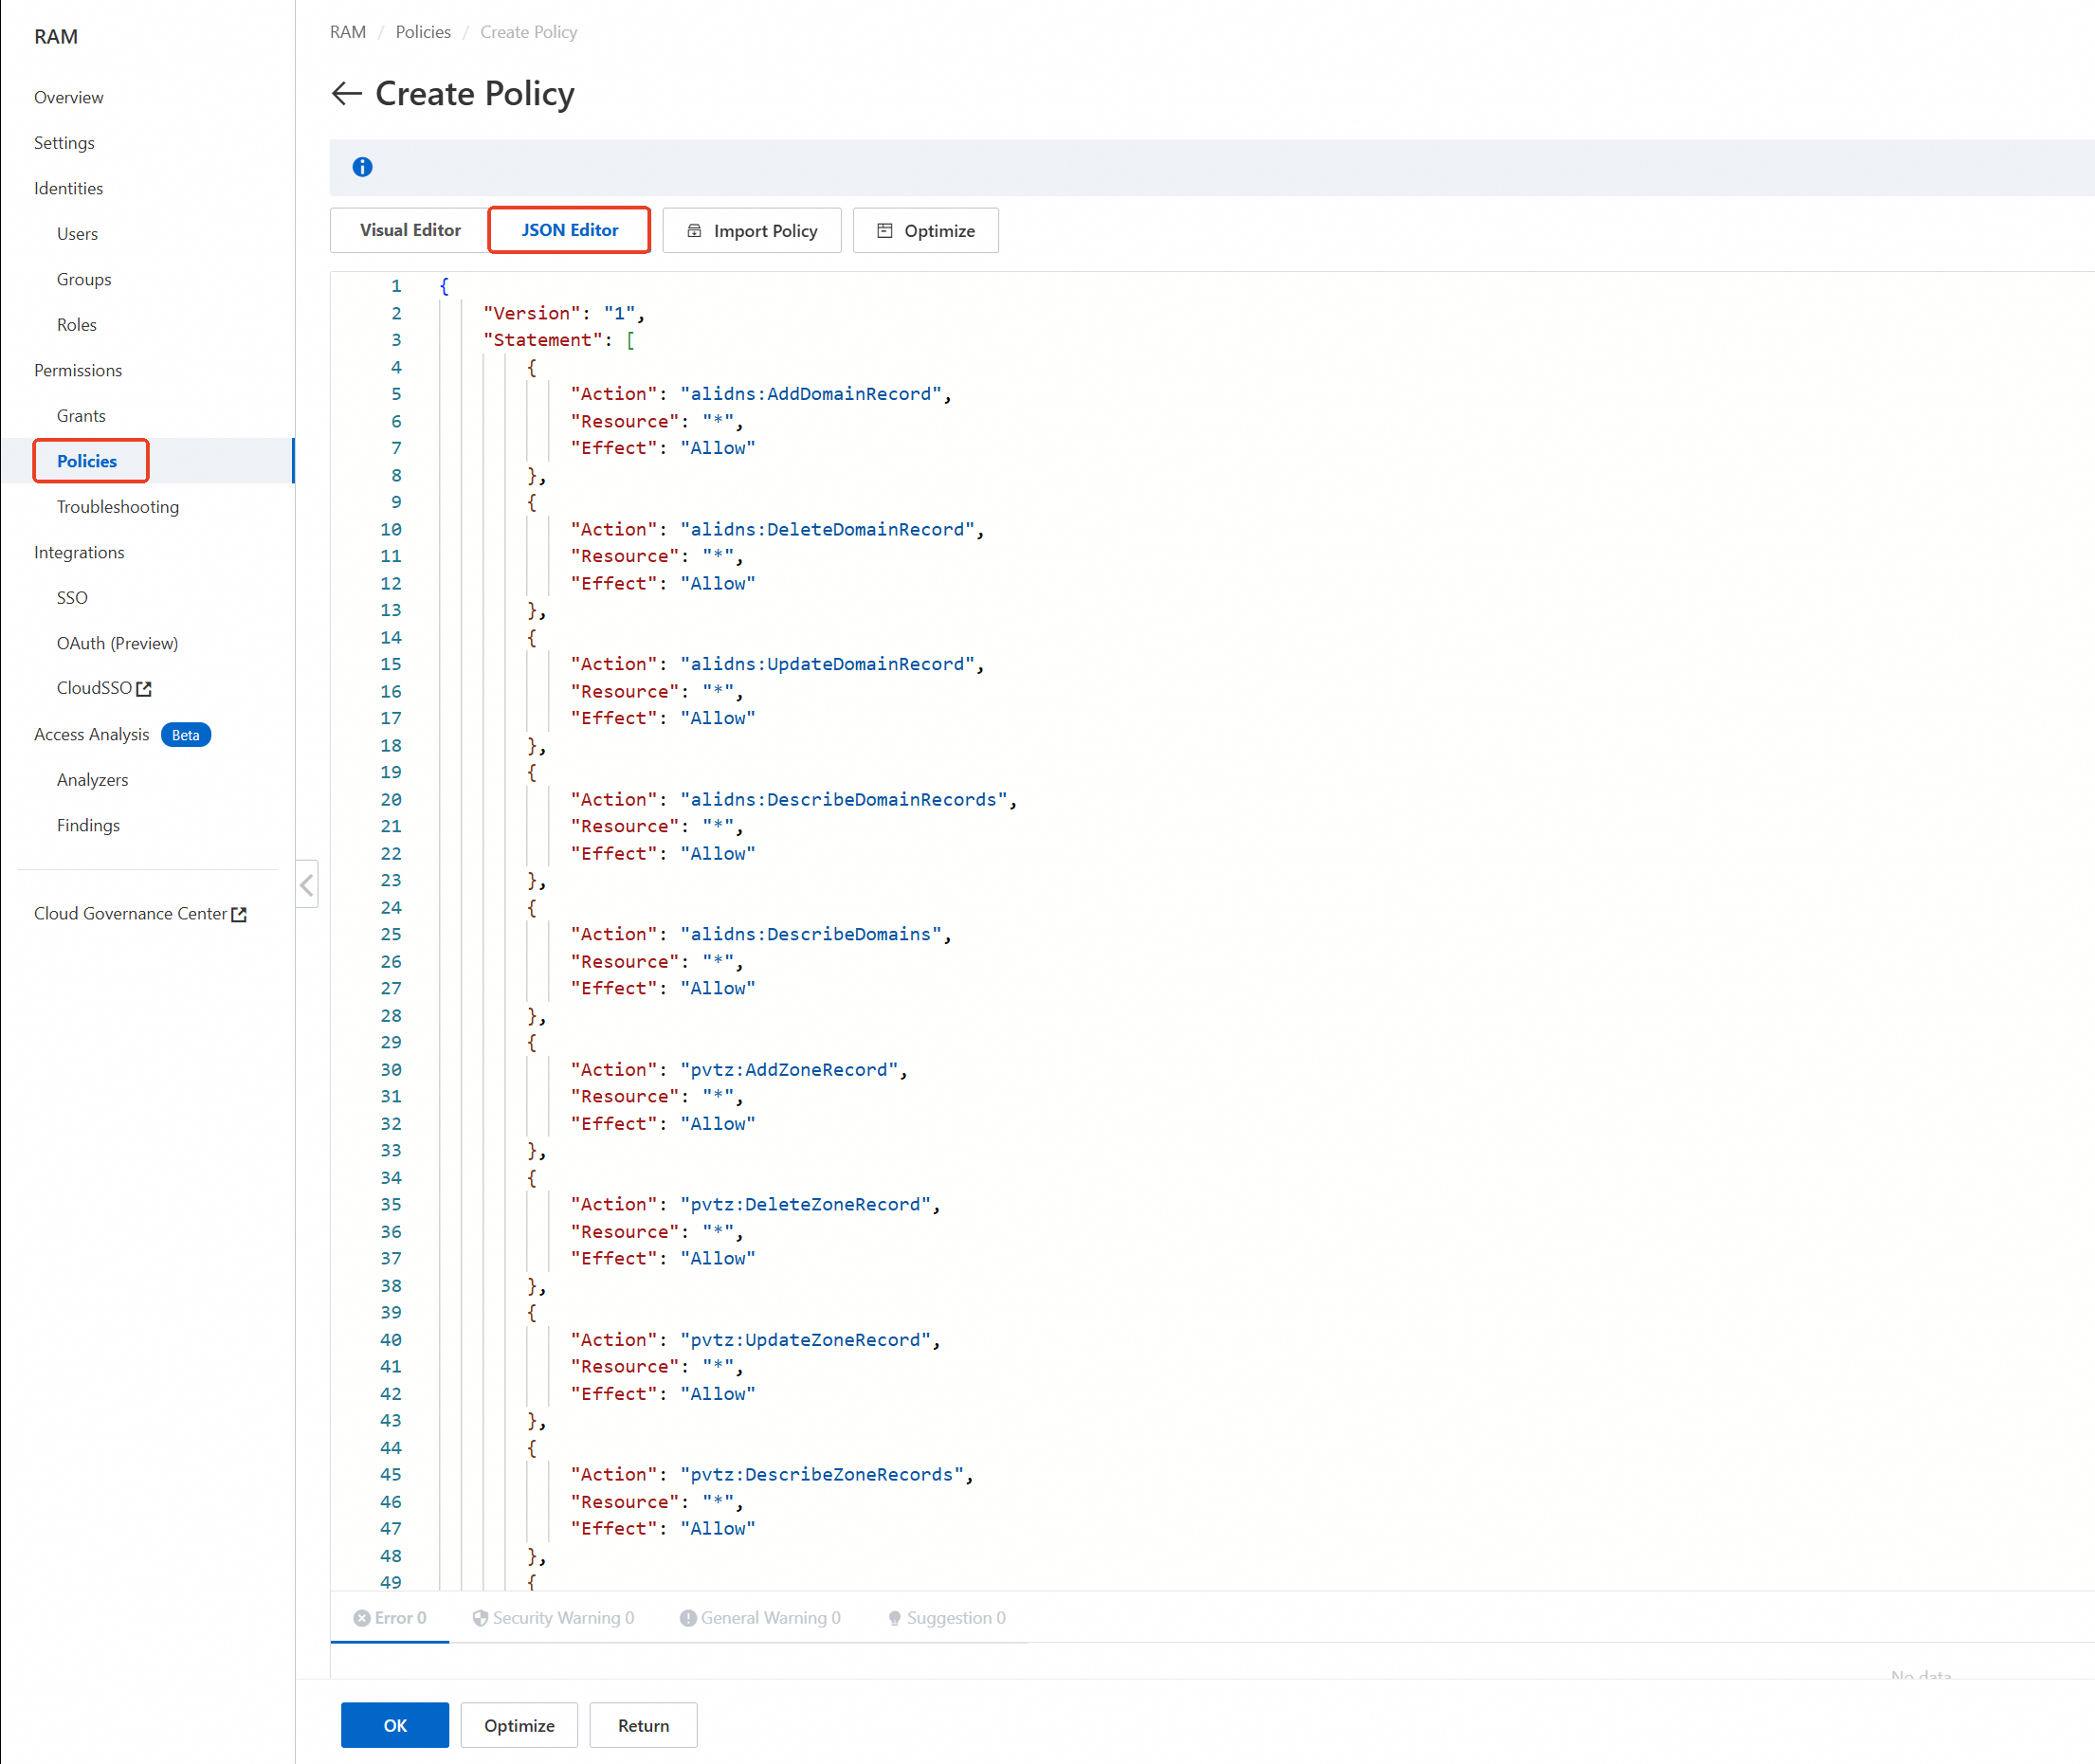
In the navigation pane on the left, click Policies. On the Policies page, click Create Policy.
-
On the Create Policy page, select JSON Editor and paste the following policy into the editor.
This policy grants ExternalDNS the permissions to manage DNS records in both Alibaba Cloud DNS (
alidns) and Alibaba Cloud DNS PrivateZone (pvtz). -
Click OK. Then, enter a Policy Name and click OK to create the custom policy.
-
-
In the left navigation pane, click Roles. Find the target worker RAM role and click Attach Policy in the Actions column. From the All Types drop-down list, select Custom Policy. Select the custom policy that you created and click Attach Policy .
Step 2: Deploy ExternalDNS
Deploy ExternalDNS to your ACK cluster by using the Helm chart in the marketplace.
-
On the Clusters page, click the name of the target cluster. In the left navigation pane, select .
-
On the Helm page, click Deploy. Configure the following parameters.
Parameter
Value
Application Name
external-dns
Namespace
kube-system
Source
Default: Marketplace
Chart
Scenarios: select All. Supported Architecture: select amd64. In the search box, search for external-dns.
Select external-dns and click Next.
-
On the Parameters page, select a Chart Version, specify values for
alibabaCloudZoneTypeandpolicyas needed, and then click OK.alibabaCloudZoneType: Specifies which DNS service ExternalDNS uses. Default value:public.Value
DNS service
publicAlibaba Cloud DNS
privateAlibaba Cloud DNS PrivateZone
policy: Controls how ExternalDNS synchronizes DNS records.Value
Behavior
upsert-onlyCreates and updates records. Does not delete records.
syncCreates, updates, and deletes records. Records are deleted when the corresponding Service or Ingress is removed.
# public or private
alibabaCloudZoneType: public

# upsert-only or sync
# upsert-only would prevent ExternalDNS from deleting any records, omit to enable full synchronization
# sync would delete records once target service or ingress are released
policy: upsert-only
Step 3: Use ExternalDNS
ExternalDNS supports four scenarios: Alibaba Cloud DNS or Alibaba Cloud DNS PrivateZone, each with a Service or an Ingress.
ExternalDNS supports only Services of the LoadBalancer type and Ingresses.
Configure Alibaba Cloud DNS for a Service
-
Log on to the Alibaba Cloud DNS console to obtain your public domain name information.
NoteMake sure that the domain name is valid and has passed identity verification.
-
Create a test application using a domain name that has passed identity verification.
apiVersion: v1 kind: Service metadata: name: nginx annotations: external-dns.alpha.kubernetes.io/hostname: nginx.<public_domain_name> # Replace <public_domain_name> with your domain name that has passed identity verification. spec: type: LoadBalancer ports: - port: 80 name: http targetPort: 80 selector: app: nginx --- apiVersion: apps/v1 kind: Deployment metadata: labels: app: nginx name: nginx spec: replicas: 1 selector: matchLabels: app: nginx template: metadata: labels: app: nginx spec: containers: - image: nginx name: nginxNoteThe
external-dns.alpha.kubernetes.io/hostnameannotation specifies the DNS name to assign. ExternalDNS automatically creates a DNS record for the corresponding IP address.After the test application is created, the automatically created DNS record appears in the Alibaba Cloud DNS console shortly after.
-
Test the DNS resolution.
curl nginx.****.comExpected output:
<!DOCTYPE html>
<html>
<head>
<title>Welcome to nginx!</title>
<style>
html { color-scheme: light dark; }
body { width: 35em; margin: 0 auto;
font-family: Tahoma, Verdana, Arial, sans-serif; }
</style>
</head>
<body>
<h1>Welcome to nginx!</h1>
<p>If you see this page, the nginx web server is successfully installed and
working. Further configuration is required.</p>

<p>For online documentation and support please refer to
<a href="http://nginx.org/">nginx.org</a>.<br/>
Commercial support is available at
<a href="http://nginx.com/">nginx.com</a>.</p>

<p><em>Thank you for using nginx.</em>
Configure Alibaba Cloud DNS for an Ingress
-
Log on to the Alibaba Cloud DNS console to obtain your public domain name information.
NoteMake sure that the domain name is valid and has passed identity verification.
-
Create a test application using a domain name that has passed identity verification.
apiVersion: v1 kind: Service metadata: name: nginx spec: type: LoadBalancer ports: - port: 80 name: http targetPort: 80 selector: app: nginx --- apiVersion: apps/v1 kind: Deployment metadata: labels: app: nginx name: nginx spec: replicas: 1 selector: matchLabels: app: nginx template: metadata: labels: app: nginx spec: containers: - image: nginx name: nginx --- apiVersion: networking.k8s.io/v1 kind: Ingress metadata: name: nginx spec: ingressClassName: nginx rules: - host: nginx-ing.<public_domain_name> # Replace <public_domain_name> with your domain name that has passed identity verification. http: paths: - backend: service: name: nginx port: number: 80 path: / pathType: ImplementationSpecificNoteThe
hostfield specifies the DNS name to assign. ExternalDNS automatically creates a DNS record for the corresponding IP address.After the test application is created, the automatically created DNS record appears in the Alibaba Cloud DNS console shortly after.
-
Test the DNS resolution.
curl nginx-ing.****.comExpected output:
<!DOCTYPE html>
<html>
<head>
<title>Welcome to nginx!</title>
<style>
html { color-scheme: light dark; }
body { width: 35em; margin: 0 auto;
font-family: Tahoma, Verdana, Arial, sans-serif; }
</style>
</head>
<body>
<h1>Welcome to nginx!</h1>
<p>If you see this page, the nginx web server is successfully installed and
working. Further configuration is required.</p>

<p>For online documentation and support please refer to
<a href="http://nginx.org/">nginx.org</a>.<br/>
Commercial support is available at
<a href="http://nginx.com/">nginx.com</a>.</p>

<p><em>Thank you for using nginx.</em>
Configure Alibaba Cloud DNS PrivateZone for a Service
To use PrivateZone, set alibabaCloudZoneType to private in the deployment parameters. The private domain name must be associated with a Virtual Private Cloud (VPC).
-
Log on to the Alibaba Cloud DNS console.
-
In the navigation pane on the left, click Private Zone. On the Private Zone (Compatible with on-premises DNS) page, click Add Zone. In the Add Authoritative Zone sidebar, enter a name in Authoritative Zone and click OK.
-
Find the target zone and click Settings in the Actions column. Manually add a DNS record before you associate the zone with a VPC.

For more information, see Record types supported by PrivateZone.
-
After adding the DNS record, click Effective Scope in the Actions column. In the Effective in VPCs drop-down list, select the VPC that contains the target cluster and click OK to associate the VPC.
-
Verify the domain name resolution.
-
Create a test application in the target cluster.
apiVersion: v1 kind: Service metadata: name: nginx annotations: external-dns.alpha.kubernetes.io/hostname: nginx.<Zone_Name> # Replace <Zone_Name> with the name of the zone that you added on the PrivateZone page. service.beta.kubernetes.io/alibaba-cloud-loadbalancer-address-type: "intranet" # An internal-facing Server Load Balancer instance. spec: type: LoadBalancer ports: - port: 80 name: http targetPort: 80 selector: app: nginx --- apiVersion: apps/v1 kind: Deployment metadata: labels: app: nginx name: nginx spec: replicas: 1 selector: matchLabels: app: nginx template: metadata: labels: app: nginx spec: containers: - image: registry.cn-hangzhou.aliyuncs.com/acs-sample/nginx:latest name: nginxNoteThe
external-dns.alpha.kubernetes.io/hostnameannotation specifies the domain name of the PrivateZone. ExternalDNS automatically creates a DNS record for the corresponding IP address.After the test application is created, the automatically created DNS record appears in the Alibaba Cloud DNS console shortly after.

-
Test the DNS resolution.
curl nginx.****Expected output:
<!DOCTYPE html>
<html>
<head>
<title>Welcome to nginx!</title>
<style>
html { color-scheme: light dark; }
body { width: 35em; margin: 0 auto;
font-family: Tahoma, Verdana, Arial, sans-serif; }
</style>
</head>
<body>
<h1>Welcome to nginx!</h1>
<p>If you see this page, the nginx web server is successfully installed and
working. Further configuration is required.</p>

<p>For online documentation and support please refer to
<a href="http://nginx.org/">nginx.org</a>.<br/>
Commercial support is available at
<a href="http://nginx.com/">nginx.com</a>.</p>

<p><em>Thank you for using nginx.</em>
-
Configure Alibaba Cloud DNS PrivateZone for an Ingress
-
Log on to the Alibaba Cloud DNS console.
-
In the navigation pane on the left, click Private Zone. On the Private Zone (Compatible with on-premises DNS) page, click Add Zone. In the Add Authoritative Zone sidebar, enter a name in Authoritative Zone and click OK.
-
Find the target zone and click Settings in the Actions column. Manually add a DNS record before you associate the zone with a VPC.
For more information, see Record types supported by PrivateZone.
-
After adding the DNS record, click Effective Scope in the Actions column. In the Effective in VPCs drop-down list, select the VPC that contains the target cluster and click OK to associate the VPC.
-
Verify the domain name resolution.
-
Create a test application in the target cluster.
apiVersion: v1
kind: Service
metadata:
  name: nginx
  annotations:
    service.beta.kubernetes.io/alibaba-cloud-loadbalancer-address-type: "intranet"  # An internal-facing Server Load Balancer instance.
spec:
  type: LoadBalancer
  ports:
  - port: 80
    name: http
    targetPort: 80
  selector:
    app: nginx

---
apiVersion: apps/v1
kind: Deployment
metadata:
  labels:
    app: nginx
  name: nginx
spec:
  replicas: 1
  selector:
    matchLabels:
      app: nginx
  template:
    metadata:
      labels:
        app: nginx
    spec:
      containers:
      - image: registry.cn-hangzhou.aliyuncs.com/acs-sample/nginx:latest
        name: nginx
---
apiVersion: networking.k8s.io/v1
kind: Ingress
metadata:
  name: nginx
spec:
  ingressClassName: nginx
  rules:
  - host: nginx-ing.<Zone_Name>  # Replace <Zone_Name> with the name of the zone that you added on the PrivateZone page.
    http:
      paths:
      - backend:
          service:
            name: nginx
            port:
              number: 80
        path: /
        pathType: ImplementationSpecific
After the test application is created, the automatically created DNS record appears in the Alibaba Cloud DNS console shortly after.

-
Test the DNS resolution.
curl nginx-ing.****Expected output:
<!DOCTYPE html>
<html>
<head>
<title>Welcome to nginx!</title>
<style>
html { color-scheme: light dark; }
body { width: 35em; margin: 0 auto;
font-family: Tahoma, Verdana, Arial, sans-serif; }
</style>
</head>
<body>
<h1>Welcome to nginx!</h1>
<p>If you see this page, the nginx web server is successfully installed and
working. Further configuration is required.</p>

<p>For online documentation and support please refer to
<a href="http://nginx.org/">nginx.org</a>.<br/>
Commercial support is available at
<a href="http://nginx.com/">nginx.com</a>.</p>

<p><em>Thank you for using nginx.</em>
-