ACK includes Terway and Flannel as default Container Network Interface (CNI) plugins for most container network requirements. For scenarios that need features unavailable in Terway or Flannel — such as eBPF-based policies or advanced network observability — ACK supports Bring Your Own Container Network Interface (BYOCNI) mode, which lets you create an ACK managed cluster Pro without a pre-installed CNI and then install any CNI plugin manually.
This topic explains how to create a BYOCNI cluster and install a custom CNI plugin.
Disclaimer
CNI plugins affect east-west and north-south traffic within the cluster, as well as core components that depend on direct pod access — for example, webhooks require the API server to reach pods directly.
Alibaba Cloud does not provide a Service-Level Agreement (SLA) for failures caused by custom CNI plugins. You are responsible for network configuration, troubleshooting, and resolving any failures related to the custom CNI plugin. ACK does not provide technical support for custom CNI plugins.
If you need CNI-related support, use the CNI plugins that ACK provides, or work with a commercial CNI vendor for professional third-party support.
Usage notes
If your custom CNI plugin uses an overlay network, the API server of the ACK managed cluster Pro cannot reach any webhooks. This affects all webhook-dependent components, including metrics-server.
Prerequisites
Before you begin, ensure that you have:
An ACK managed cluster Pro (BYOCNI clusters are not supported on other cluster types)
Access to the CreateCluster API or Terraform — BYOCNI clusters cannot be created from the ACK console
kubectl configured to connect to the cluster — see Connect to an ACK cluster using kubectl
Helm CLI installed — see Installing Helm
Step 1: Create a BYOCNI cluster
BYOCNI clusters can only be created using the CreateCluster API or Terraform. Disable the kube-flannel-ds component when creating the cluster.
| Use OpenAPI | Use Terraform |
|---|---|
| <pre>"addons": [<br> {<br> "name": "kube-flannel-ds",<br> "disabled": true<br> }<br>]</pre> | <pre>addons {<br> name = "kube-flannel-ds"<br> disabled = true<br>}</pre> |
(Optional) If you plan to use VPC route mode, configure the cloud-controller-manager add-on at cluster creation time. For configuration details, see cloud-controller-manager parameters.
| Use OpenAPI | Use Terraform |
|---|---|
| <pre>"addons": [<br> {<br> "name": "cloud-controller-manager",<br> "config": "{\"EnableCloudRoutes\":\"true\",\"BackendType\":\"NodePort\"}"<br> }<br>]</pre> | <pre>addons {<br> name = "cloud-controller-manager"<br> config = jsonencode({<br> EnableCloudRoutes = "true"<br> BackendType = "NodePort"<br> })<br>}</pre> |
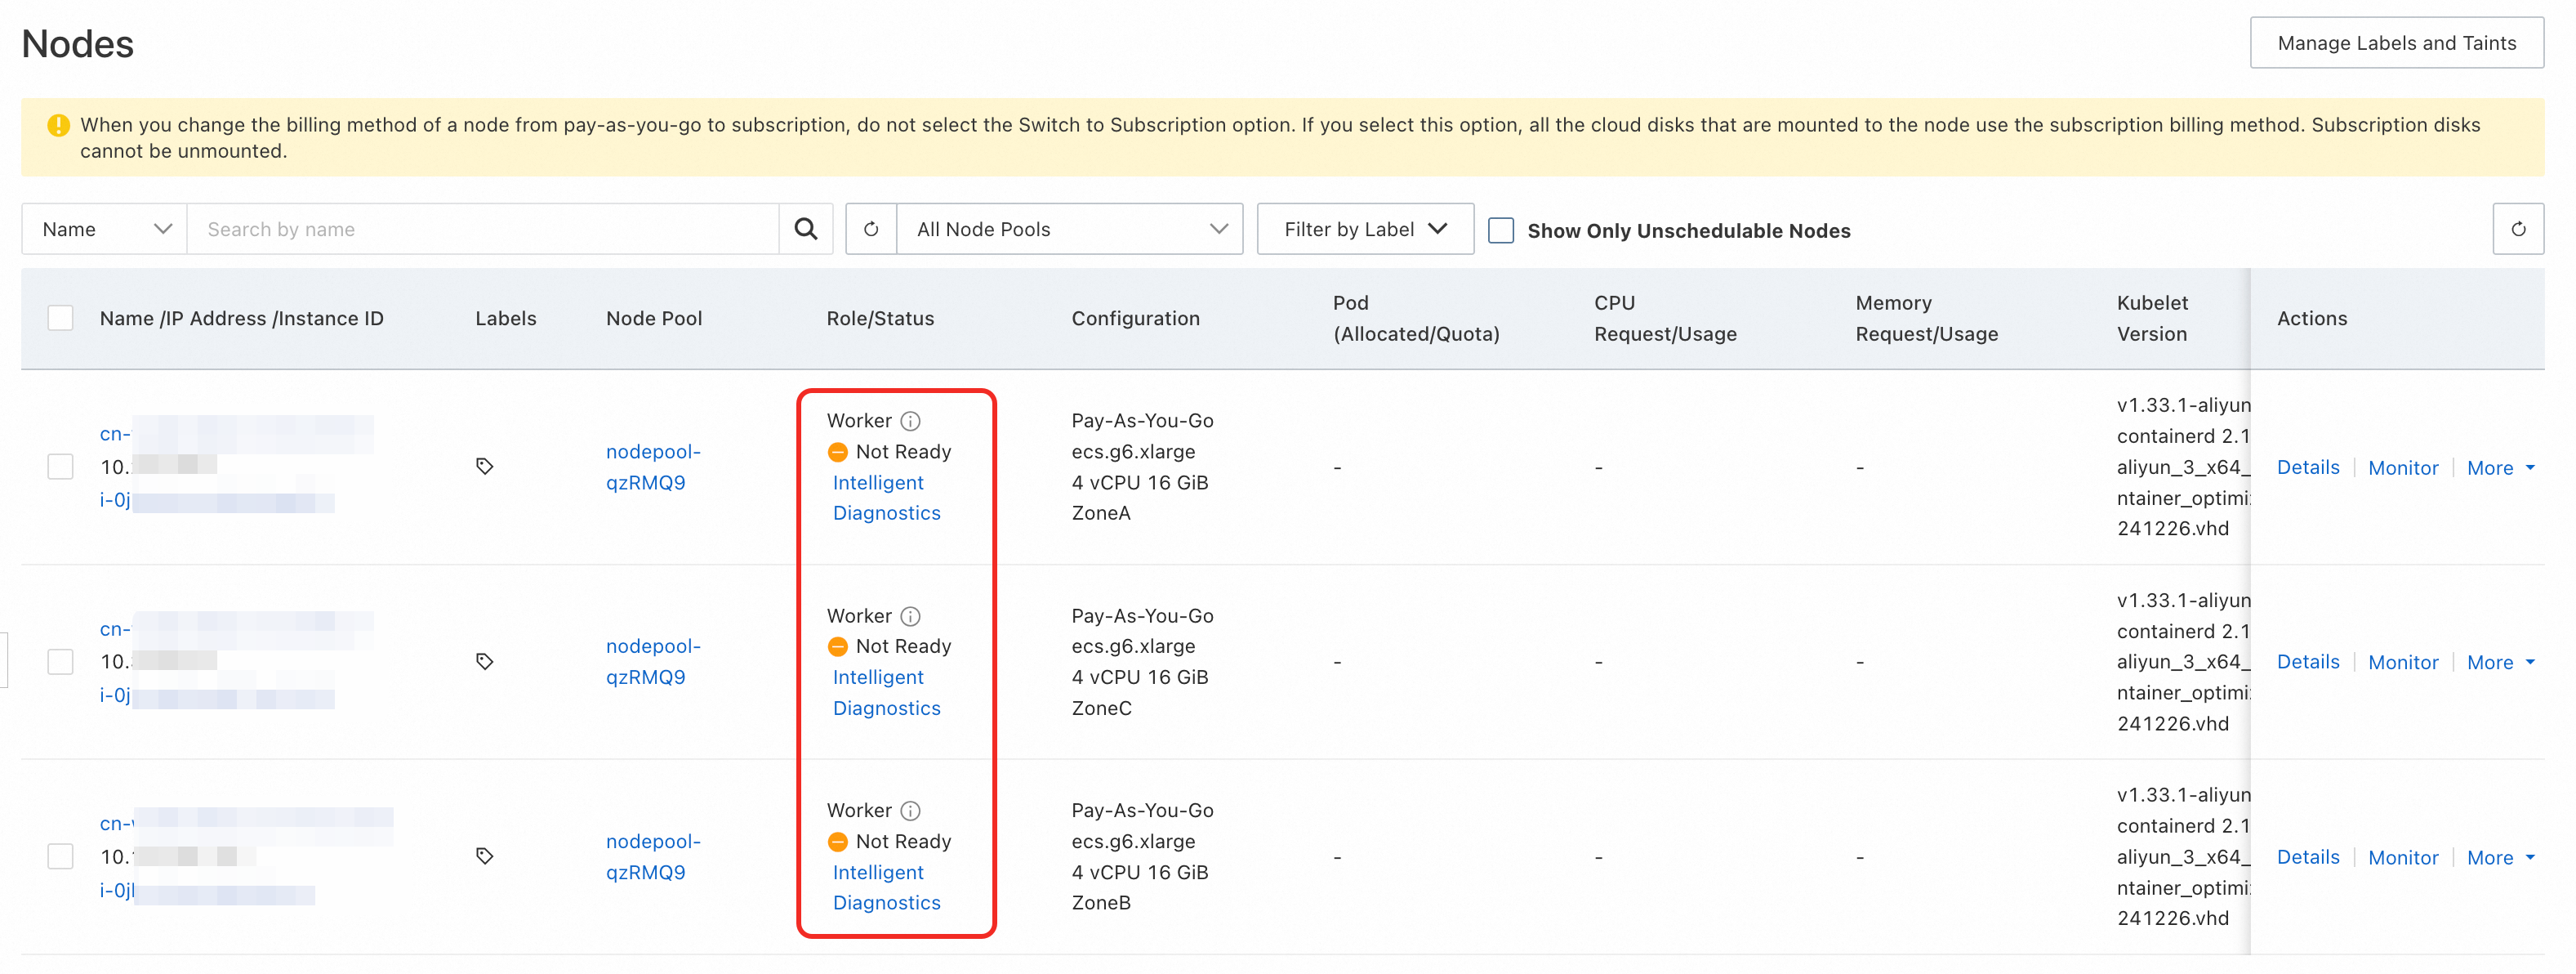
After the cluster is created, all nodes show a status of NotReady. This is expected — no CNI plugin has been installed yet. Node status changes to Ready automatically after you install a CNI plugin.
Step 2: Install a custom CNI plugin
The following steps install Cilium in VPC route mode as an example. Adapt the parameters to match your cluster network plan and CNI plugin of choice.
The Cilium image is hosted outside the Chinese mainland. If the image pull fails, use one of the following solutions:
Subscribe to images from outside-China repositories via Container Registry (ACR). For details, see Subscribe to images from outside-China repositories.
Use Global Accelerator (GA) to accelerate cross-region image pulls. For details, see Use GA to accelerate cross-region image pulls in an ACK cluster.
Add the Cilium Helm repository.
helm repo add cilium https://helm.cilium.io/Install Cilium. Modify the CIDR values to match your cluster's network plan.
Parameter Description ipv4NativeRoutingCIDRPod CIDR block of the cluster. Example: 172.16.0.0/12ipMasqAgent.config.nonMasqueradeCIDRsComma-separated list of CIDR blocks that should not be masqueraded. Set to the pod CIDR block and the VPC CIDR block. Example: 172.16.0.0/12(pod CIDR) and10.0.0.0/8(VPC CIDR)helm install \ --set securityContext.privileged=true \ --set routingMode=native \ --set ipam.mode=kubernetes \ --set ipMasqAgent.enable=true \ --set ipMasqAgent.config.nonMasqueradeCIDRs='{172.16.0.0/12,10.0.0.0/8}' \ --set ipv4NativeRoutingCIDR=172.16.0.0/12 \ cilium cilium/cilium --version 1.17.4 \ --namespace kube-systemThe expected output is:
NAME: cilium
LAST DEPLOYED: Fri Jul 18 16:34:50 2025
NAMESPACE: kube-system
STATUS: deployed
REVISION: 1
TEST SUITE: None
NOTES:
You have successfully installed Cilium with Hubble.

Your release version is 1.17.4.

For any further help, visit https://docs.cilium.io/en/v1.17/gettinghelp
After installation, nodes transition to
Readystatus automatically.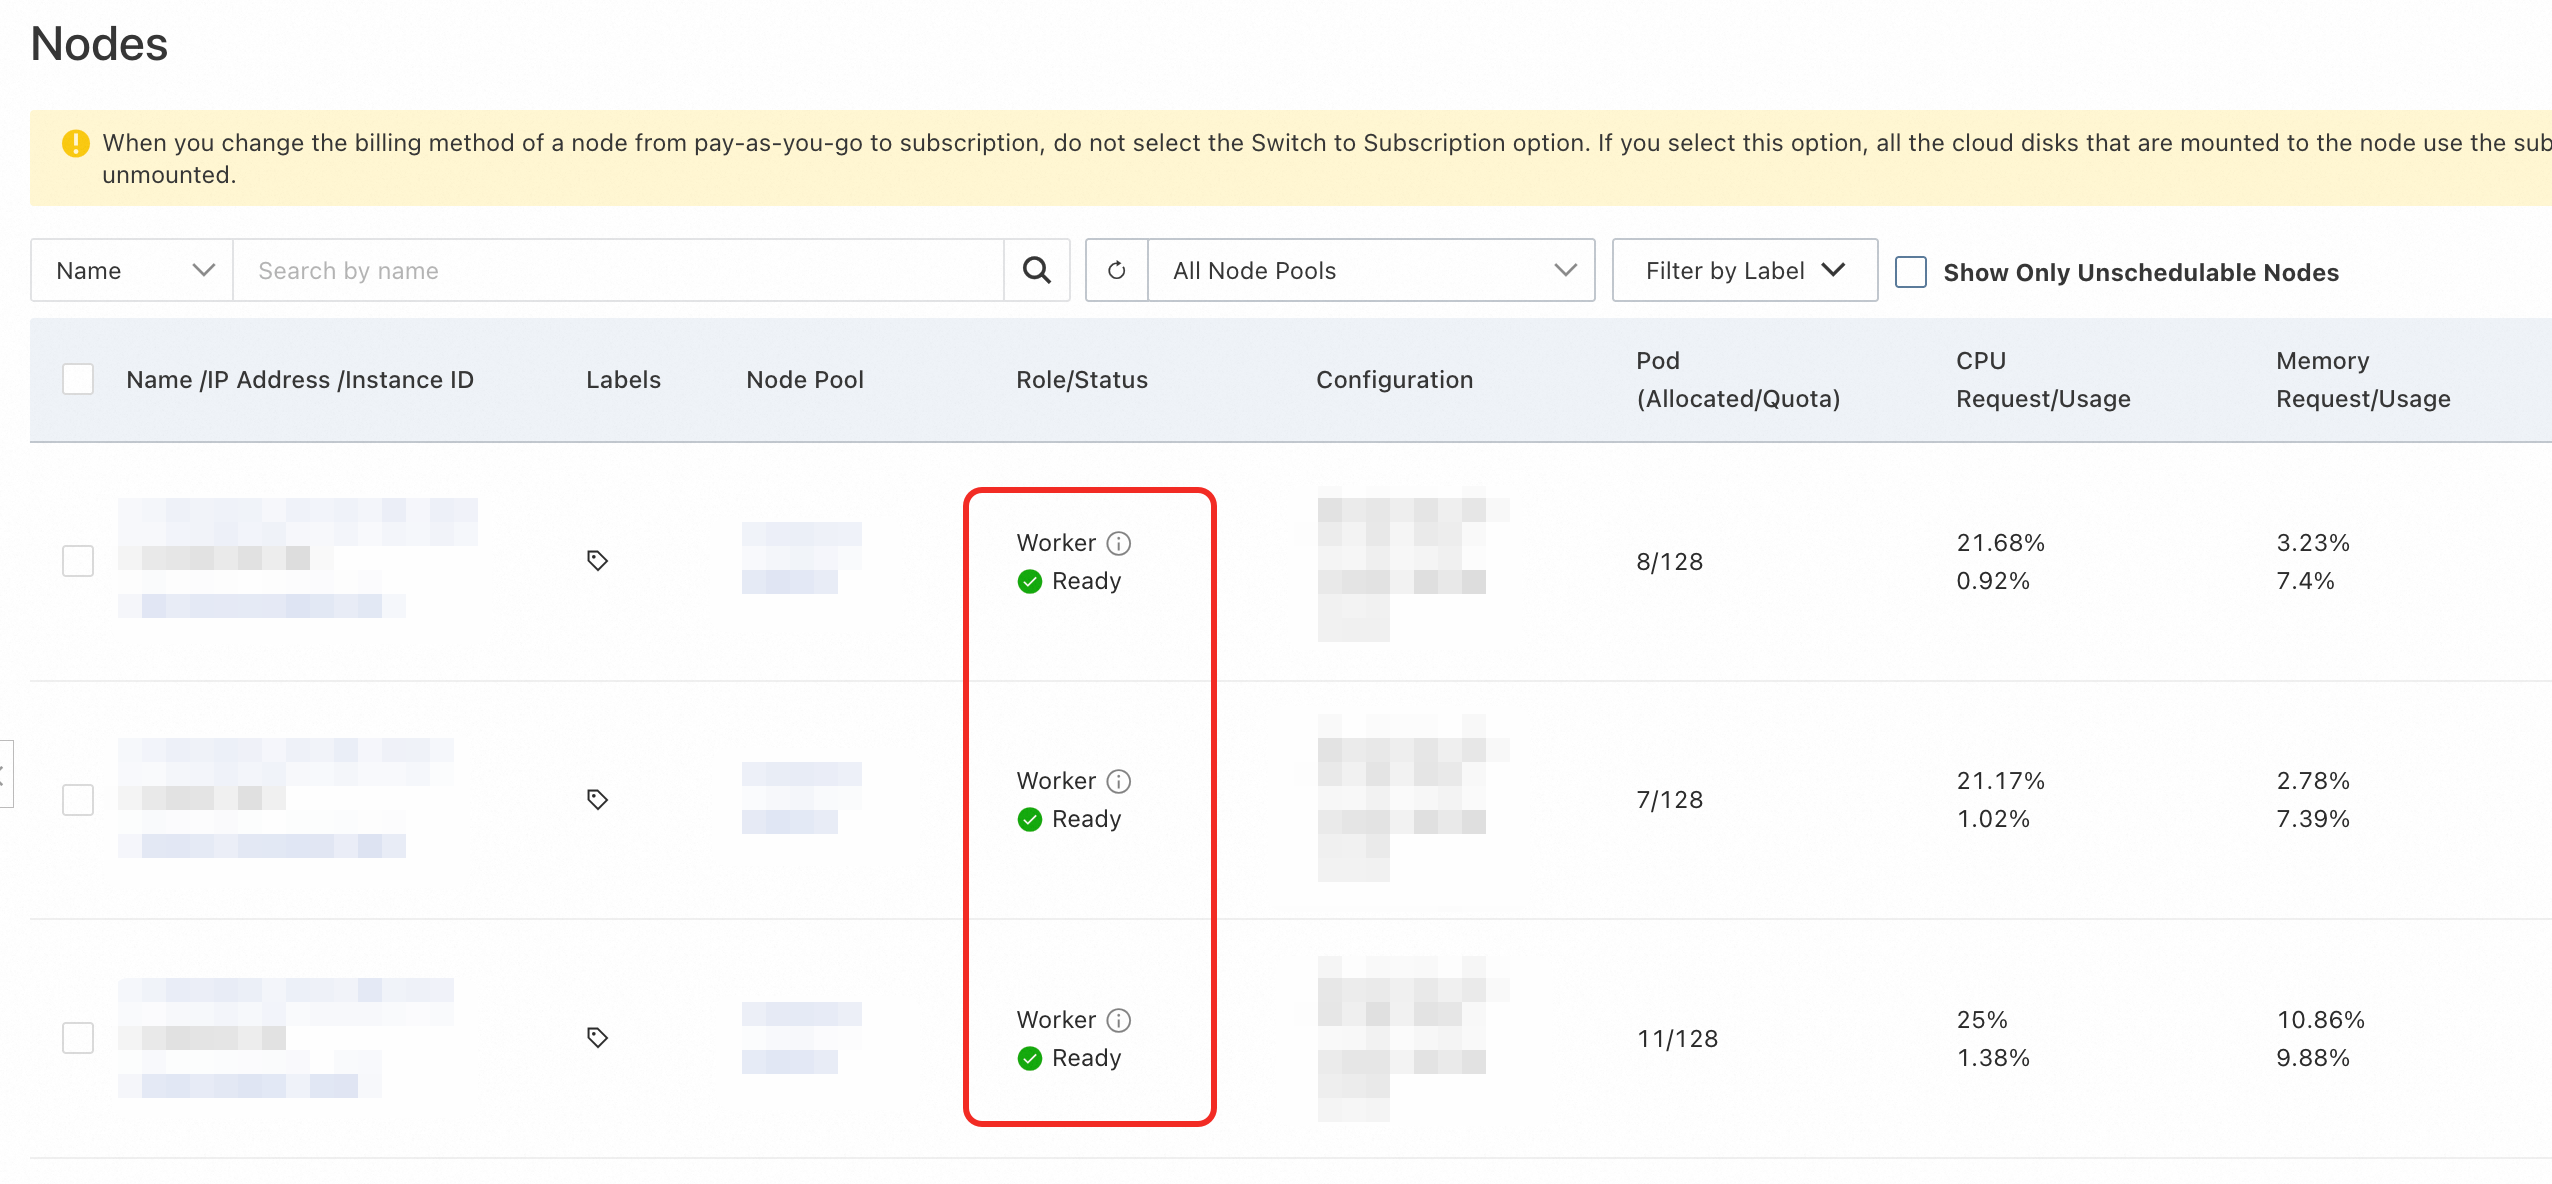
More configurations
The following optional parameters let you customize cluster behavior to match your CNI plugin's requirements.
Assign a PodCIDR block to each node
Some CNI plugins rely on the PodCIDR property of a node to assign IP addresses to pods. Specify container_cidr and node_cidr_mask in the CreateCluster request to set the cluster-wide pod CIDR block and the per-node subnet mask.
If both parameters are set, each node is assigned a PodCIDR block.
If neither parameter is set, no PodCIDR block is assigned to nodes.
For parameter details, see CreateCluster.
cloud-controller-manager parameters
The cloud-controller-manager add-on provides optional features for BYOCNI clusters. Configure these parameters in the add-on configuration when creating the cluster.
| Parameter | Default | Required | Description |
|---|---|---|---|
EnableCloudRoutes | false | No | When enabled, cloud-controller-manager automatically adds a VPC route table entry for the PodCIDR block on each node, making pod IP addresses directly reachable within the VPC. Enable this when using VPC route mode. |
BackendType | NodePort | No | Controls how traffic from load balancers reaches pods. NodePort: traffic goes to node IP addresses and is forwarded to pods via Service rules. Pod: traffic goes directly to pod IP addresses (requires pods to have VPC IP addresses). Valid values: NodePort, Pod. |
Configuration example:
| Use OpenAPI | Use Terraform |
|---|---|
| <pre>"addons": [<br> {<br> "name": "cloud-controller-manager",<br> "config": "{\"EnableCloudRoutes\":\"true\",\"BackendType\":\"NodePort\"}"<br> }<br>]</pre> | <pre>addons {<br> name = "cloud-controller-manager"<br> config = jsonencode({<br> EnableCloudRoutes = "true"<br> BackendType = "NodePort"<br> })<br>}</pre> |