High-availability architectures rely on distributing workloads evenly across multiple zones. This topic describes how to use the ack-autoscaling-placeholder component to achieve rapid, zone-aware elastic scaling in ACK clusters, ensuring that scale-out events add nodes to the correct zones simultaneously.
Prerequisites
At least one vSwitch is created in each zone where you want to scale out instances. For more information, see Create and manage vSwitches. After you create a vSwitch, you can select it when you create and manage node pools.
How it works
The problem
When a node pool is configured with vSwitches from multiple zones in a single scaling group, the Cluster Autoscaler cannot determine which specific zone needs new nodes. As a result, scaled-out instances may concentrate in one zone instead of being distributed evenly. This defeats the purpose of multi-zone deployment.

The solution
ACK addresses this problem with the ack-autoscaling-placeholder component, which uses resource redundancy to transform multi-zone elastic scaling into directed scaling of concurrent node pools. For more information, see Use ack-autoscaling-placeholder to scale pods within seconds. The mechanism works in three stages:
Create a node pool per zone with a zone label. Each node pool is assigned a label that identifies the zone it belongs to.
Deploy placeholder pods using nodeSelector. The
ack-autoscaling-placeholdercomponent schedules a placeholder pod to each zone based on the zone label. These placeholder pods use a PriorityClass with a lower weight than application pods.Application pods preempt placeholder pods. When application pods are pending, they replace the lower-priority placeholder pods on existing nodes. The displaced placeholder pods then become pending themselves. Because the placeholder pods use nodeSelector-based scheduling (rather than antiAffinity), the Cluster Autoscaler can identify the exact zone each pending placeholder needs and triggers directed scale-out to the correct node pools concurrently.
Scaling flow
The following figure shows how simultaneous scaling across two zones works with this architecture.

The
ack-autoscaling-placeholdercomponent creates a placeholder pod in each zone. Placeholder pods have a lower scheduling priority than actual application pods.When application pods enter the Pending state, they quickly preempt the placeholder pods and are deployed on existing nodes in each zone. The preempted placeholder pods then enter the Pending state.
Because the placeholder pods are scheduled using nodeSelector, the Cluster Autoscaler can scale out to the corresponding zones concurrently.
Step 1: Create a node pool for each zone and configure a custom node label
Log on to the ACK console. In the left-side navigation pane, click Clusters.
On the Clusters page, find the cluster that you want to manage and click its name. In the left-side navigation pane, choose Nodes > Node Pools.
Click Create Node Pool and complete the node pool configuration as prompted. This example creates a node pool named auto-zone-I with autoscaling enabled in Zone I. The following table describes only the key parameters. For more information, see Create and manage a node pool. When the status of the auto-zone-I node pool shows Active in the node pool list, the node pool is created.
Parameter Description Node Pool Name auto-zone-I Scaling Mode Select Auto to enable autoscaling. vSwitch Select a vSwitch in Zone I. Node Labels Set the Key of the node label to available_zoneand the Value toi.Repeat the preceding steps to create a node pool with autoscaling enabled for each zone that requires autoscaling.
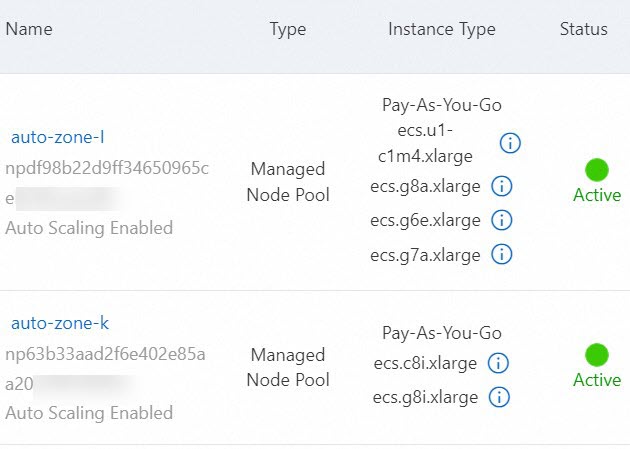
Verification: In the node pool list, confirm that each zone-specific node pool has an Active status and that the zone label is correctly applied.
Step 2: Deploy ack-autoscaling-placeholder and configure placeholder Deployments
Deploy the component
In the left-side navigation pane of the ACK console, choose Marketplace > Marketplace.
Find and click ack-autoscaling-placeholder. On the ack-autoscaling-placeholder page, click Deploy.
Select a cluster from the Cluster drop-down list and a namespace from the Namespace drop-down list, and then click Next. Select a chart version from the Chart Version drop-down list, configure the parameters, and then click OK. After the component is deployed, choose Applications > Helm in the left-side navigation pane. You can confirm that the application is in the Deployed state.
Update the Helm release with placeholder Deployments
In the left-side navigation pane of the details page, choose Applications > Helm.
On the Helm page, click Update in the Actions column of ack-autoscaling-placeholder-default.
In the Update Release panel, update the YAML file based on the following example, and then click OK. Deploy a placeholder for each zone and define a placeholder Deployment for each zone. This example creates placeholder Deployments in Zones I, K, and H. Each entry in the
deploymentslist follows the same structure. The first entry below is fully annotated; the subsequent entries differ only in thenameandnodeSelectorvalues. The following table summarizes the fields you must change for each zone: After the update succeeds, placeholder Deployments are created for each zone.Field Zone I Zone K Zone H nameack-place-holder-Iack-place-holder-Kack-place-holder-HnodeSelector{"avaliable_zone":i}{"avaliable_zone":k}{"avaliable_zone":h}deployments: # --- Zone I placeholder --- - affinity: {} annotations: {} containers: - image: registry-vpc.cn-beijing.aliyuncs.com/acs/pause:3.1 imagePullPolicy: IfNotPresent name: placeholder resources: requests: cpu: 3500m # CPU request for each placeholder pod. memory: 6 # Memory request for each placeholder pod. imagePullSecrets: {} labels: {} name: ack-place-holder-I # Deployment name. Use a unique suffix per zone. nodeSelector: {"avaliable_zone":i} # Must match the node label key and value from Step 1. replicaCount: 10 # Number of placeholder pods per zone. tolerations: [] # --- Zone K placeholder (same structure, different zone) --- - affinity: {} annotations: {} containers: - image: registry-vpc.cn-beijing.aliyuncs.com/acs/pause:3.1 imagePullPolicy: IfNotPresent name: placeholder resources: requests: cpu: 3500m memory: 6 imagePullSecrets: {} labels: {} name: ack-place-holder-K nodeSelector: {"avaliable_zone":k} replicaCount: 10 tolerations: [] # --- Zone H placeholder (same structure, different zone) --- - affinity: {} annotations: {} containers: - image: registry-vpc.cn-beijing.aliyuncs.com/acs/pause:3.1 imagePullPolicy: IfNotPresent name: placeholder resources: requests: cpu: 3500m memory: 6 imagePullSecrets: {} labels: {} name: ack-place-holder-H nodeSelector: {"avaliable_zone":h} replicaCount: 10 tolerations: [] fullnameOverride: "" nameOverride: "" podSecurityContext: {} priorityClassDefault: enabled: true name: default-priority-class value: -1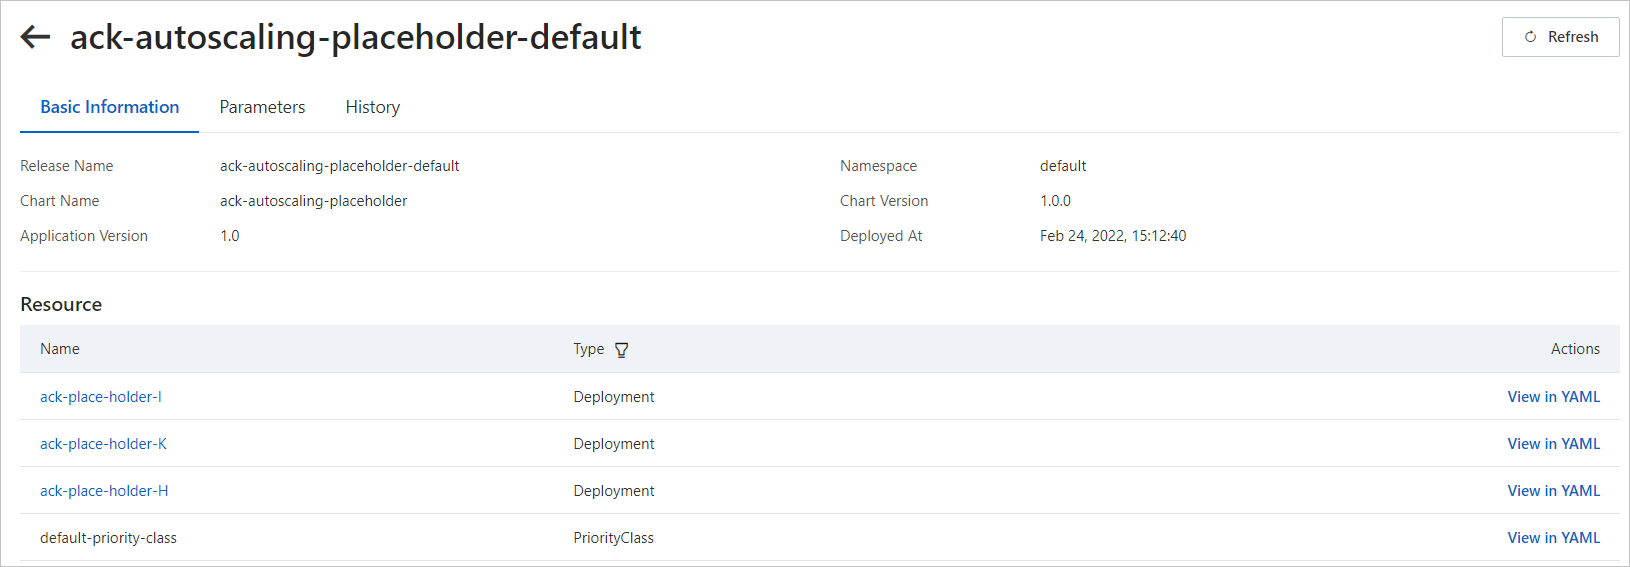
Verification: Choose Applications > Helm and confirm that ack-autoscaling-placeholder-default shows the Deployed state with the updated configuration.
Step 3: Create a PriorityClass for the workload
The workload PriorityClass must have a higher value than the placeholder PriorityClass (-1) so that application pods can preempt placeholder pods. You have two options:
Option A: Named PriorityClass -- Assign it explicitly to specific workloads via
priorityClassName.Option B: Global PriorityClass -- Applies automatically to all pods that do not specify a PriorityClass.
Option A: Named PriorityClass
Create a file named priorityClass.yaml and copy the following content to the file:
   apiVersion: scheduling.k8s.io/v1
   kind: PriorityClass
   metadata:
     name: high-priority
   value: 1000000              # The priority value. Must be higher than the default priority value (-1) of the placeholder pods created in Step 2.
   globalDefault: false
   description: "This priority class should be used for XYZ service pods only."
Option B: Global PriorityClass
If you do not need a separate PriorityClass for each pod, you can configure a global PriorityClass as the default. After this takes effect, pods without a specified PriorityClass automatically adopt this priority value, and preemption takes effect automatically.
   apiVersion: scheduling.k8s.io/v1
   kind: PriorityClass
   metadata:
     name: global-high-priority
   value: 1                              # The priority value. Must be higher than the default priority value (-1) of the placeholder pods created in Step 2.
   globalDefault: true
   description: "This priority class should be used for XYZ service pods only."
Apply the PriorityClass
Create the PriorityClass. Expected output:
kubectl apply -f priorityClass.yamlpriorityclass.scheduling.k8s.io/high-priority created
Verification: Runkubectl get priorityclassand confirm thathigh-priority(orglobal-high-priority) appears in the list with the correct priority value.
Step 4: Create a workload
This example uses Zone I.
Create a file named workload.yaml and copy the following content to the file:
   apiVersion: apps/v1
   kind: Deployment
   metadata:
     name: placeholder-test
     labels:
       app: nginx
   spec:
     replicas: 1
     selector:
       matchLabels:
         app: nginx
     template:
       metadata:
         labels:
           app: nginx
       spec:
         nodeSelector:                        # Rules used to select nodes.
           avaliable_zone: "i"
         priorityClassName: high-priority     # The PriorityClass configured in Step 3. Optional if global configuration is enabled.
         containers:
         - name: nginx
           image: nginx:1.7.9
           ports:
           - containerPort: 80
           resources:
             requests:
               cpu: 3                         # The resource request of the workload.
               memory: 5
Deploy the workload. Expected output: After the deployment, on the Workloads > Pods page, you can see that the workload PriorityClass is higher than the placeholder pod PriorityClass. The placeholder pod runs on the scaled-out node and triggers concurrent scaling by the Cluster Autoscaler to prepare for the next workload scaling event. Choose Nodes > Nodes. On the Nodes page, you can confirm that the workload pod runs on the node that previously hosted the placeholder pod.
kubectl apply -f workload.yamldeployment.apps/placeholder-test created
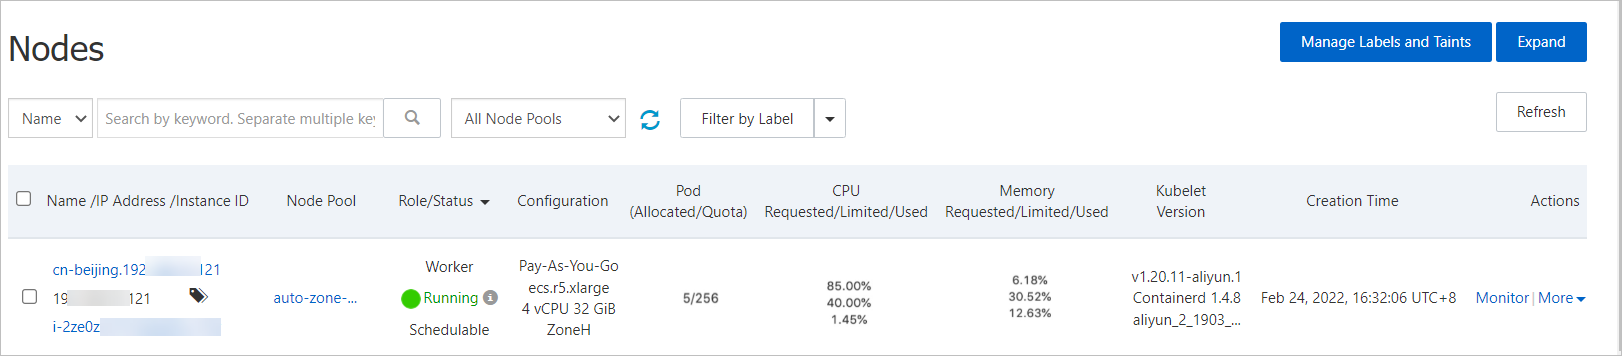
Verification: On the Workloads > Pods page, confirm that the workload pod is Running and that the displaced placeholder pod has triggered node scale-out in the correct zone.