To expose a Model Context Protocol (MCP) service running in a Container Service for Kubernetes (ACK) cluster to external Large Language Models (LLMs), install the ack-agent-gateway extension. Built on the Gateway API, it lets you route MCP traffic quickly and securely.
How it works
The gateway is composed of three Kubernetes resources that work together:
-
Backend: A CustomResourceDefinition (CRD) introduced by
ack-agent-gatewaythat extends the standard Gateway API. Because the standardbackendReffield does not support MCP-specific attributes such as Streamable HTTP transport,Backendlets you define the protocol type and access path for your MCP service precisely. -
Gateway: Defines the traffic entrypoint, specifies the listener port and protocol, and uses
ack-agent-gatewayas its controller. -
HTTPRoute: Defines routing rules that forward incoming traffic from the Gateway to your
Backendresource.
ack-agent-gateway also provides a TrafficPolicy CRD for attaching policies such as API key authentication and rate limiting to routes, without changing any application code.
Prerequisites
Before you begin, ensure that you have:
-
An ACK managed cluster running Kubernetes 1.32 or later
-
Gateway API version 1.3.0 or later installed in the cluster
Install ack-agent-gateway
ack-agent-gateway is a gateway component that implements the standard Gateway API to simplify configuring and managing traffic for your MCP services.
-
On the ACK Clusters page, click the name of your cluster. In the left navigation pane, choose Applications > Helm.
-
On the Helm page, click Deploy. In the Chart section, search for and select ack-agent-gateway. Keep the default settings and click Next.
By default, the component is installed in the
ack-agent-gatewaynamespace, and its Helm release shares the same name. -
On the Parameters step, select the latest chart version and click OK.
-
After installation completes, verify that the component status on the Helm page is Deployed.
Step 1: Deploy a sample MCP service
Deploy a sample MCP service to validate the gateway in later steps.
-
Create a file named
mcp-server.yamlwith the following content. This YAML manifest defines aDeploymentand aServicethat deploy the sample service in thedefaultnamespace.apiVersion: apps/v1 kind: Deployment metadata: name: demo-mcp spec: replicas: 1 selector: matchLabels: app.kubernetes.io/name: demo-mcp template: metadata: labels: app.kubernetes.io/name: demo-mcp spec: containers: - image: registry-cn-hangzhou.ack.aliyuncs.com/dev/sample-mcp-server-fetch:v0.2.0 imagePullPolicy: IfNotPresent name: mcp ports: - containerPort: 8000 name: server protocol: TCP --- apiVersion: v1 kind: Service metadata: name: demo-mcp-server spec: ports: - name: server port: 8000 protocol: TCP targetPort: 8000 selector: app.kubernetes.io/name: demo-mcp sessionAffinity: None type: ClusterIP -
Apply the manifest.
kubectl apply -f mcp-server.yaml -
Verify that the pod is running.
kubectl get pod -l app.kubernetes.io/name=demo-mcpThe pod should be in the
Runningstate:NAME READY STATUS RESTARTS AGE demo-mcp-58fddf4cd9-8jvzn 1/1 Running 0 3s
Step 2: Create a Gateway and routing rules
Create the three resources that form the gateway entrypoint for the MCP service deployed in the previous step.
-
Create a file named
mcp-gateway.yamlwith the following content.# Define the details of the MCP backend service apiVersion: agentgateway.alibabacloud.com/v1alpha1 kind: Backend metadata: name: test-mcp spec: type: MCP # Define the backend type as MCP mcp: targets: - name: mcp-target # The unique identifier for the target static: # The FQDN of the backend Kubernetes Service host: demo-mcp-server.default.svc.cluster.local # The protocol path of the MCP service path: /mcp port: 8000 # Define the transport protocol for MCP, which is Streamable HTTP in this case protocol: StreamableHTTP --- # Define the gateway instance as the traffic entrypoint apiVersion: gateway.networking.k8s.io/v1 kind: Gateway metadata: name: test-mcp-gateway spec: gatewayClassName: ack-agent-gateway # Specify ack-agent-gateway as the gateway controller listeners: - name: http port: 80 protocol: HTTP allowedRoutes: namespaces: from: Same # Allow only routing rules created in the same namespace to be associated with this gateway --- # Define routing rules to direct traffic to the MCP backend apiVersion: gateway.networking.k8s.io/v1 kind: HTTPRoute metadata: name: route-for-mcp-backend spec: parentRefs: - group: gateway.networking.k8s.io kind: Gateway name: test-mcp-gateway # Associate with the Gateway created above rules: - backendRefs: # Note: The backendRef here references the custom Backend CRD - group: agentgateway.alibabacloud.com kind: Backend name: test-mcp -
Apply the manifest.
kubectl apply -f mcp-gateway.yaml -
Get the public IP address of the gateway.
kubectl get gateway test-mcp-gatewayRecord the IP address from the
ADDRESScolumn. You will use it in the next step.NAME CLASS ADDRESS PROGRAMMED AGE test-mcp-gateway ack-agent-gateway 114.55.xx.xx True 13m
Step 3: Test service connectivity
Use MCP Inspector to simulate a client and verify that the MCP service is reachable through the gateway.
Prerequisite: Node.js must be installed locally.
-
In your local terminal, run the following command to install and start MCP Inspector.
npx @modelcontextprotocol/inspector@v0.17.5 -
The terminal outputs a local address in the format
http://localhost:xxxx. Open that address in your browser. -
On the MCP Inspector page, fill in the following fields:
-
Transport Type: Select
Streamable HTTP. -
URL: Enter
http://<GATEWAY_IP>:80/mcp, replacing<GATEWAY_IP>with the address you recorded in the previous step.
-
-
Click Connect. A successful connection displays a connected status on the page.
-
(Optional) Click Tools > List Tools to view the tools provided by the MCP service and further verify availability.
(Optional) Step 4: Add API key authentication
Attach API key authentication to the MCP service using a TrafficPolicy resource. This follows the Policy Attachment model, which keeps authentication policies decoupled from the HTTPRoute — no application code changes are needed.
Leaked API keys can be misused to access your MCP service without authorization. Always store API keys in Kubernetes Secrets, rotate them regularly, and never commit them to source control.
-
Create a file named
mcp-api-key.yamlwith the following content. This manifest defines aSecretthat stores two API keys and aTrafficPolicythat attaches the authentication policy to theHTTPRoute.apiVersion: v1 kind: Secret metadata: name: mcp-api-key stringData: # The key (such as key1) is only an identifier. The value (such as key-value-foo) is the actual credential the client must provide. key1: 'key-value-foo' key2: 'key-value-bar' --- apiVersion: agentgateway.alibabacloud.com/v1alpha1 kind: TrafficPolicy metadata: name: test-mcp-apikey-auth spec: targetRefs: # The target for policy attachment - group: gateway.networking.k8s.io kind: HTTPRoute name: route-for-mcp-backend # Attach to the previously created HTTPRoute traffic: authentication: apiKeyAuth: secretRef: name: mcp-api-key # Reference the Secret that stores the credentials -
Apply the authentication policy.
kubectl apply -f mcp-api-key.yaml -
Return to the MCP Inspector page to verify the policy is active.
-
Refresh the page, then click Connect again.
-
The connection fails and the page displays Connection Error. The terminal running MCP Inspector also outputs an error similar to
api key authentication failure, confirming the policy is enforced. -
Click Authentication, enter one of the credentials defined in the Secret (for example,
key-value-foo), and click Connect again. A successful connection confirms that API key authentication is working correctly.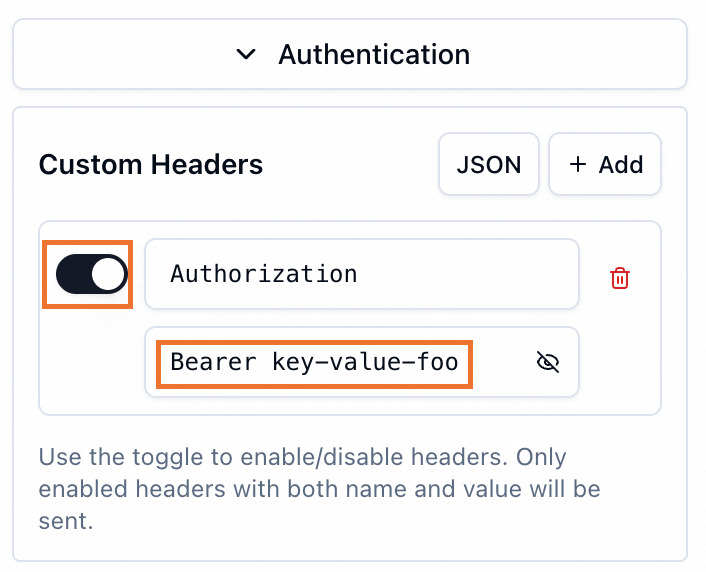
-
Clean up resources
To avoid unnecessary charges, delete all resources created in this tutorial.
-
Delete the Kubernetes resources.
# If you completed the optional Step 4, delete the authentication resources first kubectl delete -f mcp-api-key.yaml # Delete the gateway and routing rules kubectl delete -f mcp-gateway.yaml # Delete the sample MCP service kubectl delete -f mcp-server.yaml -
Verify that the associated Server Load Balancer (SLB) instance was released. Deleting the Gateway resource automatically deletes the SLB instance, which you can confirm in the SLB console.