The cloud-native AI suite provides a simple AI Dashboard and an AI Developer Console that allow you to quickly view cluster status and submit training jobs. Because the deployment of the Ingress component on an ACK Edge cluster differs from that on an ACK Pro cluster, the deployment process for the AI suite console on an ACK Edge cluster is slightly different. This topic describes how to deploy the AI suite console on an ACK Edge cluster.
Prerequisites
-
An ACK Edge cluster that runs Kubernetes 1.18 or later is available. For more information, see Create a cluster.
-
The csi-plugin and csi-provisioner components are installed in the edge cluster. For more information, see Manage components.
Step 1: Deploy the Nginx Ingress controller
-
Log on to the ACK console. In the left navigation pane, click Clusters.
-
On the Clusters page, click the name of your cluster. In the left navigation pane, click .
-
On the Helm page, click Deploy. Configure the Basic Information parameters.
Parameter
Value
Application Name
ack-ingress-nginx-{node-pool-name}
Namespace
kube-system
Source
The default value is Marketplace.
Chart
-
Use Scenarios: Select All.
-
Supported Architecture: Select amd64.
-
Search box: Search for ack-ingress-nginx-v1.
-
-
Click Next. On the Parameters page, configure the parameters and click OK.
NoteTo find the ID of the cloud-side node pool, log on to the ACK console. In the navigation pane on the left, choose to view the list of node pools.
-
In the
nodeSelectorparameter, add the cloud node pool label:alibabacloud.com/nodepool-id: {node-pool-id}.NoteIn the
nodeSelectorfield, keep onlyalibabacloud.com/nodepool-id: {node-pool-id}.
-
In the
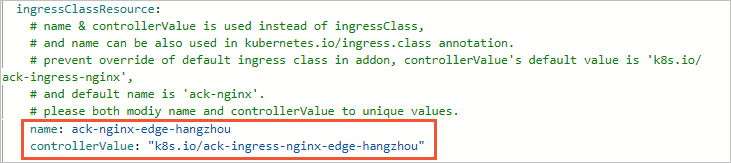
ingressClassResourceparameter, setnameandcontrollerValue.NoteIf you deploy ack-ingress-nginx-v1 multiple times in the same ACK Edge cluster, ensure that the
nameandcontrollerValueare unique for each deployment. Recommended naming conventions:-
name:ack-nginx-{node-pool-name}. For example:ack-nginx-edge-hangzhou. -
controllerValue:"k8s.io/ack-ingress-nginx-{node-pool-name}". For example:"k8s.io/ack-ingress-nginx-edge-hangzhou".
-
-
On the Parameters page, select a Server Load Balancer (SLB) type (public or private) based on your requirements, and set the
enabledvalues underexternalandinternalaccordingly. If you choose an SLB on the public network, resolve your domain name to the public IP address. If you choose an SLB on the private network, use an accessible and resolvable private IP address.service: # enable public or private network SLB enabled: true external: # enable public network SLB enabled: true # public network SLB annotations # NOTE: if you want to remove default annotations below, please set it to null. annotations: service.beta.kubernetes.io/alibaba-cloud-loadbalancer-address-type: "internet" ## Enables an additional internal load balancer (besides the external one). ## Annotations are mandatory for the load balancer to come up. Varies with the cloud service. internal: # enable private network SLB enabled: false # private network SLB annotations # NOTE: if you want to remove default annotations below, please set it to null. annotations: service.beta.kubernetes.io/alibaba-cloud-loadbalancer-address-type: "intranet"
-
Step 2: Deploy the AI suite console
For detailed instructions, see Deploy the cloud-native AI suite. Note the following points during the installation.
-
We recommend that you deploy the AI suite console components on cloud-side nodes to fully use cloud capabilities. If you want to schedule the components to a specific node pool, set the
SelectororAffinityfor the corresponding component pods. -
If you use a self-managed data store in your cluster, you must select and install the ack-mysql component when you deploy the AI suite console. This component must be deployed on a cloud-side node.
After the installation is complete, two ingress entries for the consoles are added to the Ingresses page. You must add an
ingressClassNameconfiguration to specify that the ingress entries use the same IngressClass as the deployed Nginx Ingress.-
In the navigation pane on the left, choose . For each of the two ingress entries, click Edit YAML in the Actions column.
-
Add the
ingressClassNameconfiguration and ensure that its value matches theingressClassResource.namefrom Step 1. Change theingressClassNamefield toack-nginx-edge-hangzhou. The following YAML code provides an example:spec: ingressClassName: ack-nginx-edge-hangzhou rules: - host: asdfgasdfasfdasdfasdfasd http: paths: - backend: service: name: ack-ai-dashboard-admin-ui port: number: 80 path: / pathType: Prefix
-
-
During the deployment, if you need to access the console by using a public domain name, you must resolve the domain name to the IP address of the Nginx Ingress load balancer. To find this IP address, choose in the navigation pane on the left. In the service list, find the service related to
ack-ingress-nginxof theLoadBalancertype and view the public IP address in the External IP column.
After the deployment is complete, you can access the AI Dashboard. For more information, see Access AI Dashboard.