DataService Studio lets you publish SQL queries as REST APIs without writing backend code. Script Mode (the code editor) gives you full control over the SQL, supporting table joins, subqueries, and aggregate functions. Use it when you need dynamic queries or complex filtering logic that Wizard Mode cannot express.
Prerequisites
Before you begin, make sure you have:
A data source configured on the Data Sources page. See Add a data source
A resource group created for DataService Studio. For production environments, use a serverless resource group. See Preparations
Go to DataService Studio
Log on to the DataWorks console. In the top navigation bar, select the target region. In the left-side navigation pane, choose Data Analysis and Service > DataService Studio. On the page that appears, select your workspace from the drop-down list and click Go to DataService Studio.
Create an API
In the Service Development pane, hover over the
 icon and choose Create API > Generate API. Alternatively, select a business process, right-click API, and choose Create API > Generate API.
In the Generate API dialog box, configure the following parameters.
Parameter Description API Mode Select Script Mode to use the code editor. SQL Mode Basic SQL: write standard SQL with the same capability as earlier versions. Advanced SQL: write SQL with MyBatis tags ( if,choose,when,otherwise,trim,foreach,where) for dynamic queries.API Name 4–50 characters. Letters, digits, and underscores ( _). Must start with a letter.API Path The URL path for the API, such as /user.Protocol HTTP or HTTPS. For HTTPS, bind an independent domain name and upload an SSL certificate in the API Gateway console after publishing. See Enable HTTPS for an API operation. Request Method GET or POST. GET supports only QUERYposition for parameters; POST supports bothQUERYandBODY.Response Type Set to JSON. Visible Scope Workspace: visible to all workspace members. Private: visible only to the owner; permissions cannot be granted to others. Label Optional tags. Up to 20 characters each (letters, digits, underscores). Maximum 5 tags per API. See Create and manage API tags. Description Optional. Up to 2,000 characters. Destination Folder The folder in which to store the API. Click OK. The API configuration tab opens.
Configure the API
Step 1: Select a data source
On the API configuration tab, set Datasource Type, Datasource Name, and Data Source Environment.
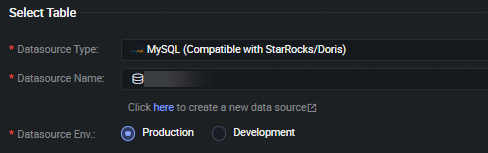
Table join queries are supported only within the same data source. For workspaces in standard mode, you can set Data Source Environment to Production or Environment. See Differences between basic mode and standard mode workspaces. For MaxCompute tables, select Acceleration Service (DataWorks acceleration) or MCQA (MaxCompute Query Acceleration) for faster query performance. Acceleration Service requires acceleration items to be created in advance. See Acceleration solutions for API-based data queries.
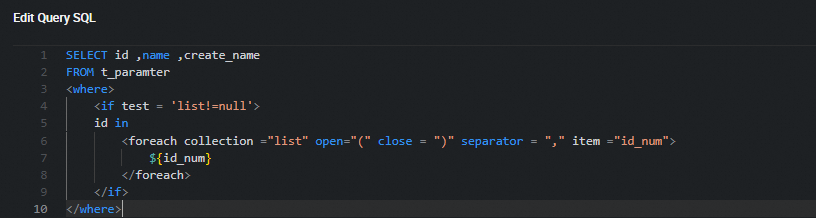
Step 2: Write the query SQL
In the Edit Query SQL section, write the SQL statement for your API.
Basic SQL rules
All SQL in Basic SQL mode must follow these rules:
| Rule | Correct | Incorrect |
|---|---|---|
| One statement only; no comments | SELECT id, name FROM users WHERE id = ${id} | Two statements or -- comment in the query |
| SELECT only; no data modification | SELECT id FROM orders | INSERT INTO ..., UPDATE ..., DELETE FROM ... |
| Specify columns explicitly | SELECT id, name FROM users | SELECT * FROM users |
Do not wrap ${param} in single quotes | concat('prefix_', ${id}) | '${id}' or 'prefix_${id}' |
| Use an alias when the column has a table prefix | SELECT t.name AS name FROM users t | SELECT t.name FROM users t |
| Use an alias for aggregate functions | SELECT SUM(amount) AS total_amount FROM orders | SELECT SUM(amount) FROM orders |
| Parameters cannot be configured as optional | — | Marking a parameter as optional |
Use ${param} to define request parameters. To treat the placeholder as a literal string, escape it with a backslash: \${param}.
Single-table queries, table joins, and nested queries are all supported within the same data source.

Advanced SQL rules
Advanced SQL supports MyBatis tags for dynamic query logic: null checks, conditional filters, loop traversal, and dynamic sorting.
When using MyBatis tags, escape special characters in SQL conditions:
| Special character | Escape sequence | Meaning |
|---|---|---|
> | > | Greater than |
>= | >= | Greater than or equal to |
< | < | Less than |
<= | <= | Less than or equal to |
& | & | And |
' | ' | Single quotation mark |
" | " | Double quotation mark |
For MyBatis tag examples, see Sample code for the Advanced SQL syntax.
In Advanced SQL mode, manually add all request parameters used in the SQL statement to the request parameter list. This keeps the API definition consistent with the SQL logic.
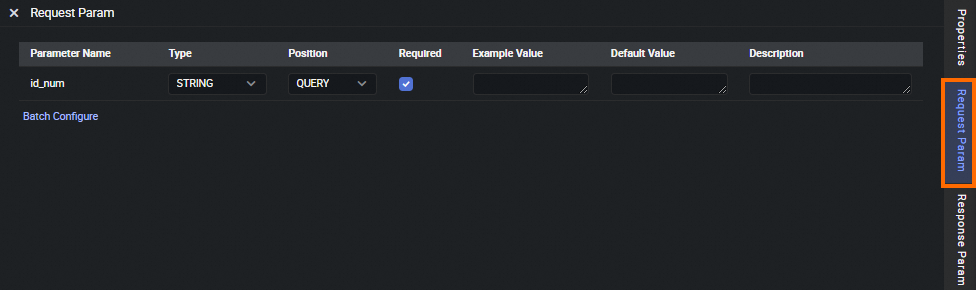
Step 3: Configure request parameters
In the right-side panel, click the Request Param tab. Add and configure the parameters your API accepts.
| Parameter | Description |
|---|---|
| Parameter Name | Up to 64 characters. Letters, digits, underscores (_), and hyphens (-). Must start with a letter. |
| Type | Data type: STRING, INT, LONG, FLOAT, DOUBLE, or BOOLEAN. |
| Position | QUERY: passed as a URL query string parameter. BODY: passed in the request body (POST only). When using BODY, set Content-Type to application/json; charset=utf-8 (JSON), application/xml; charset=utf-8 (XML), or application/x-www-form-urlencoded; charset=utf-8 (form-encoded). |
| Required | Whether the parameter is required. |
| Example Value | An example value for the parameter. Required before previewing API results. |
| Default value | The default value if the parameter is not provided. |
| Description | Optional description. |
To improve query performance, use indexed fields as request parameters.
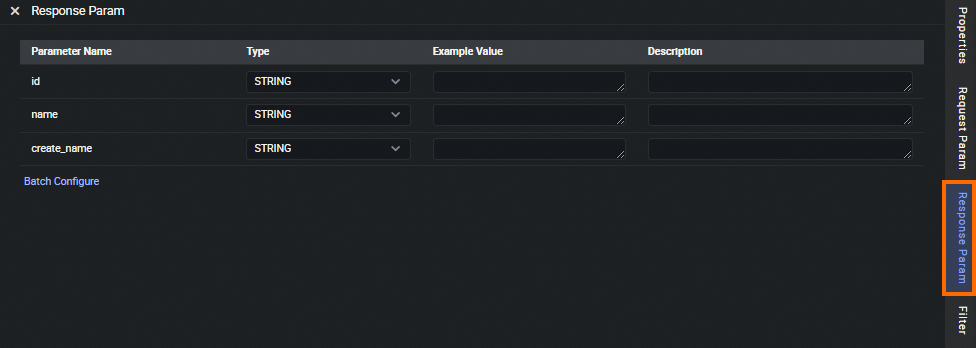
Step 4: Configure response parameters
In the right-side panel, click the Response Param tab. Add the fields your API returns.
| Parameter | Description |
|---|---|
| Parameter Name | Up to 64 characters. Letters, digits, underscores (_), and hyphens (-). Must start with a letter. |
| Type | Data type: STRING, INT, LONG, FLOAT, DOUBLE, or BOOLEAN. |
| Example Value | An example value for the response field. |
| Description | Optional description. |
In Advanced SQL mode, manually add all response parameters from the SQL statement to this list.
Pagination
By default, the API returns up to 2,000 records per request. If the result set may exceed this limit, enable Pagination for Return Results.
When pagination is enabled, any SQL-level LIMIT clauses are ignored—the pagination settings take effect instead. Go to the Resource Group tab to configure the maximum number of records per request.
| Resource group type | Maximum records per request |
|---|---|
| Shared Resource Group for DataService Studio | 2,000 |
| Exclusive Resource Group for DataService Studio | 10,000 |
Enabling pagination adds the following parameters automatically:
Request parameters added:
| Parameter | Description |
|---|---|
returnTotalNum | Whether to return the total number of records. |
pageNum | Page number. |
pageSize | Number of records per page. |
Response parameters added:
| Parameter | Description |
|---|---|
pageNum | Page number returned. |
pageSize | Number of records per page. |
totalNum | Total number of records. |
If an API has no request parameters, enable Pagination for Return Results.
Step 5: Configure a filter (optional)
Filters let you pre-process request parameters before the SQL query runs (pre-filter) or post-process results before they are returned (post-filter).
In the right-side panel, click Filter. Select Use Pre-filter or Use Post-filter, set Function Type, and select one or more functions. If you select multiple functions, they are applied in the order selected. Click Preview Responses Returned by API Operation to verify the output.
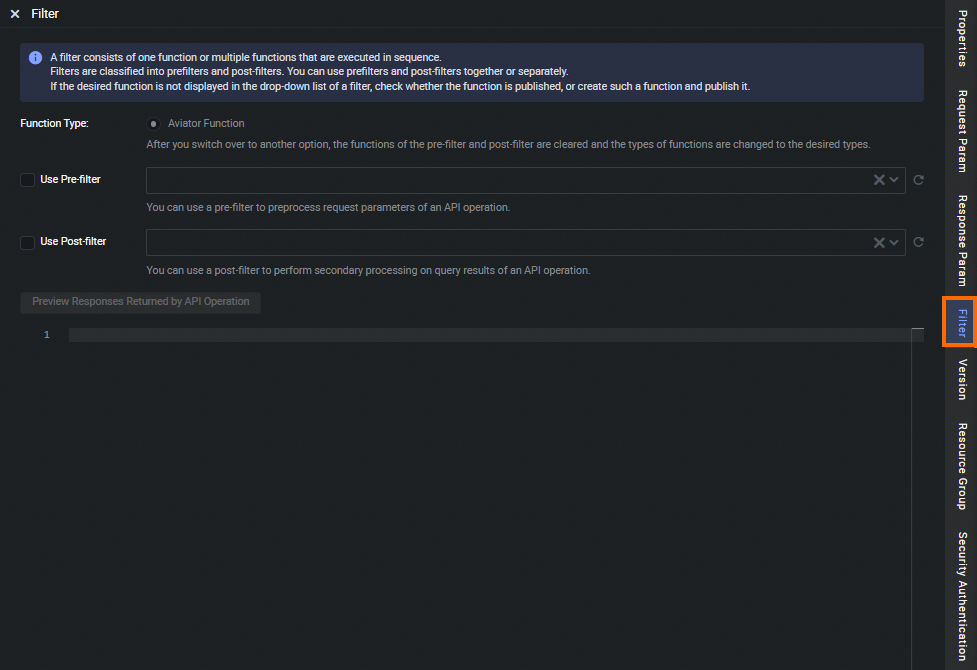
Python functions as filters require DataWorks Professional Edition or higher, and the Shared Resource Group for DataService Studio.
Aviator functions as filters work with all DataWorks editions, but require an exclusive resource group.
If a function does not appear in the drop-down list, check that it is published. See Publish a function.
For instructions on creating filters, see Create an Aviator function and Create a Python function.
Step 6: Configure a resource group
In the right-side panel, click the Resource Group tab. Under Resource Group Type, set the Scheme parameter:
Exclusive Resource Group for DataService Studio: select a specific exclusive resource group from the drop-down list.
Shared Resource Group for DataService Studio: no selection needed. DataWorks uses the shared resource group automatically.
- If the resource group you want is not in the list, go to the Resource Groups page, find the group, and click Associate Workspace in the Actions column. - If the resource group appears in the list but cannot be selected, go to the Resource Groups page, click
 > Manage Quota, and configure Occupied CUs (pay-as-you-go) or Minimum CUs (subscription) for DataService Studio.
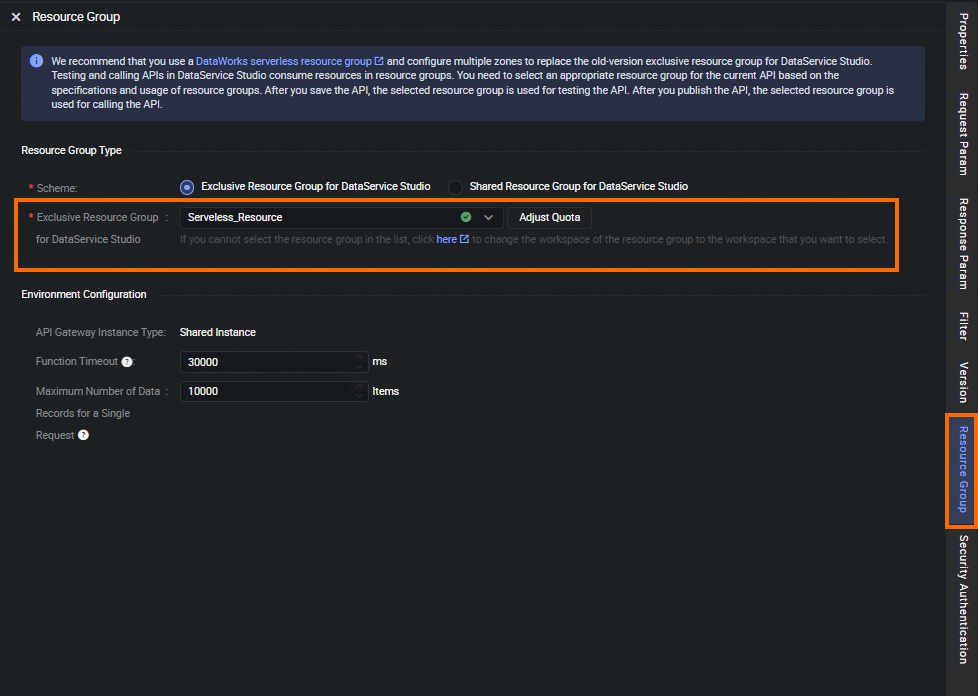
Under Environment Configuration, set the following parameters:
Memory: allocated memory for the API runtime.
Function Timeout: the maximum execution time in milliseconds. Set this based on the expected SQL execution time to avoid request failures.
Instance type Scheme Maximum timeout Shared API Gateway instance Any 30,000 ms Dedicated API Gateway instance Shared Resource Group for DataService Studio 30,000 ms Dedicated API Gateway instance Exclusive Resource Group for DataService Studio 90,000 ms Maximum Number of Data Records for a Single Request: the upper limit of records returned per request when pagination is enabled.
Save, test, and publish
Click the
 icon in the toolbar to save the API. The resource group configuration takes effect for testing immediately after saving.
Test the API. See Test an API.
After the test passes, click Submit in the upper-right corner.
In the right-side panel, click Version. Find the version to publish and click Application for publication in the Actions column. Use the default application type Publish data service API, enter a reason in Reason for application, and click Apply for permission. After submitting, the API enters the approval queue. If an approval policy is configured in DataWorks Approval Center, the API must be approved before it is published. See Approval Center overview. After the API is published, the resource group configuration takes effect when the API is called.
What's next
On the Service Development tab, find the API in the left-side navigation pane to clone or delete it.
On the Service Management tab, find the published API to view its details and manage it. See Manage APIs.