Version Control
Version | Revision Date | Types Of Changes | Effective Date |
1.0 | 2017/12/8 | ||
1.1 | 2018/4/17 | 1.Add windows platform support 2.Update RAM role for ECS data collector | 2018/4/17 |
1.2 | 2018/4/23 | 1.Add operation for “Changing hostname” and “Check host agent version” based on the Windows platform 2.Add a link to MaxDB and SQLServer specific guidance | 2018/4/23 |
1.3 | 2018/6/20 | Add Red Hat Enterprise Linux Server support | 2018/6/20 |
This guide provides instructions for deploying your own SAP NetWeaver based system and migrating an existing SAP system to Alibaba Cloud.
Deploying SAP system
Prerequisites
For SAP administrators who have experience in deploying and running SAP systems on traditional an infrastructure, the following prerequisite knowledge will help to understand some public cloud specific tasks before starting to create an ECS instance for SAP and the SAP system deployment.
Account setup
Adding a payment method
Real-name registration, it is required only if you have to create an ECS instance in a region inside Chinese mainland
Creating a VPC and vSwitch
Log on to the VPC console.
In the left-side navigation pane, click VPC.
Choose the region where the VPC is created.
Click Create VPC in the upper-right corner.
In the pop-up dialog, enter a VPC name and select the IP address range for the VPC in the form of a Classless Inter-Domain Routing block.
Use the one of the following standard CIDR blocks as the IP address range. The CIDR block cannot be modified after you create the VPC.
10.0.0.0/8 (10.0.0.0 - 10.255.255.255)
172.16.0.0/12 (172.16.0.0 - 172.31.255.255)
192.168.0.0/16 (192.168.0.0 - 192.168.255.255)
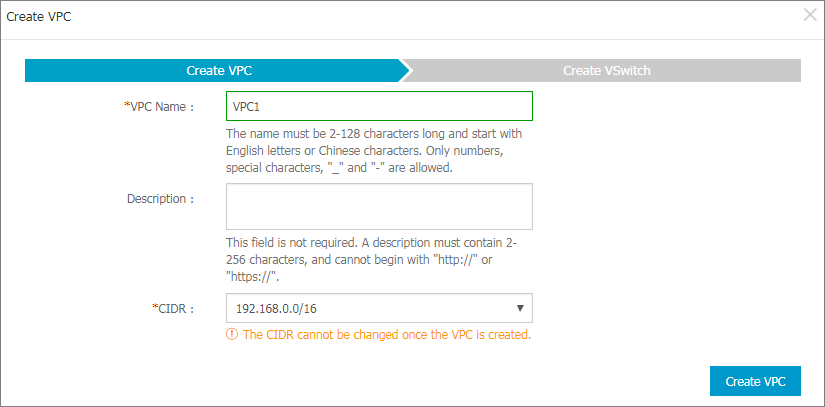
Click Create VPC.
A VPC ID is generated after the VPC is created, and a VRouter is created by the system for the VPC.
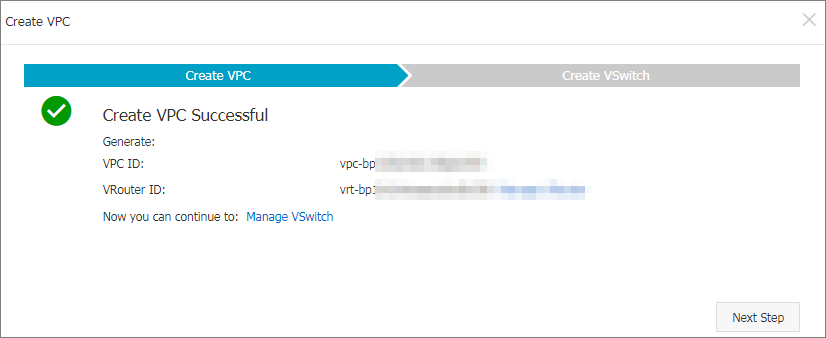
Click Next Step to create a vSwitch.
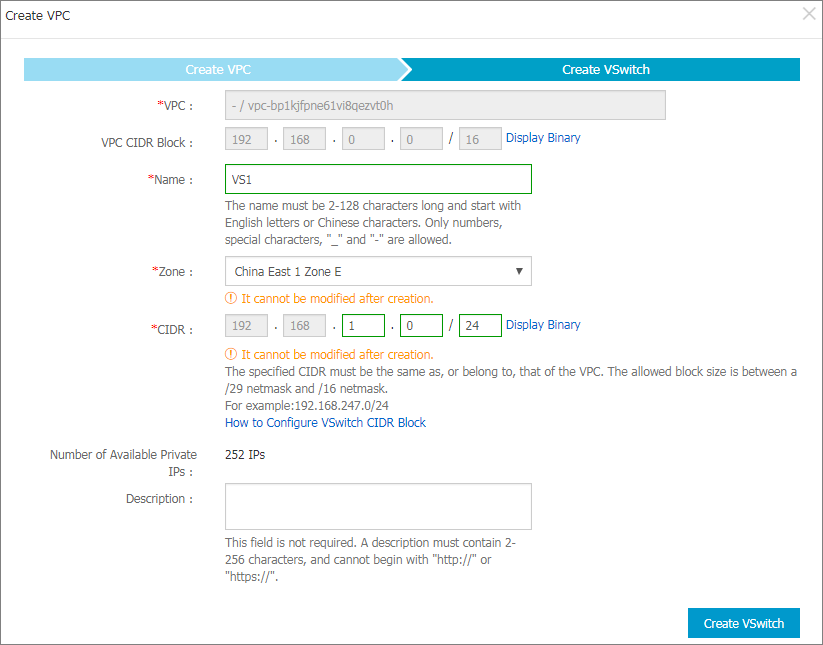
In the Create vSwitch tab, provide the following information and click Create vSwitch.
Name: Enter a name for the vSwitch.
Zone: Select a zone for the vSwitch.
CIDR block: Specify the IP address range of the vSwitch in the form of a Classless Inter-Domain Routing block.
The allowed block size for a vSwitch is between a /16 netmask and /29 netmask, and the CIDR block of the vSwitch can be the same as that of the VPC that it belongs to, or the subset of the VPC CIDR block.
NoteNote: If the CIDR block of the vSwitch is the same as that of the VPC, you can only create one vSwitch.
Click Done.
Creating a security group
You can add security group rules to enable or disable access to and from the Internet, intranet, or private networks for ECS instances in the security group. For your VPC network: You only need to set outbound and inbound rules, and do not need different rules for private networks and Internet.
To create a security group, perform the following:
Log on to the ECS console.
In the left-side navigation pane, click Security Groups.
Select a region.
Click Create Security Group. In the displayed dialog box, enter the following:
Security Group Name
The length must be 2-128 characters. It can contain uppercase letters, lowercase letters, and Chinese characters. It cannot contain numbers, underscores (_), or hyphens (-).
Description
The length must be 2-256 characters. Do not start with
http://orhttps://.Network Type
You should select VPC as a network type; you must select a specific VPC. If no VPCs have been created in the current region, you must create one first.
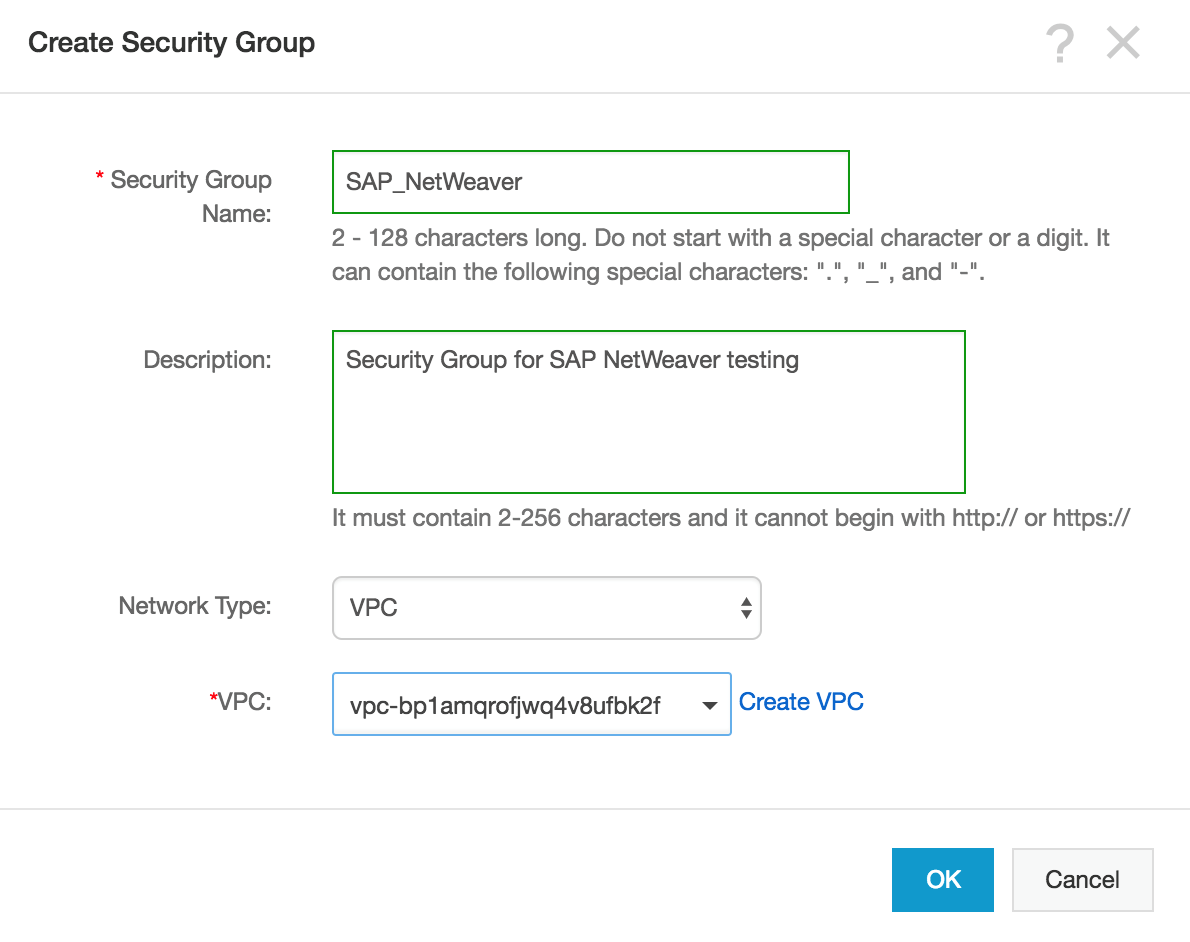
Click OK.
Adding a security group rule
To add a security group rule, follow these steps:
Log on to the ECS console.
In the left-side navigation pane, select Networks & Security > Security Groups.
Select a region.
Find the security group to add authorization rules, and in the Action column click Configure Rules.
On the Security Group Rules page, click Add Security Group Rules.
(Optional) If you do not need to enable or disable all ports for all protocols, ICMP, or GRE, you can select Quickly Create Rules.
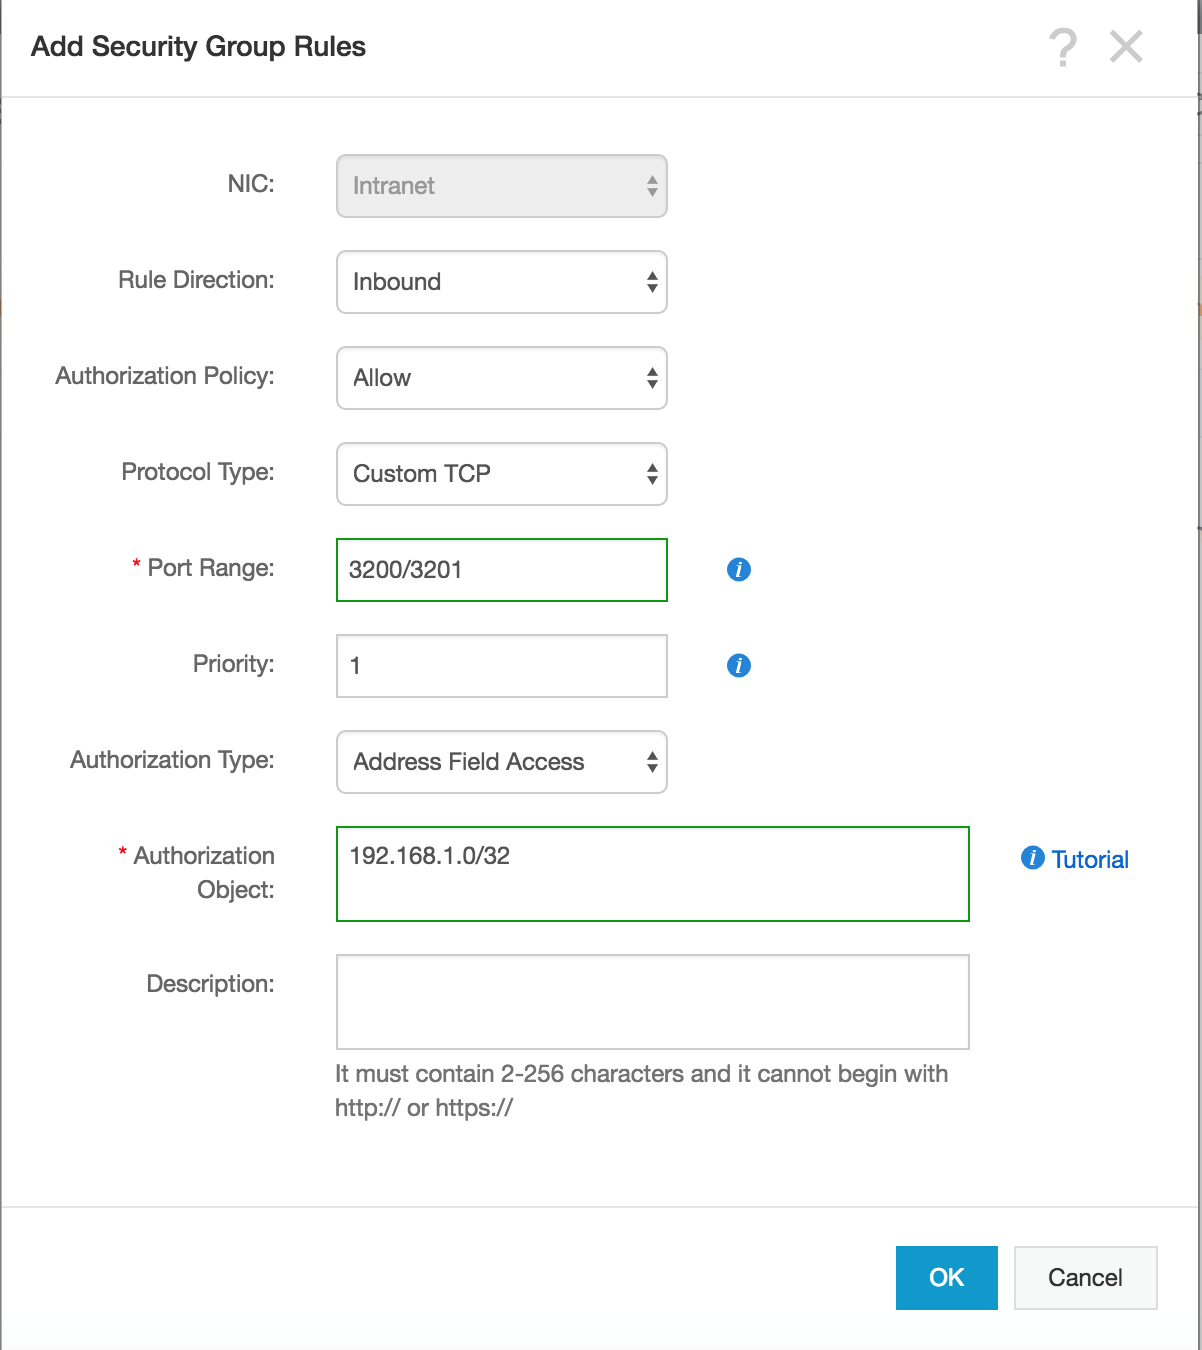
In the dialog box, set the following parameters:
NIC:
If the security group is for VPC, you do not need to select the NIC.
If your instances can access the Internet, the rules work for both the Internet and intranet.
Rule Direction:
Outbound: ECS instances access other ECS instances over intranet, private networks, or through Internet resources.
Inbound: Other ECS instances in the intranet or private networks and Internet resources access the ECS instance.
Authorization Policy: Select Allow or Drop.
NoteNote: Drop policy discards the data packet without returning a response. If two security groups overlap except the authorization policy, the Drop rule takes priority over the Allow rule.
Protocol Type and Port Range
The port range setting is affected by the selected protocol type. SAP requires access to certain ports, so add firewall rules to allow access to the ports outlined by SAP. The following table shows the relationship between all major ones.
Protocol type | Port range | Scenarios |
All | Shown as -1/-1, indicating all ports. | Used in scenarios: - No limit to outbound calls; - Both applications are fully mutually trusted. |
RDP | Shown as 3389/3389, the default RDP port 3389. | Shown as 3389/3389, the default RDP port 3389. |
SSH | Shown as 22/22, the default SSH port 22. | Used for remotely connecting to Linux instances. |
TELNET | Shown as 23/23. | Used to remotely log on to instances by using Telnet. |
HTTP | Shown as 80/80. | The instance is used as a server for a website or a web application. |
HTTPS | Shown as 443/443. | The instance is used as a server for a website or a web application that supports the HTTPS protocol. |
MS SQL | Shown as 1433/1433. | The instance is used as a MS SQL server. |
Oracle | Shown as 1521/1521. | The instance is used as an Oracle SQL server. |
MaxDB | Shown as 7210/7210. | The instance is used as an MaxDB. |
SAP HANA | Shown as 30015-39915. | The instance is used as an SAP HANA. |
SAP Dispatcher | Range 3200-3299 | Used by SAP GUI for Windows and Java. |
SAP Gateway | Range 3300-3399 | Used for CPIC and RFC communication. |
SAP Message server | Range 3600-3699 | Used for SAP message server communication. |
For more details, see TCP/IP Ports of All SAP Products
Priority
1-100. The smaller the number is, the higher the priority is. For more information on priority, see Security group rule priority.
Authorization Type and Authorization Object
The authorization object affects setting of authorization type. The following table shows the relationship between them.
Authorization type | Authorization object |
Address Field Access | Use the IP or CIDR block format such as |
Security Group Access | Authorize the instances in a security group under your account or another account to access the instances in this security group. - Authorize This Account: Select a security group under your account. - Authorize Other Account: Enter the target security group ID and the Account ID. You can view the account ID in Account Management > Security Settings. For VPC network instances, Security Group Access works for private IP addresses only. If you want to authorize Internet IP address access, use Address Field Access. |
Click OK to add the security group rule to the specified security group.
Creating an SSH key pair(Linux only)
To create an SSH key pair, follow these steps:
Log on to the ECS console.
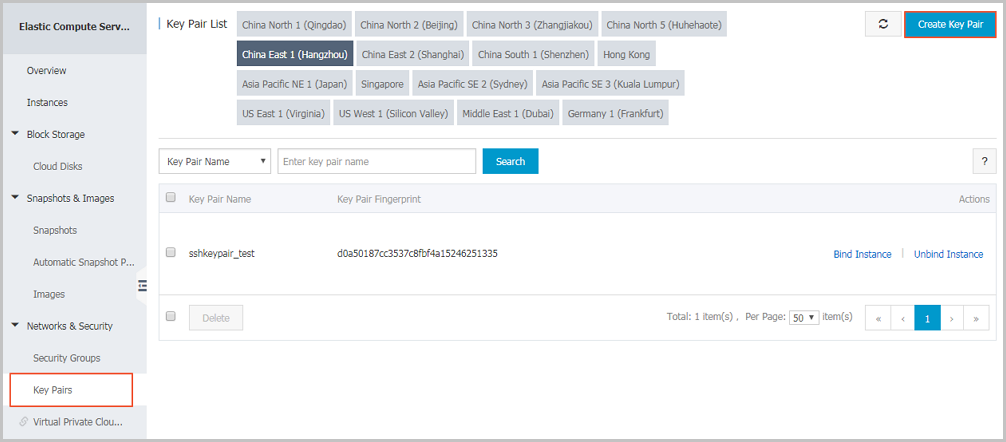
In the left-side navigation pane, choose Networks & Security > Key Pairs.
On the Key Pairs page, select a region, and click Create Key Pair.
On the Create Key Pair page, enter a name for the key pair, and select Automatically Create a Key Pair for the Creation Type.
NoteNote: The specified key pair name must be unique. It must not match with the existing key pair or a key pair that was deleted when it was still bound to an instance. Otherwise, an error message “The key pair already exists” appears.
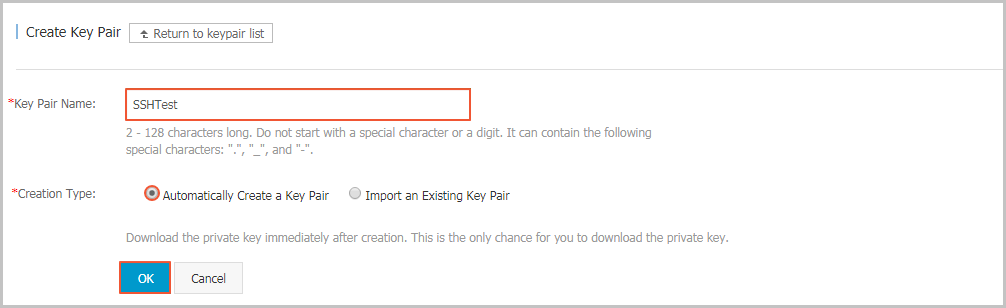
Click OK to create a key pair.
NoteNote: After a key pair is created, you must download and save the private key for further use. If you do not have the private key, you cannot log on to your ECS instance that is bound to this key pair.
After creating the key pair, you can view the information, including Key Pair Name and Key Pair Fingerprint, in the key pair list.
Connecting ECS instance from Internet
VPC is a private network established in Alibaba Cloud. VPCs are logically isolated from other virtual networks in Alibaba Cloud. You can use NAT Gateway or EIP (Elastic IP) to connect ECS instances from Internet.
NAT Gateway is an enterprise-class public network gateway that provides NAT proxy services (SNAT and DNAT), up to 10 Gbps forwarding capacity, and cross-zone disaster recovery. As a public network gateway, NAT Gateway requires configured public IPs and bandwidth. Public IPs for NAT Gateway are grouped into abstract groups called shared bandwidth packages.
An EIP address is a type of NAT IP address. It is located in a public network gateway of Alibaba Cloud, and is mapped to the private network interface card (NIC) of the bound ECS instance in the way of NAT. Therefore, the ECS instance bound with the EIP address can communicate with the Internet without disclosing the EIP address on the NIC.
For each ECS instance that runs SAP applications, ECS Metrics Collector needs to be installed. So, your SAP ECS instances also require access to the Internet for SAP system monitoring. There are two ways to enable this access, you should bind an EIP to the ECS instance directly; or you can use a NAT Gateway, configure SNAT for your ECS instances.
Creating a NAT gateway
Create a NAT gateway
Log on to the VPC console.
In the left-side navigation pane, click NAT Gateway.
In the upper-right corner of the NAT Gateway page, click Create NAT Gateway.
Configure the NAT gateway with the following information.
Configuration | Description |
Region | Select the region of the NAT gateway. Make sure the regions of the NAT gateway and VPC are the same. |
VPC | Choose the VPC for the NAT gateway. Once the gateway is created, you cannot change the VPC. If you cannot find the required VPC in the VPC list, troubleshoot the following: Check whether the VPC already has a NAT gateway configured. A VPC can be configured with only one NAT gateway. Check whether a custom route entry, where the destination CIDR block is 0.0.0.0/0, already exists in the VPC. If so, delete this custom route entry. |
Specification | Select a specification for the NAT gateway. The specification affects the maximum number of connections and the number of new connections allowed per second for the SNAT proxy service, but does not affect data throughput. Note: The specification has no impact on the DNAT function. |
Billing Cycle | Display the billing cycle. |
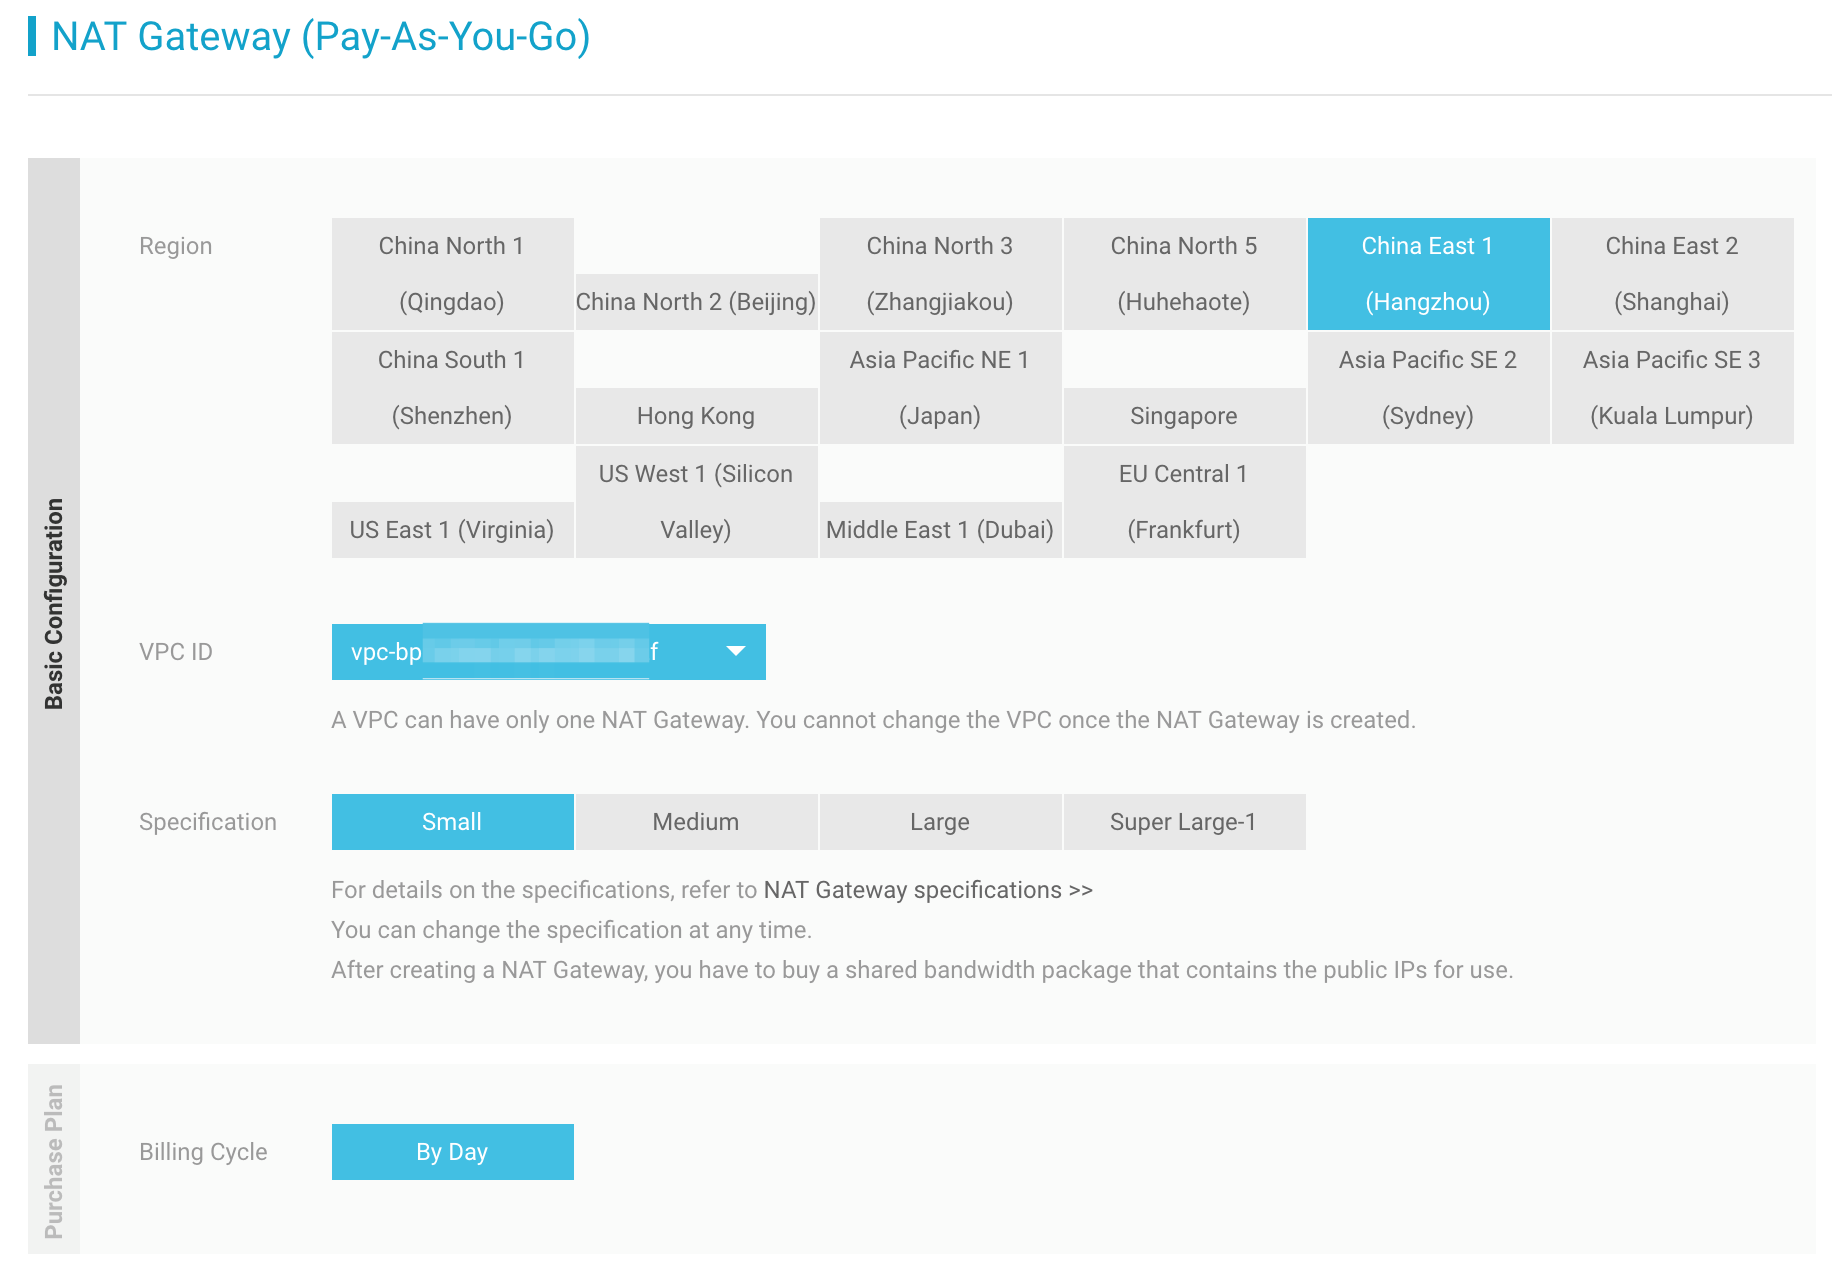
NAT Gateway has different specifications. Different specifications correspond to different performance metrics (maximum connections and the number of new connections per second). The specifications only affect the SNAT performance and have no impact on the DNAT performance.
The following table lists the available specifications. Generally, for or your SAP solution, small size is OK.
Specification | Max Connection | New Connections Per Second (CPS) |
Small | 10,000 | 1,000 |
Medium | 50,000 | 5,000 |
Large | 200,000 | 10,000 |
Click Buy Now and complete the creation.
NoteNote: The creation of a NAT gateway generally takes 1-5 minutes.
After the NAT gateway is created, the system automatically creates a DNAT table and an SNAT table. A custom route entry with the destination CIDR block 0.0.0.0/0 pointing to the NAT gateway is automatically added to the VPC route table.
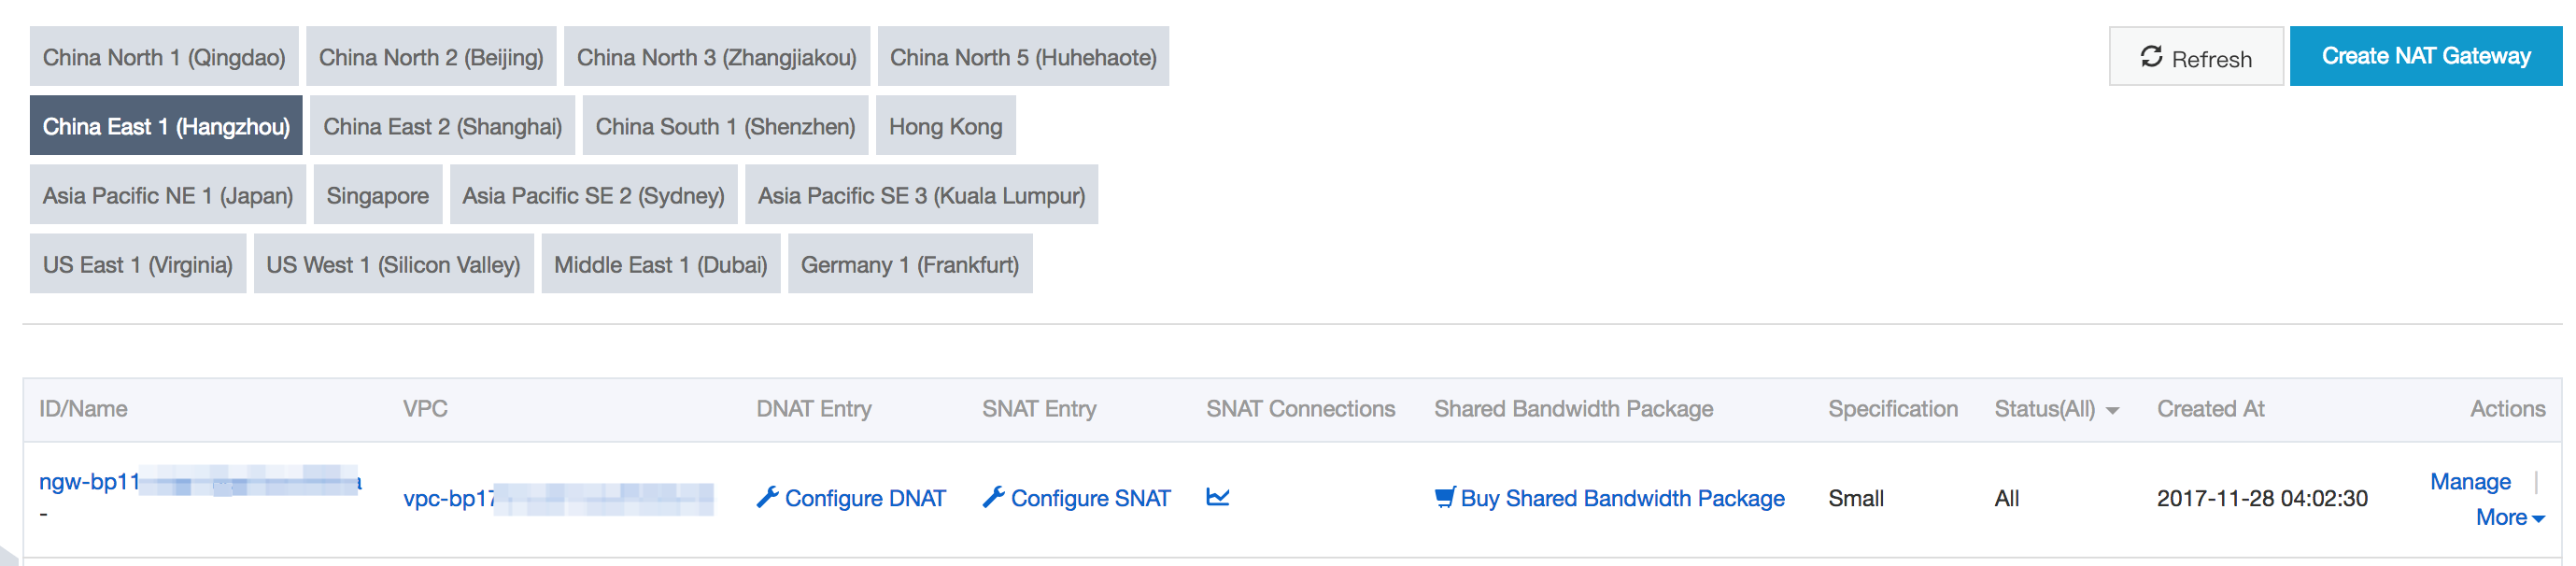
Maintain a name for NAT gateway
In the right side of NAT gateway, choose More and click Edit to change the name of NAT gateway.
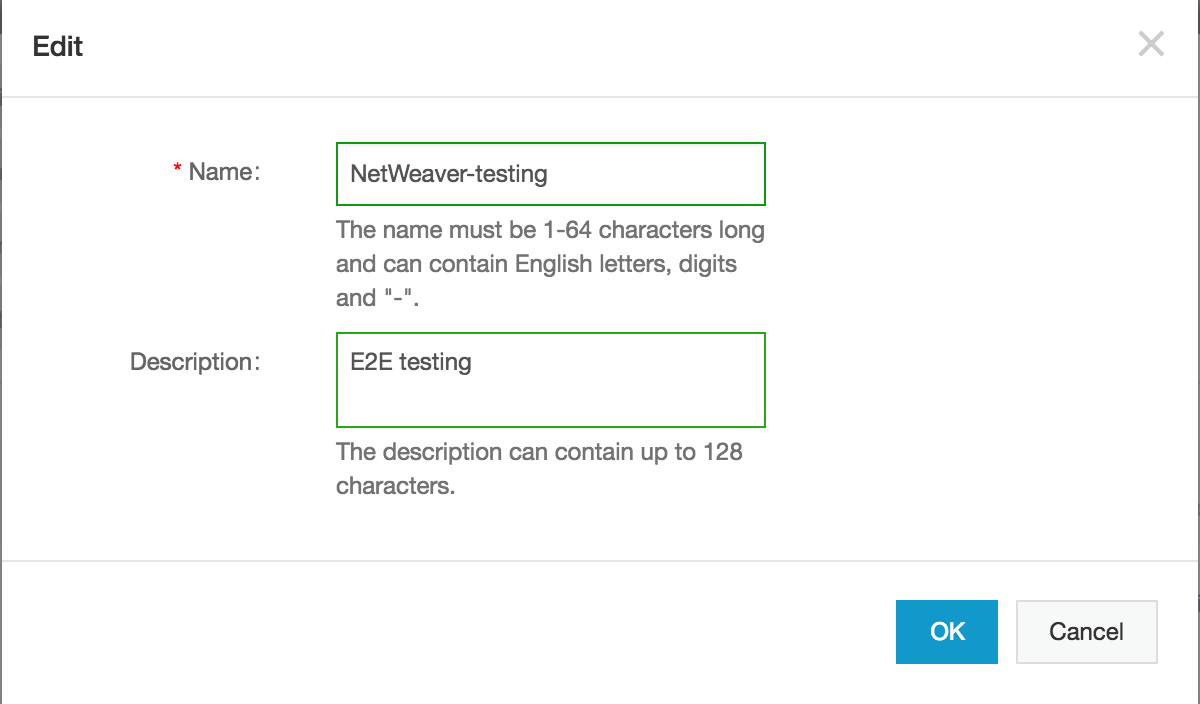
Enter a name for your NET gateway, click OK to finish configuration.
Create a shared bandwidth package
Find the target NAT gateway, and click the Buy Shared Bandwidth Package link.
NoteNote: If the NAT gateway already has a shared bandwidth package, click Manage and then click Shared Bandwidth Package.
On the Shared Bandwidth Package page, click Buy Shared Bandwidth Package again.
Configure the shared bandwidth package according to the following information.
Configuration | Description |
Public IP count | Select the number of public IPs that you want to purchase. You can adjust the number of public IPs at any time once a shared bandwidth package is created. You need at least 1 public IP for SNAT to deploy ECS Metrics Collector. |
Peak Bandwidth | Set a peak bandwidth. You can adjust the peak bandwidth at any time. |
ISP Type | BGP multi-pathing is used to connect the Internet. |
Billing method | The shared bandwidth package is billed based on traffic usage. For more details, see Billing overview. |
Billing cycle | Display the billing cycle. |
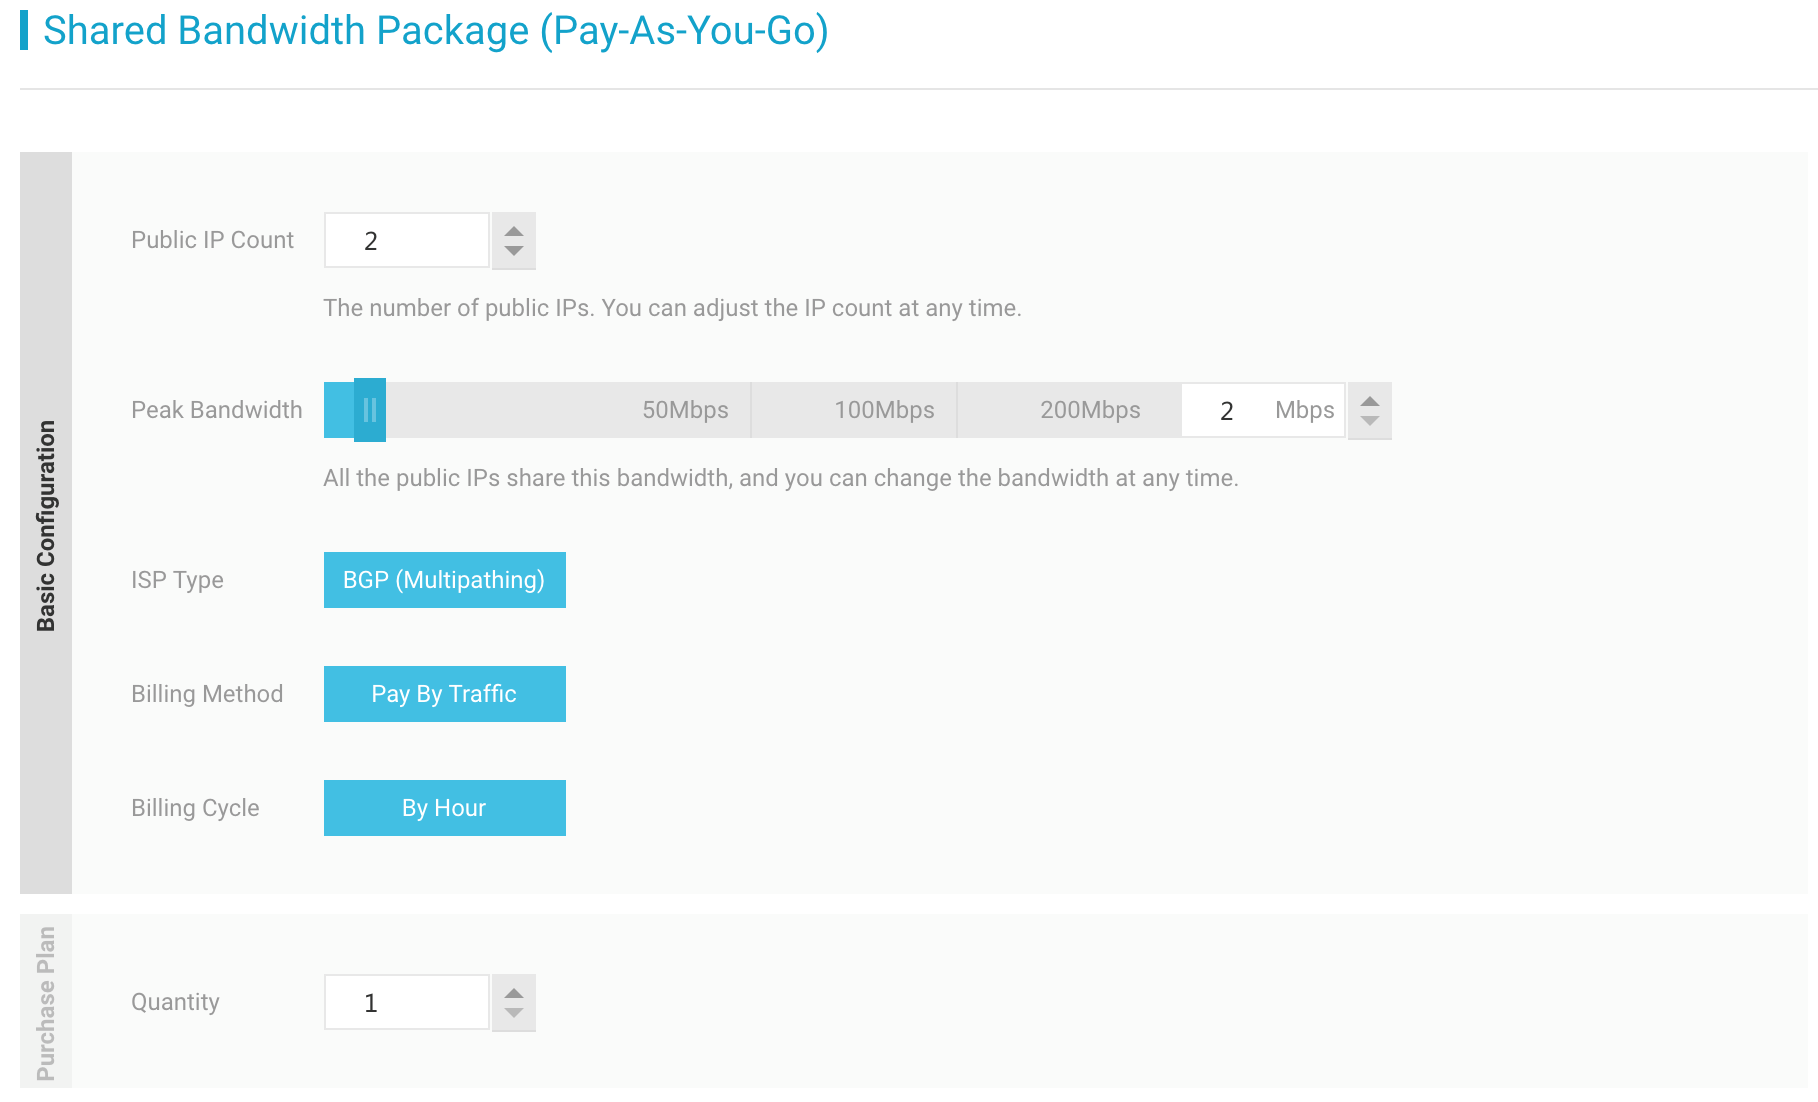
Click Buy Now.
NoteNote: The creation of a shared bandwidth package generally takes 1-5 minutes.
Creating an Elastic IP (EIP)
Elastic IP (EIP) is a public IP address resource that you can purchase and possess independently. It can be dynamically bound to a VPC ECS instance without restarting the ECS instance.
Log on to the EIP console and click Create EIP.
On the purchase page, select the region, bandwidth, and purchase quantity for the EIP address, and click Buy Now.
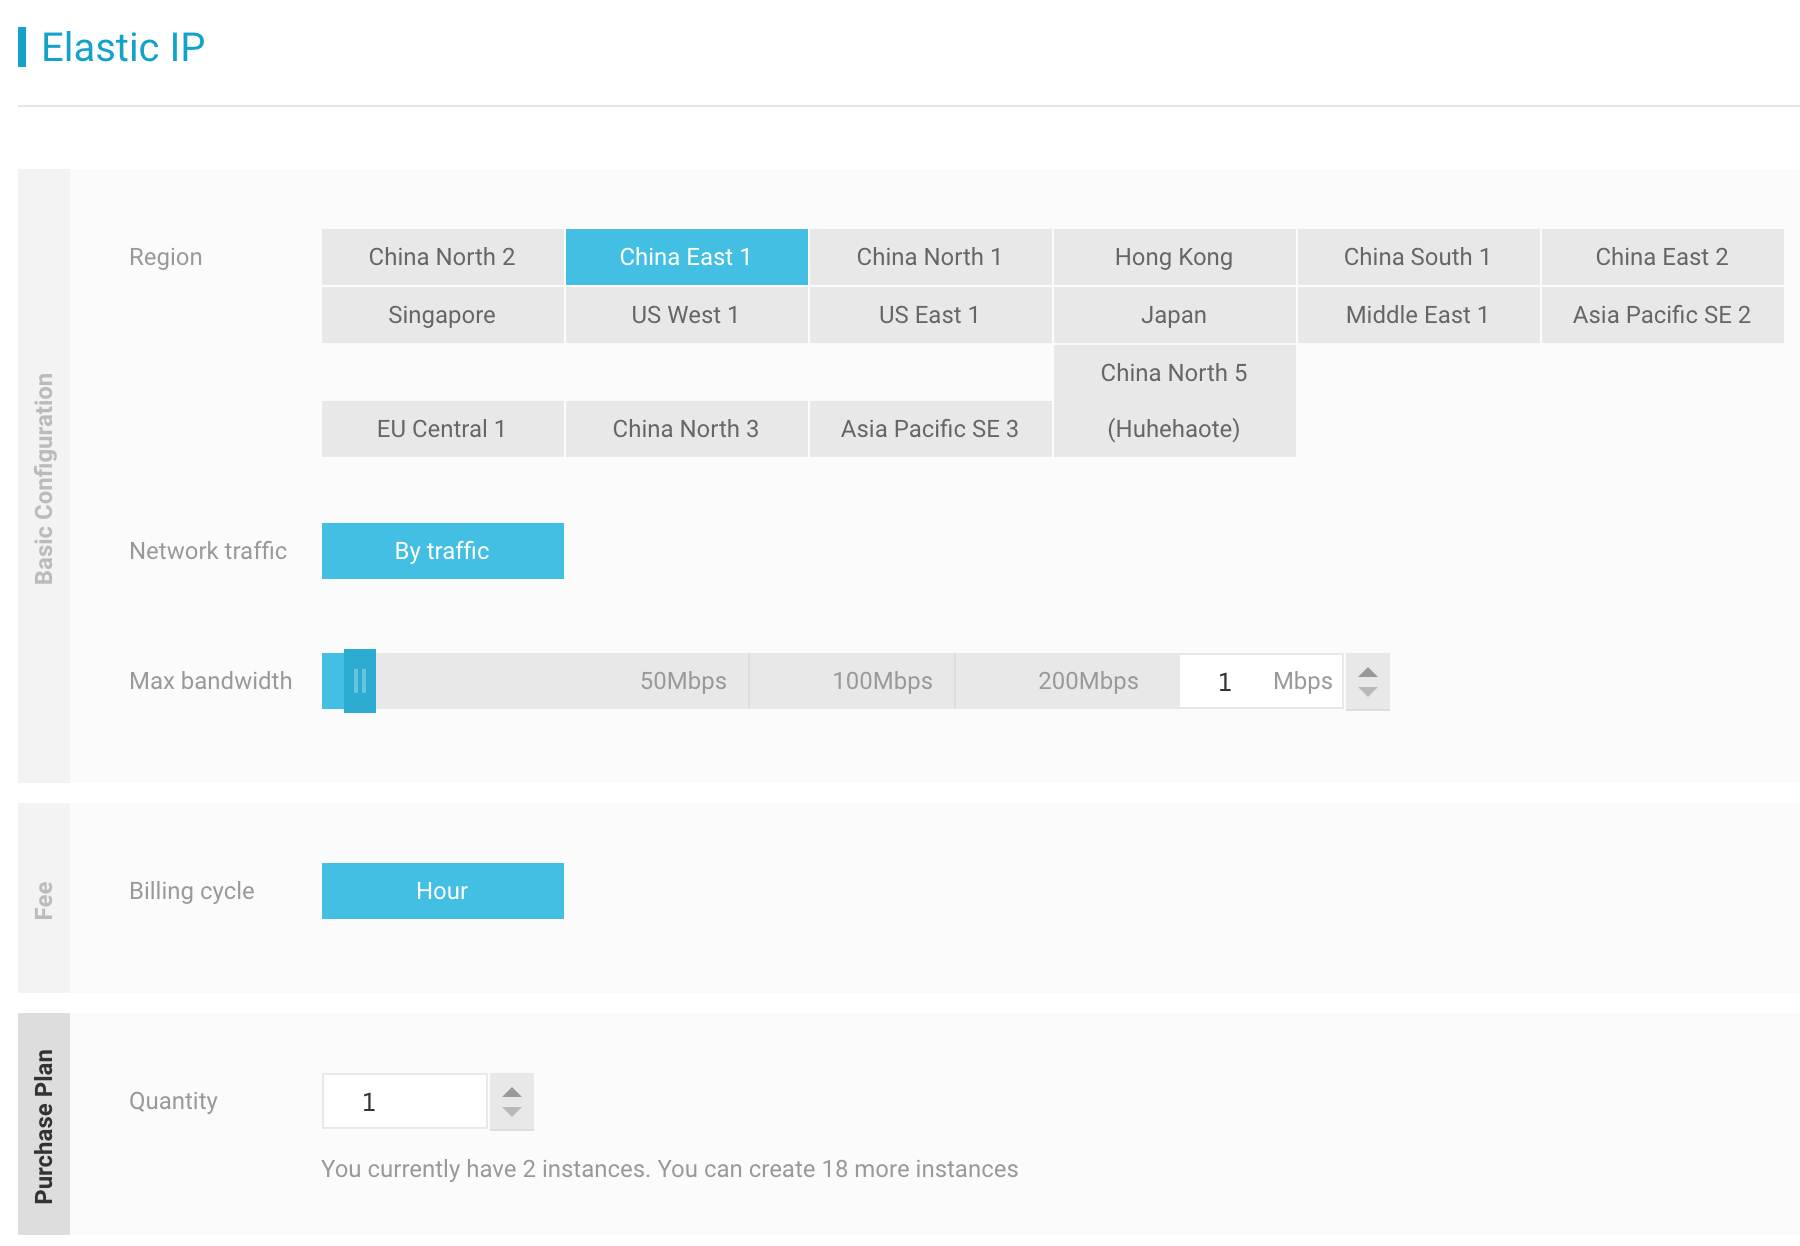
Complete the payment.
You can bind an EIP address to an ECS instance in any VPC as needed to make the instance accessible to the Internet, and release it whenever the Internet communication is not needed. Before binding an EIP address to an ECS instance, ensure that the following conditions are met:
The regions of the EIP address and ECS instance to be bound are the same.
The ECS instance to be bound is not allocated any public IP address.Procedure
Log on to the EIP console.
Choose a region. All Elastic IP addresses under the selected region are displayed.
Click Bind in the Actions column of the target EIP address.

In the Bind dialog box, perform the following operations:
Instance type: Select ECS Instance.
ECS instance: Select the ECS instance to be bound.
Click OK.
After the EIP address is bound to the ECS instance, the ECS instance can communicate with the Internet. Make sure the configured security group rules do not block the Internet access.
RAM service role setup
The monitoring agent ECS Metrics Collector, which is designed for SAP systems running on Alibaba Cloud infrastructure, needs a specific RAM service role setup. Please be noticed that this is just a one-time effort, because it’s effective at your account level. For more information about RAM (Resource Access Management) Role setup, please refer to How to use the instance RAM role on the console.
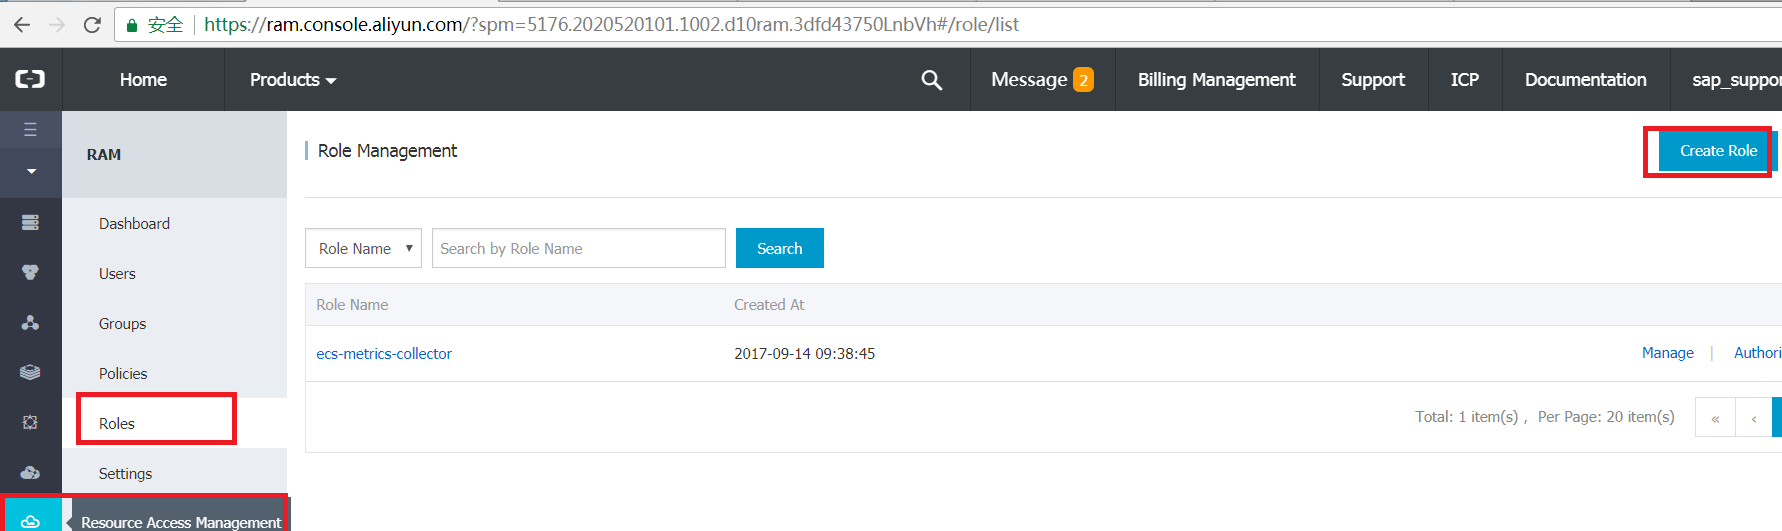
Log on to the ECS console.
On the left-side navigation pane, click Resource Access Management.
Open Resource Access Management Console, selects the tab Roles, then click Create Role
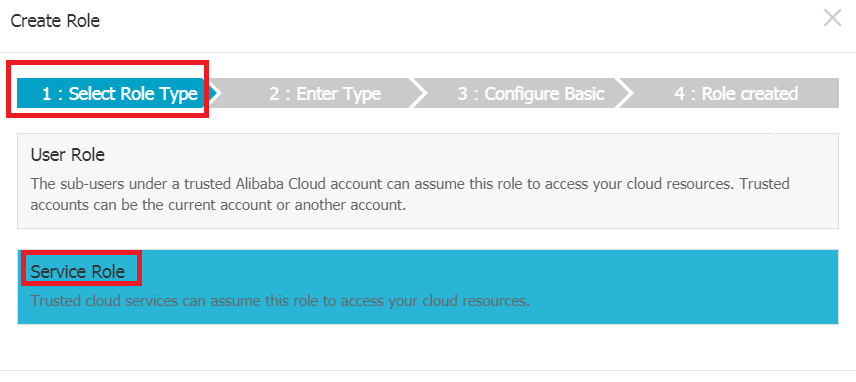
Select Service Role in step Select Role Type
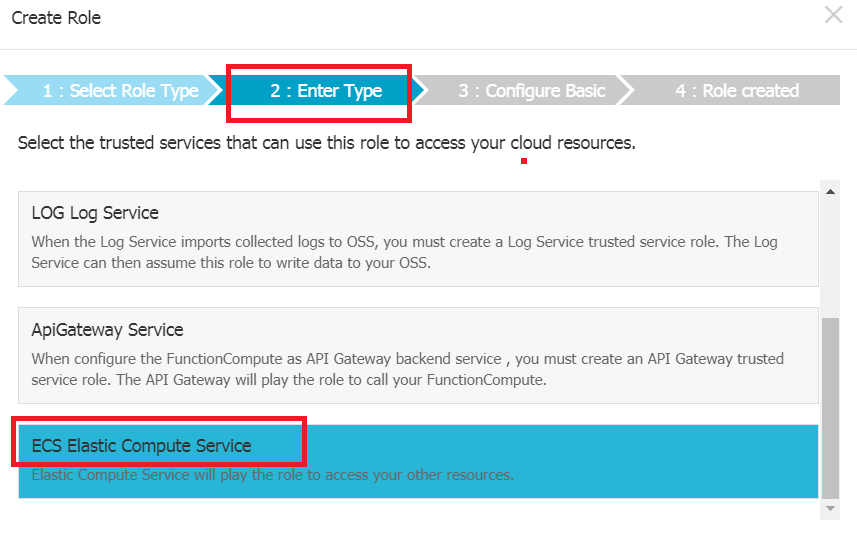
In step Enter Type, find the service ECS Elastic Compute Service
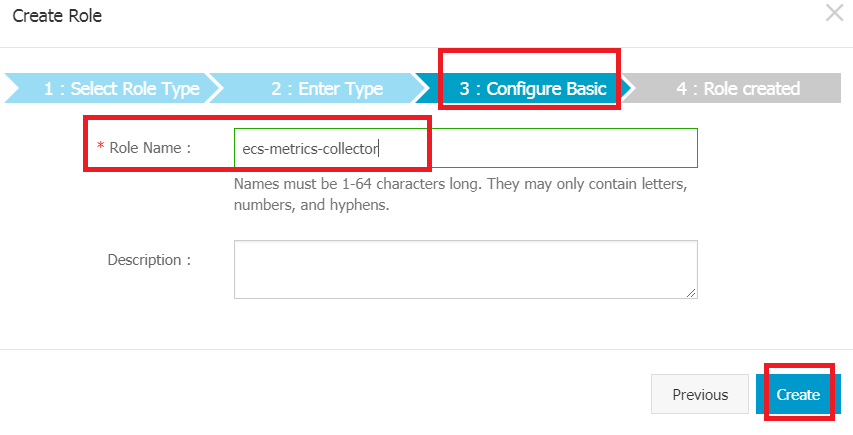
In step Configure Basic, you need to define a role name. For example, you can add ecs-metrics-collector as the role name. Then click Create
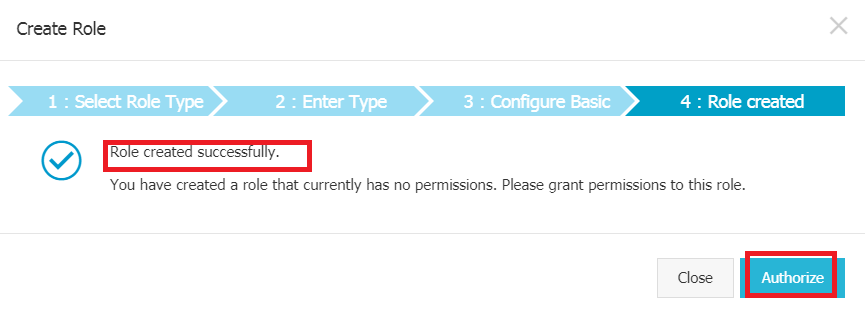
The service role is created. Click Authorize for next steps
Click Edit Authorization Policy. By typing the Policy Name AliyunECSReadOnlyAccess and AliyunCloudMonitorReadOnlyAccess in the search bar, it will be easy for you to pick up the required policy. Select Policy Name AliyunECSReadOnlyAccess and AliyunCloudMonitorReadOnlyAccess and assign it to your RAM service role
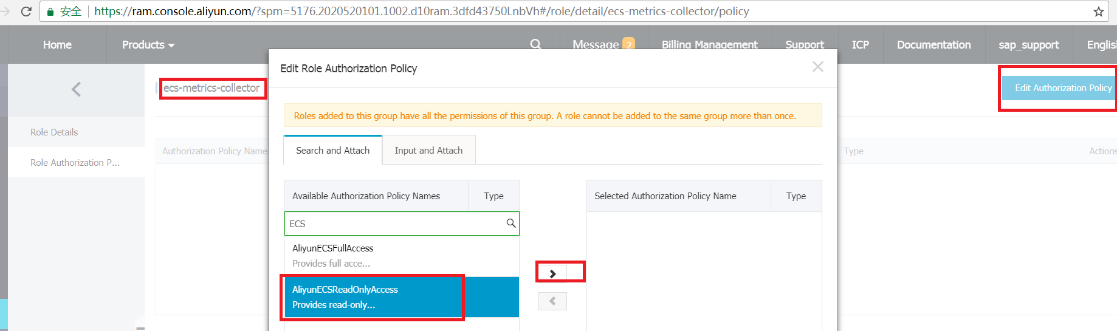
Click OK, the policy assignment is completed.

Create and configure an instance
To create an ECS instance for deploying SAP NetWeaver on Alibaba Cloud, follow these steps:
Open ECS Purchase page
Log on to the ECS console.
On the left-side navigation pane, click Instances.
On the Instance List page, click Create Instance.
Choose Pricing Model
You can choose either Subscription or Pay-As-You-Go as the billing method of your instance.
Currently, ECS instances support two billing methods:
Subscription: A type of prepayment whereby instances can be used only after payment is made. Instance usage is billed on a monthly basis, and the billing unit is US$/month. Subscription is applicable to fixed 24/7 services, such as Web service.
Pay-As-You-Go: A type of post payment whereby payment is made after instance usage. Instance usage is billed on a minute basis, and the billing unit is US$/hour. The minimum charge for the lifecycle of an ECS instance (from creation to release) is 0.01 US$. Pay-As-You-Go is applicable to scenarios with sudden traffic spikes, such as temporary scaling, interim testing, and scientific computing.
See Purchase ECS instances in the ECS Purchase Guide for the differences between these two billing methods.
Choose the Datacenter Region and Zone
Usually, All SAP applications (SAP ERP, CRM, SRM, and so on) and systems (SAP DB, SAP Application servers) should be deployed in the same Zone. The region and zone cannot be changed after the instance is created. When choosing a region and zone, consider the following:
Generally, if the region where your instance is located is close proximity to your customers, they will experience shorter network latency and faster download speed when using your service.
Some features, such as the number of zones, instance types, storage types, and network service pricing, vary by region. Select an appropriate region to meet your business needs.
ECS instances in regions outside Mainland China do not support interchange between Linux systems.
If you are creating multiple instances for your SAP system,
If it requires shorter network latency, we recommend that you create the instances in the same zone.
If it has higher requirements for disaster recovery, we recommend that you create the instances in different zones of one region.
Instances in different regions cannot communicate with each other over intranet.
Choose the instance type
The availability of instance types varies by region. See Instance generations and type families in Product Instruction for scenarios of each instance type.
Note:If you chose pricing model as ‘Pay-As-You-Go’, you cannot purchase all ECS instances from instance types. If the instance you need is not in the list, you can submit a ticket for purchasing to Alibaba Cloud support.
Alibaba Cloud ECS instance offers a number of instance types (virtual machine sizes) for deploying SAP solutions. You can only run your SAP applications on ECS instances that had been certified by SAP. For a list of SAP-certified instance types approved for production use, see following,
Instance Type | Family Type | vCPU | Memory (GiB) |
ecs.sn2ne.large | sn2ne | 2 | 8 |
ecs.sn2ne.xlarge | sn2ne | 4 | 16 |
ecs.sn2ne.2xlarge | sn2ne | 8 | 32 |
ecs.sn2ne.4xlarge | sn2ne | 16 | 64 |
ecs.sn2ne.8xlarge | sn2ne | 32 | 128 |
ecs.sn2ne.14large | sn2ne | 56 | 224 |
ecs.r5.large | r5 | 2 | 16.0 |
ecs.r5.xlarge | r5 | 4 | 32.0 |
ecs.r5.2xlarge | r5 | 8 | 64.0 |
ecs.r5.3xlarge | r5 | 12 | 96.0 |
ecs.r5.4xlarge | r5 | 16 | 128.0 |
ecs.r5.6xlarge | r5 | 24 | 192.0 |
ecs.r5.8xlarge | r5 | 32 | 256.0 |
And for more information please kindly see SAP Note 2552731 - SAP Applications on Alibaba Cloud: Supported Products and IaaS VM types.
Choose Network Type
Network Type: For your SAP system ECS instance, please choose Virtual Private Cloud (VPC) as the network type. You can select your own VPC and vSwitch. If you do not have one, use the default VPC and vSwitch.
Security Group: A security group functions similarly to virtual firewalls, and is used to set network access controls for one or more ECS instances. When creating instances, you must select a security group. Please add security group rules to control outbound and inbound network access for all SAP system ECS instances in the security group.
Network Billing Type: Billing by Data Transfer. With this billing method, charges are determined by the amount of the data transferred to an instance every hour (usually calculated by GB). The traffic price varies by region. Check the Internet traffic fee on the bottom of the page.
Network Bandwidth Peak: To help prevent high charges from sudden traffic spikes, you can specify a peak bandwidth for the Instance.
Network type | Internet access? | Network bandwidth peak |
VPC | Yes | If no Elastic IP (EIP) address is used, set the peak bandwidth to a non-zero value and an Internet IP address will be bound to your instance. The address cannot be changed or unbound. |
VPC | No | Set the peak bandwidth to 0 Mbps. |
Choose the base operating system
Public Image: it contains the image of an operating system officially provided by Alibaba Cloud. On top of this, you will need to install the related software and configure the application environment based on your specific requirements. Alibaba Cloud currently supports the following operating systems for running SAP NetWeaver systems:
SUSE Linux Enterprise Server (SLES)
Microsoft Windows Server (2016 Data Center Edition, 2012 R2 Data Center Edition)
Marketplace image:it contains certified images. Preinstalled with OS, configured user environments, and applications, to be deployed immediately. Alibaba Cloud currently supports the following operating systems for running SAP NetWeaver systems:
Red Hat Enterprise Linux Server (RHEL)
Provision and configure storage
You have to select cloud disks for the system disk and data disks. Alibaba Cloud provides you with flexible, cost-effective, and easy-to-use data storage options for your ECS instances.
System Disk is required. It is for installing the operating system.
Local, temporary, instance based storages.
Data stored on instance storage volumes will be persistent until ECS instance is released.
For system disk, we recommend using Ultra Cloud Disks; you can choose SSD Cloud Disk to get better performance.
Data Disk that you add here will be released with the instance and cannot be detached from the instance. You can create a cloud disk independently.
Persistent block-level storage volumes for use with ECS instances.
For data disk, we recommend using Ultra Cloud Disks in your SAP non-production environments, using SSD Cloud Disks in production environments.
Each user account can own up to 250 cloud disks simultaneously, with a maximum capacity of 32768 GB per data disk.
You can add up to 16 data disks, blank or from a snapshot, based on business needs.
Cloud disk types vary by region. See Disk parameters and performance test for differences of cloud disk features. Three different volume types, each option has a unique combination of performance and durability.
SSD cloud disks
Ideal for I/O intensive applications, and provide stable and high random IOPS performance.
Ultra cloud disks
Ideal for application scenarios with medium I/O load and provide a storage performance of up to 3000 random IOPS for ECS instances.
Basic cloud disks
Ideal for application scenarios with low I/O load and provide an I/O performance of several hundred IOPS for ECS instances.
For your SAP production environments, recommended storage options as below,
Directory | Disk type |
SAP software | SSD cloud disks |
DB data files | SSD cloud disks |
DB log files | SSD cloud disks |
Intermediate backup storage | Ultra cloud disks |
SAP archiving storage | Ultra cloud disks |
For SAP HANA, we recommend using SSD Cloud Disks in all environments. For more information about HANA storage configuration, please refer to SAP HANA Deployment Guide on Alibaba Cloud.
Directory | Disk type |
HANA shared | SSD cloud disks |
HANA data files | SSD cloud disks |
HANA log files | SSD cloud disks |
Intermediate backup storage | Ultra cloud disks |
For Microsoft SQL Server, we recommend using SSD Cloud Disks in all environments. For more information about SQL Server storage configuration, please refer to Microsoft SQL Server on Alibaba Cloud.
Directory | Disk type |
data files | SSD cloud disks |
log files | SSD cloud disks |
backup files | Ultra cloud disks |
For SAP MaxDB Server, we recommend using SSD Cloud Disks in all environments. For more information about MaxDB Server storage configuration, please refer to SAP MaxDB Deployment Guide on Alibaba Cloud.
Directory | Disk type |
data files | SSD cloud disks |
log files | SSD cloud disks |
backup storage | Ultra cloud disks |
Security Setting
You can set the authentication method based on the operating system.
Operating system | Authentication method |
Linux | SSH key pairs or password |
You have two choices: Set authentication method now or later.
If you want to set the authentication method later, after the instance is created, reset the password or bind an SSH key pair in the ECS console.
Purchase Plan
Subscription Type: If you are creating an ECS instance of the Subscription billing method, you have to set Subscription Type to either 1 Month or 1 Year. If you do not want to manually renew your instance after it expires, select Auto-renew to activate automatic renewal. For more information, see Auto-renewal in Purchase Guide.
Instance Name: We recommend that you specify a name for the instance for efficient management.
Number of Instances: You can create up to 10 instance of the Pay-As-You-Go billing method at the same time, but no quota for instances of the Subscription billing method.
Launch instances
Overview and cost. Check the overview and cost information to make sure that the selected configuration details are correct.
Click either Add to Cart (if you decide to continue shopping) or Buy Now (if you want to confirm the purchase).
On the Confirm Order page, confirm the order information, and then,
For an instance of the Subscription billing method, click Place Order, make payment, and then activate the instance.
For an instance of the Pay-As-You-Go billing method, click Activate, and then activate the instance.
When the instance is activated, you can go to the ECS console to check the instance details, such as the instance name, Internet IP address, and private IP address for VPC network.
Instance post-configuration
Add a DNAT entry
You can use the DNAT function to map a public IP to a private IP. Then, the ECS instance with the specified public IP can provide public services or access over the Internet.
Find the target NAT gateway and click the Configure DNAT link.
If you have already configured a DNAT entry, click the NAT gateway ID, and then click DNAT Table in the left-side navigation pane.
Click Create DNAT Entry.
Configure the DNAT entry according to the following information.
Configuration | Description |
Public IP | Select a public IP to forward the Internet traffic. Note: You cannot use the IP that is already being used in an SNAT entry. |
Private IP | The private IP that you want to map. You can specify the private IP in the following ways: Manually Input: Enter the private IP that you want to map. It must be within the private IP range of the VPC. Auto Fill: Select an ECS instance in the VPC from the list. The private IP of the selected ECS instance is automatically entered in the field. For this tutorial, select Auto Fill. |
Port Settings | DNAT supports IP mapping and port mapping. Select a mapping method: All Ports: Select this option to configure IP mapping. Using this method, the ECS instance with the specified private IP can receive any Internet requests using any protocol on any port. This is the same as binding an EIP to it. You do not need to configure the public port, private port, and IP protocol when configuring IP mapping. Specific Port: Select this option to configure port mapping. Using this method, the NAT gateway will forward the received data from You must specify the public port, private port, and IP protocol when configuring port mapping. For this tutorial, select Specific Port, set the public port and private port to 80, and use the TCP protocol. |
Click Confirm.
The status of the added DNAT entry is Configuring. Click Refresh to refresh the status. When the status is Available, the DNAT entry has been successfully added.

Add an SNAT entry
When an ECS instance in the specified vSwitch initiates an Internet access request, the NAT gateway will provide it with the Internet proxy service and then the ECS instance can use the specified public IP to access the Internet.
If the ECS instance has no access to the internet by an EIP which is directly assigned to the instance you have to add an SNAT entry to ensure that the SAP Metrics Collector can access the internet by this way.
The SNAT function provides the Internet proxy service for VPC ECS instances that do not have a public IP.
Find the target NAT gateway and click the Configure SNAT link.
If you have already configured an SNAT entry, click the NAT gateway ID, and then click SNAT Table in the left-side navigation pane.
Click Create SNAT entry.
Configure the SNAT entry according to the following information.
Configuration | Description |
VSwtich | The vSwitch of the ECS instances that require the Internet access. By default, all ECS instances in the specified vSwitch can use the specified public IP to access the Internet. Note: If an ECS instance has already configured a public IP (such as an EIP), the previously configured public IP for the ECS instance is used to access the Internet, rather than using the SNAT proxy service. |
vSwitch CIDR Block | Display the CIDR block of the selected vSwitch. |
Public IP | The public IP that is used to access the Internet. Note: You cannot use a public IP that has already been added to a DNAT entry. |
Click Confirm.
The status of the added SNAT entry is Configuring. Click Refresh to refresh the status. When the status is Available, the SNAT entry has been successfully added.

Connecting to SAP ECS instances
Generally, if you don’t use an external IP for SAP ECS instances, you can only connect to the SAP system instances through the bastion instance using SSH.
To connect to SAP systems through the bastion instance, connect to the bastion host and then to the SAP system ECS instance(s) by using an SSH client of your choice.
To install or maintain SAP system via SWPM from your bastion host, you should install bastion host with Windows Operating System. It easy to run SWPM with GUI or browser.
To connect to the SAP HANA database through SAP HANA Studio, use a remote desktop client to connect to the Windows Server instance. After connection, manually install SAP HANA Studio and start accessing your SAP HANA database.
Harden OS security
After you create an instance, for security of your instance, we recommend that you perform security compliance inspection and configuration on:
Linux instances: See Harden operating system security for Linux in Security Advisories.
Windows instance: See Harden operating system security for Windows in Security Advisories.
Changing hostname
The default naming of ECS instance is Instance ID, the naming of hosts running SAP software has to be done according to general standards and some SAP specific restrictions, for example, the maximum length of the hostname is up to 13 characters for SAP rel. 4.6 or higher. Please refer to SAP note 611361 - Hostnames of SAP servers for more details.
For your SAP system on SUSE Linux Server:
#vi /etc/HOSTNAMEor
# echo newhostname > /etc/HOSTNAMEFor your SAP system on RHEL Linux Server:
#vi /etc/hostnameor
# echo newhostname > /etc/hostnameFor your SAP system on Windows Server:
Navigate to the “This PC” screen and click “System properties”.
Click “Change settings” next to the current computer name.
Click the “Change” button.
Enter a new computer name and confirm by clicking “OK”.
This will change hostname permanently.
Reboot the server and verify before your SAP installation.
RAM Role configuration
Attach the RAM Service Role you created to your SAP ECS instances.
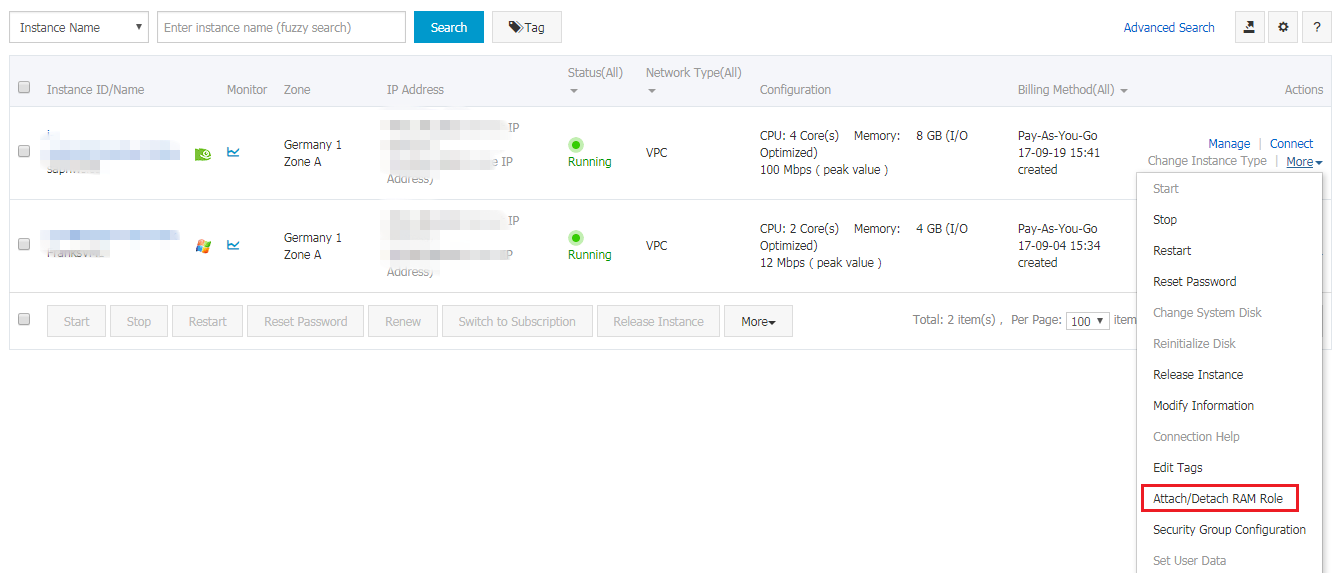
Open ECS Console, go to tab Instances and find your ECS instance
Select Attach/Detach RAM Role in the drop down list of More actions
Select the RAM service role you created at the beginning.
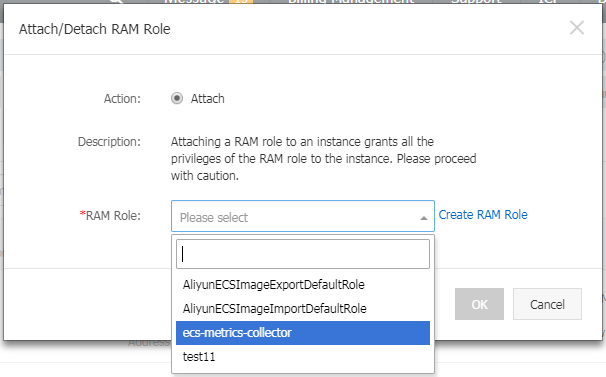
Click OK to attach the role.
For more information about attaching/detaching a RAM Role, please refer to How to use the instance RAM role on the console.
Prepare SAP installation media
You normally obtain the installation media as part of the installation package from SAP. However, you can also download installation media from the SAP Software Distribution Center at http://support.sap.com/swdc. There are two main options for copying SAP installation media to ECS instance on Alibaba Cloud:
Download from SAP Service Marketplace to ECS instance on Alibaba Cloud
From your Alibaba Cloud ECS instance, connect to the SAP Service Marketplace and download the required installation media. This option will most likely be the fastest method for getting SAP installation media to Alibaba Cloud, because Alibaba Cloud instances have very fast connections to the Internet. You can create a dedicated Alibaba Cloud OSS volume to store installation media, and then attach the volume to different instances as needed. You can also create a snapshot of the Alibaba Cloud volume and create multiple volumes that you can attach to multiple instances in parallel.
Copy from your network to ECS instance on Alibaba Cloud
If you already have the required SAP installation media downloaded to a location on your network, you can copy the media from your network directly to an Alibaba Cloud ECS instance.
ECS Metrics Collector Installation and Verification
ECS Metrics Collector is the monitoring agent which enables SAP monitoring tools to gather system information from the SAP ECS instances and underlying host environment. For each ECS instance which runs SAP applications, this monitoring agent needs to be installed.
On Linux
Install ECS Metrics Collector
Step 1: Login your SAP ECS instance through a user account with root privileges.
In order to use root privileges, you need to use sudo, and your user has to belong to the sudo group.
Step 2: Install ECS Metrics Collector via Cloud Tool (aka Aliyun Assistant) as following:
In case you are using RHEL from marketplace, you need to follow Cloud Assistant Client to install aliyun assistant manually.
aliyun_installer --list
aliyun_installer -i ecs-metrics-collector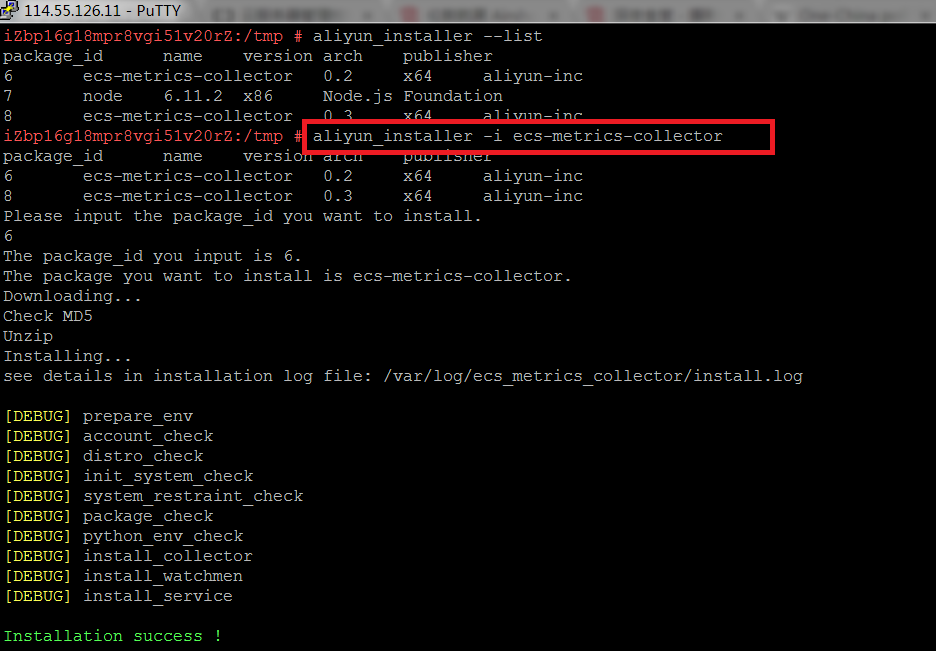
Verification the installation of ECS Metrics Collector
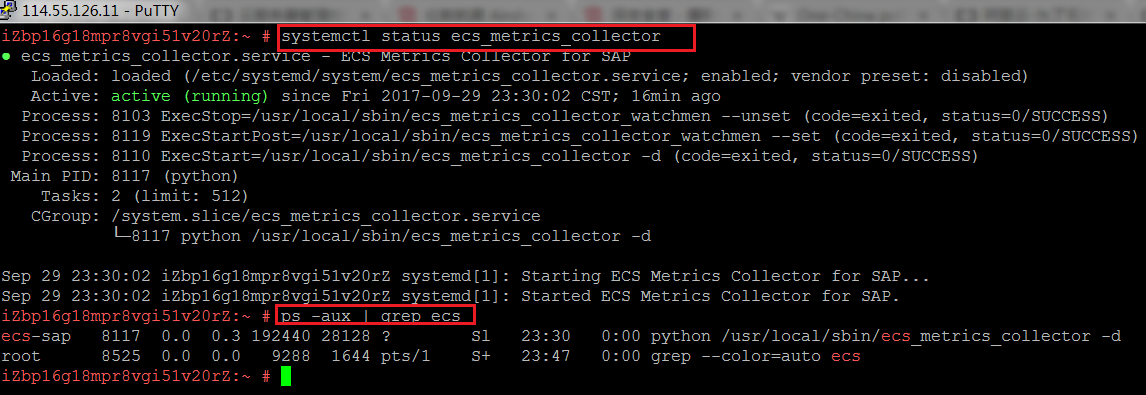
Step 3: Verify if the ECS Metrics Collector is installed successfully, by running:
systemctl status ecs_metrics_collectorCheck if the status is “active (running)”
ps -aux | grep ecsCheck if the corresponding process is running
Step 4: Verify safeguarding task and automatic update tasks configured in crontab as following, using command
cat /etc/cron.d/ecs_metrics_collector
cat /var/log/ecs_metrics_collector/watchmen.log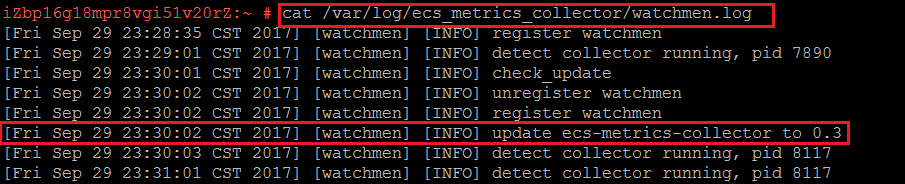
These two tasks are automatically added to crontab, during the installation of the ECS Metrics Collector. Automatic Update task automatically checks the latest version of ECS Metrics Collector from Cloud Tool (Aliyun Assistant) server every 5 minutes, and will launch auto-upgrade once there is new version available.
Check the metrics data collected
Step 5: Verify the collected data:
curl localhost:8888 | vim -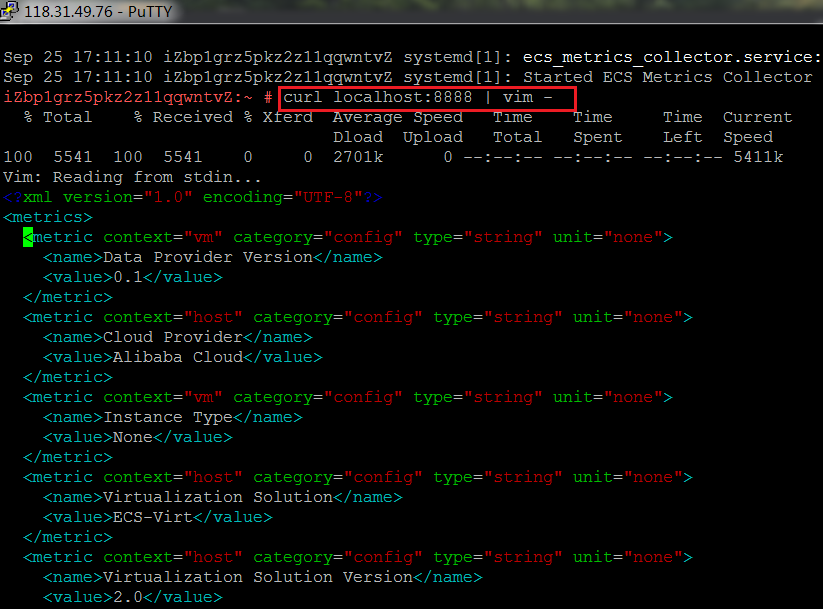
Additional operational commands
Following are some operational commands for your reference. In general, these commands are not necessary to be used, unless due to specific maintenance needs.
Start ECS Metrics Collector
systemctl start ecs_metrics_collector
Stop ECS Metrics Collector
systemctl stop ecs_metrics_collector
Uninstall ECS Metrics Collector
Aliyun_installer -u ecs-metrics-collector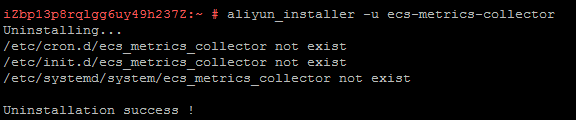
On Windows
Install ECS Metrics Collector
Run Powershell as Administrator and execute the following:
$assistPath = Get-ChildItem -Name -Path C:\ProgramData\aliyun\assist -Directory | Sort-Object CreationTime -Descending | select -First 1
$assistPath = "C:\ProgramData\aliyun\assist\" + $assistPath
Set-Location -Path $assistPath
.\aliyun_installer.exe -i ecs_metrics_collector
Verification the installation of ECS Metrics Collector
Verify if the ECS Metrics Collector is installed successfully, by checking from task manager as follows: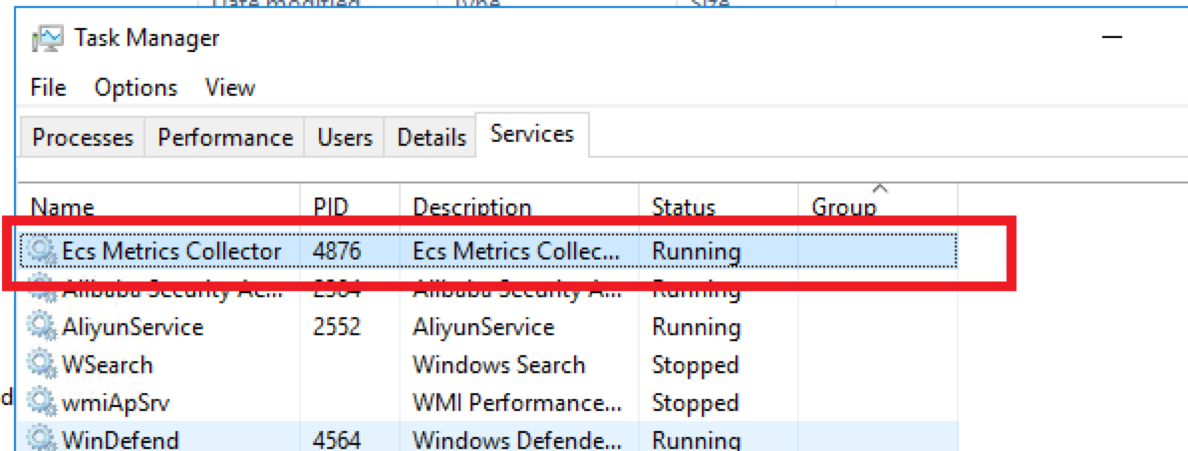
Verify safeguarding task and automatic update tasks configured in Task Scheduler as following, using commandAutomatic Restart is configured in the Service Properties as follows: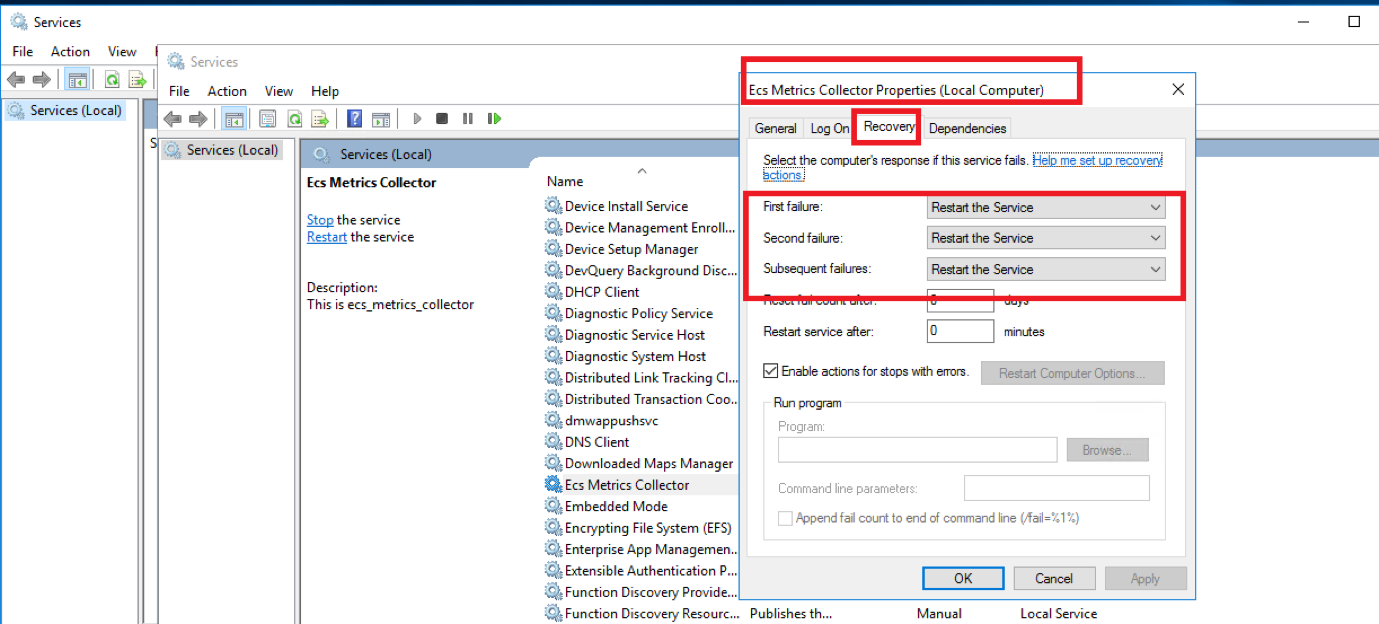
Automatic update configuration in Task Scheduler;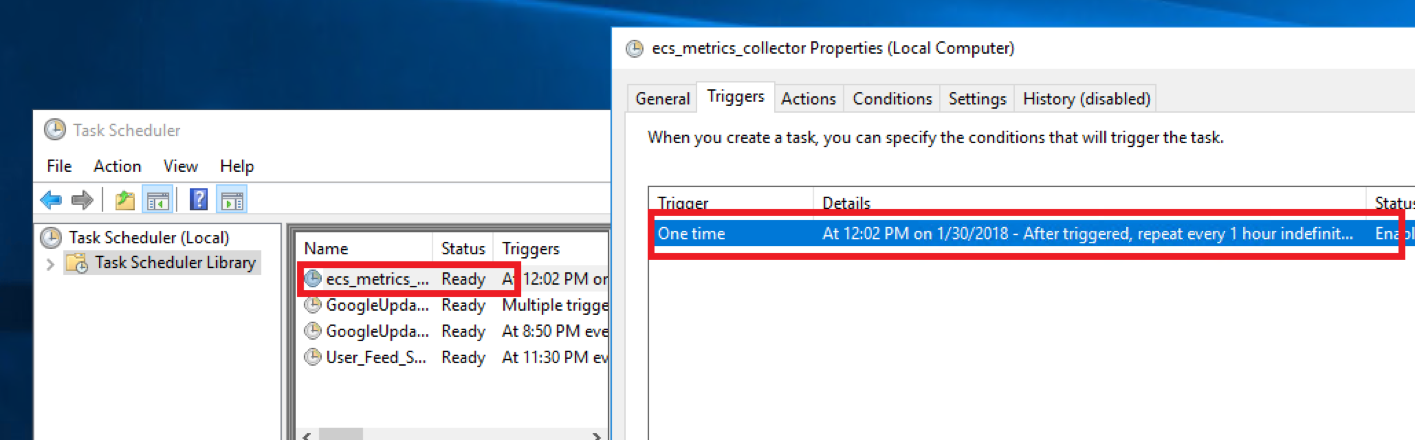
Check the metrics data collected
Verify the collected data:
http://localhost:8888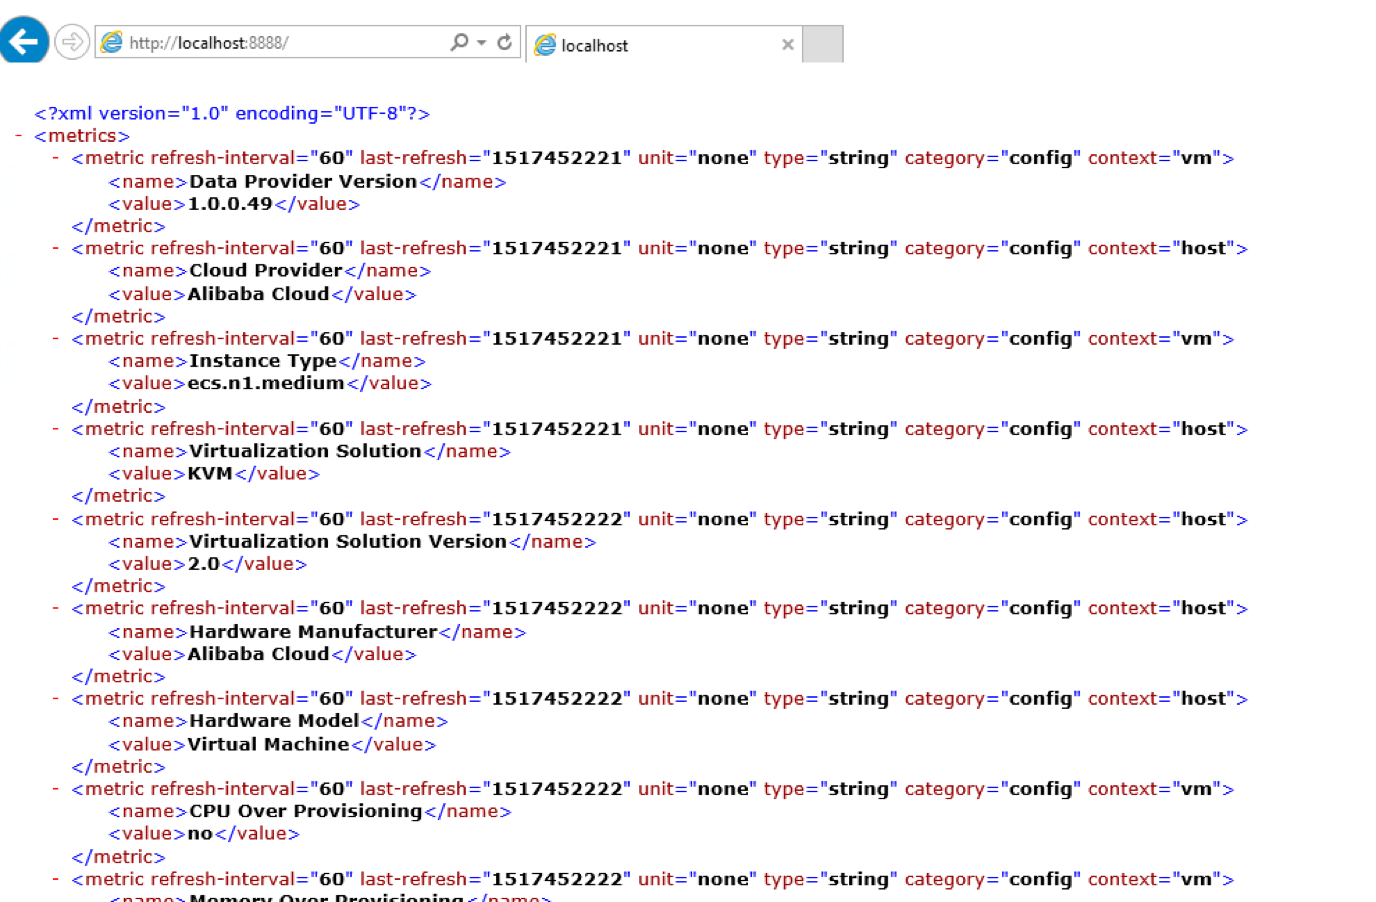
Additional operational commands
Following are some operational commands for your reference. In general, these commands are not necessary to be used, unless due to specific maintenance needs.
Manually Start ECS Metrics Collector
Run Powershell as Administrator and add following in the console and execute:
net stop "Ecs Metrics Collector"Manually Stop ECS Metrics Collector
Run Powershell as Administrator and add following in the console and execute:
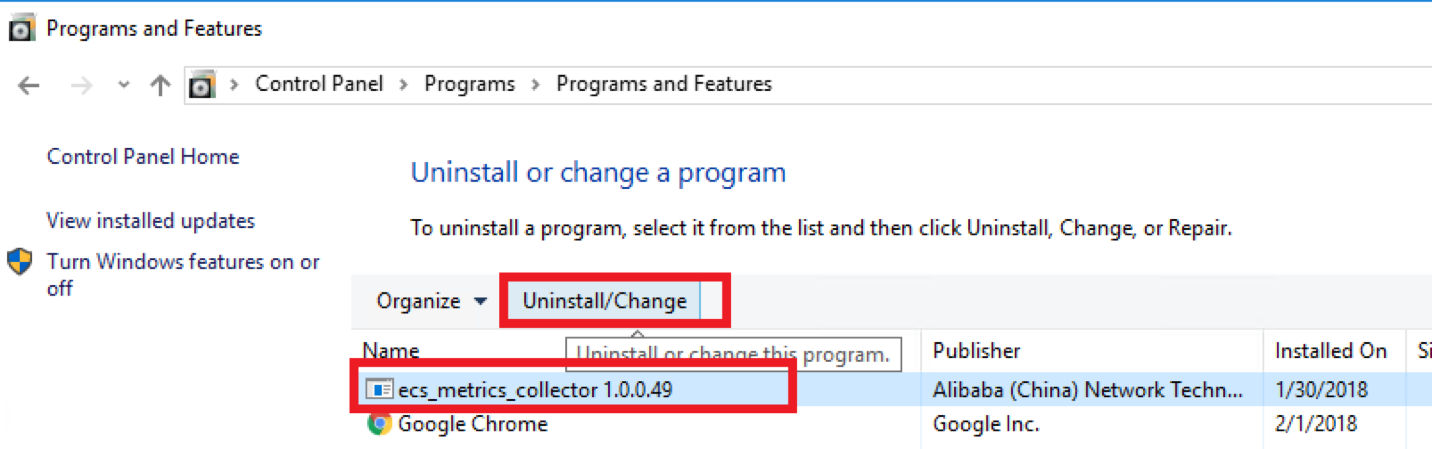
net start "Ecs Metrics Collector"Uninstall ECS Metrics Collector
Control Panel -> Programs -> Program and Features -> Unintall or change a program
Checking the operating system
After launching ECS, consult the relevant SAP notes on installation and ensure that your system includes the software components specified:
1310037 - SUSE LINUX Enterprise Server 11: Installation notes
1984787 - SUSE LINUX Enterprise Server 12: Installation notes
1496410 - Red Hat Enterprise Linux 6.x: Installation and Upgrade
2002167 - Red Hat Enterprise Linux 7.x: Installation and Upgrade
Creating operating system image
When you launched your SAP ECS instance and got SAP installation media, you should create a custom image from a snapshot, perform the following:
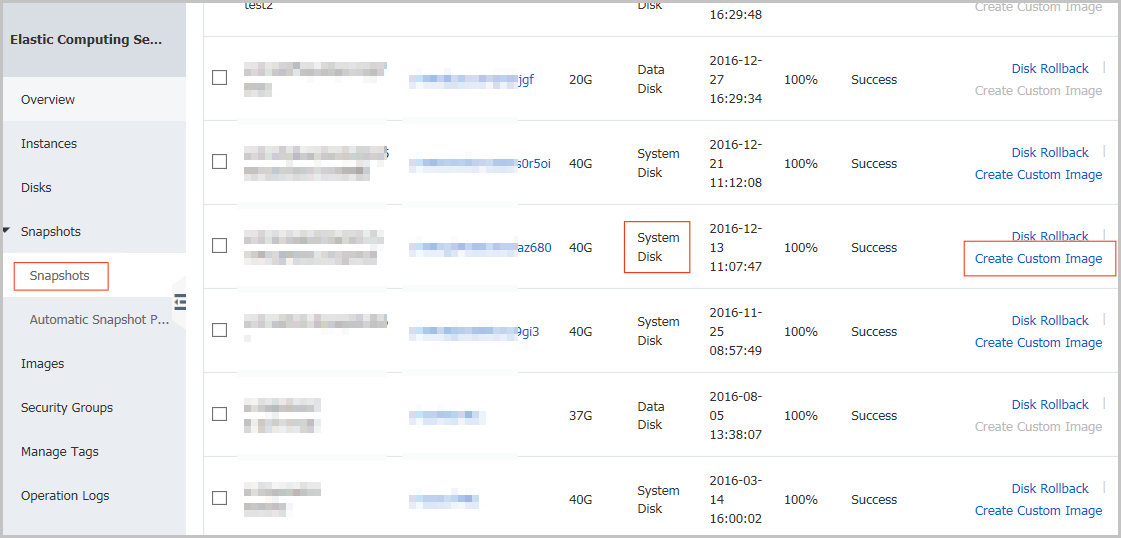
Log on to the ECS console.
Click Snapshots > Snapshots in the left navigation bar.
Select your desired region.
Select a snapshot with the disk attribute of System Disk and click Create Custom Image.
NoteNote: Data disks cannot be used to create custom images.
In the displayed dialog box, you can view the snapshot ID. Enter a name and description for the custom image.
(Optional) Click Add Data Disk Snapshot to select multiple snapshots of data disks for the image.
NoteNote: If the snapshot disk capacity is left blank, an empty disk will be created with the default capacity of 5 GB. If you select available snapshots, the disk size is the same as the size of these snapshots.
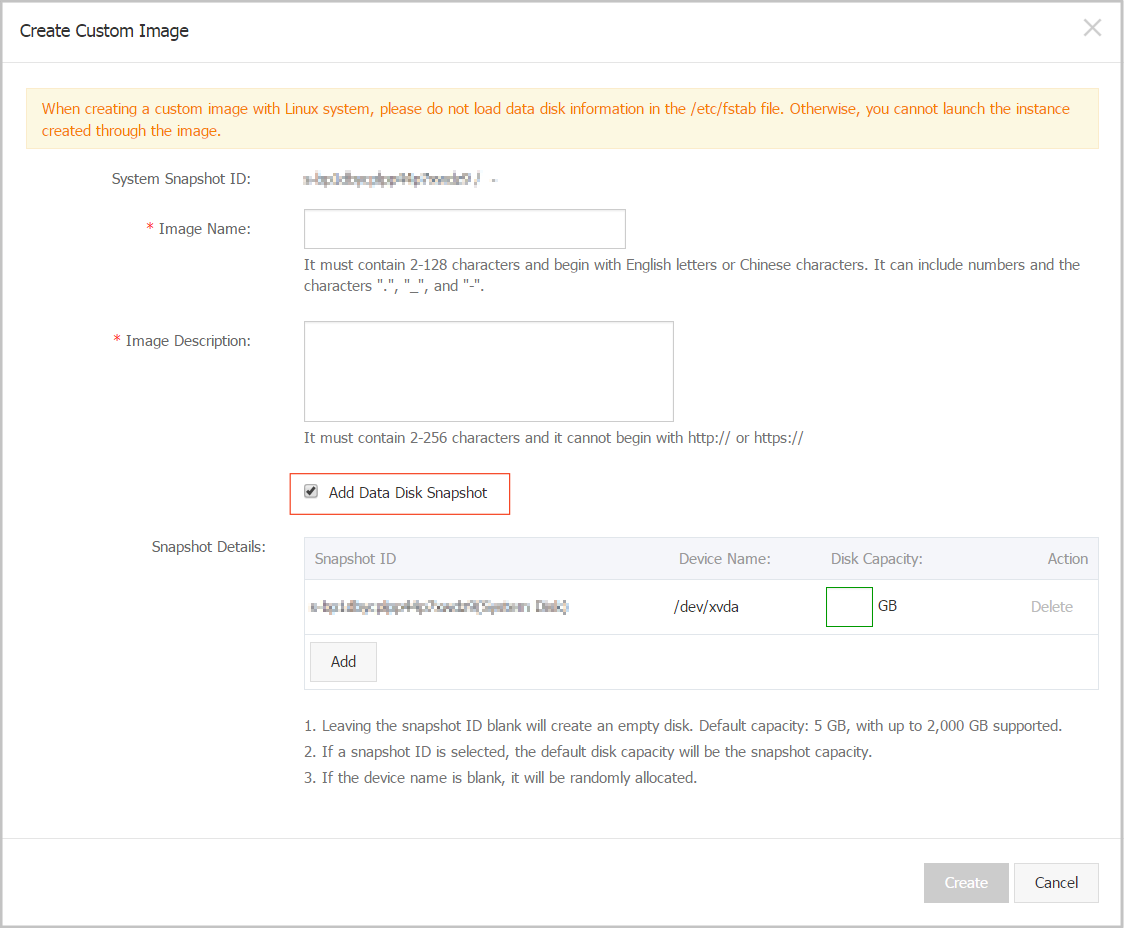
Click Create. The custom image is successfully created.
(Optional) To view images you have created, select Images in the left navigation bar.
Install the SAP solution
Once you have provisioned and configured the required ECS instance on Alibaba Cloud, you are ready to begin the installation of the SAP solution. Before that, please refer to the following SAP official guides.
Check the section of Installation Guides - Application Server Systems > and find Installing SAP Systems Based on SAP NetWeaver 7.1 and Higher - Using Software Provisioning Manager 1.0 which is appropriate to your database, SAP product release, operating system and technical stack.
More specific installation guides for all supported combinations of technologies (ABAP, Java, or ABAP and Java), databases and operating systems, available at:http://support.sap.com/sltoolset
Start SWPM
The Software Provisioning Manager (SWPM) chooses the disk drive with the most free space as an installation suggestion for each component. Be sure to assign the disks to their proper roles in the SWPM dialog boxes.
You can download the latest SWPM as per the SAP note 1680045. You need to verify that you have installed JAVA JDK software on your SAP ECS instance.
Note: When you run SWPM to perform an installation, if you want to connect to the SWPM with the browser, it is required using root user. So the password has to be set for root even if the customer selected to connect with a certificate. After installation, to secure the system, if required, the customer can disable password login within the ssh configuration.
Upgrade SAP kernel
After you have installed SAP NetWeaver, make sure that you apply the latest kernel as described in the Installation Guide, or update the SAP kernel to the minimum supported patch level.
In addition to that, please also make sure it contains the minimum SAP kernel patch level, as described in the SAP note 2533233 - Linux on Alibaba Cloud (IaaS): Adaption of your SAP License.
Check Host Agent version
SAP Host Agent is an agent that can accomplish several life-cycle management tasks, such as operating system monitoring, database monitoring, system instance control and provisioning. Usually SAP Host Agent is automatically started when the operating system is booted. You can also manually control it using the saphostexec program.
You are running SAP in a Linux ECS instance on Alibaba cloud and want to configure Enhanced Monitoring as required by SAP in cloud environments. In addition you should reference SAP Note 2564176
The steps to check SAP Host Agent version, please follow below steps to check version:
On Linux
Login as root, since
sidadmuser doesn’t have permission for executing SAP HOST AGENT commandsnavigate to directory where SAP Host Agent is installed
cd /usr/sap/hostctrl/exeexecute command
./saphostexec –version
On Windows
You are logged on as a member of the local Administrator group.
Open a command-line window.
Change to the directory where the saphostexec executable of SAP Host Agent is located:
cd %ProgramFiles%\SAP\hostctrl\exeExecute the following command:
saphostexec.exe -version
The minimum SAP Host Agent version for Enhanced Monitoring is release 7.21 patch level 32. To include Alibaba cloud performance counters in the SAP enhanced monitoring, SAP has enhanced the SAP Host Agent and its monitoring transaction ST06.
For the required SAP NetWeaver support package levels please check SAP Note 1102124.
Upgrade Host Agent
Please ensure that you run at least the minimum SAP Host Agent version required for the Alibaba Cloud environment. We recommend upgrading SAP Host Agent independently from the SAP instance, either by doing this manually or by configuring automated upgrade.
To update your SAP Host Agent by default on a regular basis, see SAP Note 1473974 - Using the SAP Host Agent Auto Upgrade Feature.
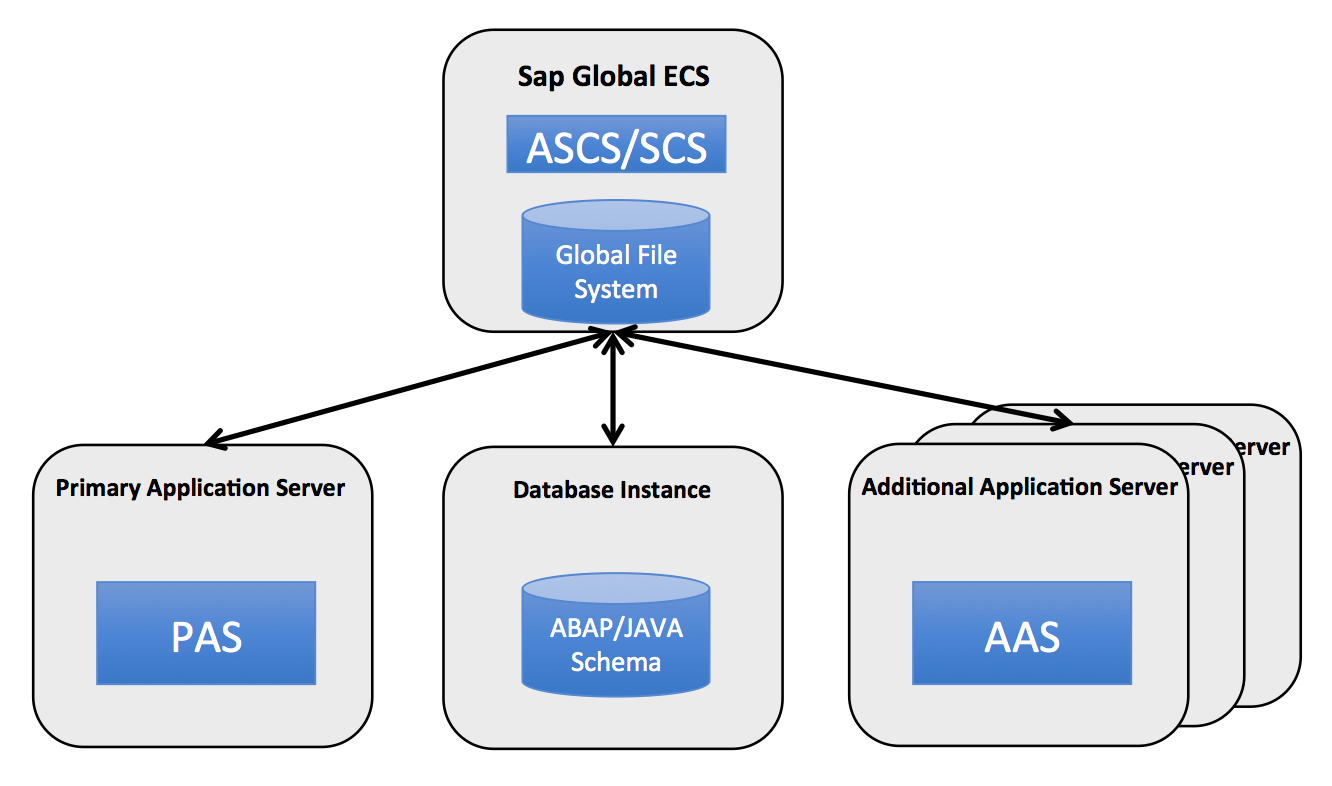
Installation of a scale-out system
In a 3-tier scale-out SAP system, you should deploy several ECS instances as different SAP instances.
ASCS: ABAP Central Services Instance, you can install ASCS on independent ECS instance, containing the enqueue server and the message server. There can only be one such instance in the SAP system, and it can be made into a high availability instance.
SCS: SAP Central Services, for Java systems the Central Services are referred to as SCS.
PAS: Primary Application Server Instance, a primary ECS instance that runs the SAP NetWeaver application server (AS), this ECS instance also hosts a shared file-system that contains the shared profile and must be accessible from each ECS instances which run parts of the same SAP SID. If it’s also used for the transport share it has to be shared with all SAP SIDs using the same transport directories.
You also can install ASCS or SCS on this primary ECS instance.
AAS: Additional Application Server Instances, some number of additional VMs that run the AS, for scaling purposes.
DB Instance: An ECS instance that is dedicated to the central database.
Everything needs to run in the same zone.
The primary steps are as follows:
DB instance: Create the ECS instance that hosts the database and then install the database instance.
PAS :
Run SWPM on the ECS instance that you want to run SAP NetWeaver.
Install central services, ASCS or SCS.
Install the AS ABAP or AS JAVA.
Connect to the existing database instance.
AAS:
Run SWPM on each additional ECS instances that you want to run SAP NetWeaver.
Install the AAS.
Connect to the existing database instance.
Point to the network share that contains the profiles and is managed by the primary instance.
Installation of a single-node system
The steps to deploy SAP NetWeaver in a 2-tier configuration on Linux are very similar to the steps for setting up a 3-tier configuration. In a 2-tier configuration:
Both SAP NetWeaver and the database instance are installed a single ECS instance.
Install the database instance before you install SAP NetWeaver.
For SAP HANA-based systems, use a different SAP system ID (SID) for the SAP NetWeaver ABAP system than for the SAP HANA system. See SAP Note 1953429 - SAP HANA and SAP NetWeaver AS ABAP on One Server. An installation guide is attached to the note.
Post-installation
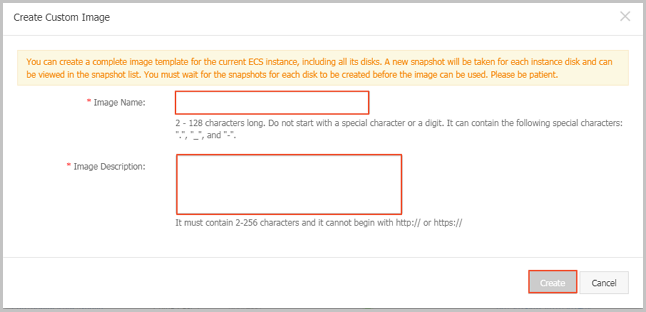
Creating SAP instance image
Once you have completed the SAP installation steps, you are suggested to create an image of the ECS instance to save all the installation works you did. Please refer to the following steps to create a custom SAP instance image.
Log on to the ECS console.
Click Instances on the left navigation pane.
Select region.
Select your SAP ECS instance, and then choose More > Create Custom Image.
Enter the name and description.
Click Create.
SAP System Migration
There are three options for migrating an SAP system to an ECS instance on Alibaba Cloud. You can use P2V tools, perform an SAP homogeneous or heterogeneous system copy or use Third-Party Tools.
VM Import/Export Tools
For the migration of small SAP systems, we recommend using P2V or V2V tools, which enable you to easily import machine images from your existing environment to ECS instances on Alibaba Cloud. The system status and data of your existing environment will mirror to a virtual disk file, and are uploaded to Alibaba Cloud platform. Make it as a custom mirror, to ensure that ECS instance runs the same application and data as the original physical server.
For additional information, see P2V migration tools on the Alibaba Cloud website.
Because of hardware key of your SAP system will be changed during migration, so you should implement new SAP license in target system on Alibaba Cloud.
You also need to install the metrics collector manually. For more information, you should refer to section about ECS Metrics Collector installation in this Guide.
SAP Homogeneous and Heterogeneous System Copy
The recommended method for migrating an SAP system to ECS instance on Alibaba Cloud is the standard SAP homogeneous and heterogeneous system copy procedure.
These are the three major steps to migrate an existing SAP system to Alibaba Cloud:
Export
In the source system, stop all SAP application instances before your export your source system. Create the export dump files of the source system by using SWPM.
Transmission
Copy the export dump files or DB backup data to Alibaba Cloud.
Network copy
For SAP systems with export dump files and DB backup data, you can copy the data over the network directly to the target ECS instance on Alibaba Cloud. The transfer time depends on the amount of data, the speed and bandwidth of the network connection. You can load data in parallel to reduce transfer time.
Import
On Alibaba Cloud, install the new SAP system on ECS instance. During the installation of the DB instance, import the files you exported from the source system by using SWPM.
Then, install SAP application instances and do post-installation of SAP System Copy.
Finally, start SAP system and provide SAP services on Alibaba Cloud.
Third-Party Tools
If using an unapproved Third-Party tool or migration method, contact the vendor of the procedure for support. SAP supported system copy methods are described in the system copy guides and SAP Notes.
After system migration, you should implement new SAP license and install metrics collector manually.