Install and load the virtio driver in your custom Linux image so that ECS instances can detect virtualized storage and network devices at boot.
Procedure
The following flowchart shows how to install the virtio driver in a Linux system:

Procedure
Check whether the kernel supports virtio
-
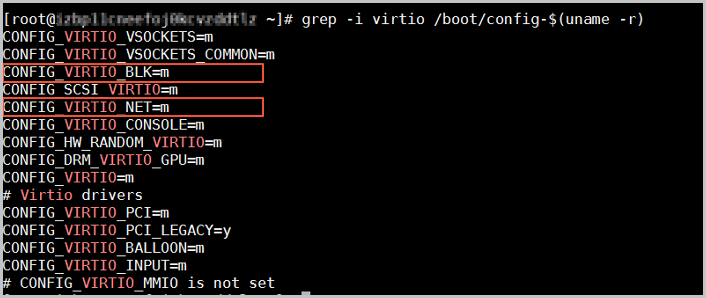
On the virtual machine where you create the image, run the following command to check whether the kernel supports virtio:
grep -i virtio /boot/config-$(uname -r)Sample output:
-
Analyze the output.
Check the
CONFIG_VIRTIO_BLKandCONFIG_VIRTIO_NETparameters:-
If the parameter values are y: The virtio driver is compiled into the kernel and loads automatically at startup. No further action is required.
-
If the parameter values are m or one parameter value is y and the other is m: The virtio driver exists as a kernel module. Add the virtio driver to the temporary file system.
-
If the parameters do not appear: The virtio driver is not installed. Manually install the virtio driver.
-
Add the virtio driver to the temporary file system
If the kernel has CONFIG_VIRTIO_BLK=m or CONFIG_VIRTIO_NET=m but these modules are not in the initramfs, the system may fail to load virtio at startup.
-
If
CONFIG_VIRTIO_BLKorCONFIG_VIRTIO_NETis m, run one of the following commands to check whether the virtio driver is in the initramfs:CentOS series
lsinitrd /boot/initramfs-$(uname -r).img | grep virtio
Debian series
lsinitramfs /boot/initrd.img-$(uname -r)|grep virtio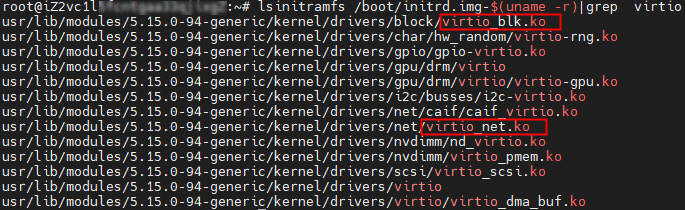
SUSE series
lsinitrd /boot/initrd-$(uname -r)|grep virtio
-
If the output contains
virtio_blk.koandvirtio_net.ko, the virtio driver is already in the initramfs. No further action is required. -
If the output is missing
virtio_blk.koorvirtio_net.ko, or contains only one ofvirtio_blk.koandvirtio_net.ko, proceed to the next step.
-
-
Add the virtio driver to the initramfs.
CentOS series
Applicable to CentOS 6, Anolis OS 7, AlmaLinux 8, Fedora 33, or later with kernel version later than 2.6.24 (run
uname -rto check).-
Open the dracut.conf file:
vim /etc/dracut.conf -
Press i to enter Insert mode and add the following content:
add_drivers+="virtio_blk virtio_net"Press Esc, enter :wq, and press Enter to save and close the file.
NoteIf one of the
CONFIG_VIRTIO_BLKandCONFIG_VIRTIO_NETvalues is y and the other is m, you need to only add the virtio driver whose value is m to the file. For example, if the value of theCONFIG_VIRTIO_NETparameter is m, write onlyadd_drivers+="virtio_net"to the file. -
Regenerate initrd:
dracut -fNoteRun
echo $?to verify a return value of 0. Run thelsinitrd /boot/initramfs-$(uname -r).img | grep virtiocommand to verify that virtio is in the initramfs.
Debian series
-
Open the modules file:
vim /etc/initramfs-tools/modules -
Press i to enter Insert mode and add the following content:
virtio_blk
virtio_net
Press Esc, enter :wq, and press Enter to save and close the file.
NoteIf one of the
CONFIG_VIRTIO_BLKandCONFIG_VIRTIO_NETvalues is y and the other is m, you need to only add the virtio driver whose value is m to the file. For example, if the value of theCONFIG_VIRTIO_NETparameter is m, add onlyvirtio_netto the file. -
Regenerate initrd:
update-initramfs -uNoteRun
echo $?to verify a return value of 0. Run thelsinitramfs /boot/initrd.img-$(uname -r)|grep virtiocommand to verify that virtio is in the initramfs.
SUSE series
-
Versions earlier than SUSE 12 SP1 or openSUSE 13
-
Open the kernel file:
vim /etc/sysconfig/kernel -
Press i to enter Insert mode and add the following content:
INITRD_MODULES="virtio_blk virtio_net"Press Esc, enter :wq, and press Enter to save and close the file.
NoteIf one of the
CONFIG_VIRTIO_BLKandCONFIG_VIRTIO_NETvalues is y and the other is m, you need to only add the virtio driver whose value is m to the file. For example, if the value of theCONFIG_VIRTIO_NETparameter is m, write onlyINITRD_MODULES="virtio_net"to the file. -
Regenerate initrd:
mkinitrd
-
-
SUSE 12 SP1, OpenSUSE 13, or later
-
Open the dracut.conf file:
vim /etc/dracut.conf -
Press i to enter Insert mode and add the following content:
add_drivers+="virtio_blk virtio_net"Press Esc, enter :wq, and press Enter to save and close the file.
NoteIf one of the
CONFIG_VIRTIO_BLKandCONFIG_VIRTIO_NETvalues is y and the other is m, you need to only add the virtio driver whose value is m to the file. For example, if the value of theCONFIG_VIRTIO_NETparameter is m, write onlyadd_drivers+="virtio_net"to the file. -
Regenerate initrd:
dracut -f
-
NoteRun
echo $?to verify a return value of 0. Run thelsinitrd /boot/initrd-$(uname -r)|grep virtiocommand to verify that virtio is in the initramfs. -
Manually install the virtio driver
Step 1: Download the kernel installation package
In this example, the linux-4.4.24.tar.gz kernel installation package is used in CentOS. Modify the commands based on your kernel version.
-
Install the components required for kernel compilation:
yum install -y ncurses-devel gcc make wget -
Query the kernel version. In this example, the kernel version is 4.4.24-2.al7.x86_64.
uname -r
-
Go to the Linux kernel list page and find the download URL for your kernel version.
In this example, the download URL of linux-4.4.24.tar.gz is
https://www.kernel.org/pub/linux/kernel/v4.x/linux-4.4.24.tar.gz.
-
Download the installation package:
cd /usr/src/ wget https://www.kernel.org/pub/linux/kernel/v4.x/linux-4.4.24.tar.gz -
Decompress the package and create a symbolic link:
tar -xzf linux-4.4.24.tar.gz
ln -s linux-4.4.24 linux
cd /usr/src/linux
Step 2: Compile the kernel
-
Compile the kernel:
make mrproper symvers_path=$(find /usr/src/ -name "Module.symvers") test -f $symvers_path && cp $symvers_path . cp /boot/config-$(uname -r) ./.config make menuconfigNoteIf the make menuconfig command fails, install the missing components. For example:
yum install ncurses-devel yum install bison yum install flex -
Complete virtio-related configurations on the following page:
NoteSelecting configurations with asterisks (*) compiles the virtio driver into the kernel. Selecting m compiles it as a module.
-
Configure the Virtualization options.
-
Select Virtualization and press Enter.
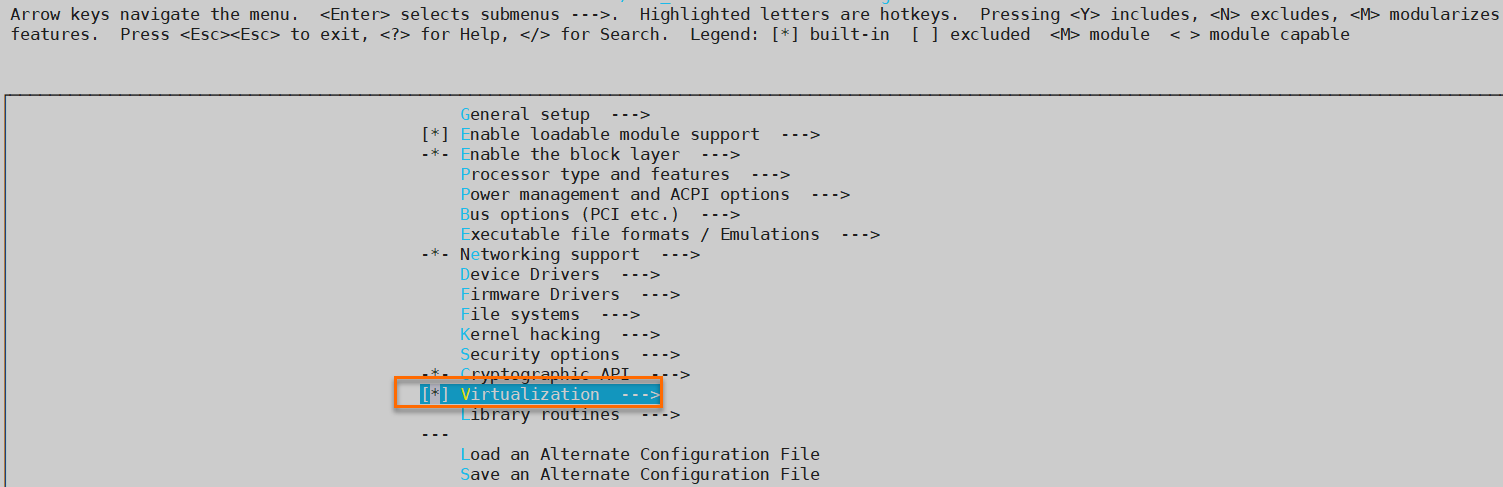
-
Verify that the Kernel-based Virtual Machine (KVM) support option is selected.

-
-
Configure the Processor type and features options.
-
Go back to the main menu, select Processor type and features, and press Enter.
-
Select Paravirtualized guest support and press Enter.
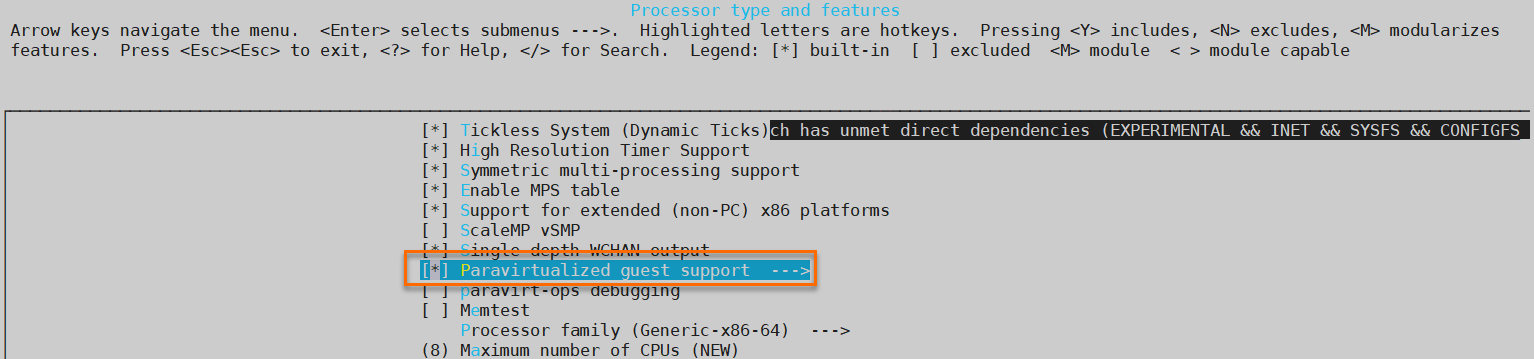
-
Verify that KVM paravirtualized clock and KVM Guest support are selected.

-
-
Configure the Device Drivers options.
-
Go back to the main menu, select Device Drivers, and press Enter.
-
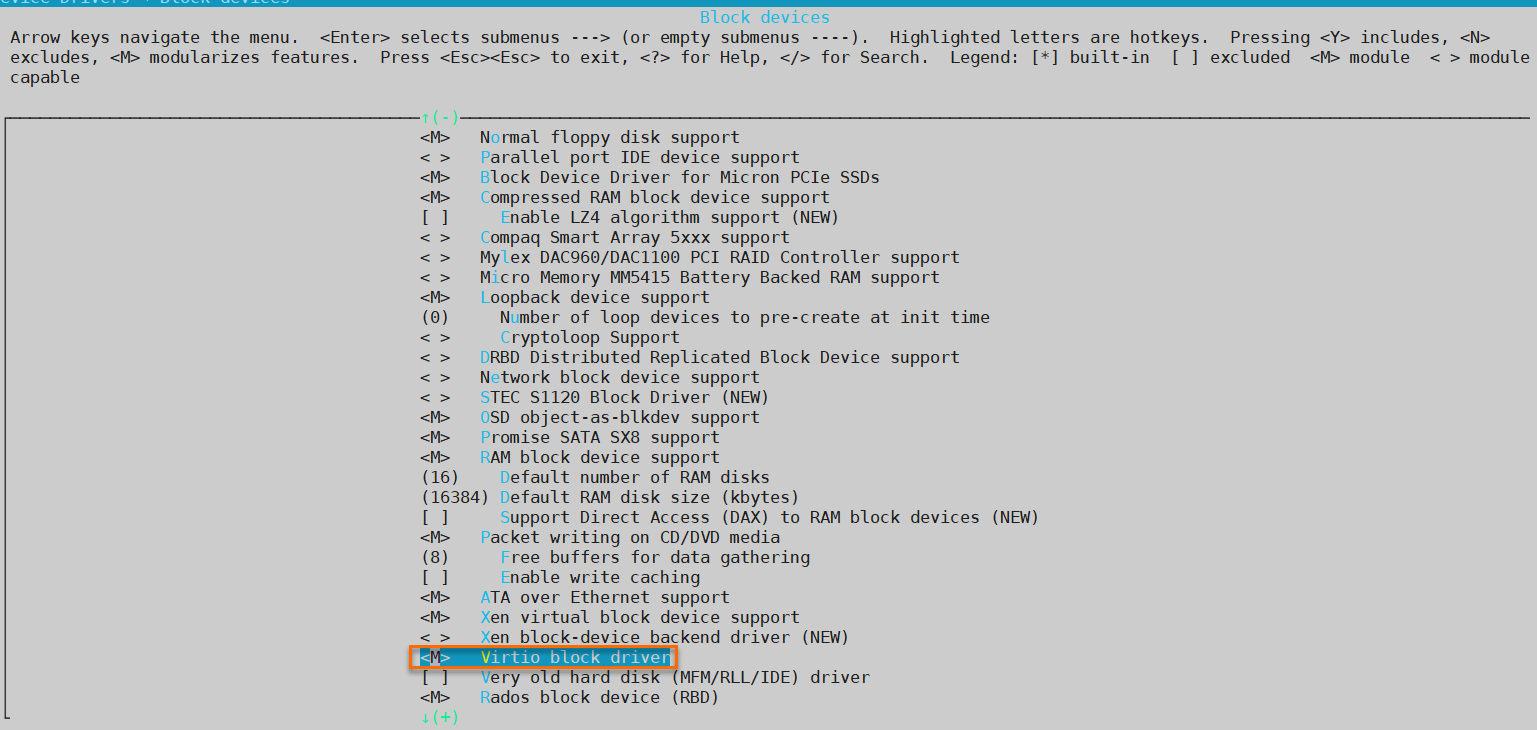
Select Block devices and press Enter.
-
Verify that Virtio block driver is selected.
-
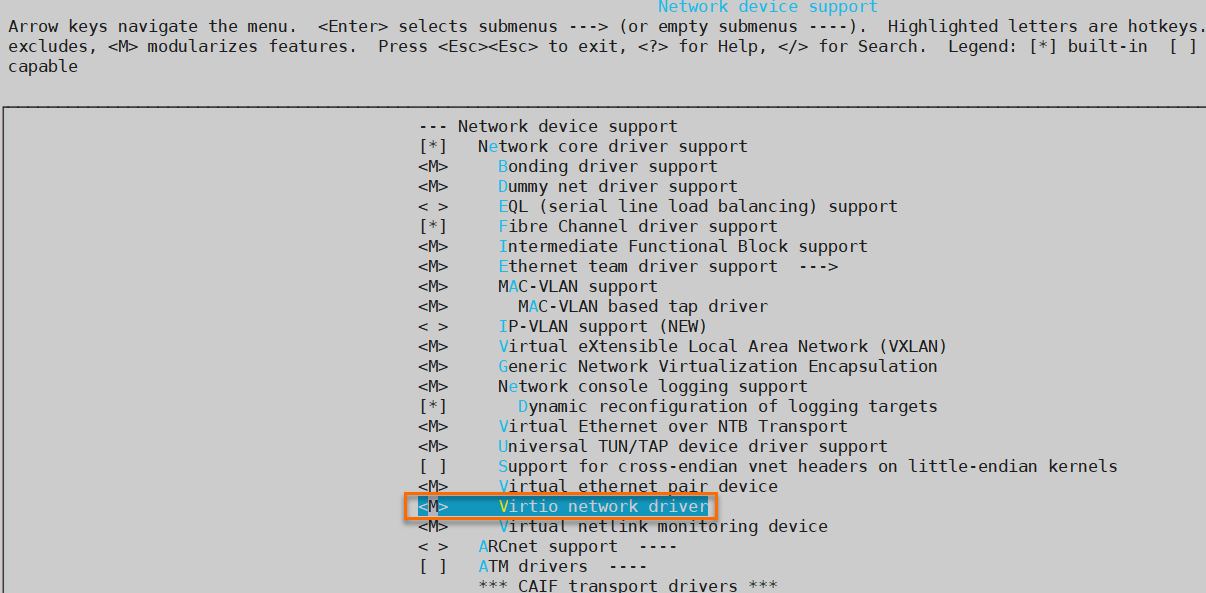
Go back to Device Drivers, select Network device support, and press Enter.
-
Verify that Virtio network driver is selected.
-
-
Press Esc to exit the kernel configuration window. Select Yes to save the .config file.
-
Check whether the virtio-related configurations are complete.
-
(Optional) If virtio configurations are incomplete, modify the .config file:
make oldconfig make prepare make scripts make make install -
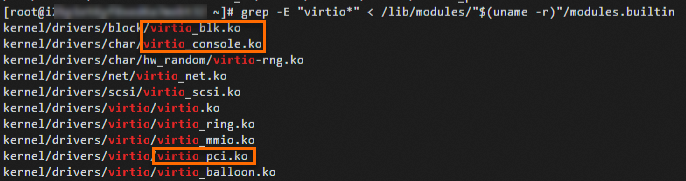
Check whether the virtio driver is installed:
find /lib/modules/"$(uname -r)"/ -name "virtio*" | grep -E "virtio*"
grep -E "virtio*" < /lib/modules/"$(uname -r)"/modules.builtin
If the virtio driver is installed, one of the command outputs lists virtio-related files such as virtio_blk, virtio_pci, and virtio_console.
-