Cloud Firewall's multi-account management feature lets you centralize your enterprise security policies. This reduces security risks from inconsistent controls, provides unified protection, and enhances overall business security. This topic describes how to use Cloud Firewall to share VPC resources and secure traffic across multiple Alibaba Cloud accounts within the same region.
Background
As businesses migrate more operations to the cloud, managing a growing number of resources, projects, and permissions becomes complex. A single account can no longer handle the load, making a multi-account strategy essential. This creates a need for centralized management of cloud resources across accounts, especially for services related to security, compliance, networking, and operations.
To meet these needs, Cloud Firewall integrates with the trusted service feature of Resource Directory. You can consolidate multiple Alibaba Cloud accounts into a single Resource Directory, where each account becomes a member account. By designating a specific member as a delegated administrator account, you grant it access to resources across all member accounts. This enables centralized traffic protection, policy configuration, traffic analysis, intrusion prevention, attack prevention, compromise detection, and log auditing for both Internet-facing and VPC assets across your organization.
Before you begin, understand the different account roles involved:
Account role | Description | Resource Management permissions | Cloud Firewall permissions |
management account | A management account can invite other Alibaba Cloud accounts to join its Resource Directory as member accounts for centralized management. | Has full management permissions over all enterprise assets. | Can manage all assets in Cloud Firewall. |
delegated administrator account | A management account can designate a member account within the Resource Directory as a delegated administrator account for a trusted service. Once designated, the delegated administrator account can access organizational information and manage service-specific tasks across all member accounts in the Resource Directory. Note Using a delegated administrator account separates organizational management from service management. The management account performs organizational tasks in Resource Directory, while the delegated administrator account performs service-specific tasks in the trusted service. | Has full management permissions over all enterprise assets. | Can manage all assets in Cloud Firewall. |
member account | An account that has been invited to and has joined a Resource Directory. | Can only manage its own assets. | Cannot purchase Cloud Firewall. |
For more information about the protection scope of a VPC Firewall, see VPC Firewall overview.
This topic uses VPCs connected by a VPC peering connection as an example.
Use case
Network topology
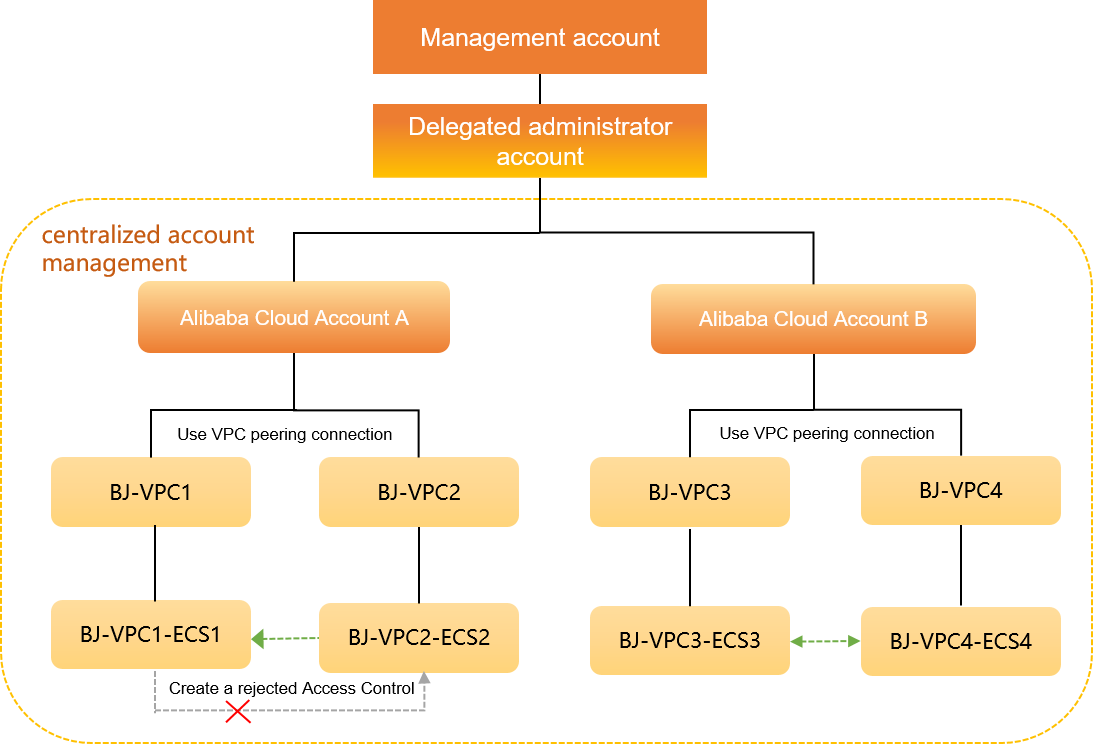
An enterprise uses two Alibaba Cloud accounts, Account A and Account B. In the China (Beijing) region, Account A has two VPCs, BJ-VPC1 and BJ-VPC2. BJ-VPC1 contains an ECS instance named BJ-VPC1-ECS1, and BJ-VPC2 contains an instance named BJ-VPC2-ECS2. Account B also has two VPCs in the same region, BJ-VPC3 and BJ-VPC4. BJ-VPC3 contains an ECS instance named BJ-VPC3-ECS3, and BJ-VPC4 contains an instance named BJ-VPC4-ECS4. A VPC peering connection enables traffic between BJ-VPC1 and BJ-VPC2, and another VPC peering connection enables traffic between BJ-VPC3 and BJ-VPC4.
Goal and solution
The enterprise wants to enable Cloud Firewall only for Account A but use it to inspect traffic between all VPCs (BJ-VPC1 and BJ-VPC2; BJ-VPC3 and BJ-VPC4). The solution must also ensure that the instance BJ-VPC1-ECS1 cannot access the instance BJ-VPC2-ECS2. To achieve this, the enterprise can use the multi-account management, VPC Firewall, and access control features of Cloud Firewall.
In this topic, Account A is the delegated administrator account. In a real-world scenario, you can designate an account based on your business needs.
The following figure shows the use case.
Prerequisites
You have enabled Resource Directory for your management account. For more information, see Enable a Resource Directory.
Account A has Cloud Firewall Premium, Enterprise, Ultimate, or Pay-as-you-go Edition enabled. For more information, see Subscription 2.0.
NoteTo add more member accounts, you may need to upgrade your Cloud Firewall edition to increase the number of supported accounts.
You have created two VPCs in the same region for both Account A and Account B. For more information, see Create and manage a VPC.
You have created an ECS instance in each VPC for both Account A and Account B. For more information, see Create a cloud resource.
You have established a VPC peering connection between the two VPCs in Account A and another between the two VPCs in Account B. For more information, see Use a VPC peering connection to enable private communication between VPCs.
The following table describes the network configuration.
Resource | Alibaba Cloud Account A | Alibaba Cloud Account B |
Account ID | 135809047715**** | 166032244439**** |
VPC | BJ-VPC1
BJ-VPC2
| BJ-VPC3
BJ-VPC4
|
ECS | BJ-VPC1-ECS1
BJ-VPC2-ECS2
| BJ-VPC3-ECS3
BJ-VPC4-ECS4
|
Procedure
Step 1: Invite members to the Resource Directory
A management account can invite other Alibaba Cloud accounts to join its Resource Directory as member accounts for centralized management.
Log on to the Resource Management console with your management account.
-
在左侧导航栏,选择。
-
单击邀请成员。

In the Invite Member panel, enter the account IDs for Account A (135809047715****) and Account B (166032244439****) in the Account ID or Logon Email Address field. Then, read and select the risk notification checkbox.
NoteEnter the email address used to register the Alibaba Cloud account, not a secondary email address. You can enter multiple account IDs or email addresses separated by commas (,) to invite accounts in bulk.
Click OK.
Step 2: Add a delegated administrator
Using a delegated administrator account separates organizational management from service management. The management account performs organizational tasks in Resource Directory, while the delegated administrator account performs service-specific tasks in the trusted service. In this topic, Account A is the delegated administrator account.
You can specify up to five delegated administrator accounts for Cloud Firewall.
Log on to the Resource Management console with your management account.
-
在左侧导航栏,选择。
-
在可信服务页面,单击目标可信服务操作列的管理。
-
在委派管理员账号区域,单击添加。
In the Delegated Administrator Account panel, select the ID for Account A (135809047715****).
-
单击确定。
添加成功后,使用该委派管理员账号访问对应可信服务的多账号管理模块,即可进行资源目录组织范围内的管理操作。
Step 3: Add member accounts to Cloud Firewall
Cloud Firewall integrates with the trusted service feature of Resource Directory. You can consolidate multiple Alibaba Cloud accounts into a single Resource Directory, where each account becomes a member account that can share resources.
Log on to the Cloud Firewall console with Account A.
In the navigation pane on the left, choose .
On the Multi-account Management page, click Add Member.
In the Add Member dialog box, add the account ID for Account B (166032244439****) to the Selected Members list on the right.
In the Selected Members list, select the ID for Account B (166032244439****) and click OK.
Account B (166032244439****) is now added as a member account of Account A (135809047715****).
After you add a member account, Cloud Firewall gains permissions to access the resources of the member account by default. If a VPC Firewall protects network instances under a Cloud Enterprise Network (CEN) that contains VPCs from different accounts, you must manually grant Cloud Firewall permissions to access the cloud resources in those accounts. For more information, see Authorize Cloud Firewall to access cloud resources.
Step 4: Create a VPC Firewall
If two VPCs are connected by a VPC peering connection, you can create a VPC Firewall to inspect the traffic between them.
When you enable a VPC Firewall, a route switchover may briefly interrupt cross-VPC traffic. We recommend that you perform this operation during off-peak hours.
Log on to the Cloud Firewall console with Account A. In the left-side navigation pane, click Firewall.
On the Firewall Settings page, click the VPC Firewall tab.
On the Express Connect tab, find the entry where VPC is BJ-VPC1 and Peer VPC is BJ-VPC2. Click Create in the Actions column.
Cloud Firewall automatically synchronizes your resources every 30 minutes. If you recently created a resource, it may take up to 30 minutes to appear.
In the Create VPC Firewall dialog box, configure the following parameters and click OK.
Parameter
Description
Example
Instance Name
The name of the VPC Firewall instance. We recommend that you use a unique, descriptive name for easy identification.
multi-account-test
Connection type
The communication method between VPCs or between a VPC and an on-premises data center. This is automatically set to Express Connect.
Express Connect
VPC-related information
Confirm the VPC region and instance. Select the route table to protect and specify the Destination CIDR Block.
Local VPC:
Region: China (Beijing)
VPC: vpc-2zekde0udtz2s1hn9****
Firewall IP/ENI: 10.33.33.15-eni-2zeau3rre2q3llavidw0
Route table: vtb-2zeo25fbkcvc2lx7j****
Destination CIDR block: 10.66.66.0/24
Peer VPC:
Region: China (Beijing)
VPC: vpc-2zey3h1i556yn5orn****
Firewall IP/ENI: 10.66.66.92-eni-2zeau3rre2q3llavidw0
Route table: vtb-2zeo25****
Destination CIDR block: 10.33.33.0/24
Intrusion prevention
Cloud Firewall provides a built-in threat detection engine for intrusion prevention (IPS), which inspects both north-south (Internet) and east-west (VPC-to-VPC) traffic to block network intrusions in real time.
IPS Mode: Block - Loose.
IPS Policy: Basic Rules and Virtual Patching.
Enable VPC Firewall
When enabled, the VPC Firewall is automatically activated after creation. This is disabled by default.
Enable this option.
On the Express Connect tab, find the entry where VPC is BJ-VPC3 and Peer VPC is BJ-VPC4. Click Create in the Actions column.
In the Create VPC Firewall dialog box, configure the following parameters and click OK.
Parameter
Description
Example
Instance Name
The name of the VPC Firewall instance. We recommend that you use a unique, descriptive name for easy identification.
multi-account-test02
Connection type
The communication method between VPCs or between a VPC and an on-premises data center. This is automatically set to Express Connect.
Express Connect
VPC-related information
Confirm the VPC region and instance. Select the route table to protect and specify the Destination CIDR Block.
Local VPC:
Region: China (Beijing)
VPC ID: vpc-2ze9epancaw8t4sha****
Firewall IP/ENI: 10.10.10.46-eni-2ze0if806m1f08w5****
Route table: vtb-2zekhldj6y24xm6vi****
Destination CIDR block: 10.10.11.0/24
Peer VPC:
Region: China (Beijing)
VPC: vpc-2ze3rb2rf1rqo3peo****
Firewall IP/ENI: 10.10.11.116-eni-2ze24sw34yq9n8ae****
Route table: vtb-2zestg1kxe9it54yu****
Destination CIDR block: 10.10.10.0/24
Intrusion prevention
Cloud Firewall provides a built-in threat detection engine for intrusion prevention (IPS), which inspects both north-south (Internet) and east-west (VPC-to-VPC) traffic to block network intrusions in real time.
IPS Mode: Block - Loose.
IPS Policy: Basic Rules and Virtual Patching.
Enable VPC Firewall
When enabled, the VPC Firewall is automatically activated after creation. This is disabled by default.
Enable this option.
Step 5: Configure an access control policy
A VPC Firewall inspects traffic between two VPCs. By default, the firewall allows all traffic. You can create access control policies to apply granular control over the assets in your VPCs. In this use case, you need to block access from the instance BJ-VPC1-ECS1 to the instance BJ-VPC2-ECS2, both of which are in Account A.
Log on to the Cloud Firewall console with Account A.
In the left-side navigation pane, choose . On the Policy Configuration page, click the VPC Border tab.
On the VPC Border tab, click Create Policy.
In the Create Policy - VPC Border panel, configure the following parameters.
Parameter
Description
Example
Source type
The type of the traffic source.
IP
Source
The source address of the traffic.
10.33.33.17/32
Destination type
The type of the traffic destination.
IP
Destination
The destination address of the traffic.
10.66.66.94/32
Protocol
The transport layer protocol.
TCP
Port type
The type of port to specify.
Port
Port
The port to allow or block. Depending on the Port type, you can enter a port manually or click Select to choose a pre-configured Port Address Book.
80
Application
The application type.
ANY
Action
The action to take on traffic that matches the policy.
Deny
Description
Enter a description to help identify the policy's purpose.
Deny policy for multi-account management
Priority
The priority of the policy. The default priority is Lowest.
Lowest
Click OK.
Step 6: View traffic logs and intrusion prevention events
You can view traffic logs and intrusion prevention events to verify your configuration. If you find unexpected traffic that does not align with your business requirements, you can adjust your access control policies or protection settings. For more information, see VPC access.
View traffic logs for VPCs
Log on to the Cloud Firewall console with Account A.
In the left-side navigation pane, choose
On the Log Audit page, click the Traffic Logs tab and then the VPC Border tab.
On the VPC Border tab, query the traffic between the VPCs in Account A and Account B.
To query the traffic logs for successful access from BJ-VPC2-ECS2 to BJ-VPC1-ECS1, set Source IP to 10.66.66.94 (BJ-VPC2-ECS2) and Destination IP to 10.33.33.17 (BJ-VPC1-ECS1).
Successful access indicates that traffic between the two VPCs in Account A is correctly routed through Cloud Firewall.
To query the traffic logs for successful access from BJ-VPC3-ECS3 to BJ-VPC4-ECS4, set Source IP to 10.10.10.44 (BJ-VPC3-ECS3) and Destination IP to 10.10.11.115 (BJ-VPC4-ECS4).
Successful access indicates that traffic between the two VPCs in Account B is also correctly routed through Cloud Firewall.
On the VPC Border tab, set Source IP to 10.33.33.17 (BJ-VPC1-ECS1) and Destination IP to 10.66.66.94 (BJ-VPC2-ECS2) to query for blocked traffic.
The logs show that traffic from BJ-VPC1-ECS1 to BJ-VPC2-ECS2 is blocked, which confirms that your access control policy is effective.
View intrusion prevention events for VPC protection
Log on to the Cloud Firewall console with Account A.
In the navigation pane on the left, choose .
On the Intrusion Prevention page, click the VPC Protection tab and set the query conditions to search for intrusion events.
The detected intrusion events indicate that Cloud Firewall is successfully monitoring communication between BJ-VPC1-ECS1 and BJ-VPC2-ECS2 in Account A and protecting your assets from intrusions.
NoteTraffic from BJ-VPC1-ECS1 to BJ-VPC2-ECS2 is not displayed here because it was blocked by the access control policy you created earlier. It does not reach the intrusion prevention engine.
Click Details to view details of a specific attack event in the Basic Information panel.