This topic describes how to connect a device to IoT Platform by using Message Queuing
Telemetry Transport (MQTT) protocol over WebSocket connections. This topic also provides
the corresponding sample code for Node.js.
Prerequisites
A product and a device are created in the IoT Platform console. The device certificate is obtained. The certificate information includes the ProductKey,
DeviceName, and DeviceSecret. In this example, a device named device2 is created. For more information, see the following topics:
Background information
For information about how to connect a device to IoT platform by using the WebSocket
protocol, see Establish MQTT over WebSocket connections.
This topic describes how to use the device Link SDK that is provided by IoT Platform
to connect a device and perform upstream and downstream messaging.
Note The device Link SDK is integrated with the Transport Layer Security (TLS) encryption
feature. No manual configurations are required.
Procedure
- Download and install Node.js on the Windows or Linux operating system. In this example, Windows 10 (64-bit) is
used. Download the node-v14.15.1-x64.msi installation package.
- Open a Command Prompt window and run the following command to view the node version:
node --version
If the package is decompressed, the following version number appears:
v14.15.1
- Create a JavaScript file, such as iot_device.js, on your computer to store the Node.js sample code.
The following Node.js sample code is used:
const iot = require('alibabacloud-iot-device-sdk');

// Specify the device certificate information.
const productKey = 'a1W***';
const deviceName = 'device2';
const deviceSecret = 'ff01e59d1a***';

// Specify the instance ID of a public instance of the new version or an Enterprise Edition instance. If you use a public instance of the old version, you do not need to specify the instance ID.
const instanceId = '';

// Specify the ID of the region to which the product and device belong.
const region = 'cn-shanghai';

const brokerUrl = instanceId
  ? `wss://${instanceId}.mqtt.iothub.aliyuncs.com:443`
  : `wss://${productKey}.iot-as-mqtt.${region}.aliyuncs.com:443`;

const device = iot.device({
  productKey: `${productKey}`,
  deviceName: `${deviceName}`,
  deviceSecret: `${deviceSecret}`,
  brokerUrl,
  tls: true,
});

// Listen to connect events: Connect the device to IoT Platform over an MQTT connection, enable the device to subscribe to a custom topic, and use the custom topic to send messages to IoT Platform.
device.on('connect', () => {
  device.subscribe(`/${productKey}/${deviceName}/user/get`);
  console.log('connect successfully!');
  device.publish(`/${productKey}/${deviceName}/user/update`, 'hello world!');
});

// Listen to message events.
device.on('message', (topic, payload) => {
  console.log(topic, payload.toString());
});

// Listen to error events.
device.on('error', (error) => {
  console.error(error);
});

// To disconnect the device from IoT Platform, delete the double slashes (//) at the beginning of the following code and call the end function.
//device.end();
You must configure the parameters that are described in the following table based
on the actual use case such as the device information.
| Parameter |
Example |
Description |
| productKey |
a1W*** |
The device certificate that is retained after you add the device. For more information,
see Create a device.
You can obtain the certificate information of device2 on the Device Details page in the IoT Platform console.
|
| deviceName |
device2 |
| deviceSecret |
ff01e59d1a*** |
| instanceId |
'' |
The ID of the instance. You can view the ID of the instance on the Overview page in the IoT Platform console.
- If the instance ID is displayed, you must configure this parameter.
- If the Overview page or the instance ID is not displayed in the IoT Platform console, specify an empty string
(
iotInstanceId = "") for this parameter.
For information about IoT Platform instances, see Overview.
|
| region |
cn-shanghai |
The ID of the region where your IoT Platform instance resides. For more information
about region IDs, see Regions.
|
- Open Command Prompt and run the cd command to go to the directory in which the iot_device.js file is stored. In this directory, run the npm command to download the device Link
SDK library. The following figure shows the downloaded library.
npm install alibabacloud-iot-device-sdk --save
- In Command Prompt, enter the following command to run the iot_device.js file to start the device.
node iot_device.js
The following response indicates that the device is connected to IoT Platform and
messages are published.

View logs and test downstream messaging
- Log on to the IoT Platform console.
- In the upper-left corner of the console, select the region where IoT Platform resides.
On the Overview page, click the instance that you want to manage.
Note If the Overview page is not displayed, you are redirected to the Products page.
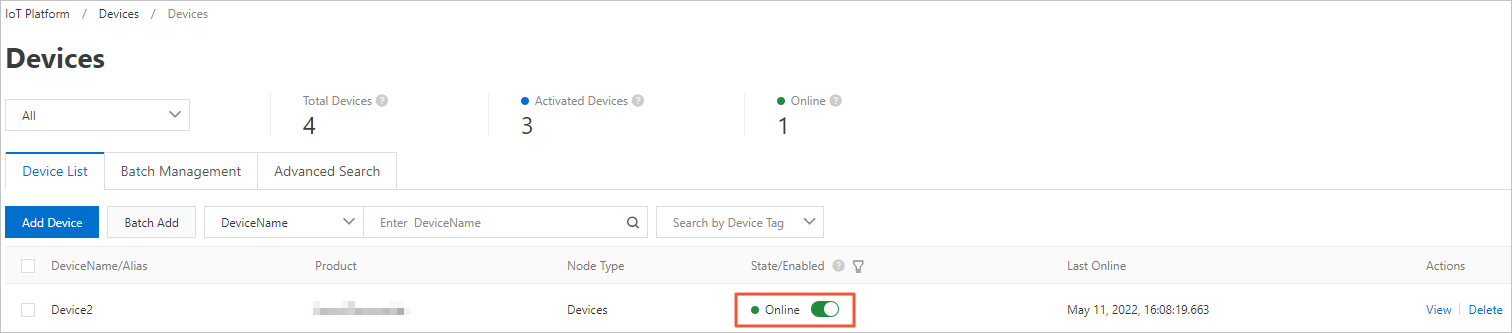
- In the left-side navigation pane, choose .
device2 is displayed on the
Device List tab, and the device is in the
Online state.
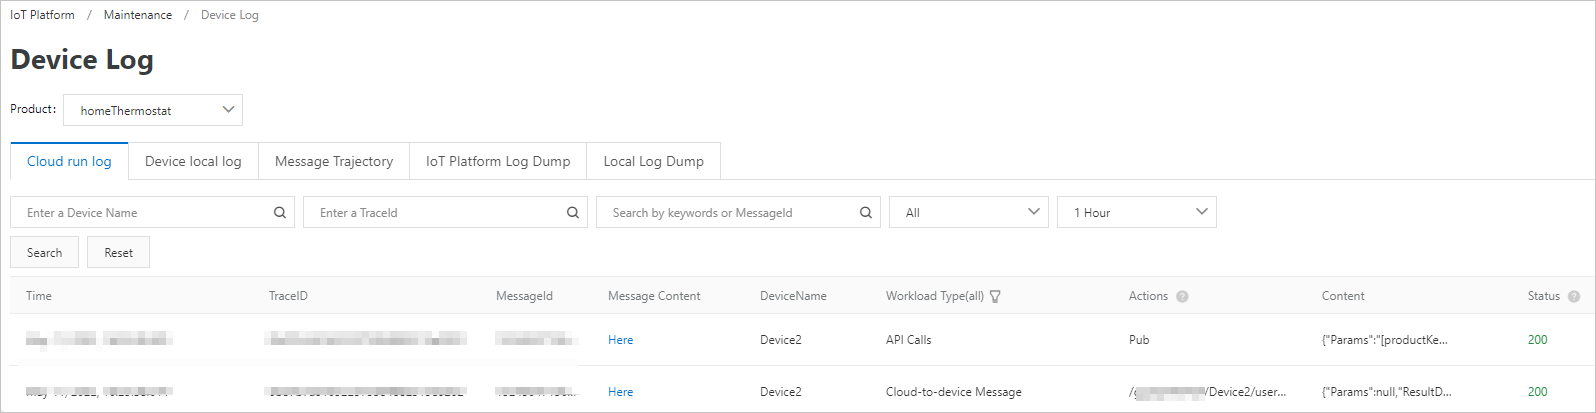
- In the Actions column of device2, click View. On the Device Details page, click the Device Log tab and then click View.
View the device logs on the
Cloud run log tab of the Device Log page.
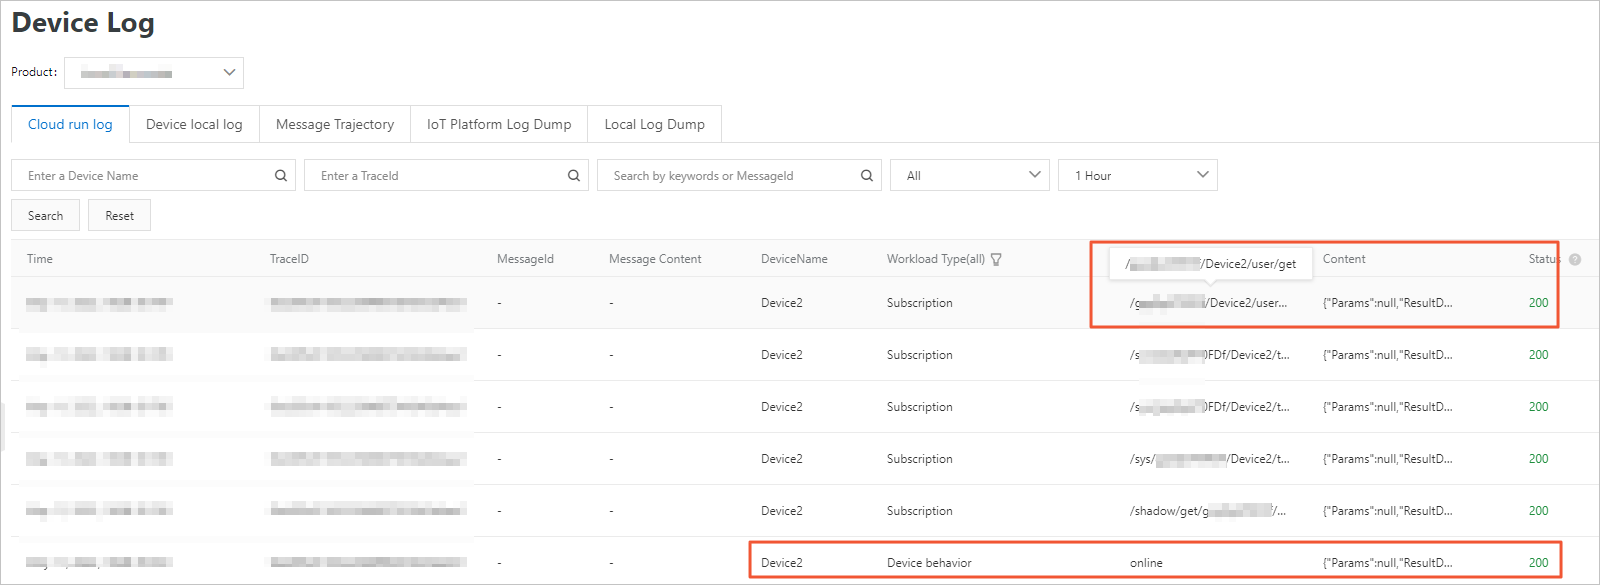
- In the log list, find the message whose Workload Type is Device-to-cloud Messages and click View to view the message content.
- Test downstream messaging by sending a message from IoT Platform to the device.
- Choose . On the Device List tab of the Devices page, find device2 and click View in the Actions column.
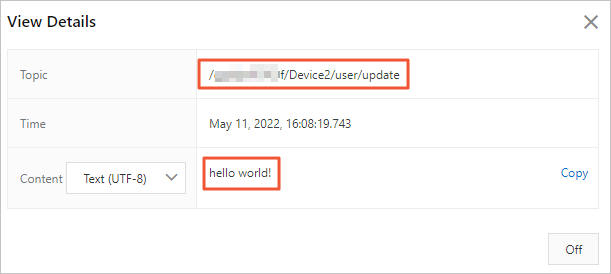
- On the Device Details page, click the Topic List tab, find the
/a1W***/device2/user/get topic in the Subscribed Topics section, and click Publish.
- Enter a message and click OK.
- Go back to Command Prompt and check whether the device received the message. If downstream
messaging works properly, the message is received.

You can also go back to the Cloud run log tab to view messaging logs.