Use the Node.js sample code in this topic to connect a device to IoT Platform over an MQTT-WebSocket channel.
Prerequisites
Create a product and a device, such as device2, in the IoT Platform console for your instance. Obtain the device certificate that contains the ProductKey, DeviceName, and DeviceSecret. For more information, see:
Background information
For more information about WebSocket-based device connections, see MQTT-WebSocket connections.
This example uses the IoT Platform device-side Link SDK to simulate device connection and messaging.
The device-side Link SDK has TLS encryption enabled. No additional configuration is required.
Procedure
-
Log on to the IoT Platform console.
-
On the Instance Overview page, locate the corresponding data-type instance and click it to go to the Instance Details page.
-
On your local computer, create a JavaScript file, such as iot_device.js, to store the Node.js sample code.
Use the following Node.js sample code:
const iot = require('alibabacloud-iot-device-sdk');

// The device certificate information.
const productKey = 'a1W***';
const deviceName = 'device2';
const deviceSecret = 'ff01e59d1a***';

// You must specify the instance ID for new public instances and Enterprise instances. You do not need to specify an instance ID for old public instances.
const instanceId = '';

// The ID of the region where the product and device reside.
const region = 'cn-shanghai';

const brokerUrl = instanceId
  ? `wss://${instanceId}.mqtt.iothub.aliyuncs.com:443`
  : `wss://${productKey}.iot-as-mqtt.${region}.aliyuncs.com:443`;

const device = iot.device({
  productKey: `${productKey}`,
  deviceName: `${deviceName}`,
  deviceSecret: `${deviceSecret}`,
  brokerUrl,
  tls: true,
});

// Listen for the 'connect' event to establish an MQTT connection, subscribe to a custom topic, and send a message to IoT Platform through the custom topic.
device.on('connect', () => {
  device.subscribe(`/${productKey}/${deviceName}/user/get`);
  console.log('connect successfully!');
  device.publish(`/${productKey}/${deviceName}/user/update`, 'hello world!');
});

// Listen for the 'message' event.
device.on('message', (topic, payload) => {
  console.log(topic, payload.toString());
});

// Listen for the 'error' event.
device.on('error', (error) => {
  console.error(error);
});

// If you want to disconnect from IoT Platform, remove the comment symbol from the next line and call the end() function.
//device.end();
Replace the parameter values with your actual device information as described in the following table.
Parameter
Example
Description
productKey
a1W***
The device certificate information saved when you created the device. For more information, see Obtain a device certificate.
You can also find this information on the Device Details page for the device2 device in the console.
deviceName
device2
deviceSecret
ff01e59d1a***
instanceId
''
The instance ID, which you can find on the Instance Overview page in the IoT Platform console.
-
If an ID is displayed, you must specify it.
-
If the Instance Overview page does not exist or no ID is available, leave this parameter empty. For example,
iotInstanceId = ''.
For more information about instances, see Instance overview.
region
cn-shanghai
The region code of the region where your IoT Platform device is located. For supported region codes, see List of regions.
-
-
Open a Command Prompt window and navigate to the directory where the iot_device.js file is saved. Run the following command to install the Alibaba Cloud IoT SDK library.
npm install alibabacloud-iot-device-sdk --save
-
In the Command Prompt window, run the following command to execute the iot_device.js file and start the device.
node iot_device.jsThe output indicates that the device is connected and has published a message.

View operational logs and test downstream communication
-
Log on to the IoT Platform console.
-
In the upper-left corner of the console, select the region where your instance is located. Then, on the Instance Overview page, click the target instance.
NoteIf the Instance Overview page does not appear, the IoT Platform feature page is displayed instead.
-
In the navigation pane on the left, choose .
On the Device List tab, the status of the device2 device is Online.
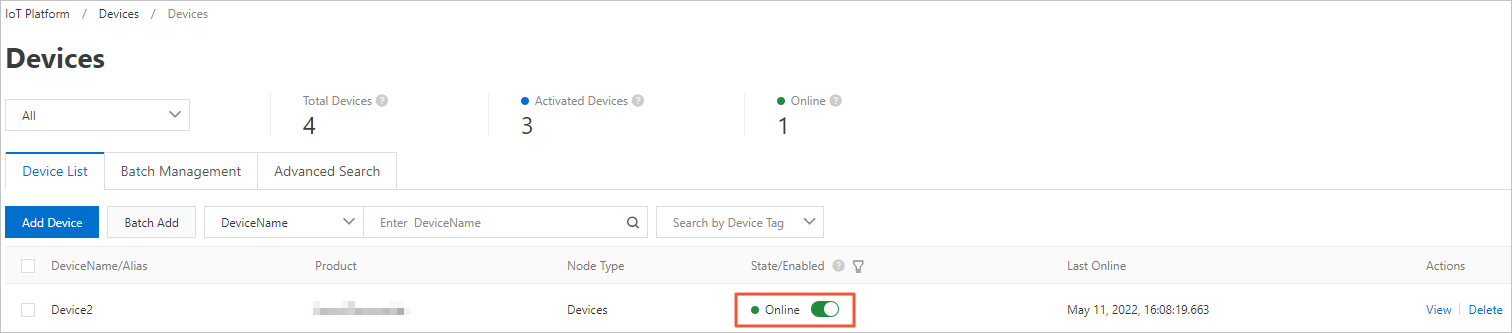
-
In the Actions column for the device2 device, click View. On the Device Details page, click the Log Service tab, and then click View Log.
On the IoT Platform Logs tab, view the log messages.

-
In the log list, find a Device-to-Cloud Message and click View to see the information that the device sent to IoT Platform.
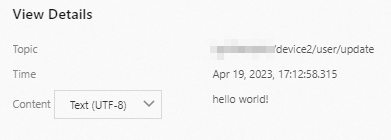
-
Test downstream communication by sending a message from IoT Platform to the device.
-
Go back to the page. On the Device List tab, click View in the Actions column for the device2
-
On the Device Details page, click the Topic List tab. Find the subscribed topic
/a1W***/device2/user/getand click Publish Message. -
Enter a message and click Confirm.
-
Return to the Command Prompt window where the device is running. The device receives the message, which indicates that communication is successful.

You can also return to the IoT Platform Logs tab to view detailed communication logs.

-