This topic uses an open source dataset named Fashion-MNIST as an example to describe how to use the cloud-native AI component set to complete the following tasks: run a deep learning job in a Container Service for Kubernetes (ACK) cluster, optimize the performance of distributed training, tune the model, and deploy the model in the ACK cluster.
Background information
The cloud-native AI component set includes components that can be independently deployed by using Helm charts. You can use these components to accelerate AI projects.
The cloud-native AI component set is suitable for two types of roles: administrators and developers.
Administrators manage users and permissions, allocate cluster resources, configure external storage, manage datasets, and monitor resource utilization by using dashboards.
Developers use cluster resources and submit jobs. Developers are created by administrators and must be granted permissions before developers can perform development by using tools such as Arena or Jupyter Notebook.
Prerequisites
The following operations are completed by an administrator:
An ACK cluster is created. For more information, see Create an ACK managed cluster.
The disk size of each node in the cluster is at least 300 GB.
If you require optimal data acceleration, use four Elastic Compute Service (ECS) instances that each provides eight V100 GPUs.
If you require optimal topology awareness, use two ECS instances that each provides two V100 GPUs.
All components included in the cloud-native AI component set are installed in the cluster. For more information, see Deploy the cloud-native AI suite.
AI Dashboard is ready for use. For more information, see Access AI Dashboard.
AI Developer Console is ready for use. For more information, see Log on to AI Developer Console.
NoteThe AI Console (including AI Dashboard and AI Developer Console) provided by Alibaba Cloud was gradually rolled out through a whitelist mechanism starting January 22, 2025.
Existing deployments: If you have already deployed AI Dashboard or AI Developer Console before this date, your current usage remains unaffected.
New installations: Users not whitelisted can install and configure the AI Console through the open-source community. For detailed open-source configuration instructions, see Open-source AI Console.
The Fashion-MNIST dataset is downloaded and uploaded to an Object Storage Service (OSS) bucket. For more information about how to upload a model to an OSS bucket, see Upload objects.
The address, username, and password of the Git repository that stores the test code are obtained.
A kubectl client is connected to the cluster. For more information, see Obtain the kubeconfig file of a cluster and use kubectl to connect to the cluster.
Arena is installed. For more information, see Configure the Arena client.
Test environment
In this example, an AI model is developed, trained, accelerated, managed, evaluated, and deployed by using the cloud-native AI component set and the open source Fashion-MNIST dataset.
The administrator must complete the following tasks: Step 1: Create a user and allocate resources and Step 2: Create a dataset. The remaining tasks can be completed by a developer.
The developer needs to create a terminal in Jupyter Notebook or use the jump server in the ACK cluster to submit Arena commands. Jupyter Notebook is recommended for submitting Arena commands.
The following table describes the nodes in the cluster.
Host name | IP | Role | Number of GPUs | Number of vCPUs | Memory |
cn-beijing.192.168.0.13 | 192.168.0.13 | Jump server | 1 | 8 | 30580004 KiB |
cn-beijing.192.168.0.16 | 192.168.0.16 | Worker | 1 | 8 | 30580004 KiB |
cn-beijing.192.168.0.17 | 192.168.0.17 | Worker | 1 | 8 | 30580004 KiB |
cn-beijing.192.168.0.240 | 192.168.0.240 | Worker | 1 | 8 | 30580004 KiB |
cn-beijing.192.168.0.239 | 192.168.0.239 | Worker | 1 | 8 | 30580004 KiB |
Experiment objectives
This topic aims to achieve the following objectives:
Manage datasets.
Use Jupyter Notebook to build a development environment.
Submit standalone training jobs.
Submit distributed training jobs.
Use Fluid to accelerate training jobs.
Use the AI job scheduler of ACK to accelerate training jobs.
Manage models.
Evaluate models.
Deploy inference services.
Step 1: Create a user and allocate resources
Developers must obtain the following information and resources from the administrator:
The username and password of a user. For more information about how to create a user, see Manage users.
Resource quotas. For more information about how to allocate resource quotas, see Manage elastic quota groups.
The endpoint of AI Developer Console if developers want to submit jobs by using AI Developer Console. For more information about how to access AI Developer Console, see Log on to AI Developer Console.
NoteThe AI Console (including AI Dashboard and AI Developer Console) provided by Alibaba Cloud was gradually rolled out through a whitelist mechanism starting January 22, 2025.
Existing deployments: If you have already deployed AI Dashboard or AI Developer Console before this date, your current usage remains unaffected.
New installations: Users not whitelisted can install and configure the AI Console through the open-source community. For detailed open-source configuration instructions, see Open-source AI Console.
The kubeconfig file that is used to log on to the cluster if developers want to submit jobs by using Arena. For more information about how to obtain the kubeconfig file that is used to log on to a cluster, see Step 2: Select a type of cluster credentials.
Step 2: Create a dataset
The administrator must prepare a dataset. In this example, the Fashion-MNIST dataset is used.
a: Add the Fashion-MNIST dataset
Use the following YAML template to create a file named fashion-mnist.yaml:
In this example, a persistent volume (PV) and a persistent volume claim (PVC) are created to mount the OSS bucket that stores the Fashion-MNIST dataset.
apiVersion: v1
kind: PersistentVolume
metadata:
  name: fashion-demo-pv
spec:
  accessModes:
  - ReadWriteMany
  capacity:
    storage: 10Gi
  csi:
    driver: ossplugin.csi.alibabacloud.com
    volumeAttributes:
      bucket: fashion-mnist
      otherOpts: ""
      url: oss-cn-beijing.aliyuncs.com
      akId: "AKID"
      akSecret: "AKSECRET"
    volumeHandle: fashion-demo-pv
  persistentVolumeReclaimPolicy: Retain
  storageClassName: oss
  volumeMode: Filesystem
---
apiVersion: v1
kind: PersistentVolumeClaim
metadata:
  name: fashion-demo-pvc
  namespace: demo-ns
spec:
  accessModes:
  - ReadWriteMany
  resources:
    requests:
      storage: 10Gi
  selector:
    matchLabels:
      alicloud-pvname: fashion-demo-pv
  storageClassName: oss
  volumeMode: Filesystem
  volumeName: fashion-demo-pv
Run the following command to create the fashion-mnist.yaml file:
kubectl create -f fashion-mnist.yamlCheck the status of the created PV and PVC.
Run the following command to check the status of the created PV:
kubectl get pv fashion-mnist-jackwgExpected output:
NAME                   CAPACITY   ACCESS MODES   RECLAIM POLICY   STATUS   CLAIM                          STORAGECLASS   REASON   AGE
fashion-mnist-jackwg   10Gi       RWX            Retain           Bound    ns1/fashion-mnist-jackwg-pvc   oss                     8h
Run the following command to check the status of the created PVC:
kubectl get pvc fashion-mnist-jackwg-pvc -n ns1Expected output:
NAME                       STATUS   VOLUME                 CAPACITY   ACCESS MODES   STORAGECLASS   AGE
fashion-mnist-jackwg-pvc   Bound    fashion-mnist-jackwg   10Gi       RWX            oss            8h
The output shows that both the PV and PVC are in the Bound state.
b: Accelerate the dataset
The administrator must accelerate the dataset by using AI Dashboard.
- Access AI Dashboard as an administrator.
- In the left-side navigation pane of AI Dashboard, choose .
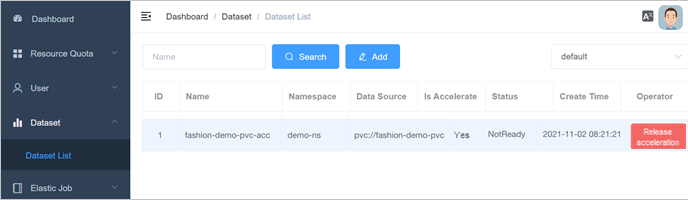
On the Dataset List page, find the dataset and click Accelerate in the Operator column.
The following figure shows the accelerated dataset.
Step 3: Develop a model
This section describes how to use Jupyter Notebook to build a development environment. Procedure:
Optional. Use a custom image to create a Jupyter notebook.
Use the Jupyter notebook to develop and test a model.
Use the Jupyter notebook to submit code to a Git repository.
Use the Arena SDK to submit a training job.
a (optional): Use a custom image to create a Jupyter notebook
AI Developer Console provides various versions of images that support TensorFlow and PyTorch for you to create Jupyter notebooks. You can also use a custom image to create a Jupyter notebook.
Use the following Dockerfile template to create a file named Dockerfile.
For more information about the limits on custom images, see Create and use notebooks.
cat<<EOF >dockerfile
FROM tensorflow/tensorflow:1.15.5-gpu
USER root
RUN pip install jupyter && \
    pip install ipywidgets && \
    jupyter nbextension enable --py widgetsnbextension && \
    pip install jupyterlab && jupyter serverextension enable --py jupyterlab
EXPOSE 8888
#USER jovyan
CMD ["sh", "-c", "jupyter-lab --notebook-dir=/home/jovyan --ip=0.0.0.0 --no-browser --allow-root --port=8888 --NotebookApp.token='' --NotebookApp.password='' --NotebookApp.allow_origin='*' --NotebookApp.base_url=${NB_PREFIX} --ServerApp.authenticate_prometheus=False"]
EOF
Run the following command to build an image from the Dockerfile:
docker build -f dockerfile .Expected output:
Sending build context to Docker daemon  9.216kB
Step 1/5 : FROM tensorflow/tensorflow:1.15.5-gpu
 ---> 73be11373498
Step 2/5 : USER root
 ---> Using cache
 ---> 7ee21dc7e42e
Step 3/5 : RUN pip install jupyter &&     pip install ipywidgets &&     jupyter nbextension enable --py widgetsnbextension &&     pip install jupyterlab && jupyter serverextension enable --py jupyterlab
 ---> Using cache
 ---> 23bc51c5e16d
Step 4/5 : EXPOSE 8888
 ---> Using cache
 ---> 76a55822ddae
Step 5/5 : CMD ["sh", "-c", "jupyter-lab --notebook-dir=/home/jovyan --ip=0.0.0.0 --no-browser --allow-root --port=8888 --NotebookApp.token='' --NotebookApp.password='' --NotebookApp.allow_origin='*' --NotebookApp.base_url=${NB_PREFIX} --ServerApp.authenticate_prometheus=False"]
 ---> Using cache
 ---> 3692f04626d5
Successfully built 3692f04626d5
Run the following commands to push the image to your Docker image repository:
docker tag ${IMAGE_ID} registry-vpc.cn-beijing.aliyuncs.com/${DOCKER_REPO}/jupyter:fashion-mnist-20210802a
docker push registry-vpc.cn-beijing.aliyuncs.com/${DOCKER_REPO}/jupyter:fashion-mnist-20210802a
Create a Secret that is used to pull the image from the Docker image repository:
For more information, see Create a Secret based on existing Docker credentials.
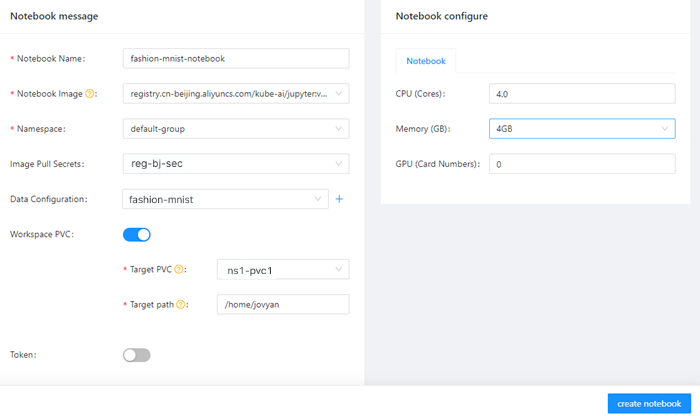
kubectl create secret docker-registry regcred \
  --docker-server=<Your registry server> \
  --docker-username=<Username> \
  --docker-password=<Password> \
  --docker-email=<Your email address>
Create a Jupyter notebook in AI Developer Console.
For more information, see Create and use notebooks.
The following figure shows the parameters for creating a Jupyter notebook.
b: Use the Jupyter notebook to develop and test a model
- Log on to AI Developer Console
- In the left-side navigation pane of AI Developer Console, click Notebook.
On the Notebook page, click the Jupyter notebook that is in the Running state.
Create a CLI launcher and verify that the dataset is mounted.
pwd
/root/data
ls -alh
Expected output:
total 30M
drwx------ 1 root root    0 Jan  1  1970 .
drwx------ 1 root root 4.0K Aug  2 04:15 ..
drwxr-xr-x 1 root root    0 Aug  1 14:16 saved_model
-rw-r----- 1 root root 4.3M Aug  1 01:53 t10k-images-idx3-ubyte.gz
-rw-r----- 1 root root 5.1K Aug  1 01:53 t10k-labels-idx1-ubyte.gz
-rw-r----- 1 root root  26M Aug  1 01:54 train-images-idx3-ubyte.gz
-rw-r----- 1 root root  29K Aug  1 01:53 train-labels-idx1-ubyte.gz
Create a Jupyter notebook that is used to train a model based on the Fashion-MNIST dataset. The following code block is used to initialize the notebook:
#!/usr/bin/python # -*- coding: UTF-8 -*- import os import gzip import numpy as np import tensorflow as tf from tensorflow import keras print('TensorFlow version: {}'.format(tf.__version__)) dataset_path = "/root/data/" model_path = "./model/" model_version = "v1" def load_data(): files = [ 'train-labels-idx1-ubyte.gz', 'train-images-idx3-ubyte.gz', 't10k-labels-idx1-ubyte.gz', 't10k-images-idx3-ubyte.gz' ] paths = [] for fname in files: paths.append(os.path.join(dataset_path, fname)) with gzip.open(paths[0], 'rb') as labelpath: y_train = np.frombuffer(labelpath.read(), np.uint8, offset=8) with gzip.open(paths[1], 'rb') as imgpath: x_train = np.frombuffer(imgpath.read(), np.uint8, offset=16).reshape(len(y_train), 28, 28) with gzip.open(paths[2], 'rb') as labelpath: y_test = np.frombuffer(labelpath.read(), np.uint8, offset=8) with gzip.open(paths[3], 'rb') as imgpath: x_test = np.frombuffer(imgpath.read(), np.uint8, offset=16).reshape(len(y_test), 28, 28) return (x_train, y_train),(x_test, y_test) def train(): (train_images, train_labels), (test_images, test_labels) = load_data() # scale the values to 0.0 to 1.0 train_images = train_images / 255.0 test_images = test_images / 255.0 # reshape for feeding into the model train_images = train_images.reshape(train_images.shape[0], 28, 28, 1) test_images = test_images.reshape(test_images.shape[0], 28, 28, 1) class_names = ['T-shirt/top', 'Trouser', 'Pullover', 'Dress', 'Coat', 'Sandal', 'Shirt', 'Sneaker', 'Bag', 'Ankle boot'] print('\ntrain_images.shape: {}, of {}'.format(train_images.shape, train_images.dtype)) print('test_images.shape: {}, of {}'.format(test_images.shape, test_images.dtype)) model = keras.Sequential([ keras.layers.Conv2D(input_shape=(28,28,1), filters=8, kernel_size=3, strides=2, activation='relu', name='Conv1'), keras.layers.Flatten(), keras.layers.Dense(10, activation=tf.nn.softmax, name='Softmax') ]) model.summary() testing = False epochs = 5 model.compile(optimizer='adam', loss='sparse_categorical_crossentropy', metrics=['accuracy']) logdir = "/training_logs" tensorboard_callback = keras.callbacks.TensorBoard(log_dir=logdir) model.fit(train_images, train_labels, epochs=epochs, callbacks=[tensorboard_callback], ) test_loss, test_acc = model.evaluate(test_images, test_labels) print('\nTest accuracy: {}'.format(test_acc)) export_path = os.path.join(model_path, model_version) print('export_path = {}\n'.format(export_path)) tf.keras.models.save_model( model, export_path, overwrite=True, include_optimizer=True, save_format=None, signatures=None, options=None ) print('\nSaved model success') if __name__ == '__main__': train()ImportantReplace dataset_path and model_path with the paths of the dataset and model. This allows the notebook to access the dataset that is mounted to the cluster.
Click the
 icon on the notebook.
 Expected output:
TensorFlow version: 1.15.5

train_images.shape: (60000, 28, 28, 1), of float64
test_images.shape: (10000, 28, 28, 1), of float64
Model: "sequential_2"
_________________________________________________________________
Layer (type)                 Output Shape              Param #
=================================================================
Conv1 (Conv2D)               (None, 13, 13, 8)         80
_________________________________________________________________
flatten_2 (Flatten)          (None, 1352)              0
_________________________________________________________________
Softmax (Dense)              (None, 10)                13530
=================================================================
Total params: 13,610
Trainable params: 13,610
Non-trainable params: 0
_________________________________________________________________
Train on 60000 samples
Epoch 1/5
60000/60000 [==============================] - 3s 57us/sample - loss: 0.5452 - acc: 0.8102
Epoch 2/5
60000/60000 [==============================] - 3s 52us/sample - loss: 0.4103 - acc: 0.8555
Epoch 3/5
60000/60000 [==============================] - 3s 55us/sample - loss: 0.3750 - acc: 0.8681
Epoch 4/5
60000/60000 [==============================] - 3s 55us/sample - loss: 0.3524 - acc: 0.8757
Epoch 5/5
60000/60000 [==============================] - 3s 53us/sample - loss: 0.3368 - acc: 0.8798
10000/10000 [==============================] - 0s 37us/sample - loss: 0.3770 - acc: 0.8673

Test accuracy: 0.8672999739646912
export_path = ./model/v1
Saved model success
c: Use the Jupyter notebook to submit code to a Git repository
After the notebook is created, you can use the notebook to submit code to a Git repository.
Run the following command to install Git:
apt-get update
apt-get install git
Run the following command to initialize Git and save the username and password to the notebook:
git config --global credential.helper store
git pull ${YOUR_GIT_REPO}
Run the following command to push code to a Git repository:
git push origin fashion-testExpected output:
Total 0 (delta 0), reused 0 (delta 0)
To codeup.aliyun.com:60b4cf5c66bba1c04b442e49/tensorflow-fashion-mnist-sample.git
 * [new branch]      fashion-test -> fashion-test
d: Use the Arena SDK to submit a training job
Install the dependency for the Arena SDK.
!pip install coloredlogsUse the following code to create a Python file for initialization:
import os import sys import time from arenasdk.client.client import ArenaClient from arenasdk.enums.types import * from arenasdk.exceptions.arena_exception import * from arenasdk.training.tensorflow_job_builder import * from arenasdk.logger.logger import LoggerBuilder def main(): print("start to test arena-python-sdk") client = ArenaClient("","demo-ns","info","arena-system") # The training job is submitted to the demo-ns namespace. print("create ArenaClient succeed.") print("start to create tfjob") job_name = "arena-sdk-distributed-test" job_type = TrainingJobType.TFTrainingJob try: # build the training job job = TensorflowJobBuilder().with_name(job_name)\ .witch_workers(1)\ .with_gpus(1)\ .witch_worker_image("tensorflow/tensorflow:1.5.0-devel-gpu")\ .witch_ps_image("tensorflow/tensorflow:1.5.0-devel")\ .witch_ps_count(1)\ .with_datas({"fashion-demo-pvc":"/data"})\ .enable_tensorboard()\ .with_sync_mode("git")\ .with_sync_source("https://codeup.aliyun.com/60b4cf5c66bba1c04b442e49/tensorflow-fashion-mnist-sample.git")\ # The address of the Git repository. .with_envs({\ "GIT_SYNC_USERNAME":"USERNAME", \ # The username of the Git repository. "GIT_SYNC_PASSWORD":"PASSWORD",\ # The password of the Git repository. "TEST_TMPDIR":"/",\ })\ .with_command("python code/tensorflow-fashion-mnist-sample/tf-distributed-mnist.py").build() # if training job is not existed,create it if client.training().get(job_name, job_type): print("the job {} has been created, to delete it".format(job_name)) client.training().delete(job_name, job_type) time.sleep(3) output = client.training().submit(job) print(output) count = 0 # waiting training job to be running while True: if count > 160: raise Exception("timeout for waiting job to be running") jobInfo = client.training().get(job_name,job_type) if jobInfo.get_status() == TrainingJobStatus.TrainingJobPending: print("job status is PENDING,waiting...") count = count + 1 time.sleep(5) continue print("current status is {} of job {}".format(jobInfo.get_status().value,job_name)) break # get the training job logs logger = LoggerBuilder().with_accepter(sys.stdout).with_follow().with_since("5m") #jobInfo.get_instances()[0].get_logs(logger) # display the training job information print(str(jobInfo)) # delete the training job #client.training().delete(job_name, job_type) except ArenaException as e: print(e) main()namespace: In this example, the training job is submitted to the demo-ns namespace.with_sync_source: The address of the Git repository.with_envs: The username and password of the Git repository.
Click the
icon on the notebook. Expected output:
2021-11-02/08:57:28 DEBUG util.py[line:19] - execute command: [arena get --namespace=demo-ns --arena-namespace=arena-system --loglevel=info arena-sdk-distributed-test --type=tfjob -o json]
2021-11-02/08:57:28 DEBUG util.py[line:19] - execute command: [arena submit --namespace=demo-ns --arena-namespace=arena-system --loglevel=info tfjob --name=arena-sdk-distributed-test --workers=1 --gpus=1 --worker-image=tensorflow/tensorflow:1.5.0-devel-gpu --ps-image=tensorflow/tensorflow:1.5.0-devel --ps=1 --data=fashion-demo-pvc:/data --tensorboard --sync-mode=git --sync-source=https://codeup.aliyun.com/60b4cf5c66bba1c04b442e49/tensorflow-fashion-mnist-sample.git --env=GIT_SYNC_USERNAME=kubeai --env=GIT_SYNC_PASSWORD=kubeai@ACK123 --env=TEST_TMPDIR=/ python code/tensorflow-fashion-mnist-sample/tf-distributed-mnist.py]
start to test arena-python-sdk
create ArenaClient succeed.
start to create tfjob
2021-11-02/08:57:29 DEBUG util.py[line:19] - execute command: [arena get --namespace=demo-ns --arena-namespace=arena-system --loglevel=info arena-sdk-distributed-test --type=tfjob -o json]
service/arena-sdk-distributed-test-tensorboard created
deployment.apps/arena-sdk-distributed-test-tensorboard created
tfjob.kubeflow.org/arena-sdk-distributed-test created

job status is PENDING,waiting...
2021-11-02/09:00:34 DEBUG util.py[line:19] - execute command: [arena get --namespace=demo-ns --arena-namespace=arena-system --loglevel=info arena-sdk-distributed-test --type=tfjob -o json]
current status is RUNNING of job arena-sdk-distributed-test
{
    "allocated_gpus": 1,
    "chief_name": "arena-sdk-distributed-test-worker-0",
    "duration": "185s",
    "instances": [
        {
            "age": "13s",
            "gpu_metrics": [],
            "is_chief": false,
            "name": "arena-sdk-distributed-test-ps-0",
            "node_ip": "192.168.5.8",
            "node_name": "cn-beijing.192.168.5.8",
            "owner": "arena-sdk-distributed-test",
            "owner_type": "tfjob",
            "request_gpus": 0,
            "status": "Running"
        },
        {
            "age": "13s",
            "gpu_metrics": [],
            "is_chief": true,
            "name": "arena-sdk-distributed-test-worker-0",
            "node_ip": "192.168.5.8",
            "node_name": "cn-beijing.192.168.5.8",
            "owner": "arena-sdk-distributed-test",
            "owner_type": "tfjob",
            "request_gpus": 1,
            "status": "Running"
        }
    ],
    "name": "arena-sdk-distributed-test",
    "namespace": "demo-ns",
    "priority": "N/A",
    "request_gpus": 1,
    "tensorboard": "http://192.168.5.6:31068",
    "type": "tfjob"
}
Step 4: Train a model
Refer to the following example to submit a standalone TensorFlow training job, a distributed TensorFlow training job, a Fluid-accelerated training job, and a distributed training job accelerated by the AI job scheduler of ACK.
Example 1: Submit a standalone TensorFlow training job
After you develop a model by using the notebook and save the model, you can use Arena or AI Developer Console to submit a training job.
Method 1: Use Arena to submit a standalone TensorFlow training job
arena \
  submit \
  tfjob \
  -n ns1 \
  --name=fashion-mnist-arena \
  --data=fashion-mnist-jackwg-pvc:/root/data/ \
  --env=DATASET_PATH=/root/data/ \
  --env=MODEL_PATH=/root/saved_model \
  --env=MODEL_VERSION=1 \
  --env=GIT_SYNC_USERNAME=<GIT_USERNAME> \
  --env=GIT_SYNC_PASSWORD=<GIT_PASSWORD> \
  --sync-mode=git \
  --sync-source=https://codeup.aliyun.com/60b4cf5c66bba1c04b442e49/tensorflow-fashion-mnist-sample.git \
  --image="tensorflow/tensorflow:2.2.2-gpu" \
  "python /root/code/tensorflow-fashion-mnist-sample/train.py --log_dir=/training_logs"
Method 2: Use AI Developer Console to submit a standalone TensorFlow training job
Configure the data source. For more information, see Configure a dataset.

The following table describes some parameters.
Parameter
Example
Required
Name
fashion-demo
Yes
Namespace
demo-ns
Yes
PersistentVolumeClaim
fashion-demo-pvc
Yes
Local Directory
/root/data
No
Configure the source code. For more information, see Configure a source code repository.

Parameter
Example
Required
Name
fashion-git
Yes
Git Repository
https://codeup.aliyun.com/60b4cf5c66bba1c04b442e49/tensorflow-fashion-mnist-sample.git
Yes
Default Branch
master
No
Local Directory
/root/
No
Git user
The username of your private Git repository.
No
Git secret
The password of your private Git repository.
No
Submit a standalone TensorFlow training job. For more information, see Submit a TensorFlow training job.
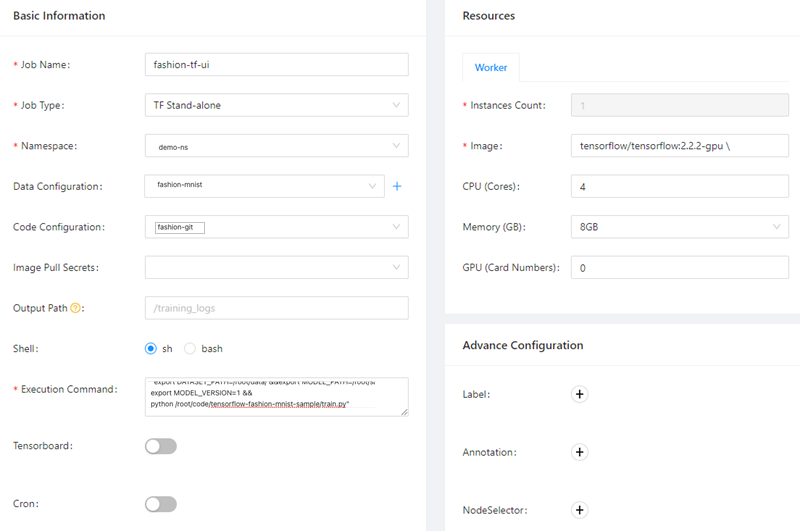
After you configure the job parameters, click Submit. The training job appears in the job list. The following figure describes the job parameters.
Parameter
Description
Job Name
In this example, fashion-tf-ui is used.
Job Type
In this example, TF Stand-alone is selected.
Namespace
In this example, demo-ns is selected. You must select the namespace to which the dataset belongs.
Data Configuration
In this example, fashion-demo is selected. You must select the data source that you configured in Step 1.
Code Configuration
In this example, fashion-git is selected. You must select the source code that you configured in Step 2.
Code branch
In this example, master is specified.
Execution Command
In this example, the following command is specified:
"export DATASET_PATH=/root/data/ &&export MODEL_PATH=/root/saved_model &&export MODEL_VERSION=1 &&python /root/code/tensorflow-fashion-mnist-sample/train.py".Private Git
To use a private Git repository, you must first specify the username and password of the private Git repository.
Instances Count
Default value: 1.
Image
In this example,
tensorflow/tensorflow:2.2.2-gpuis specified.Image Pull Secrets
To pull images from a private image repository, you must first create a Secret.
CPU (Cores)
Default value: 4.
Memory (GB)
Default value: 8.
For more information about Arena commands, see Use Arena to submit a TensorFlow training job.
After you submit the job, check the job log.
In the left-side navigation pane of AI Developer Console, click Job List.
On the Job List page, click the name of the job that you submitted.
On the details page, click the Instances tab. Find the instance that you want to view and click Log in the Operator column.
Example:
train_images.shape: (60000, 28, 28, 1), of float64
test_images.shape: (10000, 28, 28, 1), of float64
Model: "sequential"
_________________________________________________________________
Layer (type)                 Output Shape              Param #
=================================================================
Conv1 (Conv2D)               (None, 13, 13, 8)         80
_________________________________________________________________
flatten (Flatten)            (None, 1352)              0
_________________________________________________________________
Softmax (Dense)              (None, 10)                13530
=================================================================
Total params: 13,610
Trainable params: 13,610
Non-trainable params: 0
_________________________________________________________________
Epoch 1/5
2021-08-01 14:21:17.532237: E tensorflow/core/profiler/internal/gpu/cupti_tracer.cc:1430] function cupti_interface_->EnableCallback( 0 , subscriber_, CUPTI_CB_DOMAIN_DRIVER_API, cbid)failed with error CUPTI_ERROR_INVALID_PARAMETER
2021-08-01 14:21:17.532390: I tensorflow/core/profiler/internal/gpu/device_tracer.cc:216]  GpuTracer has collected 0 callback api events and 0 activity events.
2021-08-01 14:21:17.533535: I tensorflow/core/profiler/rpc/client/save_profile.cc:168] Creating directory: /training_logs/train/plugins/profile/2021_08_01_14_21_17
2021-08-01 14:21:17.533928: I tensorflow/core/profiler/rpc/client/save_profile.cc:174] Dumped gzipped tool data for trace.json.gz to /training_logs/train/plugins/profile/2021_08_01_14_21_17/fashion-mnist-arena-chief-0.trace.json.gz
2021-08-01 14:21:17.534251: I tensorflow/core/profiler/utils/event_span.cc:288] Generation of step-events took 0 ms

2021-08-01 14:21:17.534961: I tensorflow/python/profiler/internal/profiler_wrapper.cc:87] Creating directory: /training_logs/train/plugins/profile/2021_08_01_14_21_17Dumped tool data for overview_page.pb to /training_logs/train/plugins/profile/2021_08_01_14_21_17/fashion-mnist-arena-chief-0.overview_page.pb
Dumped tool data for input_pipeline.pb to /training_logs/train/plugins/profile/2021_08_01_14_21_17/fashion-mnist-arena-chief-0.input_pipeline.pb
Dumped tool data for tensorflow_stats.pb to /training_logs/train/plugins/profile/2021_08_01_14_21_17/fashion-mnist-arena-chief-0.tensorflow_stats.pb
Dumped tool data for kernel_stats.pb to /training_logs/train/plugins/profile/2021_08_01_14_21_17/fashion-mnist-arena-chief-0.kernel_stats.pb

1875/1875 [==============================] - 3s 2ms/step - loss: 0.5399 - accuracy: 0.8116
Epoch 2/5
1875/1875 [==============================] - 3s 2ms/step - loss: 0.4076 - accuracy: 0.8573
Epoch 3/5
1875/1875 [==============================] - 3s 2ms/step - loss: 0.3727 - accuracy: 0.8694
Epoch 4/5
1875/1875 [==============================] - 3s 2ms/step - loss: 0.3512 - accuracy: 0.8769
Epoch 5/5
1875/1875 [==============================] - 3s 2ms/step - loss: 0.3351 - accuracy: 0.8816
313/313 [==============================] - 0s 1ms/step - loss: 0.3595 - accuracy: 0.8733
2021-08-01 14:21:34.820089: W tensorflow/python/util/util.cc:329] Sets are not currently considered sequences, but this may change in the future, so consider avoiding using them.
WARNING:tensorflow:From /usr/local/lib/python3.6/dist-packages/tensorflow/python/ops/resource_variable_ops.py:1817: calling BaseResourceVariable.__init__ (from tensorflow.python.ops.resource_variable_ops) with constraint is deprecated and will be removed in a future version.
Instructions for updating:
If using Keras pass *_constraint arguments to layers.

Test accuracy: 0.8733000159263611
export_path = /root/saved_model/1


Saved model success
View data on TensorBoard.
You can use the kubectl port-forward command to map a local port to the TensorBoard Service. You can perform the following operations to establish a connection between MaxCompute and a VPC.
Run the following command to query the IP address of the TensorBoard Service:
kubectl get svc -n demo-nsExpected output:
NAME                        TYPE        CLUSTER-IP       EXTERNAL-IP   PORT(S)               AGE
tf-dist-arena-tensorboard   NodePort    172.16.XX.XX     <none>        6006:32226/TCP        80m
Run the following command to map a local port to the TensorBoard Service:
kubectl port-forward svc/tf-dist-arena-tensorboard -n demo-ns 6006:6006Expected output:
Forwarding from 127.0.0.1:6006 -> 6006
Forwarding from [::1]:6006 -> 6006
Handling connection for 6006
Handling connection for 6006
Enter
http://localhost:6006/into the address bar of your browser to view data on TensorBoard.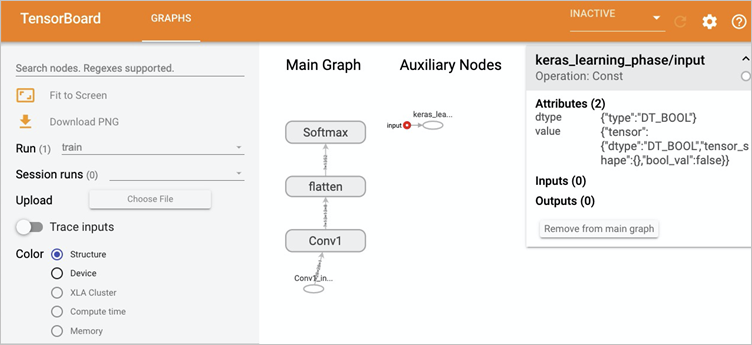
Example 2: Submit a distributed TensorFlow training job
Method 1: Use Arena to submit a distributed TensorFlow training job
Run the following command to submit a distributed TensorFlow training job by using Arena:
arena submit tf \
    -n demo-ns \
    --name=tf-dist-arena \
    --working-dir=/root/ \
    --data fashion-mnist-pvc:/data \
    --env=TEST_TMPDIR=/ \
    --env=GIT_SYNC_USERNAME=kubeai \
    --env=GIT_SYNC_PASSWORD=kubeai@ACK123 \
    --env=GIT_SYNC_BRANCH=master \
    --gpus=1 \
    --workers=2 \
    --worker-image=tensorflow/tensorflow:1.5.0-devel-gpu \
    --sync-mode=git \
    --sync-source=https://codeup.aliyun.com/60b4cf5c66bba1c04b442e49/tensorflow-fashion-mnist-sample.git \
    --ps=1 \
    --ps-image=tensorflow/tensorflow:1.5.0-devel \
    --tensorboard \
    "python code/tensorflow-fashion-mnist-sample/tf-distributed-mnist.py --log_dir=/training_logs"
Run the following command to query the IP address of the TensorBoard Service:
kubectl get svc -n demo-nsExpected output:
NAME                        TYPE        CLUSTER-IP       EXTERNAL-IP   PORT(S)                 AGE
tf-dist-arena-tensorboard   NodePort    172.16.204.248   <none>        6006:32226/TCP          80m
Run the following command to map a local port to the TensorBoard Service.
To view TensorBoard, use the kubectl port-forward command to map a local port to the TensorBoard Service.
kubectl port-forward svc/tf-dist-arena-tensorboard -n demo-ns 6006:6006Expected output:
Forwarding from 127.0.0.1:6006 -> 6006
Forwarding from [::1]:6006 -> 6006
Handling connection for 6006
Handling connection for 6006
Enter
http://localhost:6006/into the address bar of your browser to view data on TensorBoard.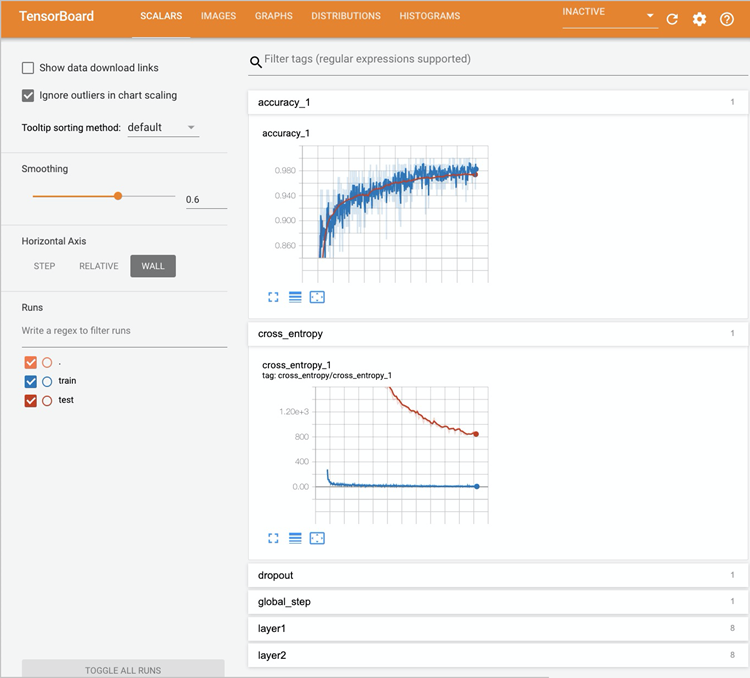
Method 2: Use AI Developer Console to submit a distributed TensorFlow training job
Configure the data source. For more information, see Configure a dataset.
In this example, the data source configuration is the same as that used in 1.
Configure the source code. For more information, see Configure a source code repository.
In this example, the source code configuration is the same as that used in 2.
Submit a distributed Tensorflow training job. For more information, see Submit a TensorFlow training job.
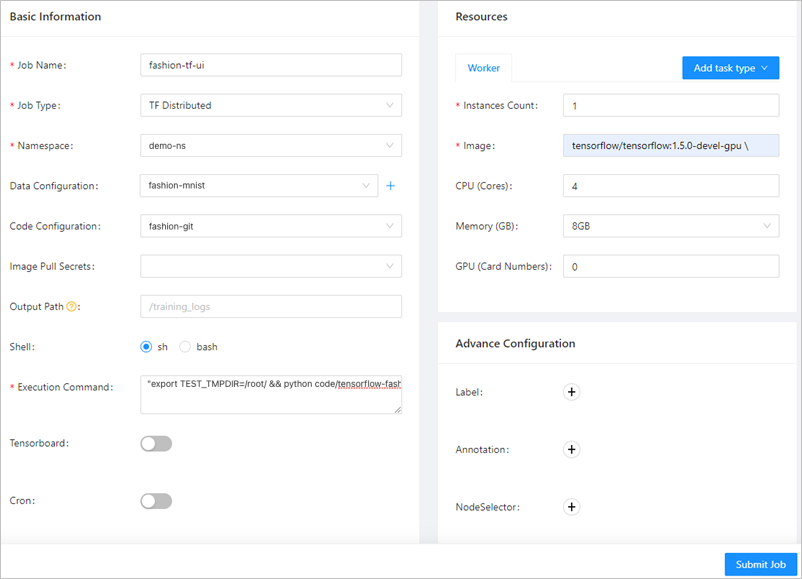
After you configure the job parameters, click Submit. The training job appears in the job list. The following figure describes the job parameters.
Parameter
Description
Job Name
In this example, fashion-ps-ui is used.
Job Type
In this example, TF Distributed is selected.
Namespace
In this example, demo-ns is selected. You must select the namespace to which the dataset belongs.
Data Configuration
In this example, fashion-demo is selected. You must select the data source that you configured in Step 1.
Code Configuration
In this example, fashion-git is selected. You must select the source code that you configured in Step 2.
Execution Command
In this example, the following command is specified:
"export TEST_TMPDIR=/root/ && python code/tensorflow-fashion-mnist-sample/tf-distributed-mnist.py --log_dir=/training_logs".Image
On the Worker tab in the Resources section, set Image to
tensorflow/tensorflow:1.5.0-devel-gpu.On the PS tab in the Resources section, set Image to
tensorflow/tensorflow:1.5.0-devel.
For more information about Arena commands, see Use Arena to submit a TensorFlow training job.
View data on TensorBoard. For more information, see 2 to 4 in Method 1: Use Arena to submit a distributed TensorFlow training job.
Example 3: Submit a Fluid-accelerated training job
In this example, the dataset is accelerated on AI Dashboard and a training job that uses the accelerated dataset is submitted. The result shows that the time required to complete the training job is reduced. Procedure:
The administrator accelerates the dataset on AI Dashboard.
A developer uses Arena to submit a training job that uses the accelerated dataset.
Use Arena to query the time that is required to complete the training job.
Accelerate the dataset.
If you have accelerated fashion-demo-pvc in Step 2: Create a dataset, skip this step. For more information about how to accelerate a dataset, see Create an accelerated dataset based on OSS.
Submit a training job that uses the accelerated dataset.
A developer submits a training job that uses the accelerated dataset to the demo-ns namespace. The configuration of a job that uses the accelerated dataset and the configuration of a job that uses a regular dataset differ in the following parameter settings:
--data: the accelerated VPC, which isfashion-demo-pvc-accin this example.--env=DATASET_PATH: the mount path of the dataset PVC, which is /root/data/ in--datain this example, and the name of the PVC, which is fashion-demo-pvc-acc in this example.
arena \
  submit \
  tfjob \
  -n demo-ns \
  --name=fashion-mnist-fluid \
  --data=fashion-demo-pvc-acc:/root/data/ \
  --env=DATASET_PATH=/root/data/fashion-demo-pvc-acc \
  --env=MODEL_PATH=/root/saved_model \
  --env=MODEL_VERSION=1 \
  --env=GIT_SYNC_USERNAME=${GIT_USERNAME} \
  --env=GIT_SYNC_PASSWORD=${GIT_PASSWORD} \
  --sync-mode=git \
  --sync-source=https://codeup.aliyun.com/60b4cf5c66bba1c04b442e49/tensorflow-fashion-mnist-sample.git \
  --image="tensorflow/tensorflow:2.2.2-gpu" \
  "python /root/code/tensorflow-fashion-mnist-sample/train.py --log_dir=/training_logs"
Run the following command to compare the time that is required to complete the two training jobs:
arena list -n demo-nsExpected output:
NAME                 STATUS     TRAINER  DURATION  GPU(Requested)  GPU(Allocated)  NODE
fashion-mnist-fluid  SUCCEEDED  TFJOB    33s       0               N/A             192.168.5.7
fashion-mnist-arena  SUCCEEDED  TFJOB    3m        0               N/A             192.168.5.8
The output of the arena list command shows that 33 seconds is required to complete the Fluid-accelerated training job, whereas 3 minutes is required to complete the training job that uses a regular dataset. Both jobs run with the same code and on the same node.
Example 4: Use the AI job scheduler of ACK to accelerate a distributed training job
ACK provides the AI job scheduler that is optimized for AI and big data computing. The AI job scheduler supports gang scheduling, capacity scheduling, and topology-aware scheduling. In this example, a training job that has topology-aware GPU scheduling enabled is used.
To ensure the high performance of AI workloads, the AI job scheduler chooses an optimal scheduling solution based on the topological information about heterogeneous resources on nodes. The information includes how GPUs communicate with each other by using NVLink and PCIe Switches, and the non-uniform memory access (NUMA) topology of CPUs. For more information about topology-aware GPU scheduling, see GPU topology-aware scheduling. For more information about topology-aware CPU scheduling, see Enable topology-aware CPU scheduling.
Perform the following steps to submit a training job that has topology-aware GPU scheduling enabled and a training job that has topology-aware GPU scheduling disabled. Then, compare the time that is required to complete the jobs.
Run the following command to submit a training job that has topology-aware GPU scheduling disabled:
arena submit mpi \
  --name=tensorflow-4-vgg16 \
  --gpus=1 \
  --workers=4 \
  --image=registry.cn-hangzhou.aliyuncs.com/kubernetes-image-hub/tensorflow-benchmark:tf2.3.0-py3.7-cuda10.1 \
  "mpirun --allow-run-as-root -np "4" -bind-to none -map-by slot -x NCCL_DEBUG=INFO -x NCCL_SOCKET_IFNAME=eth0 -x LD_LIBRARY_PATH -x PATH --mca pml ob1 --mca btl_tcp_if_include eth0 --mca oob_tcp_if_include eth0 --mca orte_keep_fqdn_hostnames t --mca btl ^openib python /tensorflow/benchmarks/scripts/tf_cnn_benchmarks/tf_cnn_benchmarks.py --model=vgg16 --batch_size=64 --variable_update=horovod"
Submit a training job that has topology-aware GPU scheduling enabled.
You must add a label to the node on which you want to run the job. In this example, the cn-beijing.192.168.XX.XX node is used. Replace the node with the actual node that is used.
kubectl label node cn-beijing.192.168.XX.XX ack.node.gpu.schedule=topology --overwriteRun the following command to submit a training job that is configured with
--gputopology=true, which is used to enable topology-aware GPU scheduling.arena submit mpi \ --name=tensorflow-topo-4-vgg16 \ --gpus=1 \ --workers=4 \ --gputopology=true \ --image=registry.cn-hangzhou.aliyuncs.com/kubernetes-image-hub/tensorflow-benchmark:tf2.3.0-py3.7-cuda10.1 \ "mpirun --allow-run-as-root -np "4" -bind-to none -map-by slot -x NCCL_DEBUG=INFO -x NCCL_SOCKET_IFNAME=eth0 -x LD_LIBRARY_PATH -x PATH --mca pml ob1 --mca btl_tcp_if_include eth0 --mca oob_tcp_if_include eth0 --mca orte_keep_fqdn_hostnames t --mca btl ^openib python /tensorflow/benchmarks/scripts/tf_cnn_benchmarks/tf_cnn_benchmarks.py --model=vgg16 --batch_size=64 --variable_update=horovodCompare the time that is required to complete the training jobs.
Run the following command to compare the time that is required to complete the two training jobs:
arena list -n demo-nsExpected output:
NAME                             STATUS     TRAINER  DURATION  GPU(Requested)  GPU(Allocated)  NODE
tensorflow-topo-4-vgg16          SUCCEEDED  MPIJOB   44s       4               N/A             192.168.4.XX1
tensorflow-4-vgg16-image-warned  SUCCEEDED  MPIJOB   2m        4               N/A             192.168.4.XX0
Run the following command to query the total GPU processing time of the training job that has topology-aware GPU scheduling disabled:
arena logs tensorflow-topo-4-vgg16 -n demo-nsExpected output:
100 images/sec: 251.7 +/- 0.1 (jitter = 1.2)  7.262
----------------------------------------------------------------
total images/sec: 1006.44
Run the following command to query the total GPU processing time of the training job that has topology-aware GPU scheduling enabled:
arena logs tensorflow-4-vgg16-image-warned -n demo-nsExpected output:
100 images/sec: +/- 0.2 (jitter = 1.5)  7.261
----------------------------------------------------------------
total images/sec: 225.50
The following table shows the results about the two jobs.
Training job | Processing time per GPU (ns) | Total GPU processing time (ns) | Duration (s) |
Topology-aware GPU scheduling enabled | 56.4 | 225.50 | 44 |
Topology-aware GPU scheduling disabled | 251.7 | 1006.44 | 120 |
After topology-aware GPU scheduling is enabled on nodes, regular GPU scheduling cannot be enabled. To resume regular GPU scheduling, run the following command to modify the node labels:
kubectl label node cn-beijing.192.168.XX.XX0 ack.node.gpu.schedule=default --overwriteStep 5: Manage the model
- Log on to AI Developer Console
- In the left-side navigation pane of AI Developer Console, click Model Manage.
On the Model Manage page, click Create Model.
In the Create dialog box, set Model Name, Model Version, and Job Name.
In this example, Model Name is set to fsahion-mnist-demo, Model Version is set to v1, and Job Name is set to tf-single.
Click OK. The model appears on the page.
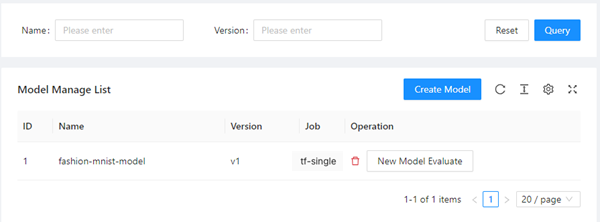
If you want to evaluate the model, click New Model Evaluate in the Operation column.
Step 6: Evaluate the model
After you install the cloud-native component set, you can use Arena or AI Developer Console to submit an evaluation job. In this example, an evaluation job is submitted to evaluate the checkpoint of the model that is trained based on the Fashion-MNIST dataset. Procedure:
Use Arena to submit a training job that exports a checkpoint.
Use Arena to submit an evaluation job.
Use AI Developer Console to compare the evaluation results of different models.
Submit a training job that exports a checkpoint.
Run the following command to use Arena to submit a training job that exports a checkpoint to fashion-demo-pvc:
arena \
  submit \
  tfjob \
  -n demo-ns \ # You can change the namespace based on your business requirements.
  --name=fashion-mnist-arena-ckpt \
  --data=fashion-demo-pvc:/root/data/ \
  --env=DATASET_PATH=/root/data/ \
  --env=MODEL_PATH=/root/data/saved_model \
  --env=MODEL_VERSION=1 \
  --env=GIT_SYNC_USERNAME=${GIT_USERNAME} \ # The username of your Git repository.
  --env=GIT_SYNC_PASSWORD=${GIT_PASSWORD} \ # The password of your Git repository.
  --env=OUTPUT_CHECKPOINT=1 \
  --sync-mode=git \
  --sync-source=https://codeup.aliyun.com/60b4cf5c66bba1c04b442e49/tensorflow-fashion-mnist-sample.git \
  --image="tensorflow/tensorflow:2.2.2-gpu" \
  "python /root/code/tensorflow-fashion-mnist-sample/train.py --log_dir=/training_logs"
Submit an evaluation job.
Build an image that is used to deploy the job.
Obtain the code for model evaluation. Run the following commands in the kubeai-sdk directory to create and push an image:
docker build . -t ${DOCKER_REGISTRY}:fashion-mnist
docker push ${DOCKER_REGISTRY}:fashion-mnist
Run the following command to query the Service that provides access to MySQL:
kubectl get svc -n kube-ai ack-mysqlExpected output:
NAME        TYPE        CLUSTER-IP      EXTERNAL-IP   PORT(S)    AGE
ack-mysql   ClusterIP   172.16.XX.XX    <none>        3306/TCP   28h
Run the following command to submit an evaluation job by using Arena:
arena evaluate model \ --namespace=demo-ns \ --loglevel=debug \ --name=evaluate-job \ --image=registry.cn-beijing.aliyuncs.com/kube-ai/kubeai-sdk-demo:fashion-minist \ --env=ENABLE_MYSQL=True \ --env=MYSQL_HOST=172.16.77.227 \ --env=MYSQL_PORT=3306 \ --env=MYSQL_USERNAME=kubeai \ --env=MYSQL_PASSWORD=kubeai@ACK \ --data=fashion-demo-pvc:/data \ --model-name=1 \ --model-path=/data/saved_model/ \ --dataset-path=/data/ \ --metrics-path=/data/output \ "python /kubeai/evaluate.py"NoteYou can obtain the IP address and port from the output in the previous step to access MySQL.
Compare evaluation results.
In the left-side navigation pane of AI Developer Console, click Model Manage.
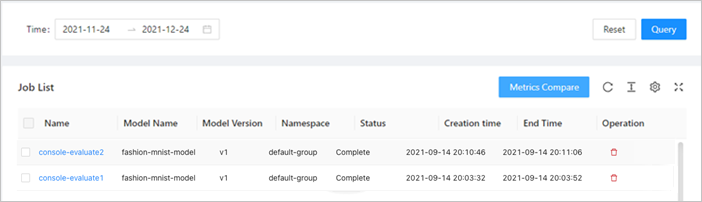
In the Job List section, you can click the name of an evaluation job to view the metrics.
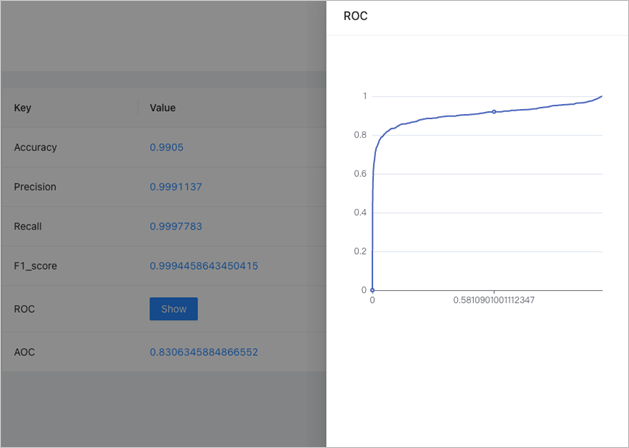
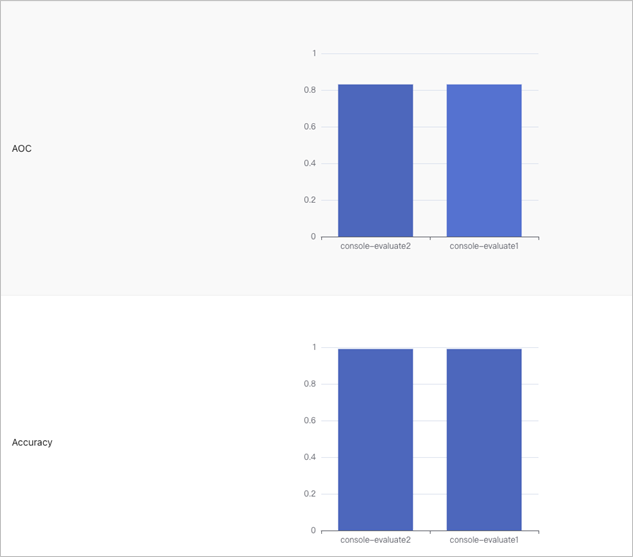
You can also compare the metrics of different evaluation jobs.
Step 7: Deploy the model as a service
After a model is developed and evaluated, you can deploy the model as a service. The following steps describe how to deploy the preceding model as an inference service named tf-serving. Arena supports various service architectures, such as Triton and Seldon. For more information, see Arena serve guide.
In this example, the model that is trained in Step 4: Train a model is used. The model is stored in the fashion-minist-demo PVC that is used in Step 2: Create a dataset. If you want to store the model to other types of storage, you must first create a PVC of the storage type that you want to use.
Run the following command to use Arena to deploy the TensorFlow model to TensorFlow Serving:
arena serve tensorflow \
  --loglevel=debug \
  --namespace=demo-ns \
  --name=fashion-mnist \
  --model-name=1  \
  --gpus=1  \
  --image=tensorflow/serving:1.15.0-gpu \
  --data=fashion-demo-pvc:/data \
  --model-path=/data/saved_model/ \
  --version-policy=latest
Run the following command to query the name of the inference service that you deployed:
arena serve list -n demo-nsExpected output:
NAME           TYPE        VERSION       DESIRED  AVAILABLE  ADDRESS         PORTS                   GPU
fashion-mnist  Tensorflow  202111031203  1        1          172.16.XX.XX    GRPC:8500,RESTFUL:8501  1
You can use the IP address and ports in the ADDRESS and PORTS columns to send requests to the inference service from within the cluster.
Create a Jupyter notebook in Jupyter and use the notebook as a client to send HTTP requests to the tf-serving service.
In this example, the Jupyter notebook created in Step 3: Develop a model is used.
Specify 172.16.XX.XX as the value of the
server_ipfield in the code that is used to initialize the notebook. 172.16.XX.XX is returned in the ADDRESS column in the previous step.Specify 8501 as the value of the
server_http_portfield in the code that is used to initialize the notebook. Port 8501 is returned in the PORTS column in the previous step and is used to call the RESTful API.
Example:
import os
import gzip
import numpy as np
# import matplotlib.pyplot as plt
import random
import requests
import json

server_ip = "172.16.XX.XX"
server_http_port = 8501

dataset_dir = "/root/data/"

def load_data():
        files = [
            'train-labels-idx1-ubyte.gz',
            'train-images-idx3-ubyte.gz',
            't10k-labels-idx1-ubyte.gz',
            't10k-images-idx3-ubyte.gz'
        ]

        paths = []
        for fname in files:
            paths.append(os.path.join(dataset_dir, fname))

        with gzip.open(paths[0], 'rb') as labelpath:
            y_train = np.frombuffer(labelpath.read(), np.uint8, offset=8)
        with gzip.open(paths[1], 'rb') as imgpath:
            x_train = np.frombuffer(imgpath.read(), np.uint8, offset=16).reshape(len(y_train), 28, 28)
        with gzip.open(paths[2], 'rb') as labelpath:
            y_test = np.frombuffer(labelpath.read(), np.uint8, offset=8)
        with gzip.open(paths[3], 'rb') as imgpath:
            x_test = np.frombuffer(imgpath.read(), np.uint8, offset=16).reshape(len(y_test), 28, 28)


        return (x_train, y_train),(x_test, y_test)

def show(idx, title):
  plt.figure()
  plt.imshow(test_images[idx].reshape(28,28))
  plt.axis('off')
  plt.title('\n\n{}'.format(title), fontdict={'size': 16})

class_names = ['T-shirt/top', 'Trouser', 'Pullover', 'Dress', 'Coat',
               'Sandal', 'Shirt', 'Sneaker', 'Bag', 'Ankle boot']

(train_images, train_labels), (test_images, test_labels) = load_data()
train_images = train_images / 255.0
test_images = test_images / 255.0

# reshape for feeding into the model
train_images = train_images.reshape(train_images.shape[0], 28, 28, 1)
test_images = test_images.reshape(test_images.shape[0], 28, 28, 1)

print('\ntrain_images.shape: {}, of {}'.format(train_images.shape, train_images.dtype))
print('test_images.shape: {}, of {}'.format(test_images.shape, test_images.dtype))

rando = random.randint(0,len(test_images)-1)
#show(rando, 'An Example Image: {}'.format(class_names[test_labels[rando]]))

# !pip install -q requests

# import requests
# headers = {"content-type": "application/json"}
# json_response = requests.post('http://localhost:8501/v1/models/fashion_model:predict', data=data, headers=headers)
# predictions = json.loads(json_response.text)['predictions']

# show(0, 'The model thought this was a {} (class {}), and it was actually a {} (class {})'.format(
#   class_names[np.argmax(predictions[0])], np.argmax(predictions[0]), class_names[test_labels[0]], test_labels[0]))


def request_model(data):
    headers = {"content-type": "application/json"}
    json_response = requests.post('http://{}:{}/v1/models/1:predict'.format(server_ip, server_http_port), data=data, headers=headers)
    print('=======response:', json_response, json_response.text)
    predictions = json.loads(json_response.text)['predictions']

    print('The model thought this was a {} (class {}), and it was actually a {} (class {})'.format(class_names[np.argmax(predictions[0])], np.argmax(predictions[0]), class_names[test_labels[0]], test_labels[0]))
    #show(0, 'The model thought this was a {} (class {}), and it was actually a {} (class {})'.format(
    #  class_names[np.argmax(predictions[0])], np.argmax(predictions[0]), class_names[test_labels[0]], test_labels[0]))

# def request_model_version(data):
#     headers = {"content-type": "application/json"}
#     json_response = requests.post('http://{}:{}/v1/models/1/version/1:predict'.format(server_ip, server_http_port), data=data, headers=headers)
#     print('=======response:', json_response, json_response.text)

#     predictions = json.loads(json_response.text)
#     for i in range(0,3):
#       show(i, 'The model thought this was a {} (class {}), and it was actually a {} (class {})'.format(
#         class_names[np.argmax(predictions[i])], np.argmax(predictions[i]), class_names[test_labels[i]], test_labels[i]))

data = json.dumps({"signature_name": "serving_default", "instances": test_images[0:3].tolist()})
print('Data: {} ... {}'.format(data[:50], data[len(data)-52:]))
#request_model_version(data)
request_model(data)
Click the
icon on the notebook. The following output is returned:train_images.shape: (60000, 28, 28, 1), of float64 test_images.shape: (10000, 28, 28, 1), of float64 Data: {"signature_name": "serving_default", "instances": ... [0.0], [0.0], [0.0], [0.0], [0.0], [0.0], [0.0]]]]} =======response: <Response [200]> { "predictions": [[7.42696e-07, 6.91237556e-09, 2.66364452e-07, 2.27735413e-07, 4.0373439e-07, 0.00490919966, 7.27086217e-06, 0.0316713452, 0.0010733594, 0.962337255], [0.00685342, 1.8516447e-08, 0.9266119, 2.42278338e-06, 0.0603800081, 4.01338771e-12, 0.00613868702, 4.26091073e-15, 1.35764185e-05, 3.38685469e-10], [1.09047969e-05, 0.999816835, 7.98738e-09, 0.000122893631, 4.85748023e-05, 1.50353979e-10, 3.57102294e-07, 1.89657579e-09, 4.4604468e-07, 9.23274524e-09] ] } The model thought this was a Ankle boot (class 9), and it was actually a Ankle boot (class 9)
FAQ
How do I install commonly used software in the Jupyter notebook console?
To install commonly used software in the Jupyter notebook console, run the following command:
apt-get install ${Software name}How do I fix the garbled character issue in the Jupyter notebook console?
Modify the /etc/locale file based on the following content and then reopen the terminal.
LC_CTYPE="da_DK.UTF-8"
LC_NUMERIC="da_DK.UTF-8"
LC_TIME="da_DK.UTF-8"
LC_COLLATE="da_DK.UTF-8"
LC_MONETARY="da_DK.UTF-8"
LC_MESSAGES="da_DK.UTF-8"
LC_PAPER="da_DK.UTF-8"
LC_NAME="da_DK.UTF-8"
LC_ADDRESS="da_DK.UTF-8"
LC_TELEPHONE="da_DK.UTF-8"
LC_MEASUREMENT="da_DK.UTF-8"
LC_IDENTIFICATION="da_DK.UTF-8"
LC_ALL=