OpenClaw is an open-source, self-hosted AI agent framework that turns large language models into task executors capable of file processing, code writing, and workflow automation. Deploy a dedicated OpenClaw agent on PAI-EAS and connect it to Alibaba Cloud Model Studio or custom EAS model services.
Deploy as EAS service
-
Log on to the PAI console. Select a region on the top of the page. Then, select the desired workspace and click Elastic Algorithm Service (EAS).
-
On the Inference Service page, click Deploy Service. In the Scenario-based Model Deployment section, click OpenClaw Deployment.
-
Configure key parameters:
Parameter
Description
Service Name
Enter a service name. Example: openclaw_demo
Image Configuration
Select the
latestversion.Resource Configuration
Select a CPU instance type. Default:
ecs.c7a.large.Model Settings
Select an OSS path for persistent OpenClaw configuration storage, such as
oss://examplebucket/openclaw/.VPC
Create and configure VPC, vSwitch, and security group.
NoteOpenClaw requires internet access for web search and browser automation. Select a VPC with internet access enabled.
-
Click Deploy. Wait for the service status to change to Running.
Configure public internet access
The EAS service accesses the public internet through an Internet NAT Gateway. For more information, see Internet NAT Gateway.
1. Create Internet NAT Gateway and bind EIP
Go to the NAT Gateway - Internet NAT Gateway purchase page.
Billing Method: Select pay-as-you-go.
Region: Select the region where your EAS service is deployed.
Network and Zone: Select the VPC configured for your EAS service. You cannot change this setting after creation.
EIP: Select an EIP that is not associated with any instance, or purchase a new EIP.
2. Configure an SNAT entry
Go to the Internet NAT Gateway page. Find the Internet NAT Gateway that you created. In the Actions column, click Configure SNAT , and click Create SNAT Entry.
SNAT Entry: Select VPC granularity.
Select EIP: Select the Elastic IP Address (EIP) that you configured.
Launch WebUI
-
In the Invoke/Log/Monitoring column, click the
 button to open the web UI page.
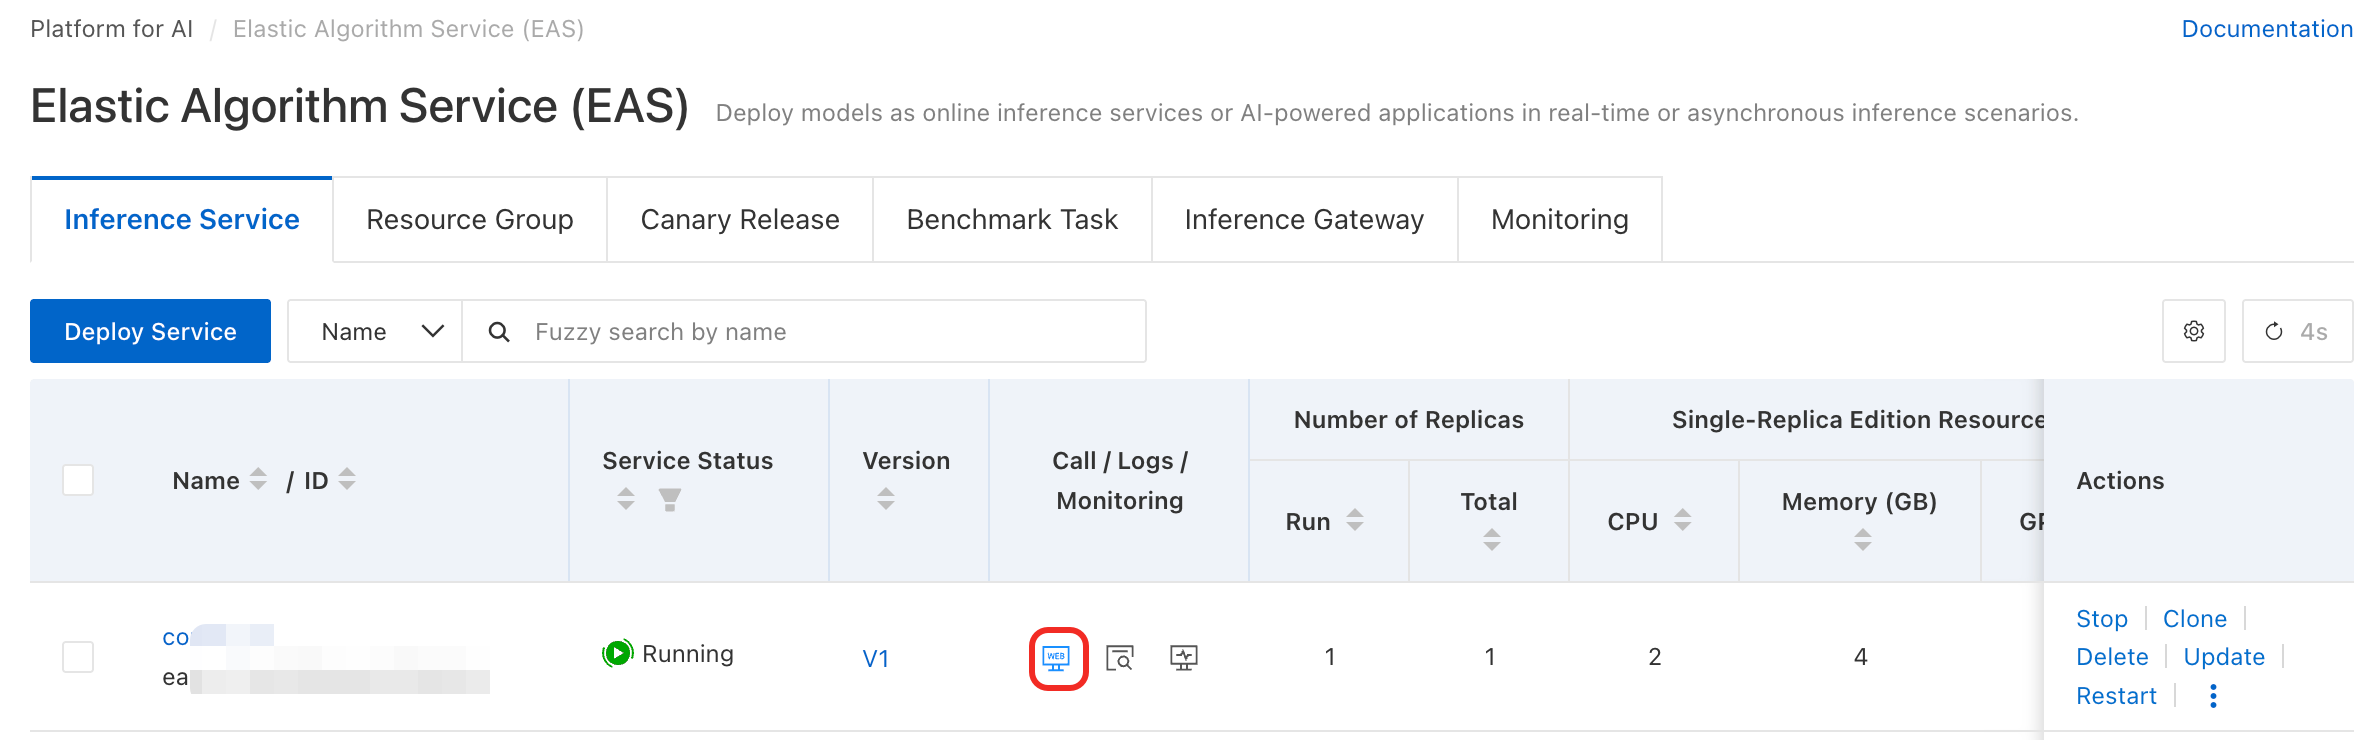
-
Configure the model. By default, WebUI uses an Alibaba Cloud Model Studio model in the China (Beijing) region. Obtain the API key for your region, enter it in WebUI, and save. You can also use Alibaba Cloud Model Studio Coding Plan or an EAS model service. For more information, see Configure multiple model providers.
Note: After you click Save, the key is hidden and displayed as
__OPENCLAW_REDACTED__.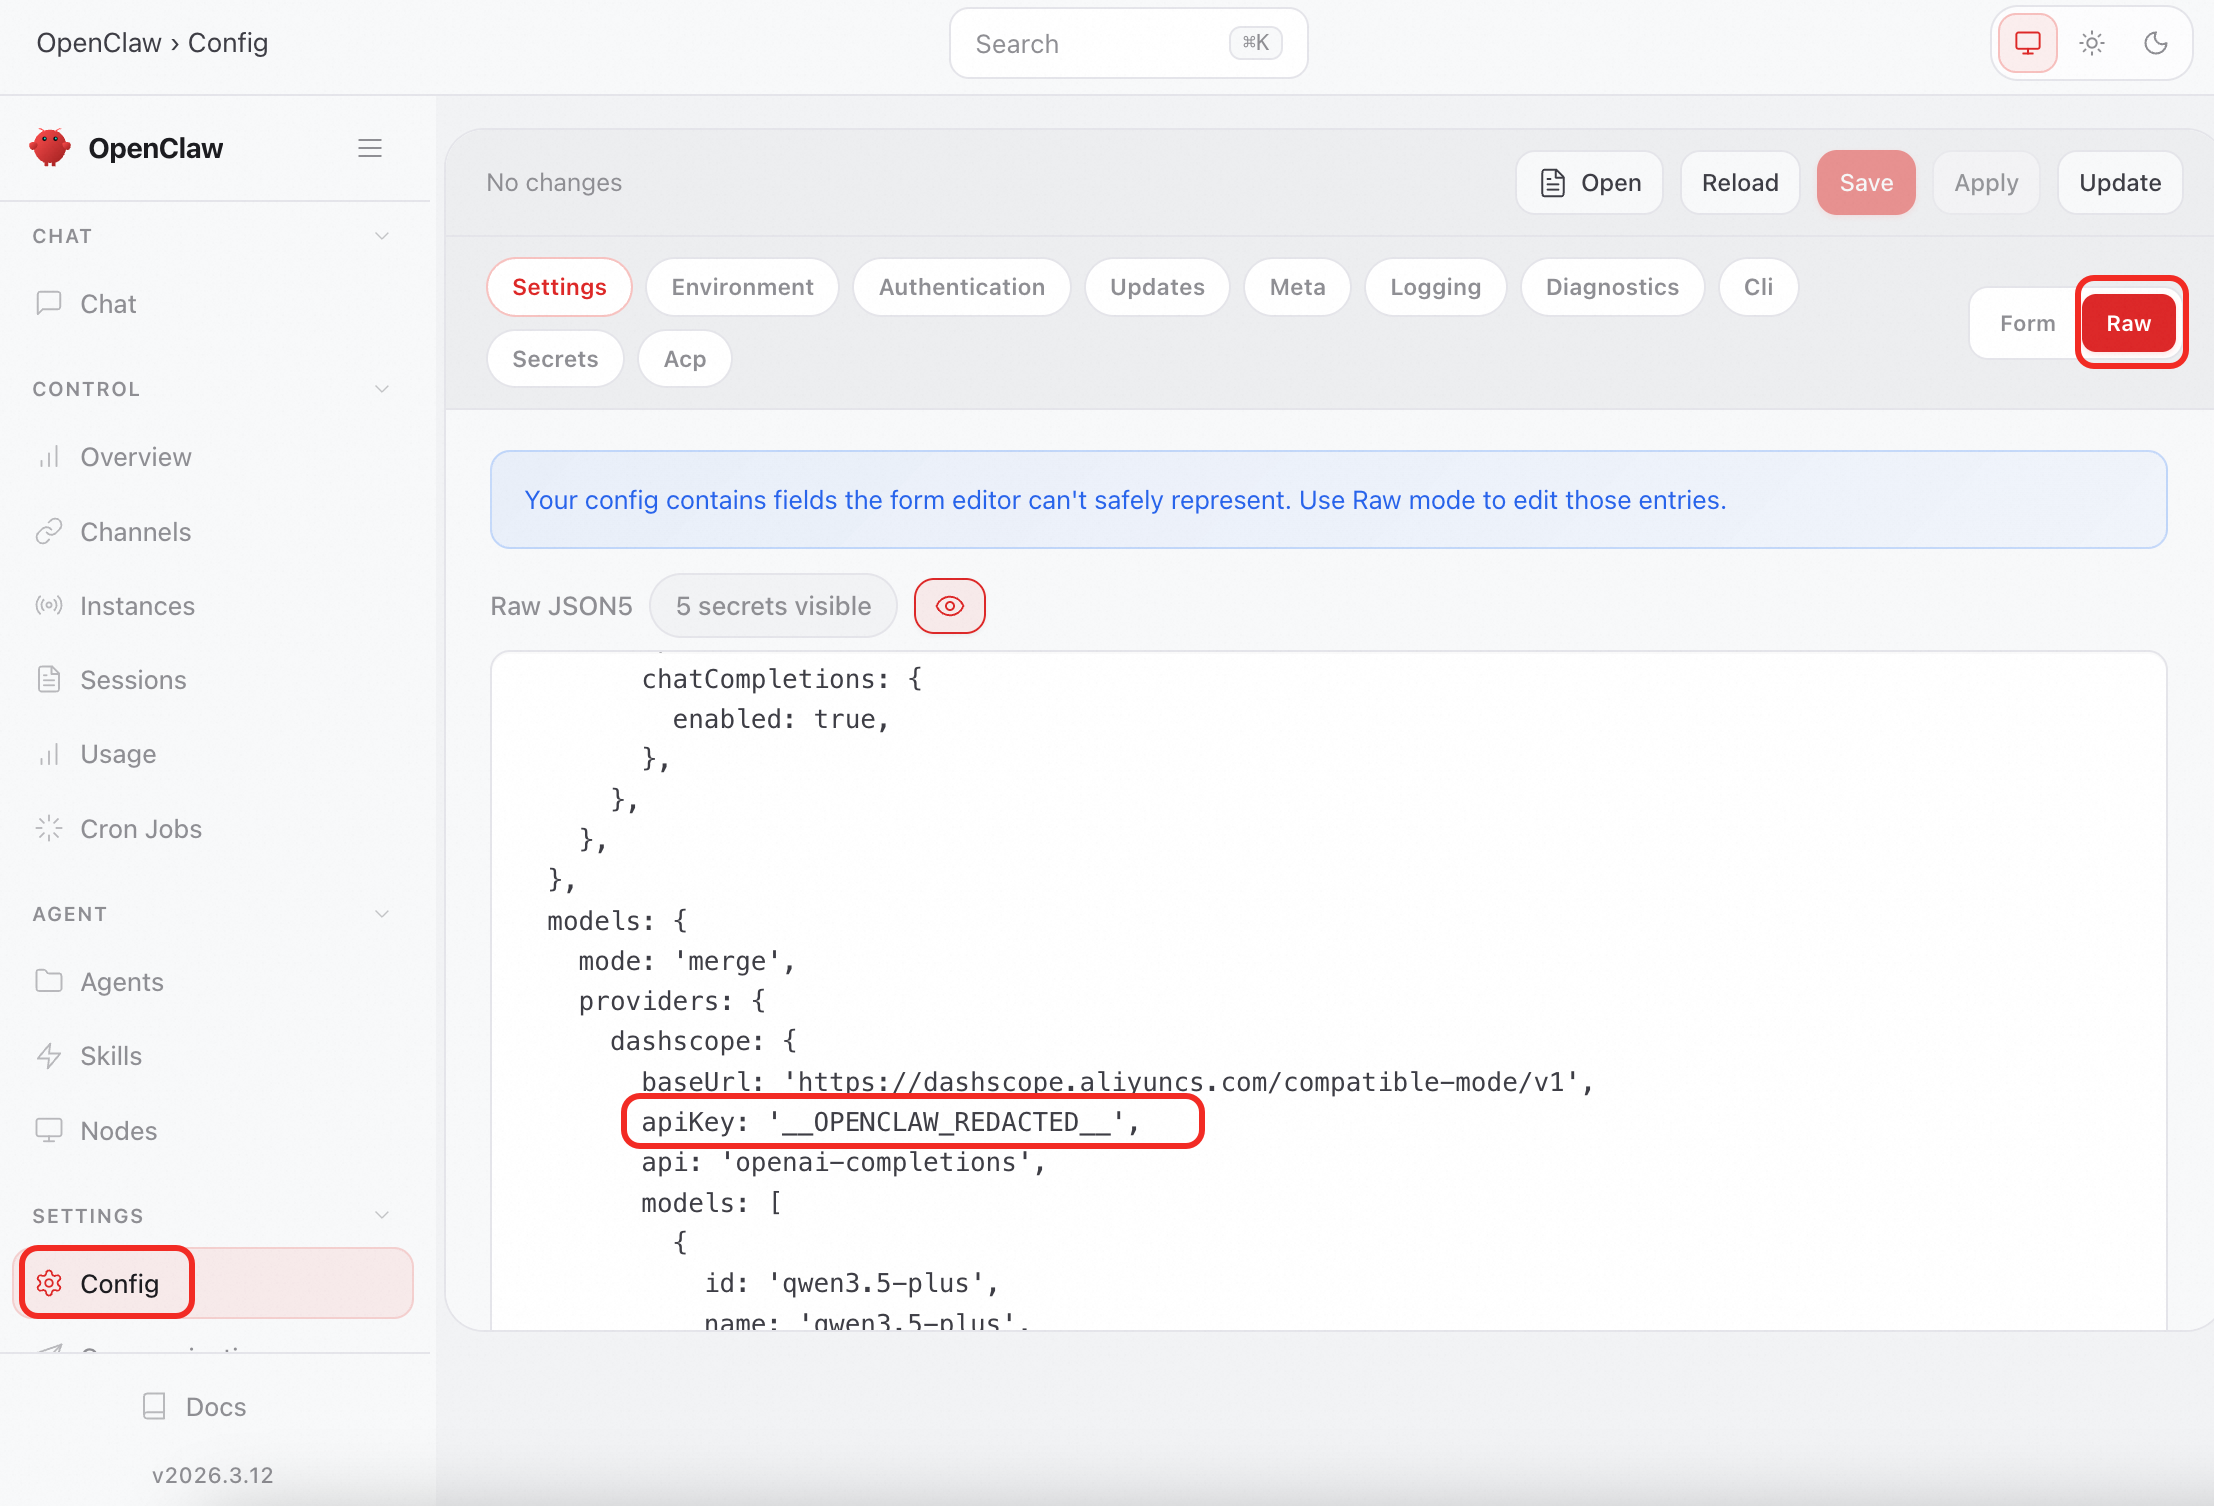
-
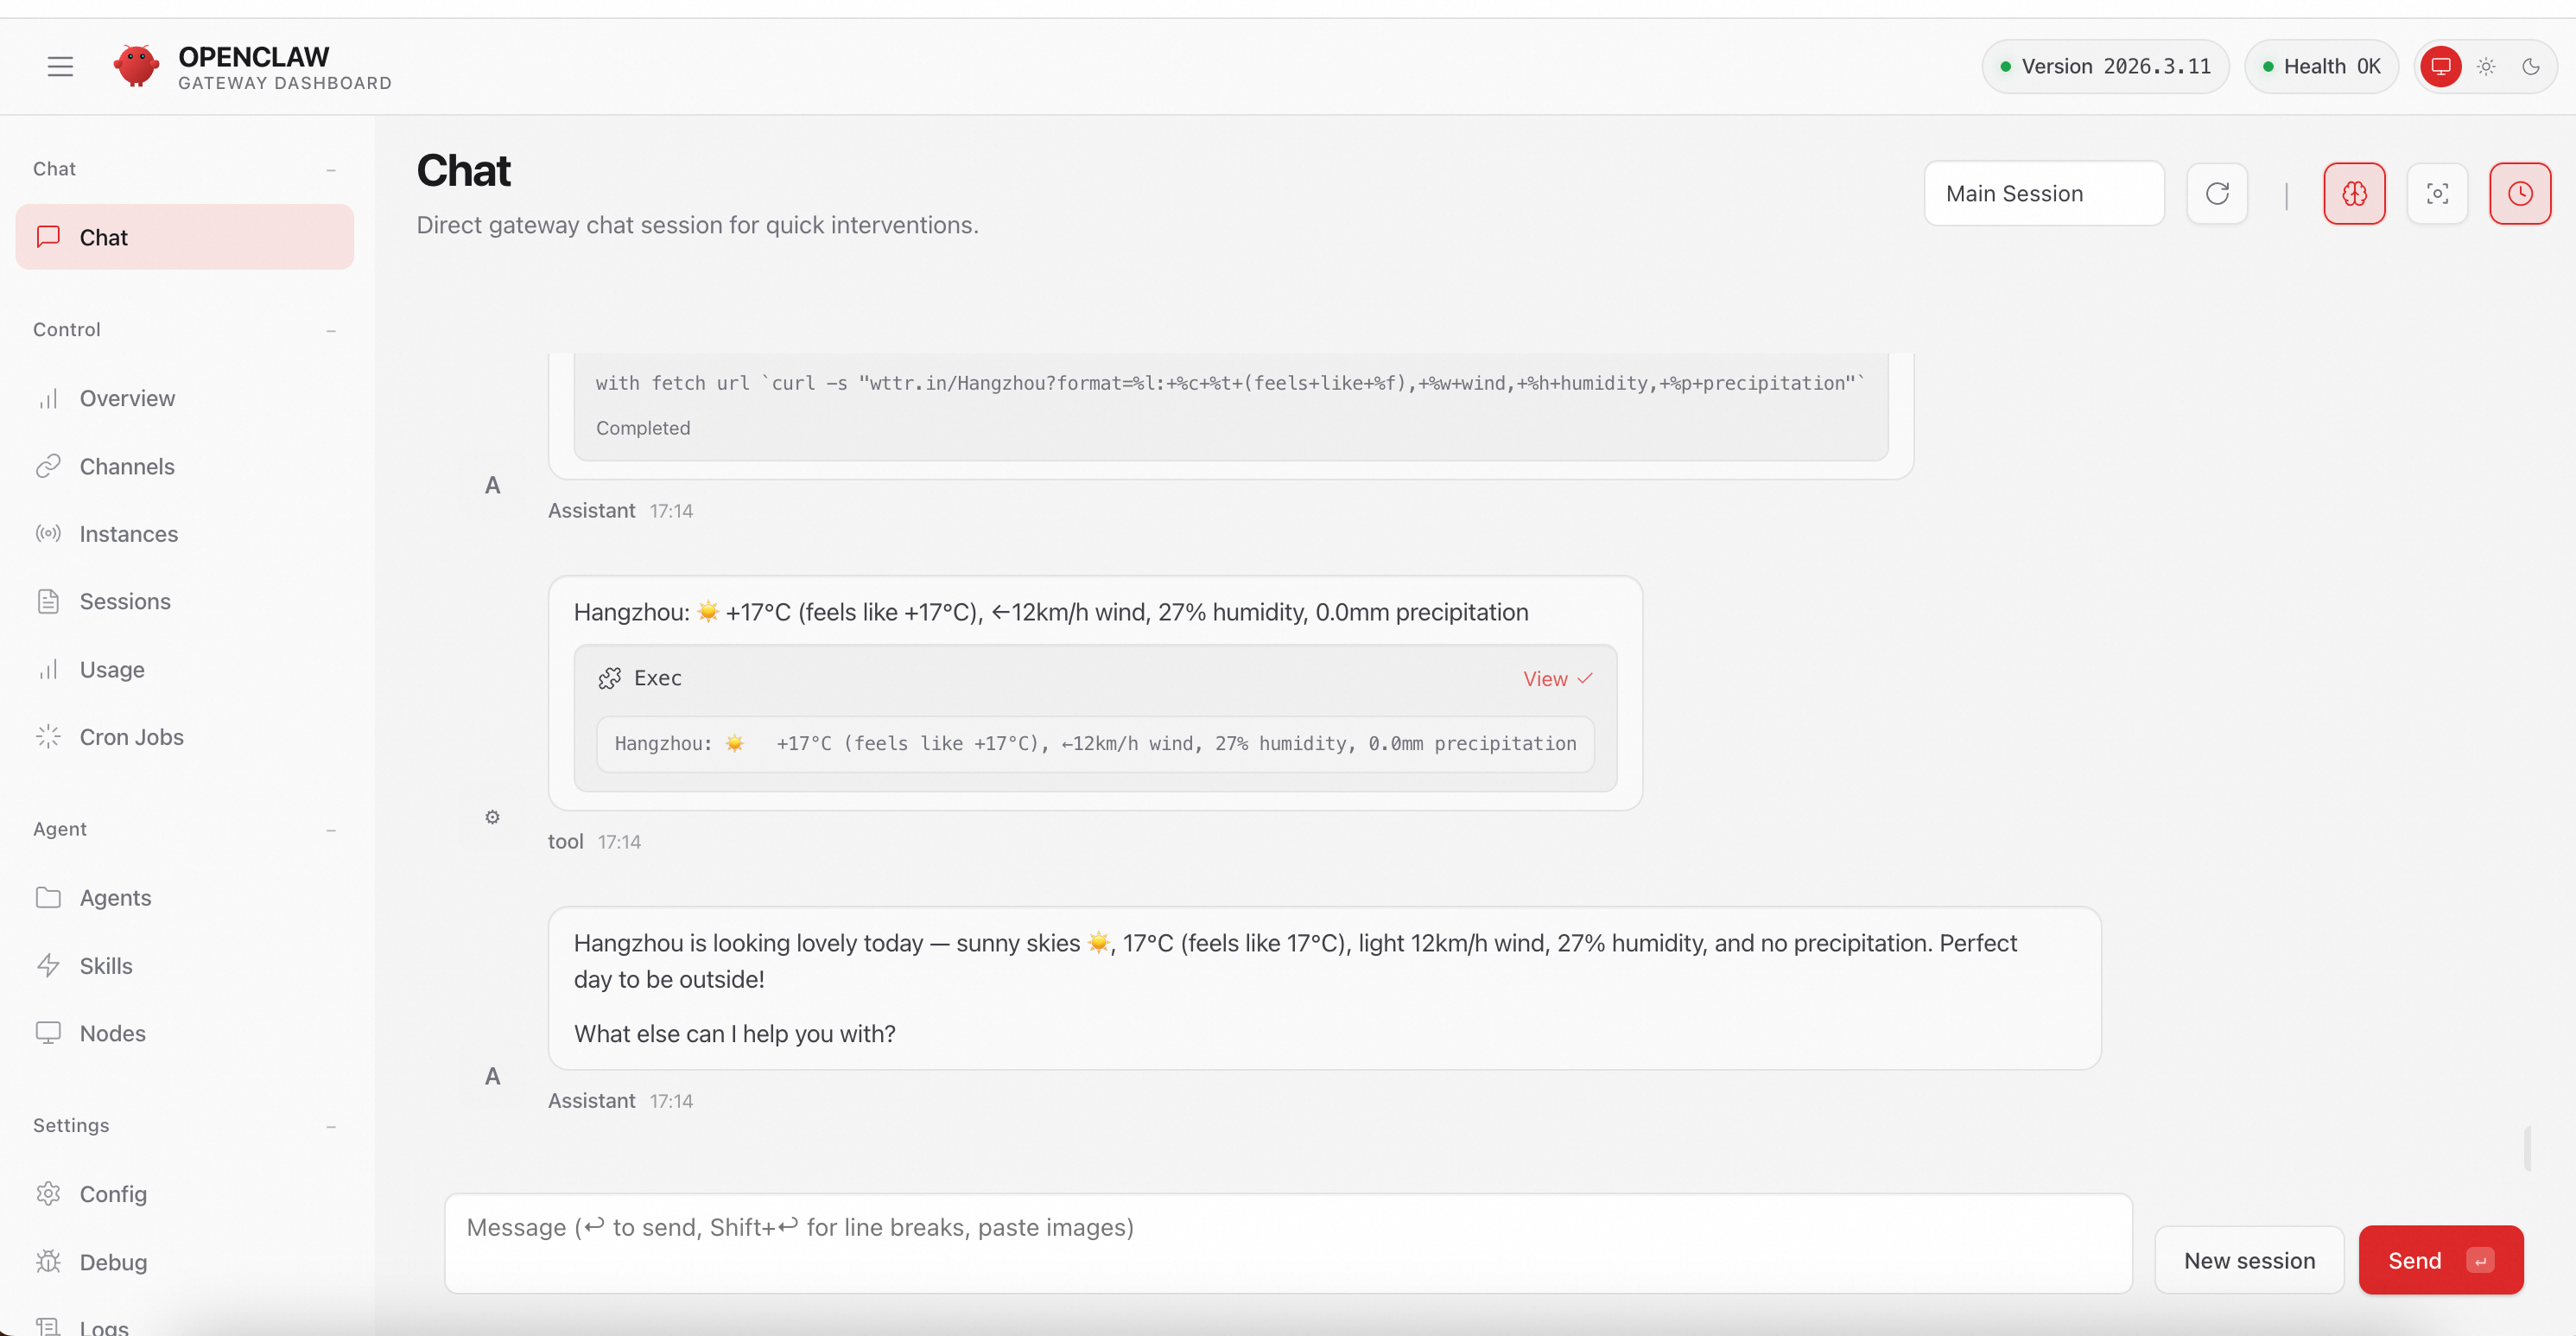
Chat with your OpenClaw assistant and assign tasks in WebUI.
Configure channel
DingTalk
-
Create a DingTalk bot and obtain its
Client IDandClient Secret. Create an OpenClaw bot with one click. -
In the OpenClaw WebUI, under Configuration > RAW, find
dingtalk-connectorin thechannelsconfiguration block, enter the Client ID and Client Secret, and save.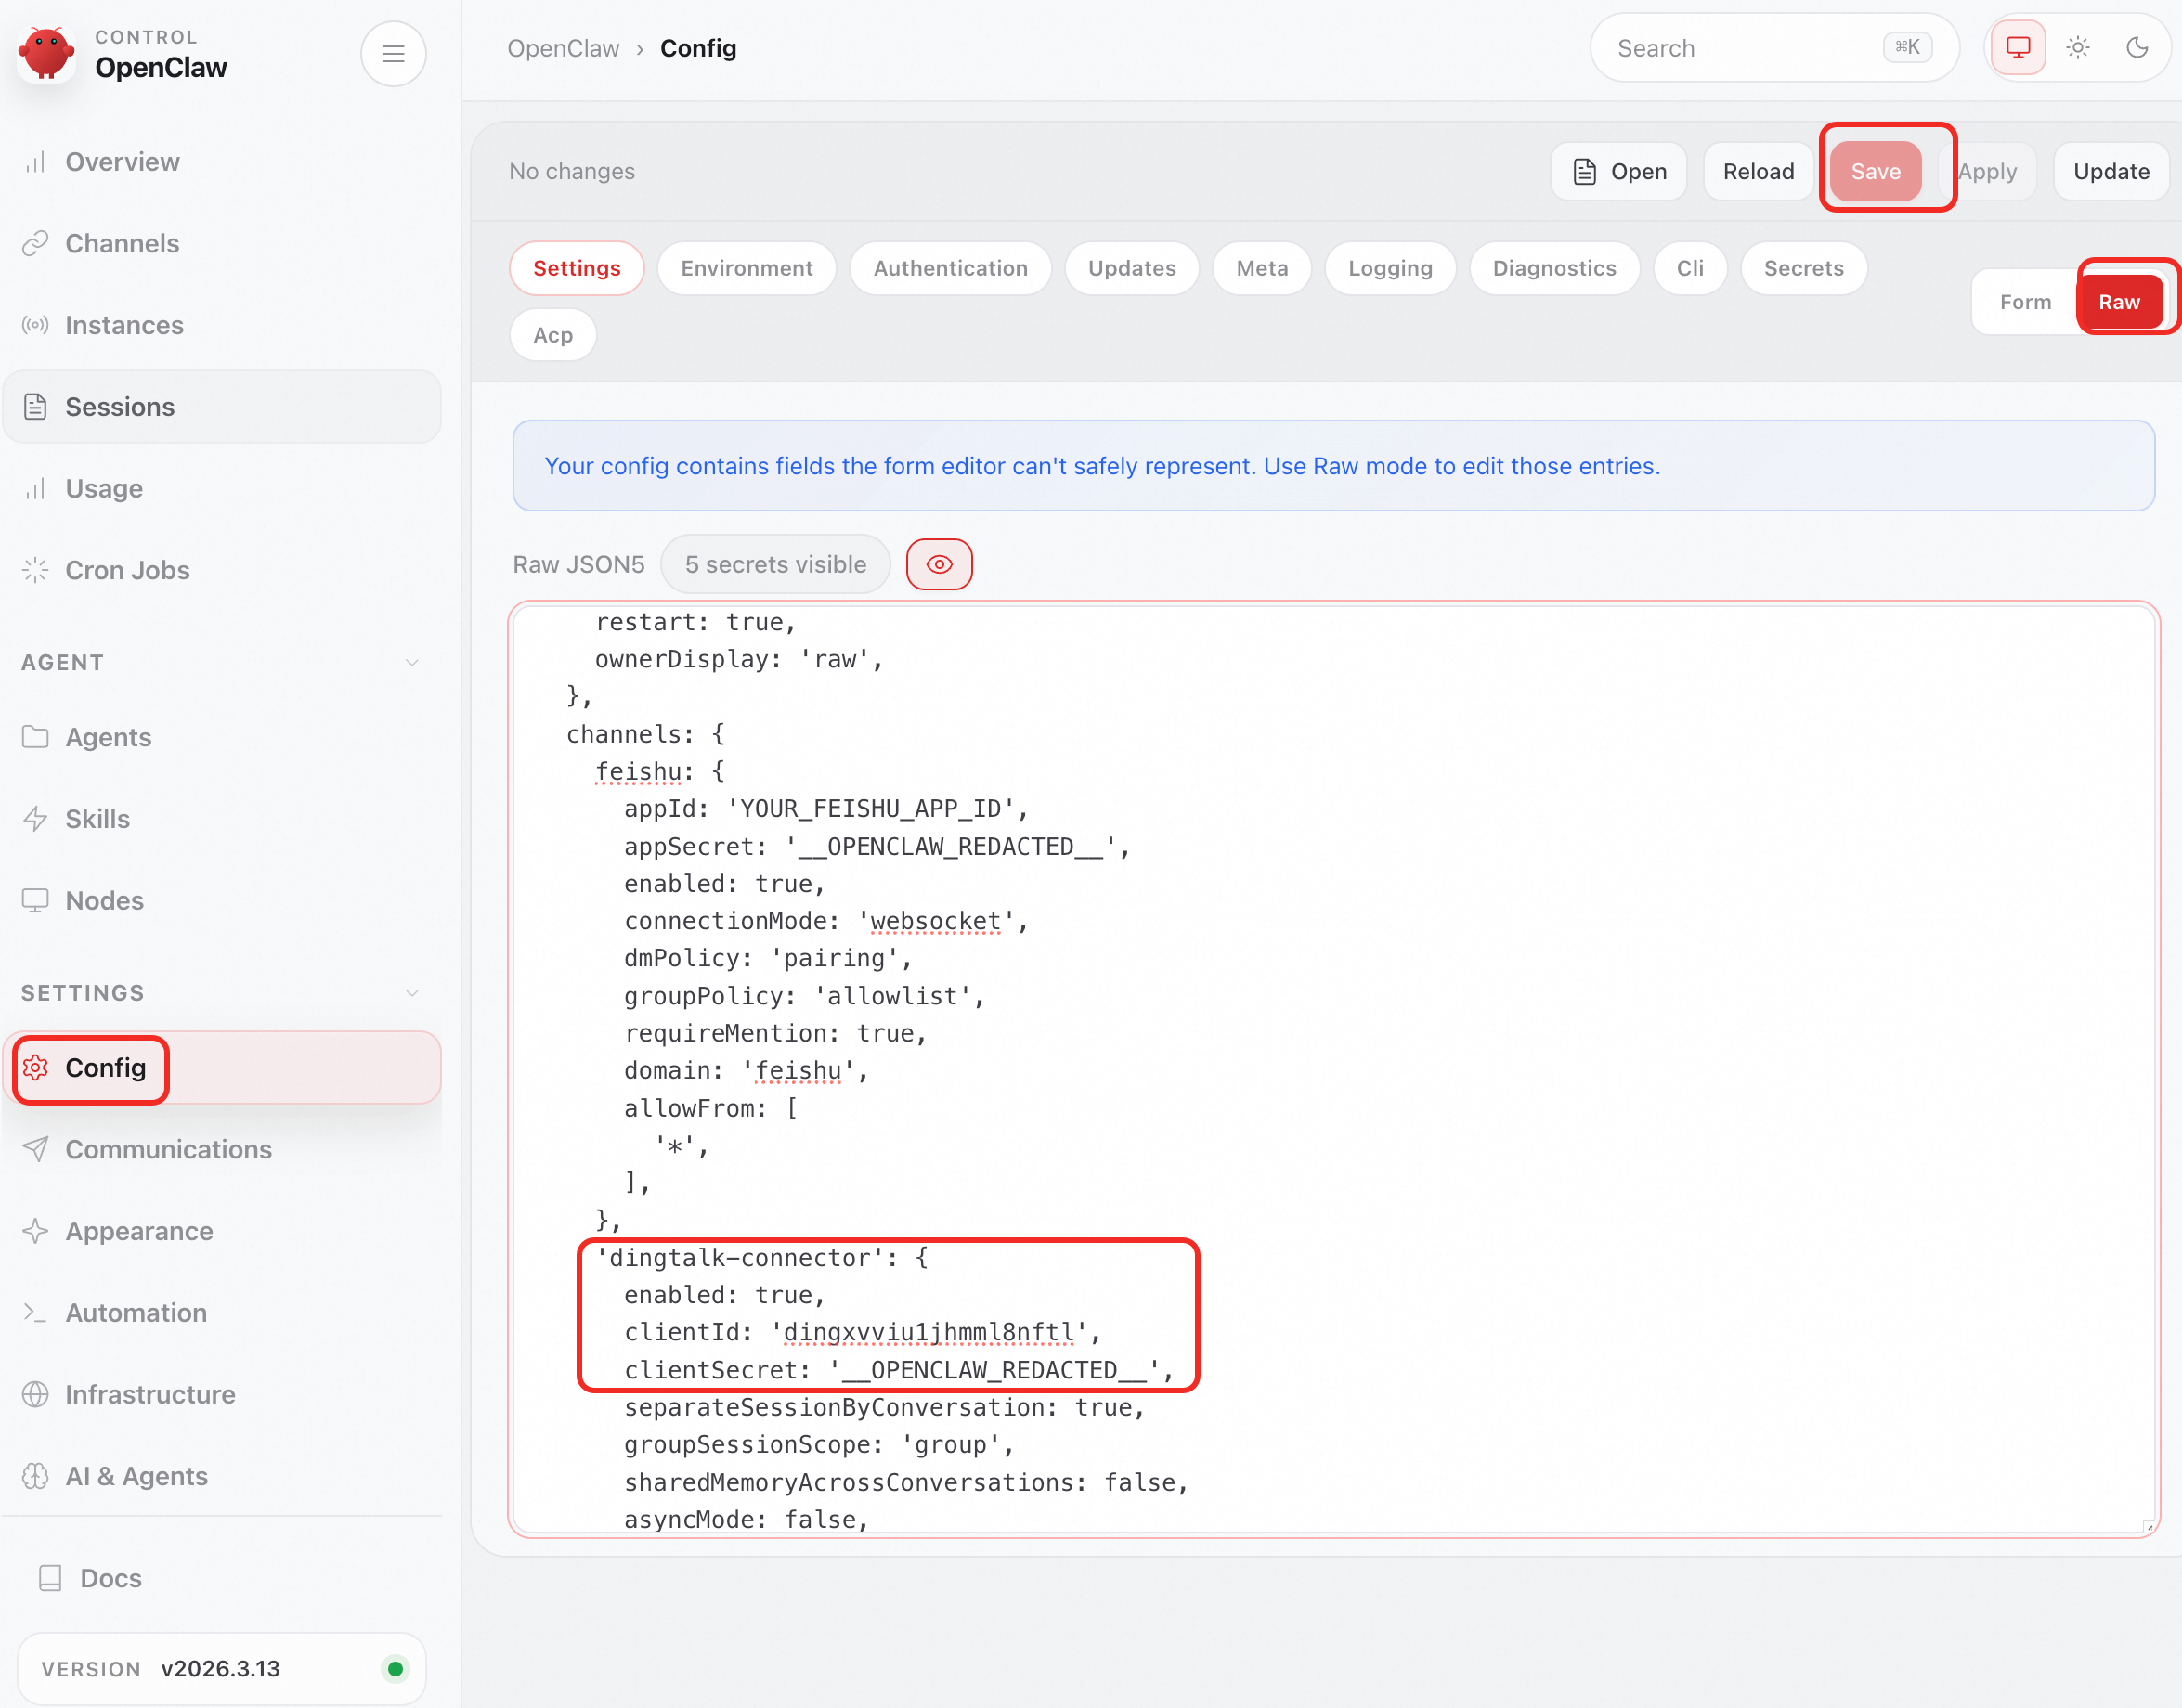
Lark
-
Go to the Lark Open Platform. Click Create Enterprise Self-Built App. Enter an app name and description, select an app icon, and click Create.
-
In the left-side navigation pane, go to the Credentials and Basic Information page. Copy App ID (format:
cli_xxx) and App Secret. -
In the left-side navigation pane, go to the Permission Management page. Click Batch Import/Export Permissions, paste the following JSON configuration, click Next, Confirm New Permissions, and click Request Activation.
-
In the left-side navigation pane, click Add App Capabilities. On the Add by Capability tab, find the Bot card and click Configure.
-
Configure event subscription
-
In OpenClaw WebUI, go to Configuration > RAW. Locate the channels section for feishu, add the App ID and App Secret, and click Save. Note: After saving, the secret is displayed as
__OPENCLAW_REDACTED__.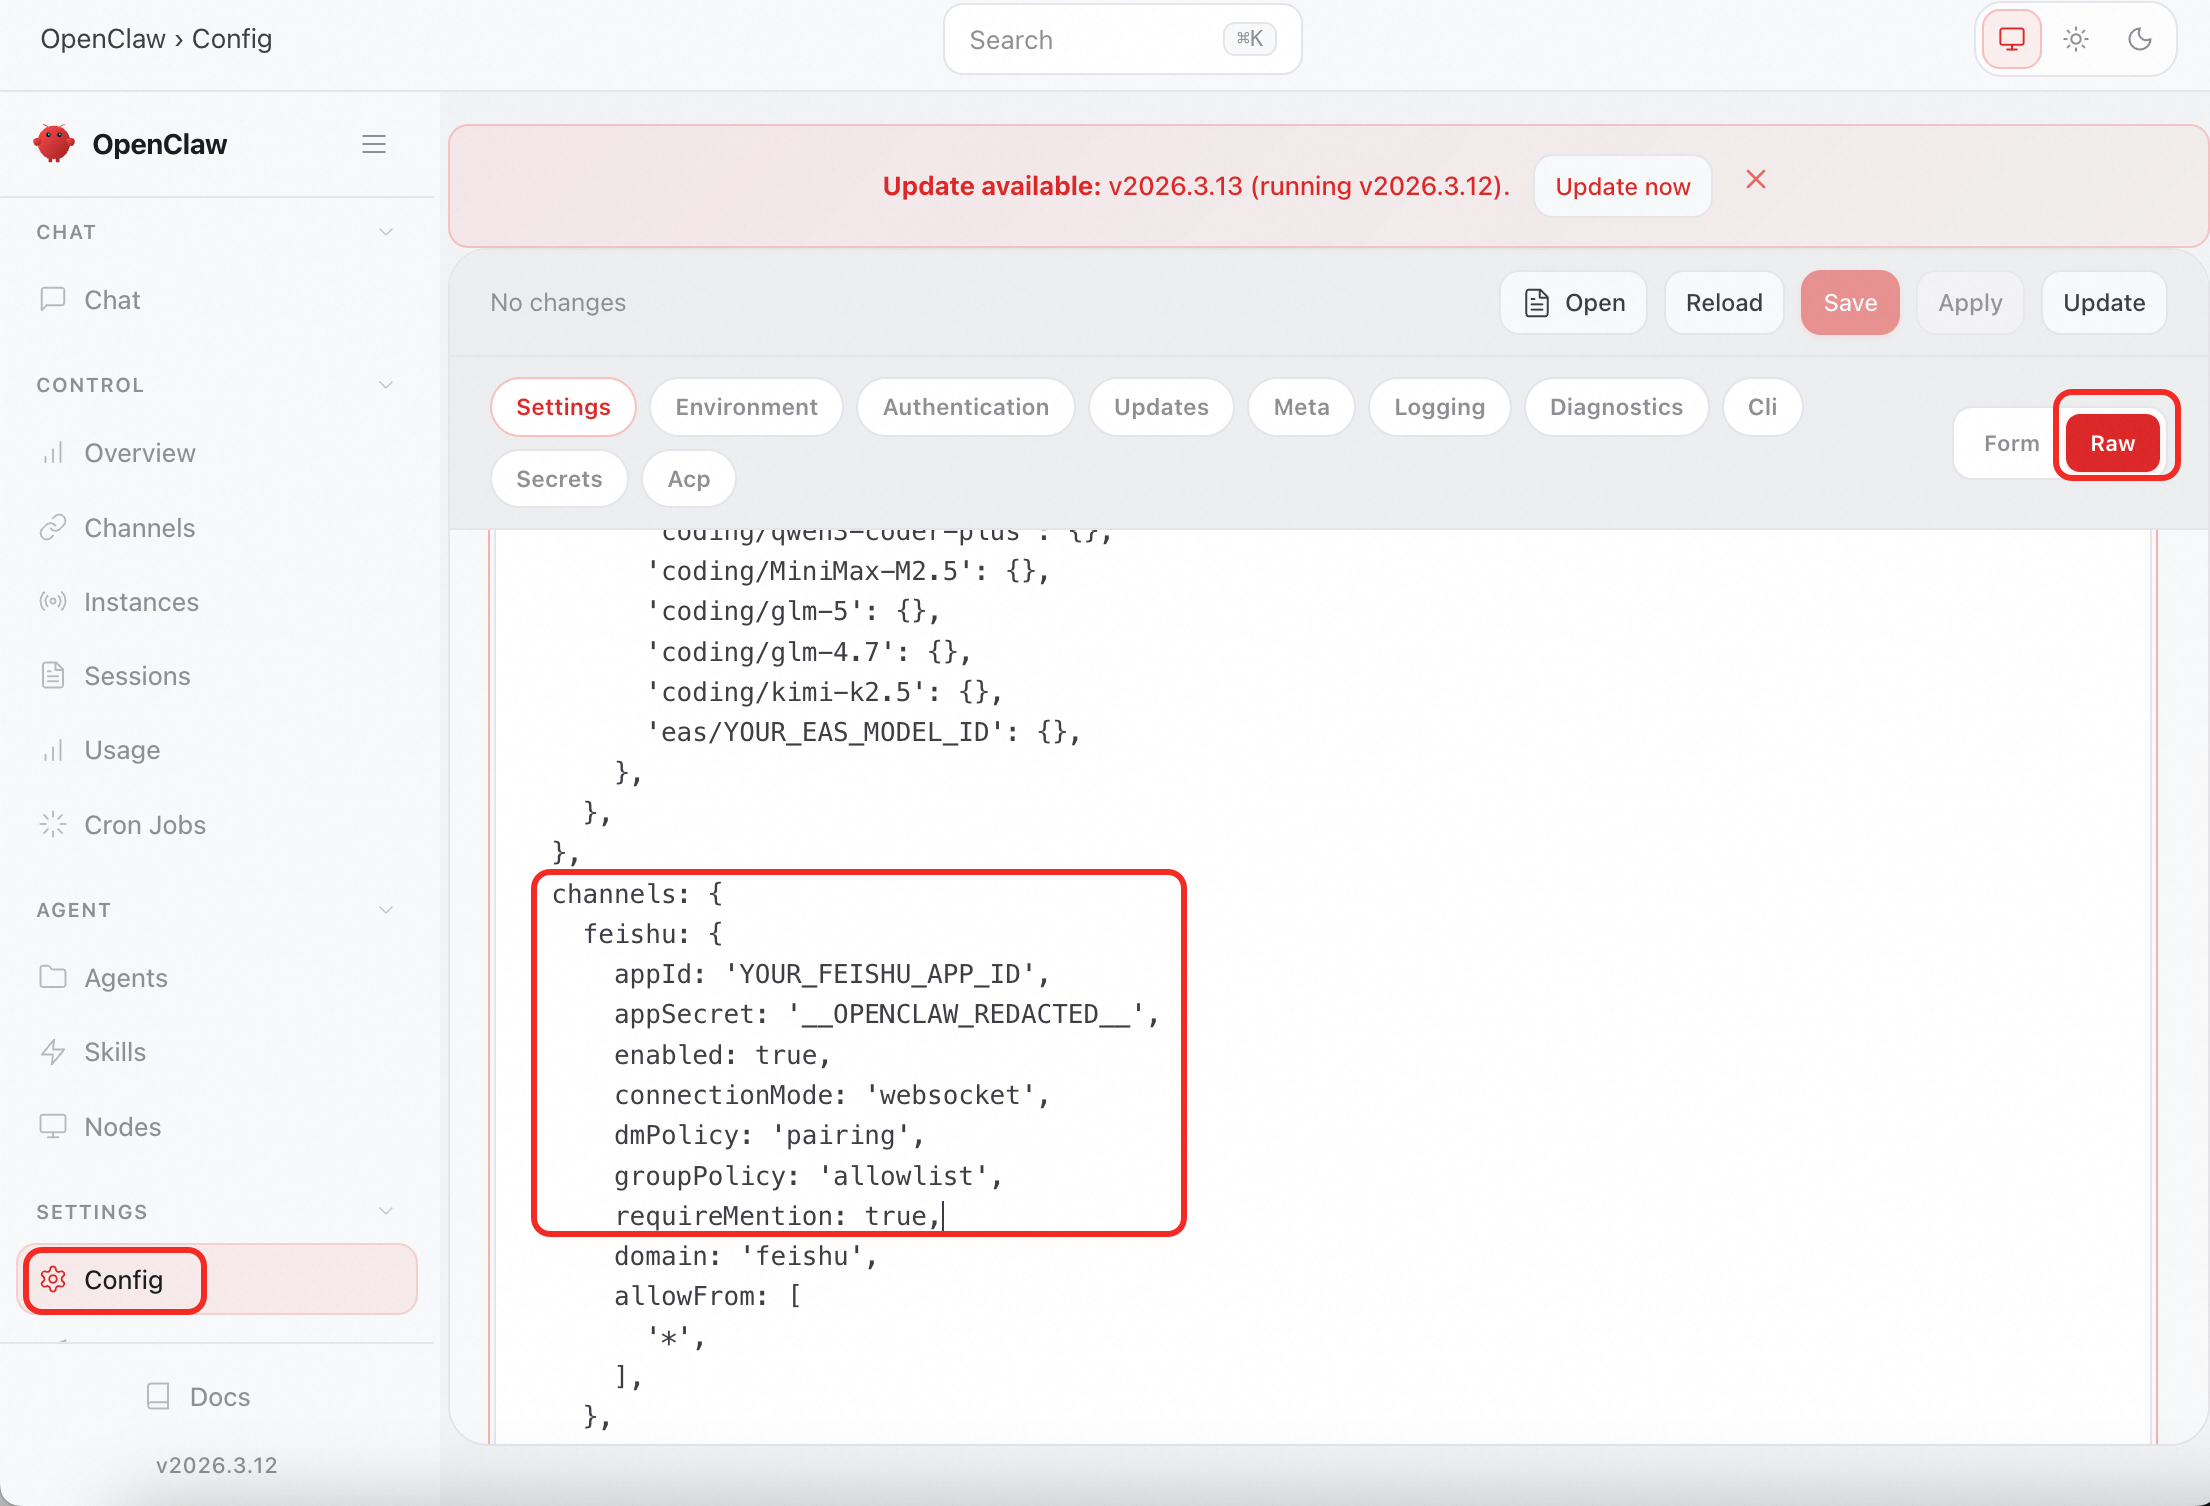
-
On the Lark Open Platform, click Events and Callbacks in the left-side navigation pane. On the Event Configuration tab, for Subscription Method, select Receive Events via Persistent Connection, and then click Save.
-
On the event configuration page, click Add Event, search for the Accept Message event, and click Confirm Add.
-
-
On the Version Management and Publishing page, create a version. Enter Application Version Number and Update Description, click Save, then submit for review and publish.
-
In Workbench, click Add to Favorites, search for the bot, and click Add. Double-click the bot in your favorites to open the chat interface.
WeCom
-
Create a WeCom bot and obtain its
Bot IDandSecret. How to integrate OpenClaw with WeCom. -
In OpenClaw WebUI, go to Configuration > RAW. Add the WeCom configuration to the
channelsblock and replace the botId and secret values with your actual credentials."wecom": { "enabled": true, "botId": "${WECOM_BOT_ID}", // Replace this with your actual content. "secret": "${WECOM_SECRET}", // Replace this with your actual content. "allowFrom": [ "*" ], "dmPolicy": "open" }
Advanced configuration
Configure multiple model providers
In WebUI, go to Configuration > RAW. In the JSON, locate the models block. Under providers, configure multiple model providers:
{
  // Other configurations omitted ...
  models: {
    mode: 'merge',
    providers: {
      dashscope: {},
      codingplan:{},
      eas:{},
    },
   },
}
Configuration examples for common model providers:
Alibaba Cloud Coding Plan
-
baseUrl:
https://coding.dashscope.aliyuncs.com/v1 -
apiKey: Visit the or the Coding Plan page to subscribe to the service and obtain your API key.
providers: {
  codingplan : {
    baseUrl: 'https://coding.dashscope.aliyuncs.com/v1',
    apiKey: '__OPENCLAW_REDACTED__',        // Replace with your actual value
    api: 'openai-completions',
    models: [
      {
        id: 'qwen3.5-plus',
        name: 'qwen3.5-plus',
        reasoning: false,
        input: [
          'text',
          'image',
        ],
        contextWindow: 1000000,
        maxTokens: 65536,
      },
      {
        id: 'qwen3-coder-next',
        name: 'qwen3-coder-next',
        reasoning: false,
        input: [
          'text',
        ],
        contextWindow: 262144,
        maxTokens: 65536,
      },
    ],
  },
},
EAS Model Service
Obtain the endpoint and token of the EAS service. Then configure:
-
baseUrl: URL used to invoke the EAS service. Append
/v1to it. -
apiKey: Token of your EAS service.
    providers: {
      eas: {
        baseUrl: 'http://xxxxxx.cn-hangzhou.pai-eas.aliyuncs.com/api/predict/quickstart_deploy_xxxx/v1/',
        apiKey: '__OPENCLAW_REDACTED__',
        api: 'openai-completions',
        models: [
          {
            id: 'Qwen3.5-27B',
            name: 'Qwen3.5-27B',
            api: 'openai-completions',
            reasoning: false,
            input: [
              'text',
            ],
            cost: {
              input: 0,
              output: 0,
              cacheRead: 0,
              cacheWrite: 0,
            },
            contextWindow: 1000000,
            maxTokens: 65536,
          },
        ],
      },
    },
DashScope
-
baseUrl: Default value is
https://dashscope.aliyuncs.com/compatible-mode/v1. -
apiKey: Enter the API key for the same region as baseUrl.
  models: {
    mode: 'merge',
    providers: {
      dashscope: {
        baseUrl: 'https://dashscope.aliyuncs.com/compatible-mode/v1',
        apiKey: '__OPENCLAW_REDACTED__',    // Replace with your actual value
        api: 'openai-completions',
        models: [
          {
            id: 'qwen3.5-plus',
            name: 'qwen3.5-plus',
            reasoning: false,
            input: [
              'text',
              'image',
            ],
            contextWindow: 1000000,
            maxTokens: 65536,
          },

        ],
      },
    },
  },
Configure default model
In WebUI, go to Configuration > RAW. In the JSON, locate the agents block.
-
agents.defaults.model.primary: Specifies the default model. -
Format:
provider/model, whereprovideris the provider name andmodelis the model ID.
  agents: {
    defaults: {
      model: {
        primary: 'dashscope/qwen3.5-plus',
      },
      models: {
        'dashscope/qwen3.5-plus': {},
        'coding/qwen3-coder-next': {},
        'eas/Qwen3.5-27B': {}
      },
    },
  },