You can integrate AI CAPTCHA in two steps. For example, you can add Click-and-pass verification to the logon page at test.example.com/login.
Step 1: Configure CAPTCHA rules
Configure basic information, such as the URI to be verified and the CAPTCHA type.
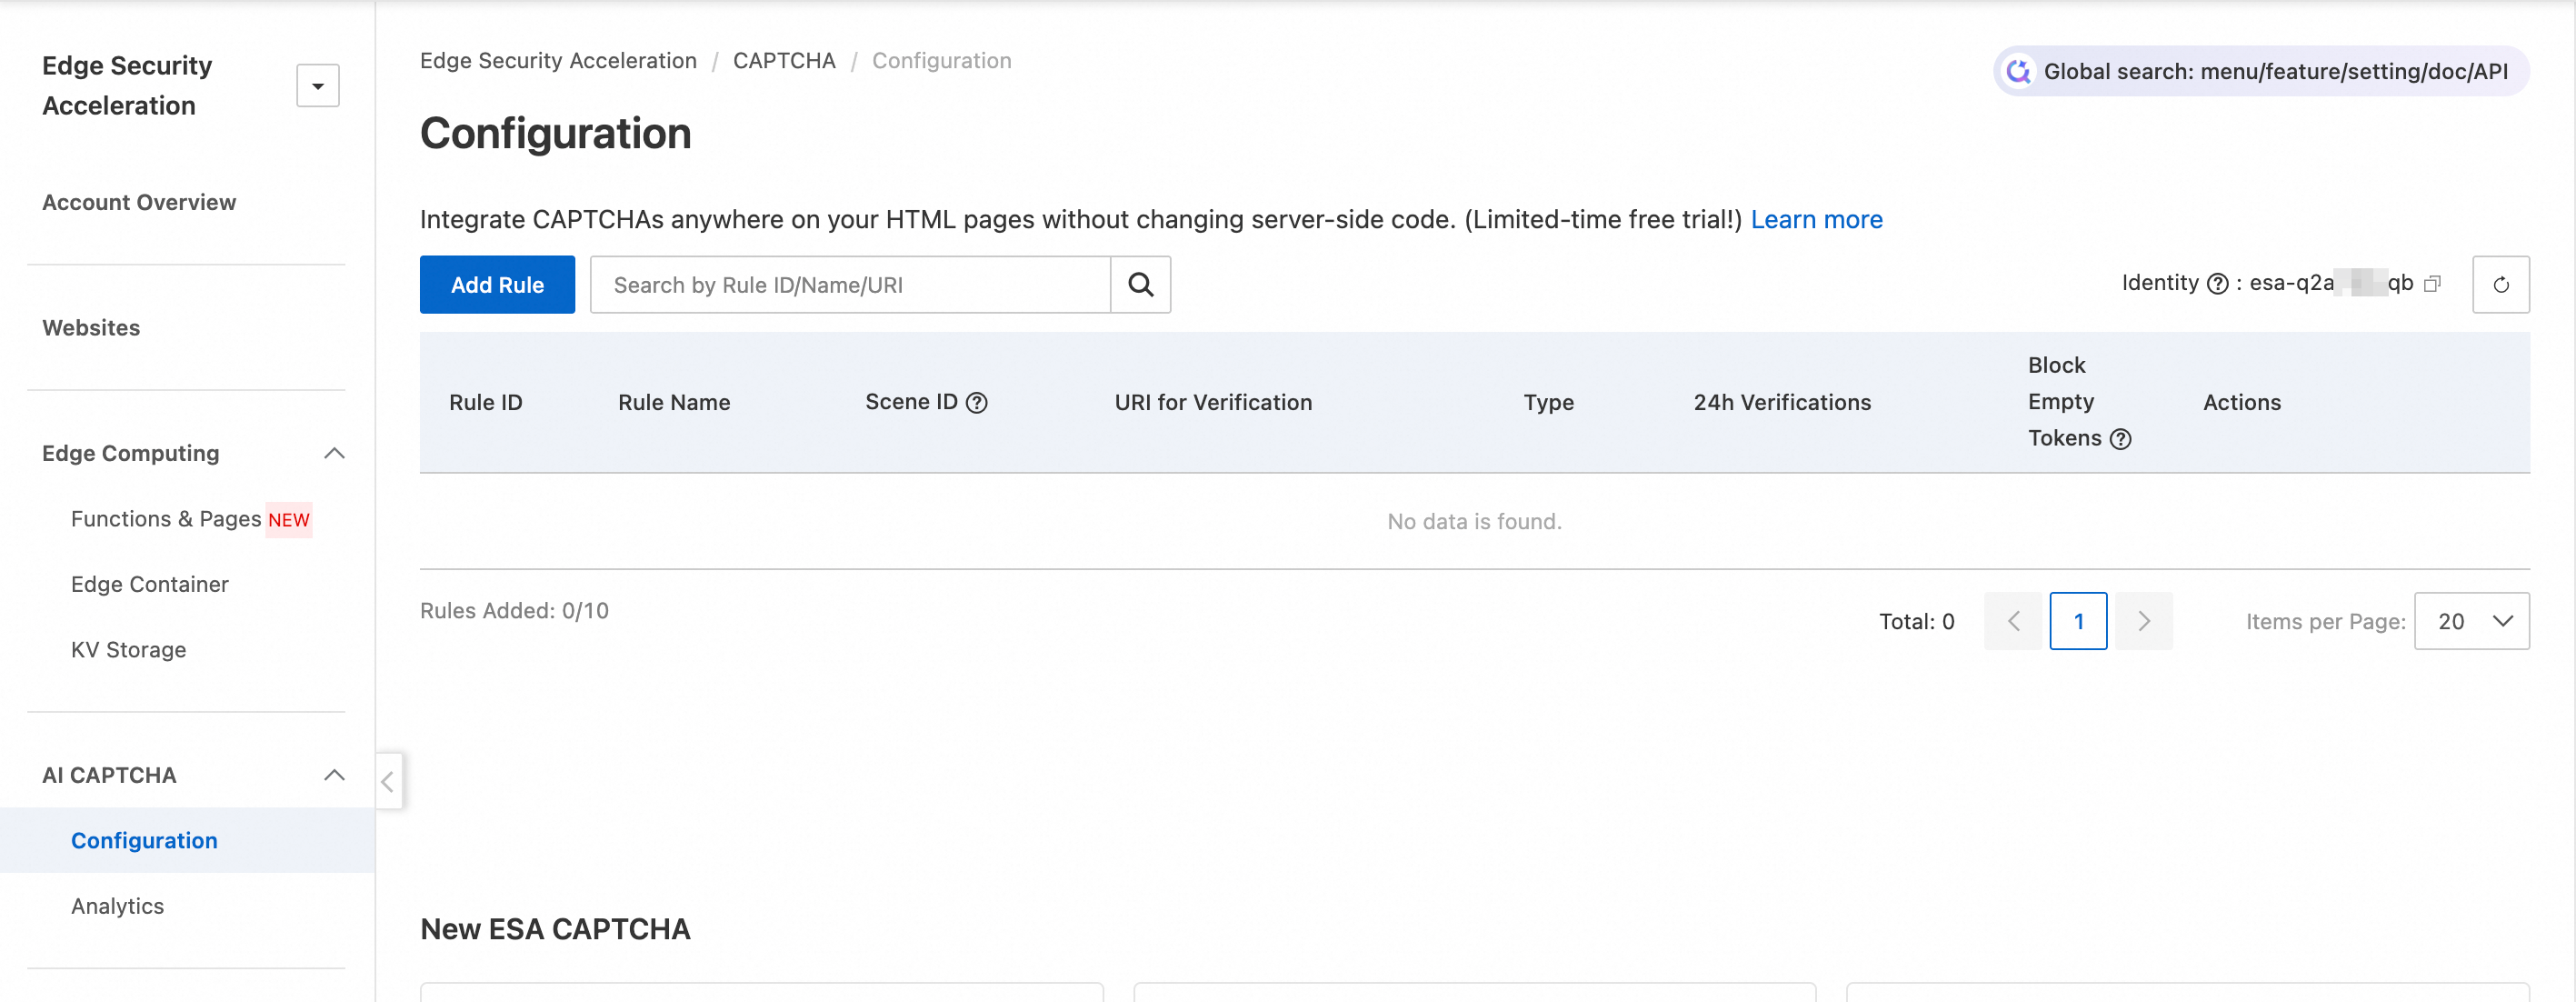
Log on to the ESA console and go to the AI CAPTCHA configuration page.
On the Configuration page, click Add Rule.
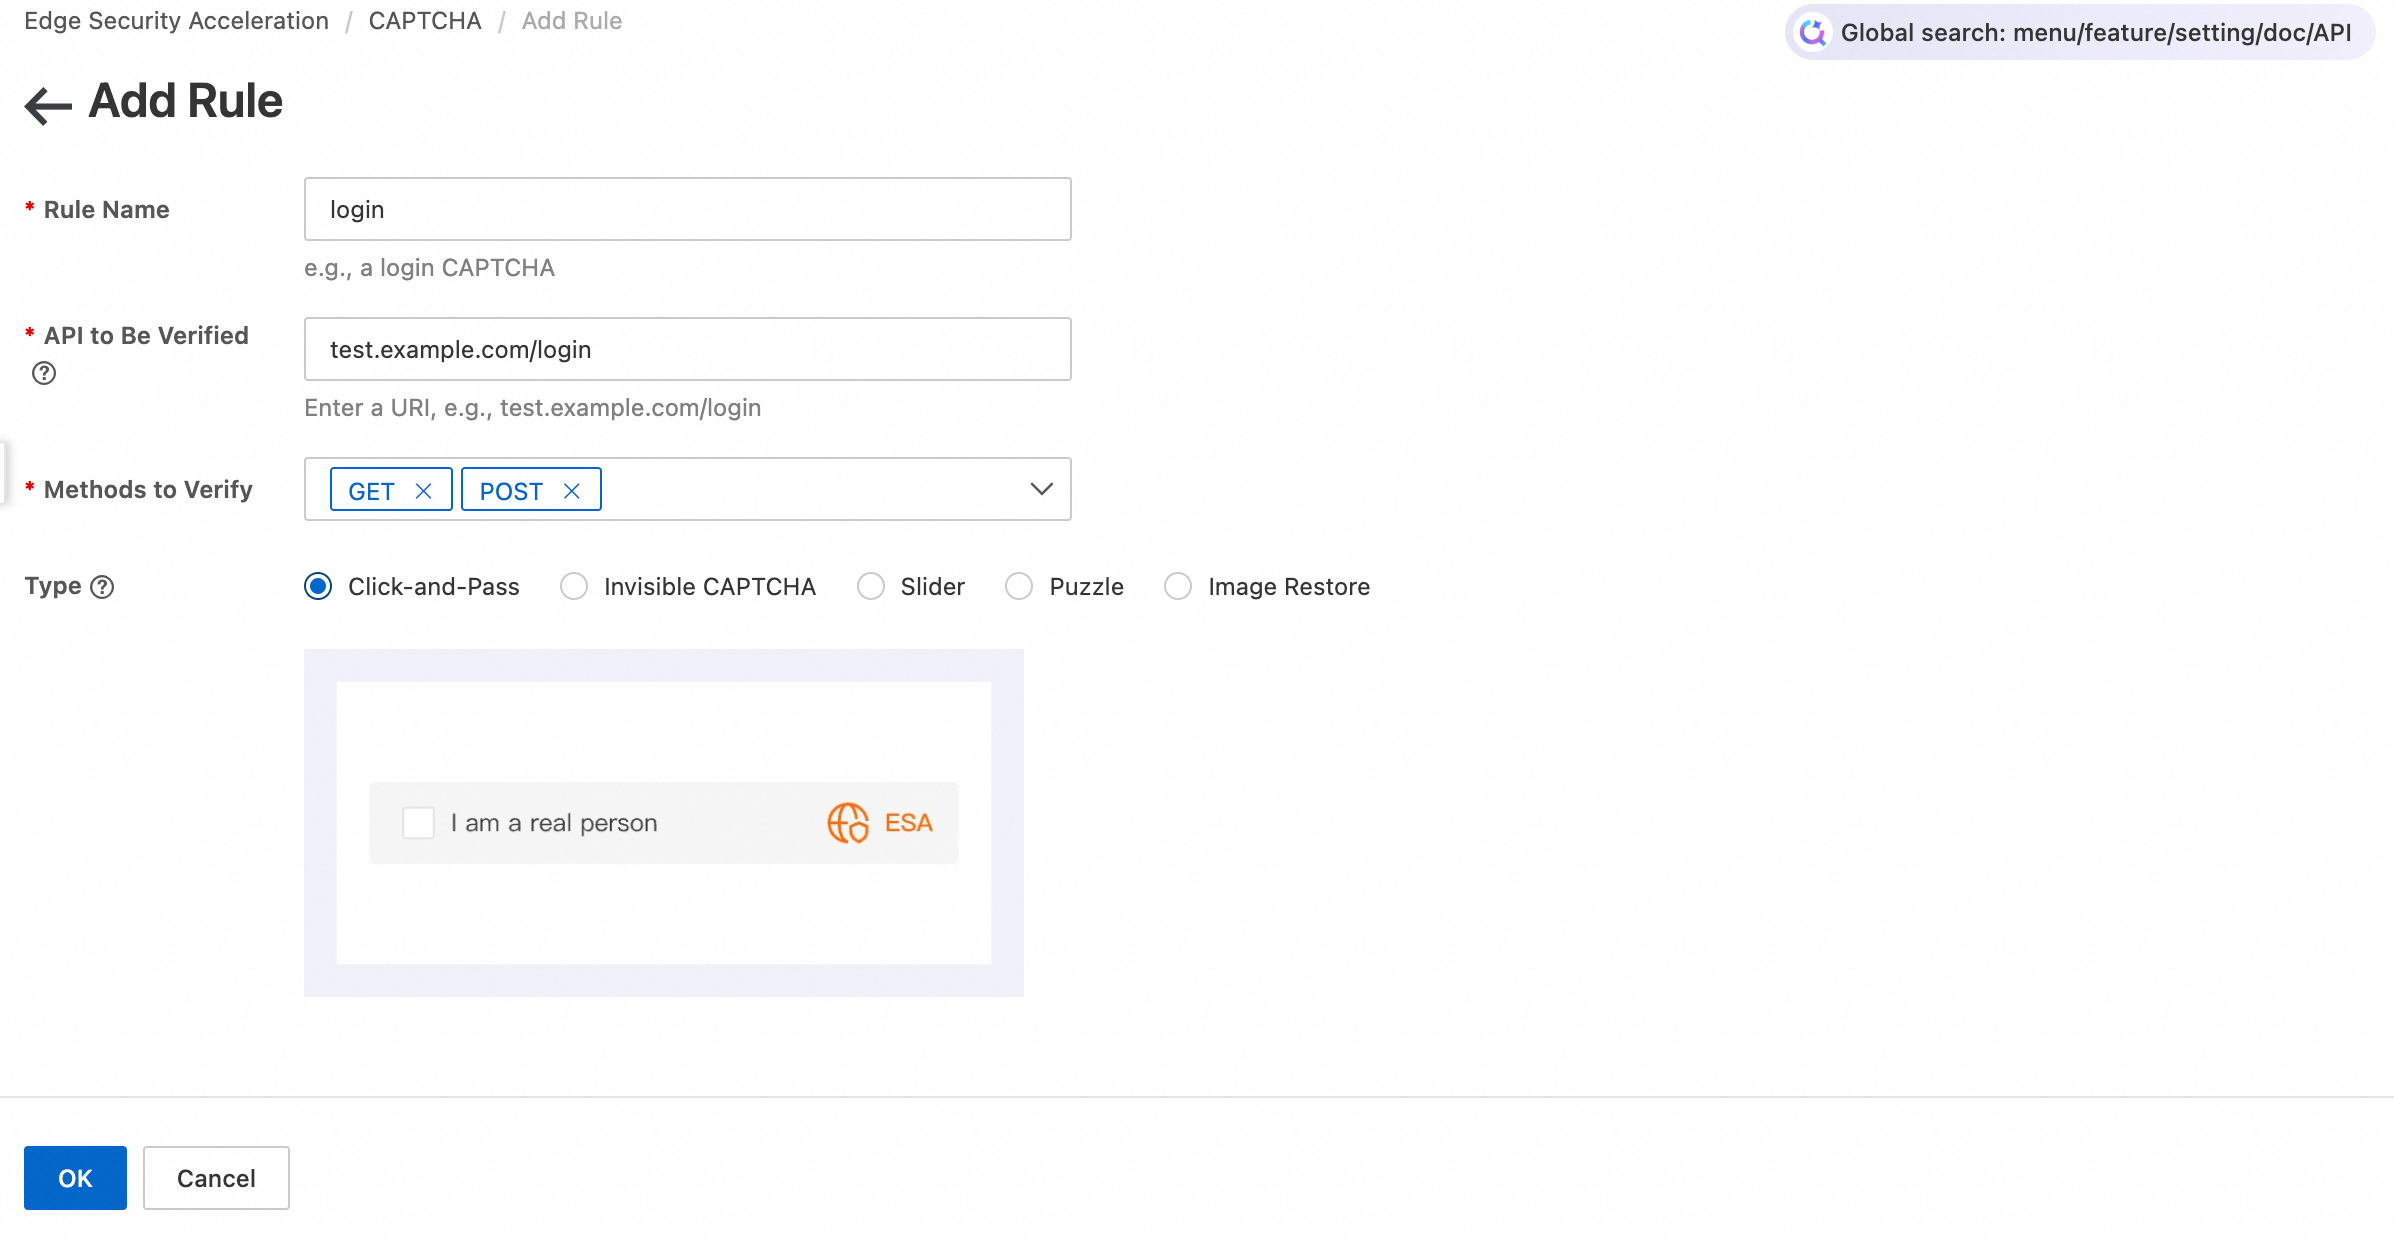
On the Add Rule page, configure the following parameters:
Rule Name: Enter a custom name, such as
login.API to Be Verified: Enter the URI for CAPTCHA integration. For example, enter
test.example.com/login.Methods for Verification: Select the request methods that require CAPTCHA verification, such as
GETandPOST.Type: Select Click-and-Pass.
For more information about other types, see CAPTCHA Types and Selection Suggestions.
Step 2: Integrate frontend code
After you add the validation rule in the console, integrate the CAPTCHA initialization code into the web or H5 page that requires verification. This completes the client-side integration.
Obtain identity verification information
ESA uses the Identity and Scene ID for identity verification. Before adding the frontend code, obtain the following information:
Identity: This value is located in the upper-right corner of the Configuration page.
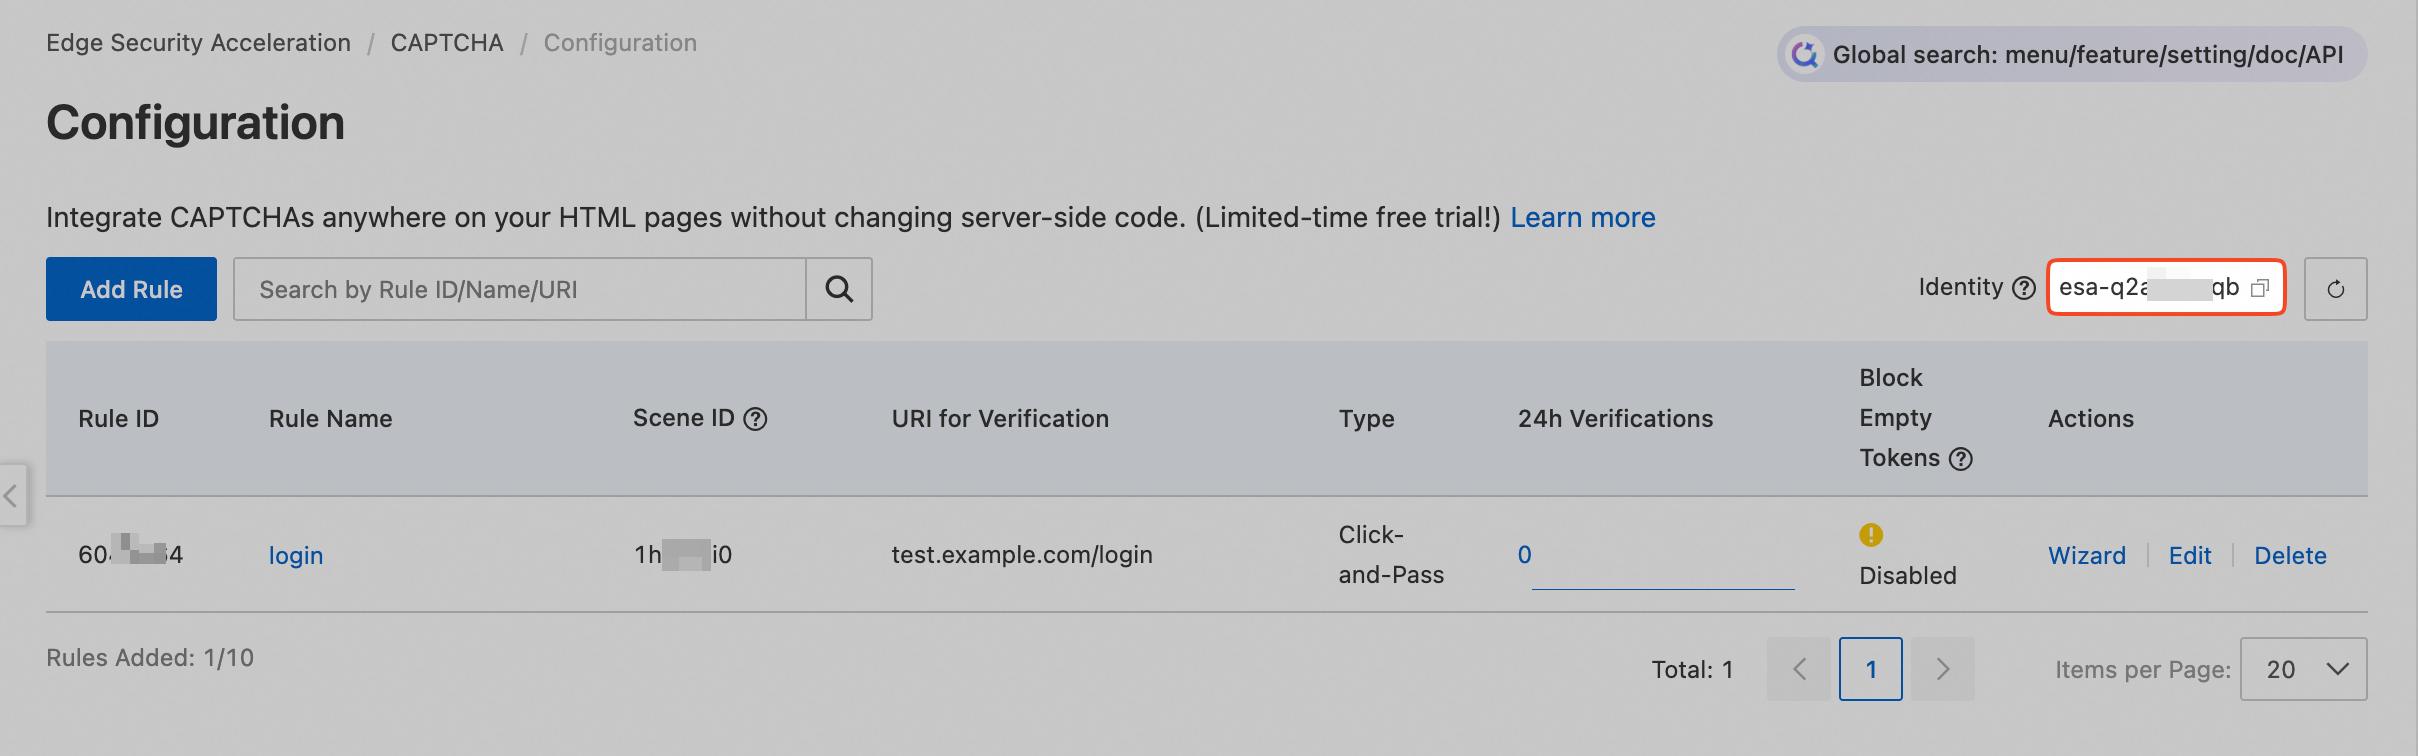
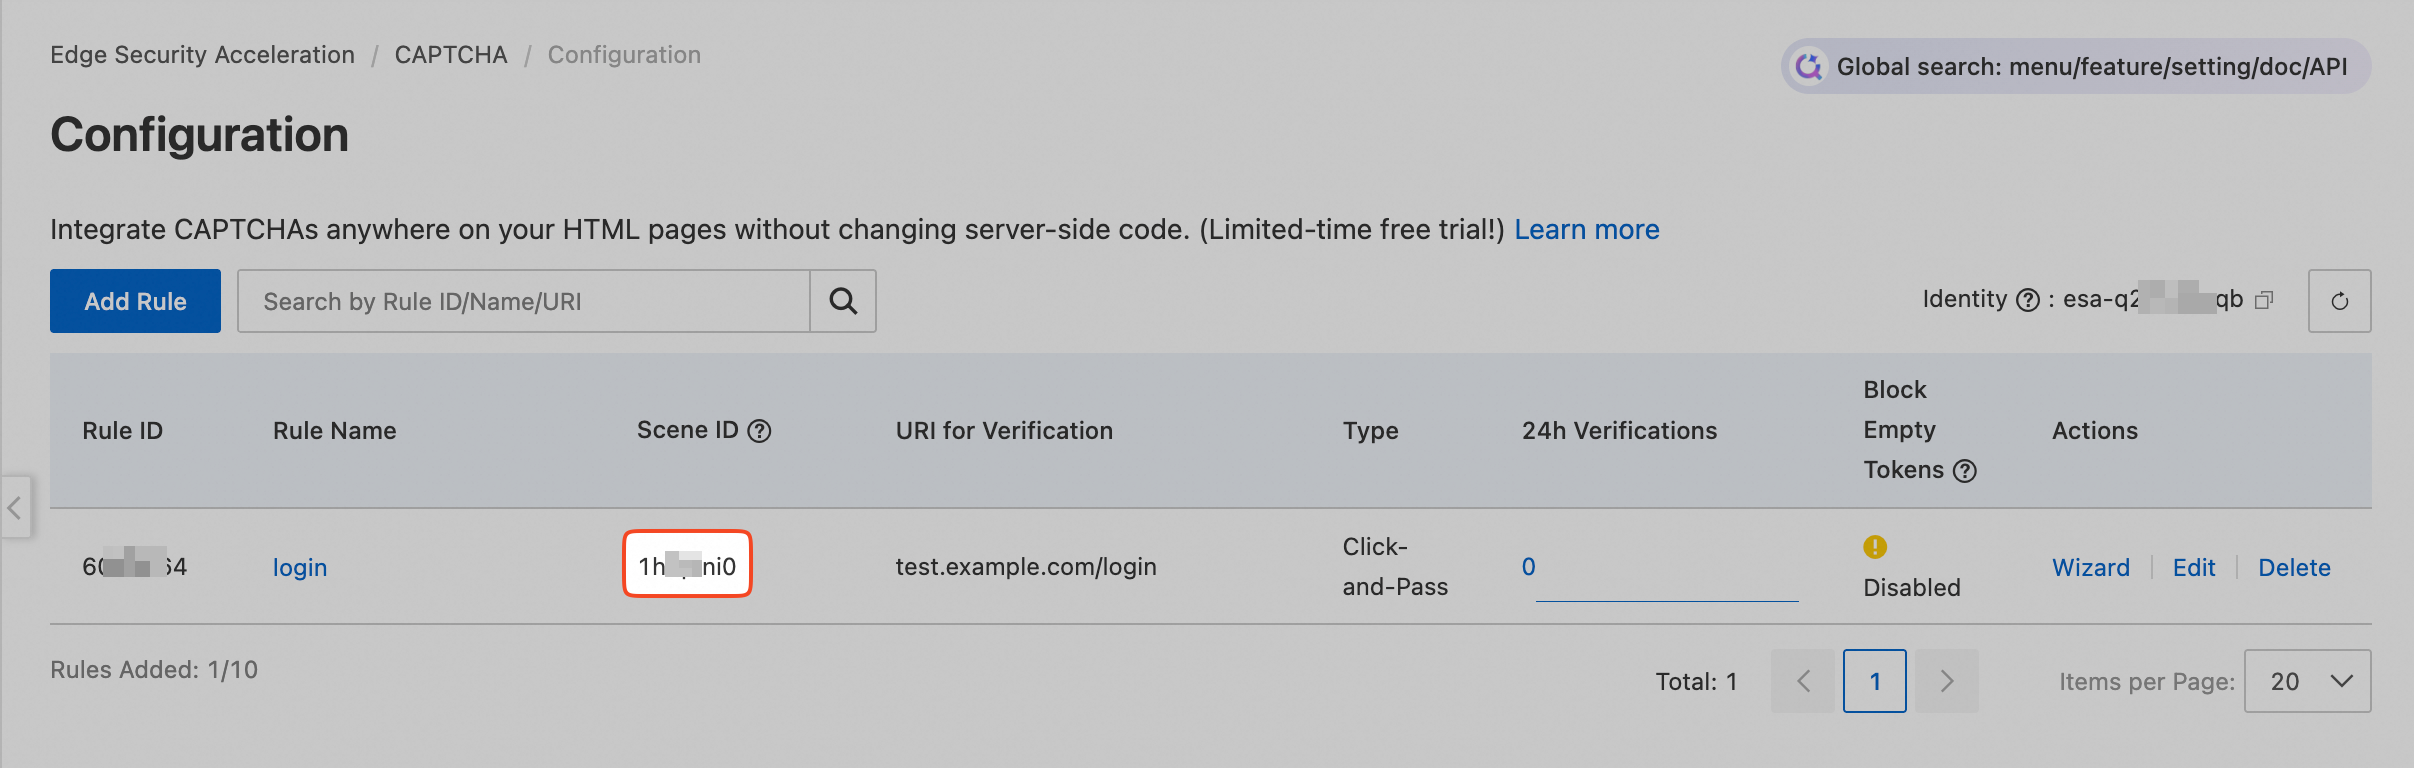
Scene ID: The ID is located in the Scene ID column for the corresponding rule on the Configuration page.
Add script
In the frontend code where you want to add the CAPTCHA, such as login.html, add the following three script segments:
Add the global variable
AliyunCAPTCHAConfig: Add a script that defines the global variableAliyunCAPTCHAConfig, which contains theregionandprefixparameters. Place this script before you include the CAPTCHA JS script or at the top of the HTMLheadtag. For more information about the parameters, see the referenced document.<script> window.AliyunCaptchaConfig = { region: "cn", // Required. Specifies the region where the Captcha example is deployed. Supported regions include the Chinese mainland (cn) and Singapore (sgp). prefix: "<span class="var-span" contenteditable="true" data-var="IDENTITY">IDENTITY</span>", // Required. The identity token. Replace IDENTITY with the identity token that you obtained in the previous step, such as esa-q2*****cqb. }; </script>Dynamically import the CAPTCHA JS: After the
AliyunCAPTCHAConfigvariable script, add a JS script to dynamically import the CAPTCHA. This lets you call the CAPTCHA for verification when your service requires it.NoteYou must dynamically import the CAPTCHA JS. If you use other methods to avoid dynamic loading, such as pulling the JS code for local deployment, the CAPTCHA cannot be updated. This compromises security and may cause incorrect blocking or compatibility issues.
<script
  type="text/javascript"
  src="https://o.alicdn.com/CAPTCHA-frontend/aliyunCAPTCHA/AliyunCAPTCHA.js"
></script>
Add the CAPTCHA initialization method: Call the
initAliyunCAPTCHAinitialization method to initialize the CAPTCHA. For more information, see initAliyunCAPTCHA parameters.NoteDo not call the
initAliyunCAPTCHAinitializer function repeatedly, except in necessary scenarios, such as when initialization parameters change. If the initialization fails, see Client-side initialization errors for troubleshooting.<script type="text/javascript"> var CAPTCHA; window.initAliyunCAPTCHA({...}); </script>
Sample Code
Refer to the following sample code to add the CAPTCHA to your frontend code.
Load the CAPTCHA JS as early as possible. This allows the script to collect more complete environment and device information. The interval between loading the CAPTCHA JS and the verification request must be greater than 2 s.
To ensure that image resources load faster, initialize the CAPTCHA as early as possible. The interval between initialization and the verification request must be greater than 2 s. This allows the related CAPTCHA resources to be loaded in advance, which speeds up image loading.
In the client's source code, create placeholder elements for the CAPTCHA. These are the Document Object Model (DOM) elements specified by the
elementandbuttonparameters, such as<div id="CAPTCHA-element"></div>in the following example.
<!doctype html>
<html>
  <head>
    <meta charset="utf-8" />
    <meta name="data-spm" />
    <!--1. Before the script that imports the Alibaba Cloud CAPTCHA JS, or at the very beginning of the HTML head tag, add a script. This script saves a global variable named AliyunCAPTCHAConfig that contains the region and prefix parameters.-->
    <script>
      window.AliyunCAPTCHAConfig = {
        region: "cn",
        prefix: "{{IDENTITY}}",
      };
    </script>
    <!--2. Integrate the main JS.-->
    <script
      type="text/javascript"
      src="https://o.alicdn.com/CAPTCHA-frontend/aliyunCAPTCHA/AliyunCAPTCHA.js"
    ></script>
  </head>

  <body>
    <div id="CAPTCHA-element"></div>
    <!--A reserved element for the CAPTCHA. This is used to configure the element parameter in the initializer function.-->
    <button id="button" class="btn">Log on</button>
    <!--In pop-up mode, this is the element that triggers the CAPTCHA pop-up window.-->
    <!--3. Create a new <script> tag to call the CAPTCHA initializer function initAliyunCAPTCHA.-->
    <script type="text/javascript">
      var CAPTCHA;
      window.initAliyunCAPTCHA({
        SceneId: "{{SCENE_ID}}",  // The scene ID. After you create a verification scenario in Step 2, you can obtain the scene ID from the CAPTCHA scenario list.
        mode: "popup",  // The CAPTCHA mode. popup indicates the pop-up mode. embed indicates the embedded mode. You do not need to modify this.
        // The reserved element on the page for rendering the CAPTCHA. This must be consistent with the reserved page element in the original code.
        element: "#CAPTCHA-element",
        button: "#button",  // The ID of the element that triggers the CAPTCHA pop-up window or no-CAPTCHA verification.
        // The callback function for successful CAPTCHA verification.
        success: function (CAPTCHAVerifyParam) {
          // The input parameter is CAPTCHAVerifyParam for signature verification.
          // 1. Send a service request to the backend (that is, ESA) to perform signature verification on CAPTCHAVerifyParam.
          // 2. Process the service based on the verification result.
          // 3. If the service requires re-verification, call the initAliyunCAPTCHA initializer function to re-initialize the CAPTCHA.
          console.log('SUCCESS'); // Print SUCCESS to the console.
        },
        // The callback function for failed CAPTCHA verification.
        fail: function (result) {
          // The input parameter contains information about the failure.
          // Within the normal validity period, no action is required. The CAPTCHA automatically refreshes for re-verification.
          console.error(result);
        },
        // The callback function to attach the CAPTCHA instance. This callback is invoked after the CAPTCHA is successfully initialized.
        getInstance: function (instance) {
          CAPTCHA = instance;
        },
        // Specifies the service domain names for ESA. You do not need to change this.
        server: ['CAPTCHA-esa-open.aliyuncs.com', 'CAPTCHA-esa-open-b.aliyuncs.com'],
        // The style of the trigger box for Slider and Click-and-pass verification types. You can customize the width and height in px.
        slideStyle: {
          width: 360,
          height: 40,
        },
        // ...For other parameters, see the initAliyunCAPTCHA parameter description.
      });
    </script>
  </body>
</html>
When you call the success: function (CAPTCHAVerifyParam) callback, the client sends a request to ESA that includes the CAPTCHAVerifyParam signature verification parameter. You can place CAPTCHAVerifyParam in the request parameters or the request header. For more information, see the following examples:
Signature verification parameter as a URI parameter
async function CAPTCHAVerifyCallback(CAPTCHAVerifyParam) {
    // 1. Send a service request to ESA to obtain the CAPTCHA verification result and the business result.
    const result = await fetch('${Business verification URI (the URI configured for CAPTCHA in the ESA console)}?CAPTCHA_verify_param=' + CAPTCHAVerifyParam, {
        method: 'POST',
        headers: { 'Content-Type': 'application/json'},
        body: JSON.stringify({
            // Custom business parameters
            //BizParam:
        }),
        credentials: 'include'
    });
    const verify_code = result.headers.get('X-CAPTCHA-Verify-Code')
    if (verify_code === 'T001') {
        alert('CAPTCHA verification passed!');
    } else {
        alert('CAPTCHA verification failed: ', verify_code)
    }
    CAPTCHA.refresh()
    const data = await result.json()
    return data
}
Signature verification parameter as a Header value
async function CAPTCHAVerifyCallback(CAPTCHAVerifyParam) {
    // 1. Send a service request to ESA to obtain the CAPTCHA verification result and the business result.
    const result = await fetch('${Business verification URI (the URI configured for CAPTCHA in the ESA console)}', {
        method: 'POST',
        headers: { 'Content-Type': 'application/json', 'CAPTCHA-verify-param': CAPTCHAVerifyParam},
        body: JSON.stringify({
            BizParam: document.getElementById('biz_result').value
        }),
        credentials: 'include'
    });
    const verify_code = result.headers.get('X-CAPTCHA-Verify-Code')
    if (verify_code === 'T001') {
        alert('CAPTCHA verification passed!');
    } else {
        alert('CAPTCHA verification failed: ', verify_code)
    }
    CAPTCHA.refresh()
    const data = await result.json()
    return data
}
After server-side signature verification, ESA returns the reason code x-CAPTCHA-verify-code in the response header. Your client can process the request based on whether the verification succeeded or failed:
Reason Code | Cause |
T001 | Verification passed. |
F003 | Failed to parse |
F005 | The scene ID ( |
F017 | The content of |
F018 | The signature verification data was reused. |
F019 | Signature verification timed out (valid for 90 seconds) or was performed before verification was initiated. |
F020 | The signature verification ticket does not match the scene ID or user. |
F021 | The |
References
AliyunCAPTCHAConfig Parameter Description
Parameter | Type | Required | Default | Description |
region | String |
| The region where the CAPTCHA instance is located. Valid values:
The CAPTCHA product has control planes in the Chinese mainland (China (Shanghai)) and Singapore. Based on the call parameters you configure, behavioral data, device data, and other data collected by the client are sent to the corresponding center for processing. This is mainly for security authentication. | |
prefix | String | None | The identity of the CAPTCHA. |
initAliyunCAPTCHA Parameter Description
Parameter | Type | Required | Default | Description |
SceneId | String | None | The CAPTCHA scene ID. | |
mode | String | None | The CAPTCHA mode. Options:
| |
element | String | None | The reserved element on the page for rendering the CAPTCHA. This must be consistent with the reserved page element in the source code. | |
button | String | None | The element that triggers the CAPTCHA pop-up window or no-CAPTCHA verification. When clicked, it displays the CAPTCHA or triggers no-CAPTCHA verification. The value must be the same as the | |
success | Function | None | The callback function for successful CAPTCHA verification. This function exposes the verification parameter. In this callback function, the client can obtain the | |
fail | Function | None | The callback function for failed CAPTCHA verification. This function exposes the failure error code. | |
getInstance | Function |
| The callback function to attach the CAPTCHA instance. This callback is invoked after the CAPTCHA is successfully initialized. It must be written as follows: | |
slideStyle | Object |
| The style of the trigger box for Slider and Click-and-pass verification types. You can customize the width and height in px. This parameter is compatible with historical parameter names. Note:
| |
language | String |
| The language supported by the CAPTCHA:
| |
timeout | Number |
| The timeout period for a single CAPTCHA initialization request, in milliseconds. | |
rem | Number |
| Scales the entire CAPTCHA UI. Enter a positive number. For example, rem parameter is mainly for mobile browsers. | |
onError | Function | None | The error callback function for failed or timed-out CAPTCHA initialization requests and resource loading. It must be written as follows: | |
onClose | Function | None | The callback function that is triggered when the CAPTCHA pop-up window is closed. | |
showErrorTip | Boolean | true | Specifies whether to display an error tip for access exceptions when the network quality is poor. | |
delayBeforeSuccess | Boolean | true | Specifies whether to delay triggering the |
Notes on Invoking CAPTCHA in No-CAPTCHA Mode
You can call the corresponding methods for the CAPTCHA instance. The following methods are not supported for the initial verification in incognito mode.
Method Name | Description | Example | Scenario |
show | Shows the CAPTCHA element and mask. |
| Use this when you need the CAPTCHA pop-up to appear automatically without a button click. |
hide | Hides or closes the CAPTCHA element and mask. |
| Use this when you need the CAPTCHA pop-up to close automatically without a button click. |