Use Secure Access Service Edge (SASE) to enforce zero-trust access to Alibaba Cloud Bastionhost, replacing traditional approaches that require opening inbound ports or managing SSH keys directly.
How it works
Traditional remote access to Bastionhost requires exposing a public endpoint or maintaining SSH keys on individual servers — both of which create ongoing security and operational overhead.
SASE removes this burden by establishing a secure private tunnel between the SASE gateway and the VPC (Virtual Private Cloud) where Bastionhost resides. All traffic flows through this tunnel, so Bastionhost never needs to expose public endpoints.
Before traffic reaches Bastionhost, SASE applies zero-trust policies tied to your organization's identity source. Only users in authorized groups — on compliant devices — can access the internal application. SASE logs every access attempt for audit purposes.
Prerequisites
Before you begin, ensure that you have:
An active SASE subscription. If you haven't activated SASE, purchase the service or apply for a 7-day free trial
Enabled the private O&M portal on Bastionhost and configured the security group to allow access to it
Step 1: Configure an identity source
Identity sources authenticate your employees when they log on to the SASE App. SASE supports LDAP, DingTalk, WeCom, Lark, IDaaS, and custom identity sources. If your organization uses multiple systems, configure each one separately.
The following steps use a custom identity source as an example.
Log on to the SASE console.
In the left navigation pane, choose Identity Authentication > Identity Access.
On the Identity synchronization tab, find Custom IdP and click Edit. Follow the wizard to complete the configuration.
For detailed configuration options, see Configure an SASE identity source.
Step 2: Configure a user group
Zero-trust policies apply to user groups. Create a user group that represents the employees who need access to Bastionhost.
In the left navigation pane, choose Identity Authentication > Identity Access.
On the User Group Management tab, click Create User Group.
In the Create User Group panel, fill in Organizational Structure, Account Name, Email Address, Mobile Phone Number, and any other required fields. Click OK.
For details, see Configure a user group.
Step 3: Install and log on to the SASE App
Log on to the SASE console.
In the left navigation pane, click Settings.
On the Download Client tab, download and install the client for your operating system.
Open the SASE App, enter the corporate identity, and click Confirm.
Select the configured corporate identity source, then enter your username and password or scan the QR code to log on.
Step 4: Establish network connectivity
Connect SASE to the VPC where Bastionhost resides. The steps differ depending on whether your VPC is associated with a Cloud Enterprise Network (CEN) instance.
Log on to the SASE console.
In the left navigation pane, choose Private Access > Network Settings.
Follow the instructions for your network configuration:
CEN associated
On the Network Settings page, go to Services on Alibaba Cloud > CEN Instance to view the network resources synchronized by SASE.
Parameter Description CEN Instance ID/Name All CEN resources under the current management account and added member accounts Account The account to which the CEN instance belongs Back-to-origin Address The origin URL for the SASE gateway and CEN. For Bastionhost resources in a VPC associated with a CEN instance, a security group policy that allows the origin URL is automatically added. For resources such as Virtual Border Routers (VBRs) and Smart Access Gateways (SAGs) associated with the CEN instance, if an access control list (ACL) policy already exists, you must allow the origin URL manually Find the CEN instance or a VPC connected to it, then turn on the Network Connection switch. Choose one of the following methods:
Turn on Network Connection for a CEN instance: Establishes a back-to-origin link between the SASE gateway and all network resources connected to the CEN instance. SASE verifies access traffic based on zero-trust policies and forwards it to the destination. All CEN-connected VPCs become accessible to SASE App users. When you turn on Network Connection, SASE prompts you to select a VPC for back-to-origin traffic.
 After you select a back-to-origin VPC, SASE displays the back-to-origin VPC and the back-to-origin address automatically assigned to it. The system adds a security group rule allowing this address for any ECS instance in a VPC connected to the CEN instance. Previously configured back-to-origin addresses for your VPC, VBR, and SAG instances are automatically released.
Turn on Network Connection for a specific VPC connected to the CEN instance: Only the selected VPC is accessible to SASE App users. Other CEN-connected VPCs remain unaffected.

CEN not associated
On the Network Settings page, go to Services on Alibaba Cloud > VPCs (No CEN Instances Associated) to view the business resources synchronized to SASE.
Parameter Description Instance ID/Name The ID and name of the VPC. VPCs within the management account and added member accounts of your resource directory are displayed Owner Account The account to which the VPC belongs Region The region where the VPC resides VPC CIDR Block The CIDR block of vSwitches in the VPC Find the target VPC and turn on the Network Connection switch. After you turn on the switch, SASE displays the back-to-origin address assigned to the VPC. This is the IP address the SASE gateway uses to reach the origin server. A security group policy allowing this address is automatically added to the security group attached to Bastionhost.

Step 5: Create an internal application
Register your Bastionhost instance as an internal application in SASE. Employees can only access applications registered through the SASE App.
Log on to the SASE console.
In the left navigation pane, choose Private Access > Application Management.
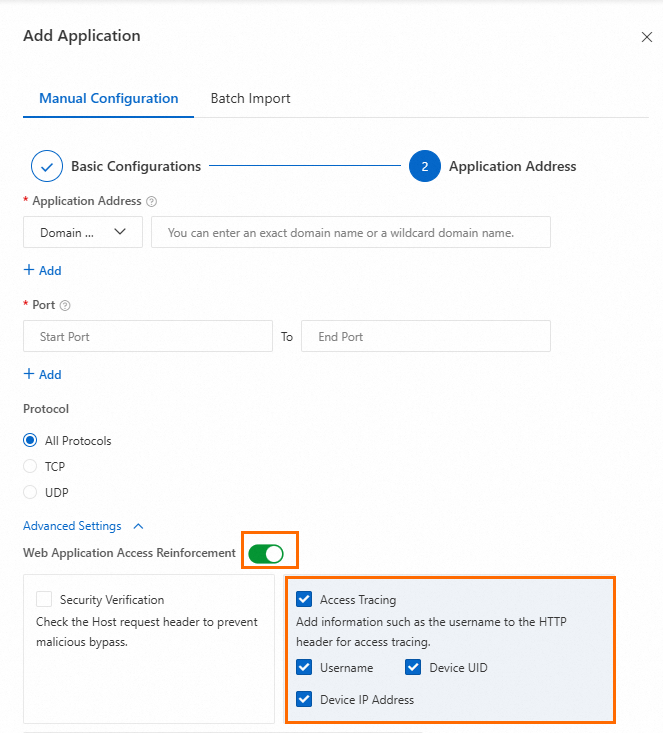
Click Add Application. In the Add Application panel, go to the Manual Configuration tab and configure the following parameters.
Parameter Description Example Application Name The name of the application. Must be 2–100 characters and can contain Chinese characters, letters, digits, hyphens (-), underscores (_), and periods (.) Bastionhost Application Status The status of the application Enable Access Mode The access mode for users. Client-based Access: Users must install the SASE App. Supports Layer 4 and Layer 7 applications, including O&M and office scenarios, with full endpoint security detection and control. Browser-based Access: Users access web applications from a browser without installing the SASE App. Endpoint security detection and control are not supported Client-based Access Click Next. Configure the Application Address, Port, and Protocol for the Bastionhost instance, then click OK. To trace access to the application, enable Web Application Access Reinforcement, select Access Tracing, and choose the HTTP header fields to include. Your application can then read these fields from incoming requests.
Step 6: Configure a zero-trust policy
Create a zero-trust policy that grants the authorized user group access to the internal application you registered.
Log on to the SASE console.
In the left navigation pane, choose Private Access > Access Control.
On the Zero Trust Policies tab, click Create Policy.
In the Create Policy panel, configure the following parameters and click OK.
Parameter Description Example Policy Name The name of the zero-trust policy. Must be 2–100 characters and can contain Chinese characters, letters, digits, hyphens (-), and underscores (_) Bastionhost access policy Priority The priority of the policy. A lower value means higher priority. The highest priority is 1. The maximum value for a new policy equals the current number of zero-trust policies in your account plus 1. When policies conflict, the higher-priority policy takes effect 1 Action The access permission. Allow Access: Grants access to the specified application. Access Denied: Blocks access to the specified application Allow Access Applicable User The user group the policy applies to. SASE applies the policy to endpoint devices belonging to users in this group. Click Add, then select a user group on the User Group tab. To create a new group, use the Custom User Group tab. For details, see Configure a user group Select the user group that is allowed access Selected Applications The applications the user group can access. Click Add and select applications by tag on the Tag tab, or select them directly on the Application tab Select the internal application created in Step 5 Security baseline A security baseline template that defines the security requirements for accessing the application. For details, see Create a security baseline Select a security baseline policy Trigger Templates A dynamic decision trigger template that re-evaluates trust on specific conditions. Click View Trigger Templates to review configured templates. For details, see Configure a trigger template Select a trigger template Policy Status The status of the policy Enabled
Step 7: Verify the connection
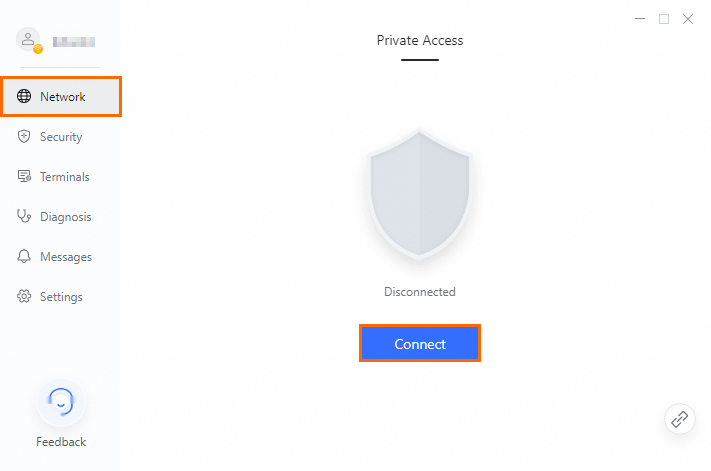
Open the SASE App.
In the navigation pane, click Network, then click Connect and wait for the connection to be established.
Access the internal application you registered. SASE generates an audit log for the internal access.
Log on to the SASE console.
In the left navigation pane, choose Log Analysis > Log Audit.
On the Private Access Audit tab, check for an audit log entry for your access. If the log appears, the configuration is complete.
What's next
Refine your access policy: Add a security baseline to enforce device compliance before granting access. See Create a security baseline.
Add more identity sources: If your organization uses multiple identity systems, configure additional identity sources in Identity Authentication > Identity Access.
Monitor access activity: Review ongoing access logs under Log Analysis > Log Audit > Private Access Audit to detect anomalies and maintain audit trails.