Encrypted protocols such as HTTPS protect data in transit, but they also create blind spots for security tools. Because the payload of encrypted traffic is ciphertext, the Cloud Firewall intrusion prevention system (IPS) engine cannot inspect the content or analyze it for threats. Advanced attacks and sensitive data exfiltration can hide inside this encrypted traffic and go undetected.
TLS inspection solves this problem. When you enable TLS inspection for outbound traffic, Cloud Firewall replaces the original TLS certificate between the client and the firewall with a private root CA that you specify. After Cloud Firewall obtains the server-side certificate, it decrypts the traffic, passes it to the IPS engine for threat detection, and then re-encrypts it before forwarding it to the destination. This allows the IPS engine to detect and block advanced attacks and sensitive data leakage while still maintaining secure communication with private certificates.
TLS inspection is currently in public preview and may change before general availability. If you have questions or feedback, contact your account manager.
Prerequisites and limitations
Before you enable TLS inspection, review the following requirements and limitations to determine whether the feature is compatible with your environment.
| Category | Requirement |
|---|---|
| Billing method | Cloud Firewall instances billed using the legacy pay-as-you-go 1.0 billing method do not support TLS inspection. |
| Region availability | Supported only in: China (Beijing), China (Shanghai), China (Hangzhou), and China (Zhangjiakou). |
| Protocol type | Non-TCP requests (such as QUIC over UDP) are forwarded only and do not support TLS inspection. |
| Authentication mode | Mutual TLS (mTLS) is not supported. Only standard TLS (server authentication only) is supported, where the client validates the server-side certificate. |
| SNI requirement | The TLS Server Name Indication (SNI) must match the domain name in the configured certificate for TLS inspection to take effect. |
| Network diagnostics | After you enable TLS inspection, TCP MTR (My Traceroute) cannot trace the path to the origin server. |
TLS protocol version support
The following table describes how TLS inspection handles different TLS versions.
| TLS version | Behavior |
|---|---|
| TLS 1.0, 1.1, and 1.2 | Fully supported. Traffic is decrypted and inspected. |
| TLS 1.3 without Encrypted Client Hello (ECH) | Forwarded normally, but cannot be decrypted or inspected. |
| Early SSL versions and TLS 1.3 with ECH enabled | Not supported. Enabling TLS inspection for this traffic disrupts the connection. |
Procedure
Log on to the Cloud Firewall console. In the left-side navigation pane, choose Prevention Configuration > TLS Inspection.
Step 1: Create a TLS inspection policy
On the TLS Inspection page, click Create TLS Inspection Policy above the policy list. The Create TLS Inspection Policy drawer appears on the right side.
1. Associate a certificate
Configure the following parameters in the Associate Certificate section.
| Parameter | Description |
|---|---|
| Policy Name | Enter a name that helps you identify this TLS inspection policy. |
| Associate TLS Certificate | Select an existing PCA certificate. The certificate must meet all of the following requirements:
|
| Certificate Validity | After you select a certificate, the system displays its validity period. If the remaining validity is less than one year, the system shows a mandatory reminder. Check your certificates regularly and make sure at least one year of validity remains. |
| Description | Enter a description for the policy. |
When you create your first policy, the certificate dropdown includes an Apply for a Trial Certificate option. Click this option to automatically generate a test certificate for quick evaluation. Trial certificates can be used only once. In production environments, purchase and use your own certificate.
After you configure all parameters, click Next to proceed to Configure Inspection Range. The policy is created and saved after you complete this step.
2. Configure the inspection scope
Each inspection scope can contain a maximum of 20,000 items.
The quota consumed by a single TLS inspection policy equals the sum of quotas from all its inspection scopes.
The quota consumed by a single inspection scope is calculated as: number of source IPs x number of source port ranges x number of destination IPs x number of destination port ranges.
Configure the following parameters for the inspection scope.
| Parameter | Description |
|---|---|
| Protocol Type | Only TCP is supported. |
| Source IP Address | Select the public IP addresses of the hosts whose outbound traffic you want to inspect. You can select up to 1,000 IPs. Supported asset types: ECS EIP, ECS public IP, NAT EIP, EIP, and ENI EIP (elastic network interface EIP). |
| Source Port | Specify the port ranges to inspect for the selected assets. Use the format start port/end port. Valid port values: 0 to 65535. Separate multiple port ranges with commas. You can specify up to 100 ranges. |
| Destination IP Address | Specify the destination IP addresses that the source IP addresses access. Use standard IPv4 CIDR notation, such as 192.0.2.0/24,8.8.8.8/32. Separate multiple CIDR blocks with commas. You can enter up to 100 IP objects. To represent all addresses, use 0.0.0.0/0. |
| Destination Port | Specify the destination ports that the source IP addresses access. Use the format start port/end port. Valid port values: 0 to 65535. Separate multiple port ranges with commas. You can specify up to 100 ranges. |
| Description | Enter a description for the inspection scope. |
All ports must be specified as ranges, even for a single port. For example, enter
8080/8080to inspect only port 8080.To inspect all ports, enter
0/65535.
You can also perform the following actions:
Save: Click the Inspection Scope section and then click Save below the section to save the inspection scope directly without clicking Next. After the scope is saved, Saved appears in the upper-right corner of the section.
Add: Click Add an inspection range to add another inspection scope. A single policy supports up to 10 inspection scopes.
Delete: Click the
 icon in the upper-right corner of the Inspection Scope collapsible panel. After you confirm, the inspection scope is deleted immediately without requiring you to click Next. Exercise caution when you delete an inspection scope.
After you configure all parameters, click Next to complete the policy configuration.
3. Review the policy
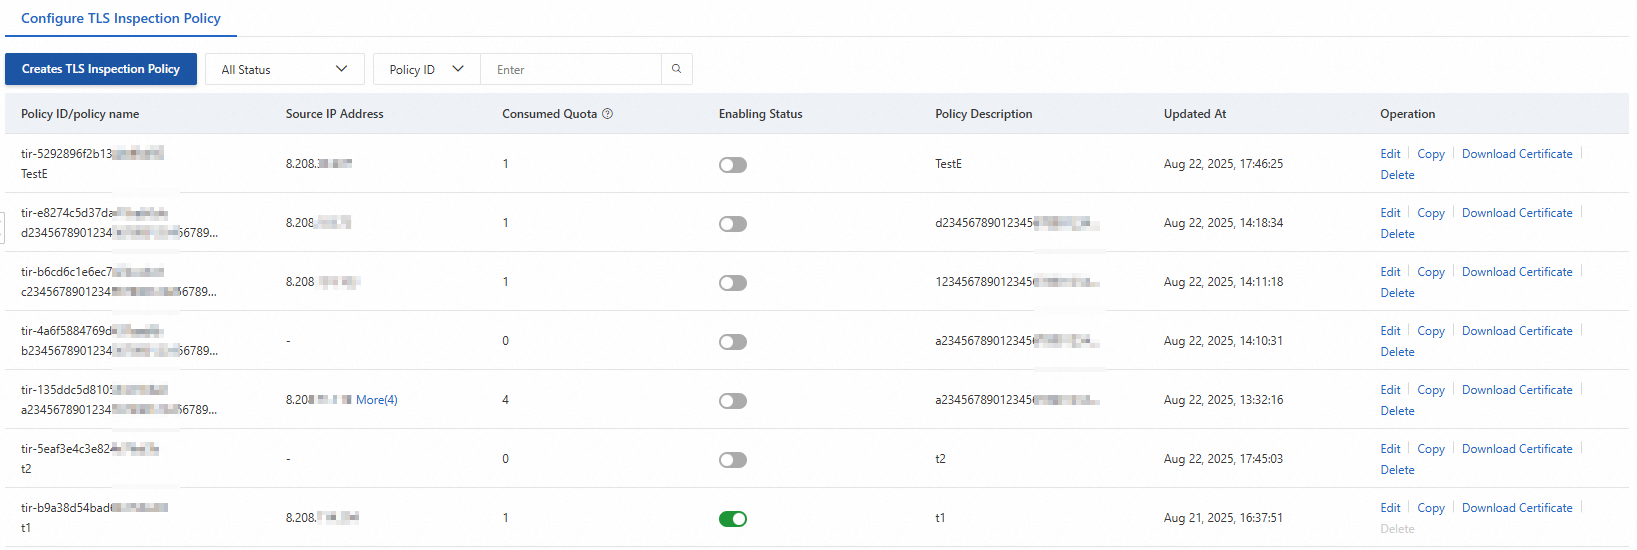
After configuration is complete, the policy and inspection scope details appear. The Policy ID shown here is included in traffic logs.
Step 2: Install the TLS certificate
After you create a TLS inspection policy, install the associated certificate on the hosts specified in the inspection scope.
If the inspected asset is of type NAT EIP, install the certificate on all ECS instances that access the Internet through the Internet NAT gateway. Otherwise, traffic may be disrupted.
Download the certificate

In the Configure TLS Inspection Policy list, find your policy and click Download Certificate in the Actions column. Download and extract the file to obtain the certificate file (with a .crt extension).
Log on to the host and upload the certificate
Log on to the host specified as the Source IP Address in the inspection scope. Upload the certificate to any directory on the host. For ECS instances, see Choose a file transfer method for upload instructions.
Install the certificate
Navigate to the directory where you uploaded the certificate. Copy the certificate to the system trust store and run the update command. The steps vary by operating system.
If your TLS policy uses an intermediate CA certificate, install both the root CA and the intermediate CA.
The following examples use the system trust store. If your application uses a custom trust store, install the certificate accordingly.
CentOS / Alibaba Cloud Linux / Anolis / Red Hat
# 1. Copy the certificate file
cp <certificate filename> /etc/pki/ca-trust/source/anchors/

# 2. Update the trust store
sudo update-ca-trust

# 3. Verify the installation (certificate content should appear in the output)
cat /etc/ssl/certs/ca-bundle.crt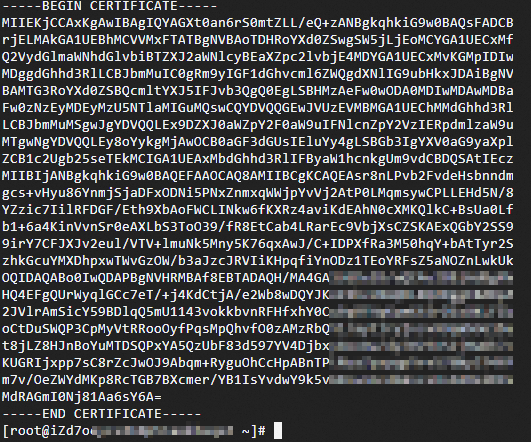
Ubuntu
# 1. Copy the certificate file
cp <certificate filename> /usr/local/share/ca-certificates/

# 2. Update the trust store
sudo update-ca-certificates

# 3. Verify the installation (certificate content should appear in the output)
cat /etc/ssl/certs/ca-certificates.crt
SUSE
# 1. Copy the certificate file
cp <certificate filename> /etc/pki/trust/anchors

# 2. Update the trust store
sudo c_rehash .

# 3. Verify the installation (certificate information should appear in the output)
sudo trust list --filter=ca-anchors |grep -C 2 <certificate CN>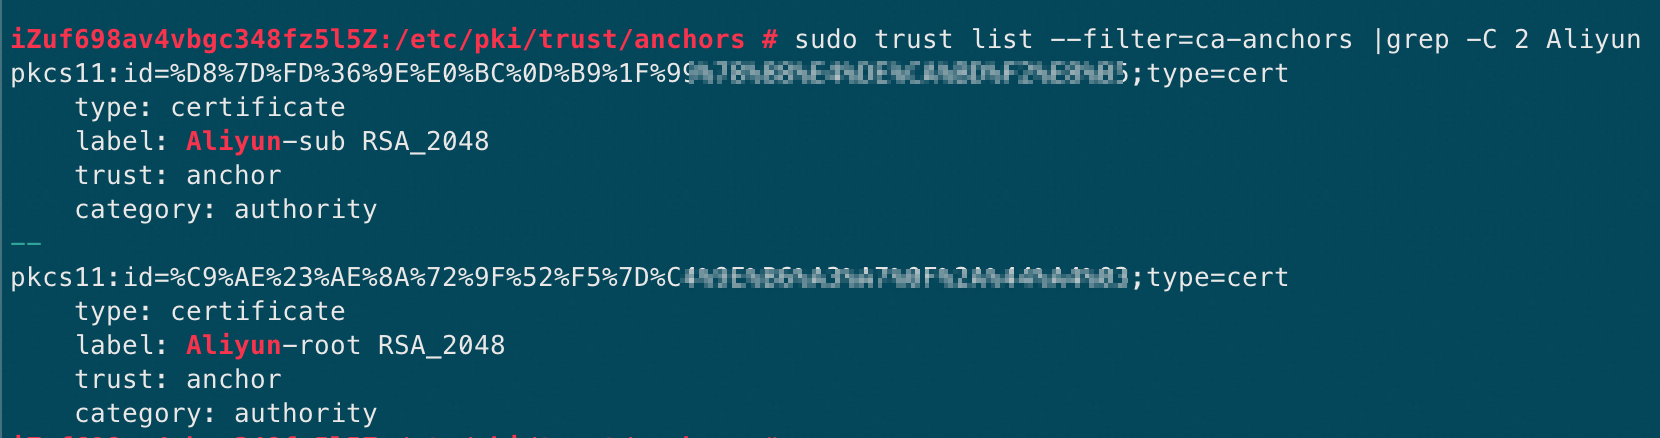
Fedora / Fedora CoreOS
# 1. Copy the certificate file
sudo cp <certificate filename> /etc/pki/ca-trust/source/anchors/

# 2. Update the trust store
sudo update-ca-trust extract

# 3. Verify the installation (certificate information should appear in the output)
sudo trust list --filter=ca-anchors |grep -C 2 <certificate CN>
Windows
If your certificate file contains a chain with multiple CAs (for example, root and intermediate), Windows Certificate Manager installs only the first CA by default. You must manually split each CA block into a separate file and install them individually. To split the certificate, open the downloaded file in a text editor. Copy each block between -----BEGIN CERTIFICATE----- and -----END CERTIFICATE----- into a new file and save it with a .crt extension.
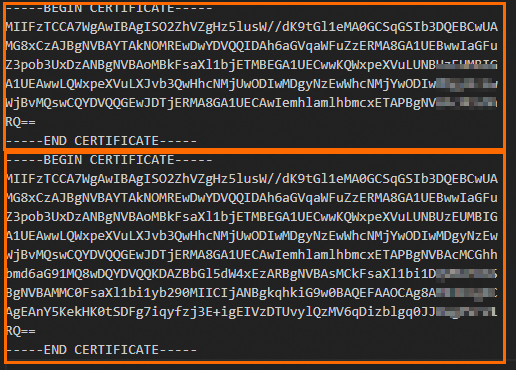
After splitting: ![]()
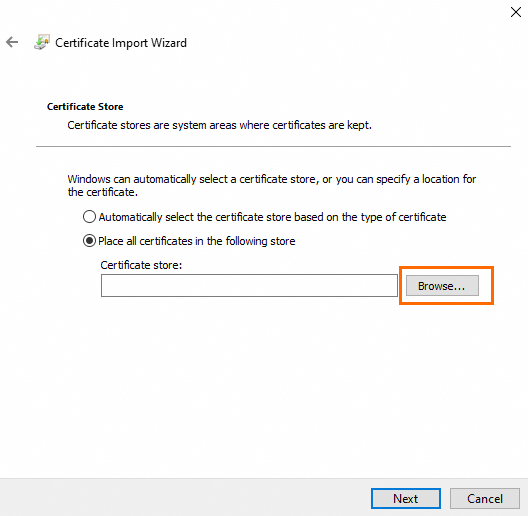
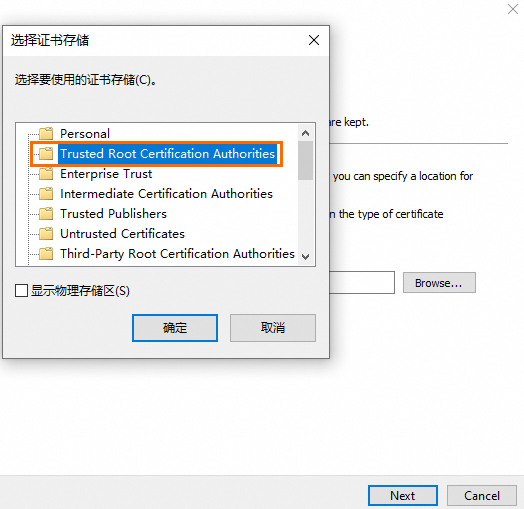
Install the certificate: Right-click the certificate file and click Install Certificate. Follow these steps: Click Next to complete the import.
1 2 3 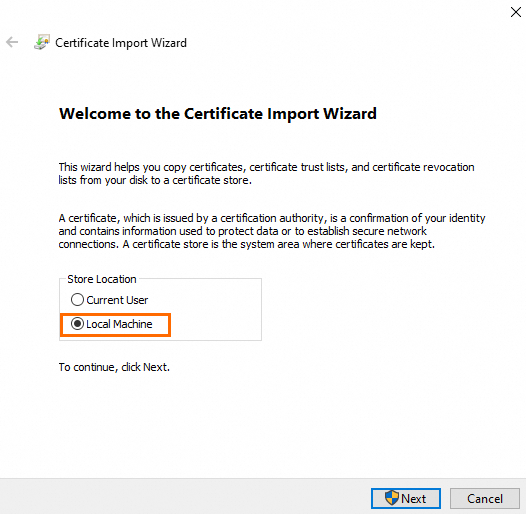
View the installed certificates: In Command Prompt, run
certmgr.mscto open Certificate Manager.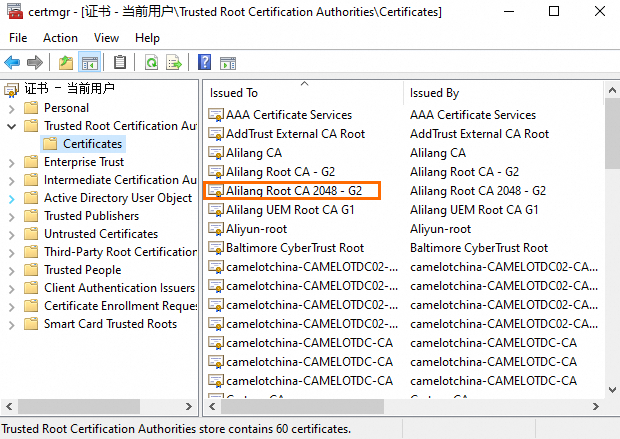
Container Service for Kubernetes (ACK)
When outbound traffic originates from pods in an ACK cluster, you must install the PCA certificate inside each pod because containers are isolated from the host. If the nodes themselves initiate HTTPS requests (for example, to pull public images), also install the certificate on the nodes.
The following steps apply to Alibaba Cloud Linux 3.2104 LTS 64-bit (container optimized) and are for reference only. Adjust the commands based on your operating system and workload requirements.
Some commands restart services. Perform these operations during off-peak hours to avoid impact on your workloads.
Install the certificate on nodes
Log on to each node and run the following commands:
# 1. Copy the certificate file
cp <certificate filename> /etc/pki/ca-trust/source/anchors/

# 2. Update the trust store
sudo update-ca-trust

# 3. Verify the installation (certificate content should appear in the output)
cat /etc/ssl/certs/ca-bundle.crt

# 4. Restart containerd to apply the changes
sudo systemctl restart containerd
Install the certificate in pods
Create a secret in the target cluster with the certificate file content as the secret value. For detailed steps, see Manage secrets. You can also create the secret by using the following kubectl command. Replace
ca_chain.crtwith your actual certificate filename.kubectl create secret generic cfw-pca-cert \ --from-file=ca_chain.crt=./ca_chain.crt \ -n default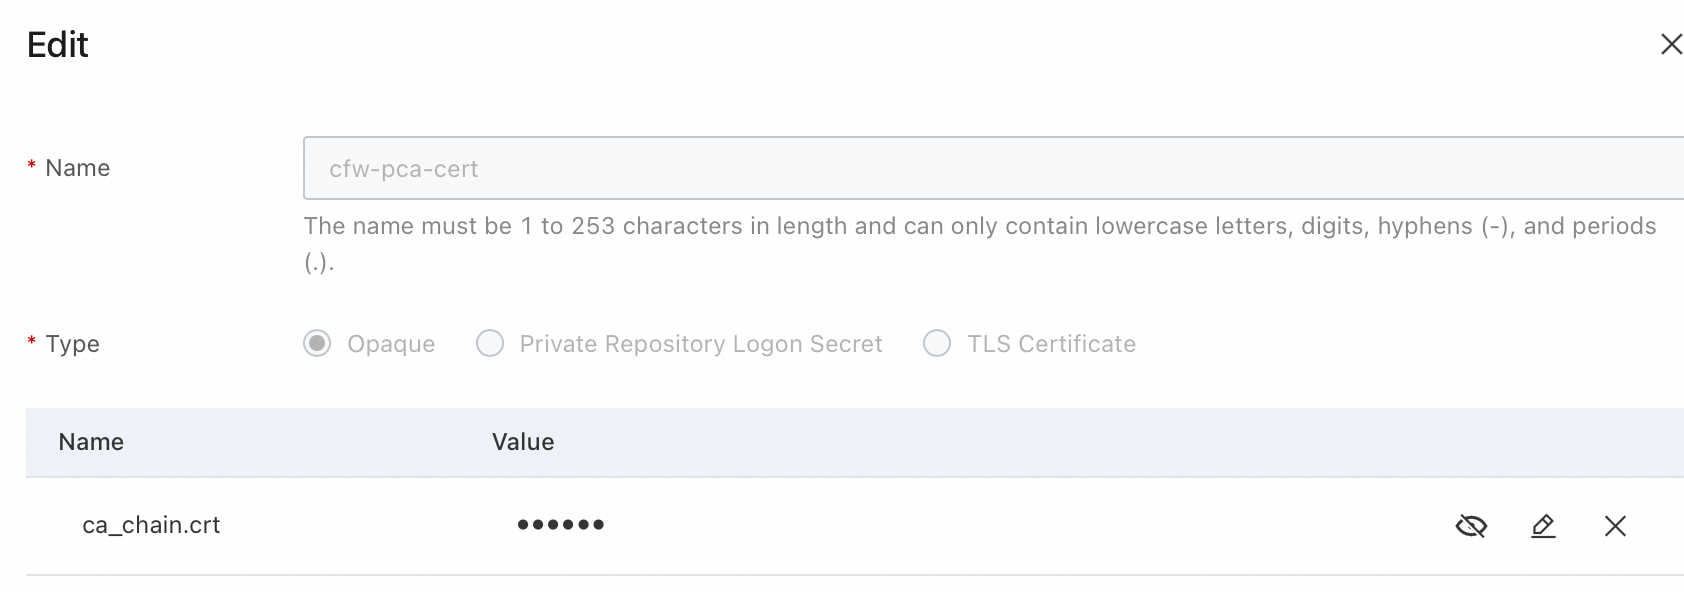
For a Deployment, add the following to its YAML file:
In the
spec.template.spec.containersfield, add the following to mount the certificate and update the trust store. ReplacesecretNamewith the secret name from the previous step (cfw-pca-cert):volumes: - name: custom-ca-volume secret: secretName: cfw-pca-cert volumeMounts: - name: custom-ca-volume mountPath: /etc/ssl/custom readOnly: trueStill under
spec.template.spec.containers, add a startup command.NoteThe following example uses CentOS in the container and is for reference only. Adjust the commands based on your operating system and workload requirements.
command:
          - "/bin/sh"
          - "-c"
          - |
            # 1. Install curl
            echo "Installing curl......"
            yum install -y curl

            # 2. Verify certificate mount; replace ca_chain.crt with your actual filename
            if [ ! -f /etc/ssl/custom/ca_chain.crt ]; then
              echo "ERROR: Certificate file not found!"
              exit 1
            fi

            # 3. Inject certificate per CentOS steps
            echo "Copying certificate to anchors directory..."
            cp /etc/ssl/custom/ca_chain.crt /etc/pki/ca-trust/source/anchors/

            echo "Updating CA trust store..."
            update-ca-trust

            # 4. Keep Pod running
            echo "Pod ready for manual testing. Use 'kubectl exec' to test further."
            sleep infinity
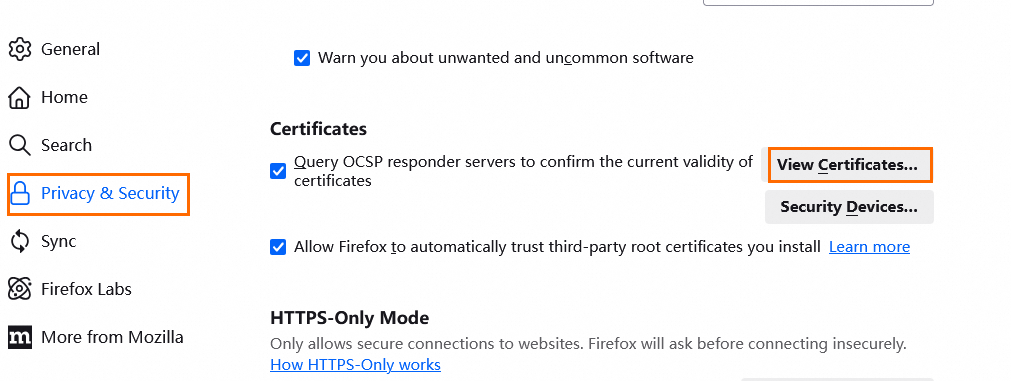
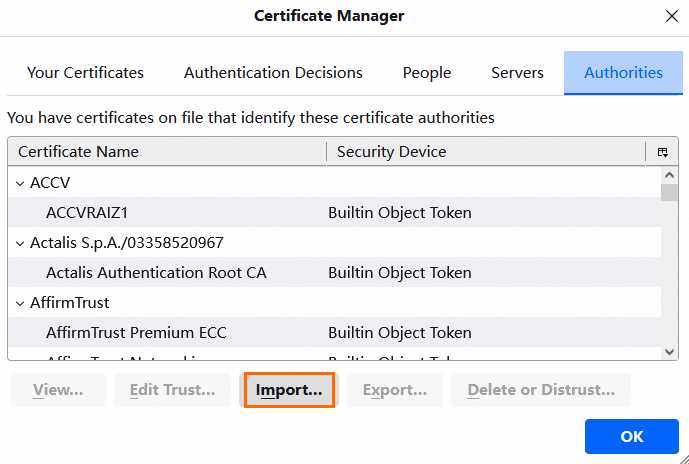
Browser trust store
Some browsers (such as Firefox) maintain their own certificate trust store instead of using the system trust store. Even after you update system certificates with update-ca-certificates, the browser may still show a certificate warning. In this case, import the certificate into the browser's trust store.
The steps to import a certificate into browser trust stores are the same on Linux and Windows.
| 1 | 2 |
|---|---|
 |  |
Step 3: Enable the inspection policy and view traffic logs
Enable TLS inspection
After you install the certificate on the hosts, enable the inspection policy.
For new connections, protection takes effect approximately one minute after you enable TLS inspection. Existing persistent connections are not protected.
For EIPs already protected by Cloud Firewall, disabling TLS inspection disrupts persistent connections. The duration of the disruption depends on how quickly your application reconnects.
On the TLS Inspection page, find your policy and toggle the status switch to enable TLS inspection. After TLS inspection is enabled, Cloud Firewall decrypts and inspects the encrypted outbound traffic based on your inspection scope configuration.
You can delete a policy only when it is disabled.
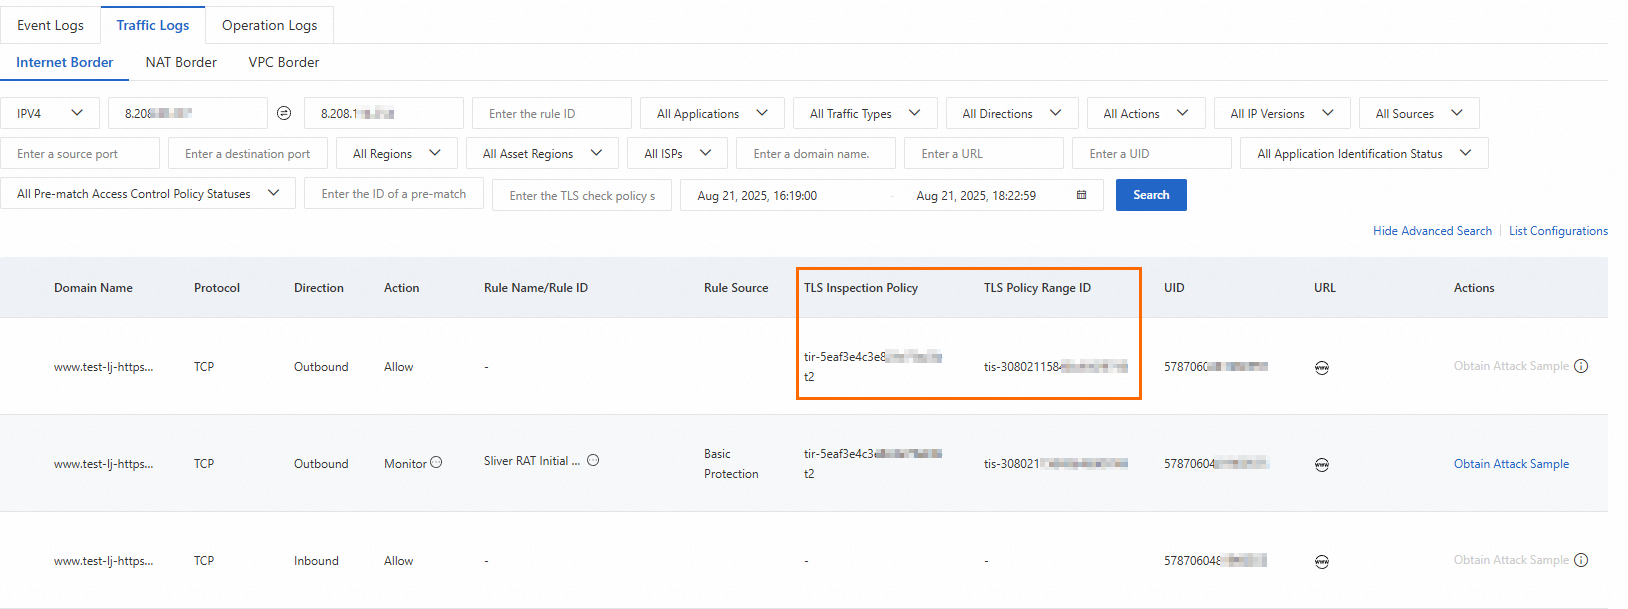
View traffic logs
After the inspected hosts generate traffic, you can view the inspection results in the traffic logs.
In the left-side navigation pane of the Cloud Firewall console, choose Log Monitoring > Log Audit. On the Traffic Logs > Internet Border tab, you can view traffic from the hosts, including the matched TLS inspection policy and inspection scope IDs.