Use ESA abuse prevention to protect your applications from traffic abuse that can lead to inflated costs and resource exhaustion. The feature leverages ESA IP intelligence database to automatically challenge or block requests from sources known for malicious activity.
What is abuse prevention
Abuse prevention combines global monitoring of unusual traffic with an open-source IP reputation database updated daily. This feature is particularly effective against automated threats from botnets, scrapers, and traffic from certain Peer-to-Peer Content Delivery Networks (PCDNs), which are often used to disguise the origin of abusive traffic.
Enable abuse prevention
Disclaimer: The prevention rules are strict and designed for situations where you are actively experiencing traffic abuse. You are responsible for any impact to legitimate traffic.
In the ESA console, select Websites, and then click the target website in the Website column.
In the navigation pane on the left, choose .
On the Overview tab, in the Abuse Prevention area, click Configure.
Turn on the Status switch and select an action:
Set this feature to Monitor action first, which logs requests without blocking them.
Go to Security Analytics to review the requests that have matched the abuse prevention rules. Confirm that the flagged IP addresses are indeed suspicious and that legitimate user traffic is not being incorrectly identified.
Change the action to Block if needed. Blocked requests data is visible in the Event analytics dashboard.
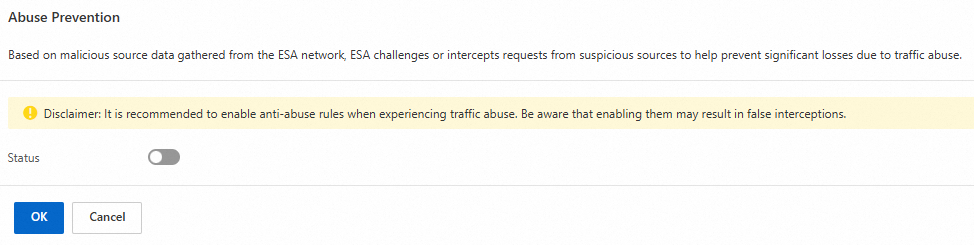
Click OK.
Managing exceptions
If the automated rules are either too aggressive (a false positive) or not catching a specific threat (a false negative), you can create exceptions.
Handling false positives
If you find that a legitimate IP address is being blocked by the abuse prevention rule, you can create a whitelist rule to allow traffic from the IP address.
In the ESA console, select Websites, and then click the target site in the Website column.
In the navigation pane on the left, choose .
Select the Whitelist Rules tab and click Create Rule. Configure the rule with the following settings:
Set Rule Name to a value such as
False-Positive-01.In the If requests match... area:
Match Field: Client IP.
Operator: equals.
Match value: the client IP address that you consider legitimate, such as
192.168.0.1.
In the Then skip... area:
Rule: Specific Rule Category/ID.
Rule Category: Abuse Prevention.
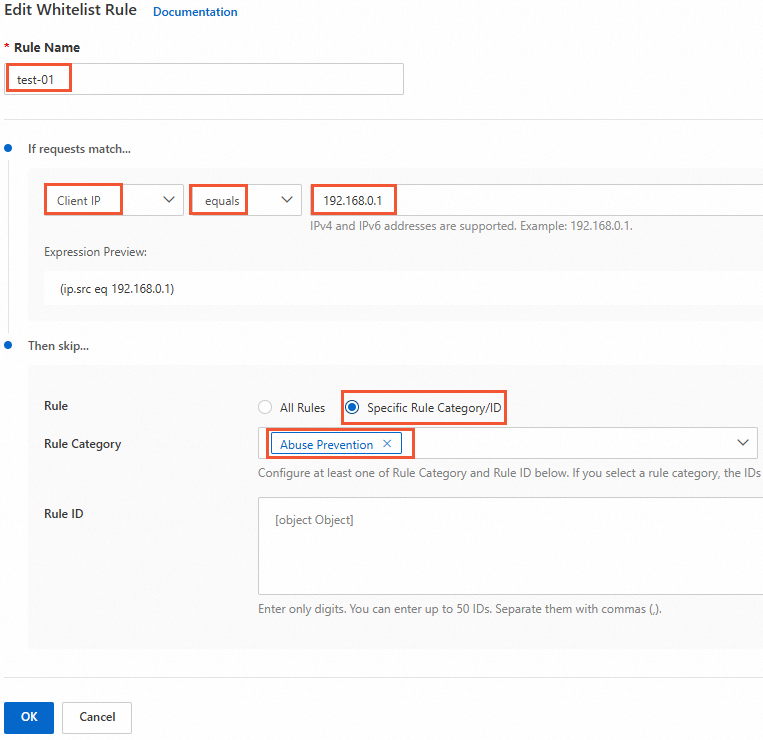
Click OK.
Handling false negatives
If you have identified a malicious IP address that is not being caught by the feature, you can block it manually using Custom rules. Additionally, contact us to report the suspicious IP address. If verified, it will be added to the global malicious IP database.
In the ESA console, select Websites, and then click the target site in the Website column.
In the navigation pane on the left, choose .
Click the Custom Rules tab. On the Custom Rules tab, click Create Rule. The settings are as follows:
Set Rule Name to a value such as
False-Negative-01.In the If requests match... area:
Match Field: Client IP
Operator: equals
Match value: the client IP address that you consider malicious, such as
192.168.0.1.
In the Then execute... area:
Action: Block
Error Page: Default Error Page
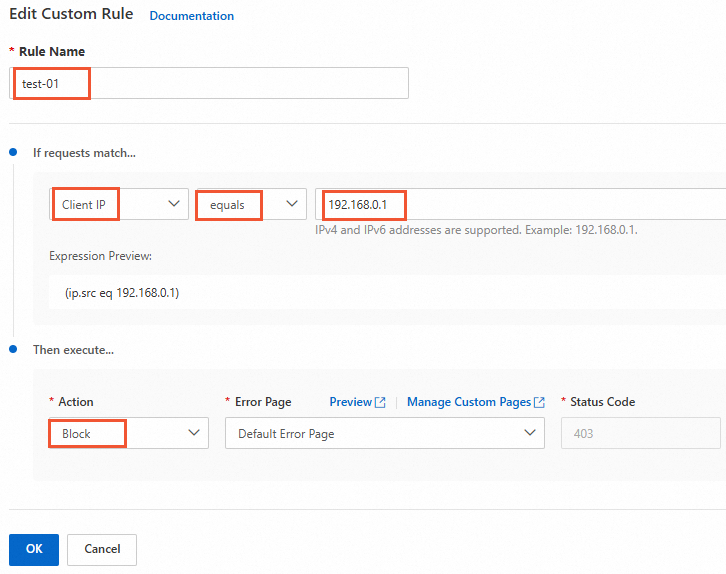
Click OK.