The Amazon RDS for MySQL output component writes data to an Amazon RDS for MySQL data source. When synchronizing data from other data sources to an Amazon RDS for MySQL data source, you need to configure the target data source for the Amazon RDS for MySQL output component after configuring the source data source information. This topic describes how to configure the Amazon RDS for MySQL output component.
Prerequisites
You have created an Amazon RDS for MySQL data source. For more information, see Create an Amazon RDS for MySQL data source.
The account used to configure the Amazon RDS for MySQL output component properties must have write-through permission for the data source. If you do not have the permission, you need to request the data source permission. For more information, see Request, renew, and return data source permissions.
Procedure
In the top navigation bar of the Dataphin homepage, choose Develop > Data Integration.
In the top navigation bar of the Integration page, select Project (In Dev-Prod mode, you need to select Environment).
In the navigation pane on the left, click Batch Pipeline, and then click the offline pipeline that you want to develop in the Batch Pipeline list to open the configuration page of the offline pipeline.
Click Component Library in the upper-right corner of the page to open the Component Library panel.
In the navigation pane on the left of the Component Library panel, select Outputs, find the Amazon RDS for MySQL component in the output component list on the right, and drag the component to the canvas.
Click and drag the
 icon of the target input, transform, or flow component to connect it to the current Amazon RDS for MySQL output component.
Click the
 icon on the Amazon RDS for MySQL output component card to open the Amazon RDS for MySQL Output Configuration dialog box.
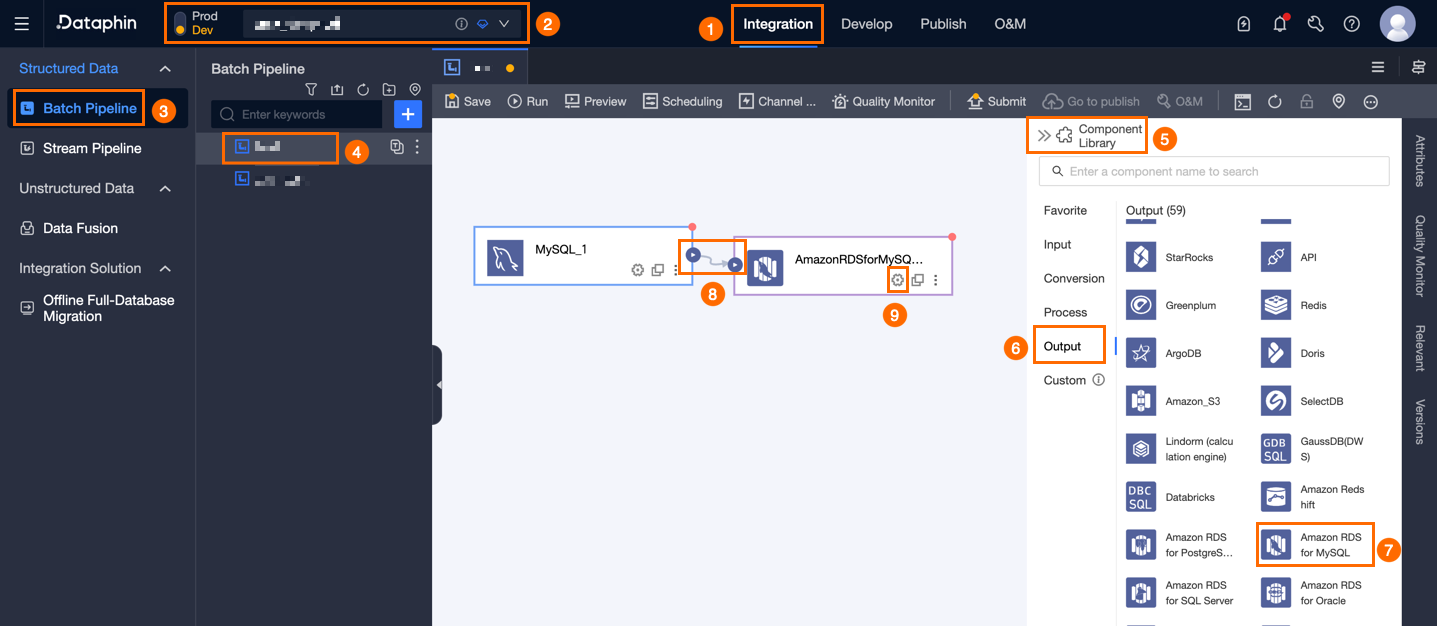
In the Amazon RDS For MySQL Output Configuration dialog box, configure the parameters.
Parameter
Description
Basic Settings
Step Name
The name of the Amazon RDS for MySQL output component. Dataphin automatically generates a step name, which you can modify based on your business scenario. The name must meet the following requirements:
It can contain only Chinese characters, letters, underscores (_), and digits.
It cannot exceed 64 characters in length.
Datasource
The data source dropdown list displays all Amazon RDS for MySQL data sources, including those for which you have write-through permission and those for which you do not. Click the
 icon to copy the current data source name.
For data sources for which you do not have write-through permission, you can click Request after the data source to request write-through permission for the data source. For more information, see Request, renew, and return data source permissions.
If you do not have an Amazon RDS for MySQL data source, click Create Data Source to create one. For more information, see Create an Amazon RDS for Amazon RDS for MySQL data source.
Database (optional)
Select the database where the table is located. If you do not specify a database, the database specified when registering the data source is used.
Table
Select the target table for output data. You can enter a keyword to search for tables, or enter the exact table name and click Exact Match. After you select a table, the system automatically checks the table status. Click the
 icon to copy the name of the currently selected table.
If there is no target table for data synchronization in the Amazon RDS for MySQL data source, you can use the one-click table creation feature to quickly generate a target table. Perform the following steps:
Click Create Table With One Click. Dataphin automatically matches the code for creating the target table, including the target table name (default is the source table name), field types (initially converted based on Dataphin fields), and other information.
You can modify the SQL script for creating the target table as needed, and then click Create.
After the target table is created, Dataphin automatically sets the newly created table as the target table for output data. One-click table creation is used to create target tables for data synchronization in development and production environments. Dataphin selects the production environment for table creation by default. If a table with the same name and structure already exists in the production environment, you do not need to select table creation for the production environment.
NoteIf a table with the same name exists in the development or production environment, Dataphin will report an error indicating that the table already exists when you click Create.
When there are no matching items, you can still perform integration based on a manually entered table name.
Loading Policy
Select the policy for writing data to the target table. Loading Policy includes:
Append Data (insert Into): Appends data to the existing data in the target table without modifying historical data. When a primary key/constraint conflict occurs, a dirty data error is reported.
Overwrite On Primary Key Conflict (replace Into): When a primary key/constraint conflict occurs, the system first deletes the entire row of old data with the duplicate primary key, and then inserts the new data.
Update On Primary Key Conflict (on Duplicate Key Update): When a primary key/constraint conflict occurs, the system updates the data of the mapped fields on the existing record.
Batch Write Data Size (optional)
The size of data to be written at one time. You can also set Batch Write Records. The system will write data when either of the two configured limits is reached. The default is 32M.
Batch Write Records (optional)
The default is 2048 records. When synchronizing data, the system uses a batch write strategy with parameters including Batch Write Records and Batch Write Data Size.
When the accumulated data reaches either of the set limits (i.e., the batch write data size or record count limit), the system considers a batch of data to be full and immediately writes this batch of data to the target end.
It is recommended to set the batch write data size to 32MB. For the batch insert record limit, you can adjust it flexibly based on the actual size of a single record, usually setting it to a large value to fully utilize the advantages of batch writing. For example, if the size of a single record is about 1KB, you can set the batch insert byte size to 16MB, and considering this condition, set the batch insert record count to greater than the result of 16MB divided by the single record size of 1KB (i.e., greater than 16384 records), assuming it is set to 20000 records. With this configuration, the system will trigger batch writes based on the batch insert byte size, executing a write operation whenever the accumulated data reaches 16MB.
Preparation Statement (optional)
The SQL script to be executed on the database before data import.
For example, to ensure continuous service availability, before the current step writes data, it first creates a target table Target_A, executes writing to Target_A, and after the current step completes writing data, it renames the continuously serving table Service_B to Temp_C, then renames Target_A to Service_B, and finally deletes Temp_C.
Completion Statement (optional)
The SQL script to be executed on the database after data import.
Field Mapping
Input Fields
Displays the input fields based on the output of the upstream component.
Output Fields
Displays the output fields. You can perform the following operations:
Field management: Click Field Management to select output fields.
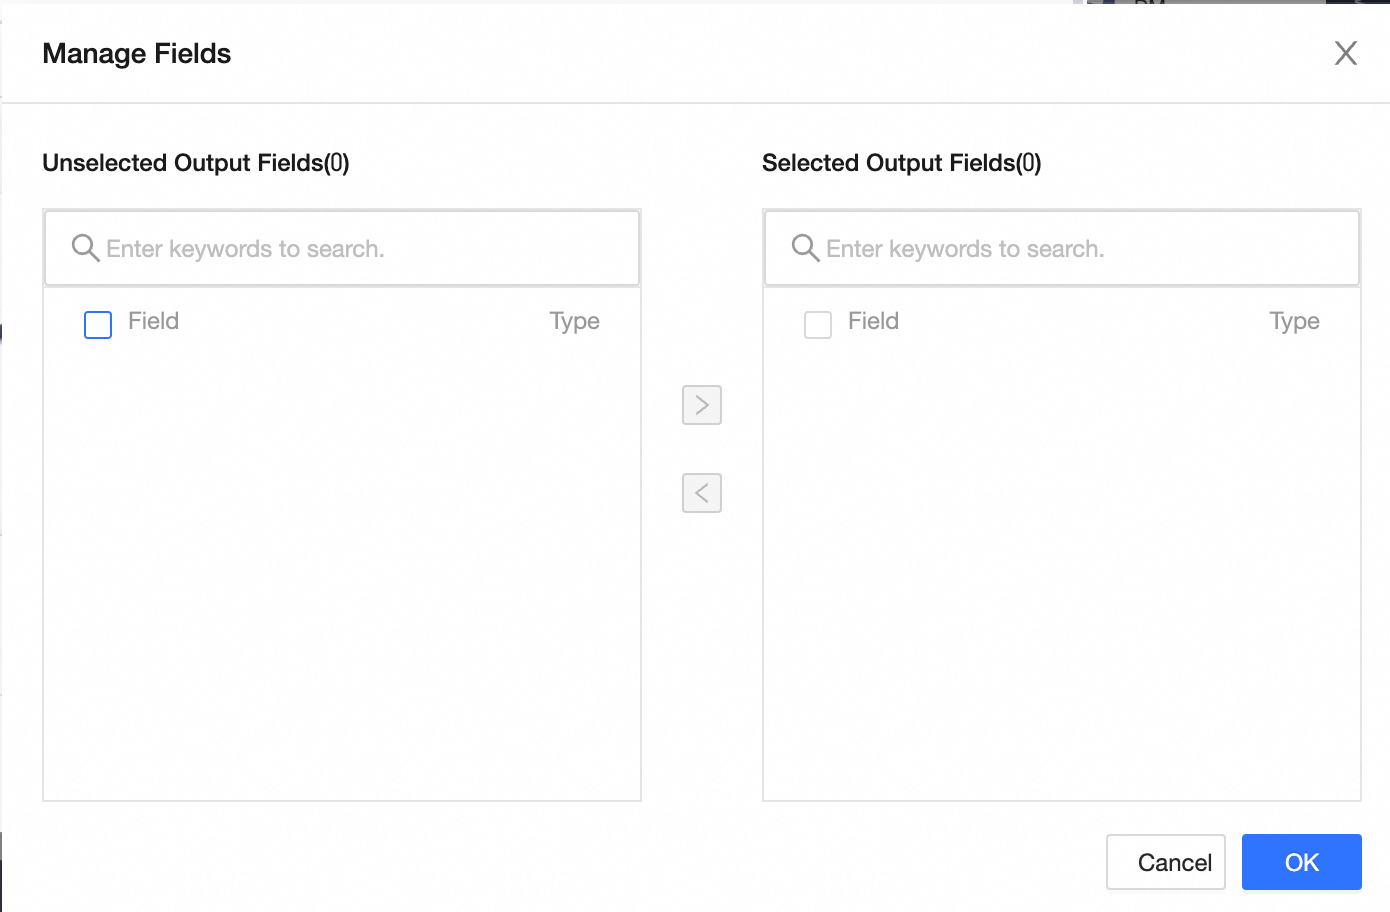
Click the
 icon to move Selected Input Fields to Unselected Input Fields.
Click the
 icon to move Unselected Input Fields to Selected Input Fields.
Batch add: Click Batch Add to configure in JSON, TEXT, or DDL format.
Batch configuration in JSON format, for example:
// Example: [{ "name": "user_id", "type": "String" }, { "name": "user_name", "type": "String" }]Note`name` specifies the name of the field to import. `type` specifies the data type of the field after it is imported. For example,
"name":"user_id","type":"String"imports the field named `user_id` and sets its data type to String.Batch configuration in TEXT format, for example:
// Example:
user_id,String
user_name,String
The row delimiter is used to separate the information of each field, with the default being a line feed (\n). It supports line feed (\n), semicolon (;), and period (.).
The column delimiter is used to separate the field name and field type, with the default being a comma (,).
Batch configuration in DDL format, for example:
CREATE TABLE tablename (
    id INT PRIMARY KEY,
    name VARCHAR(50),
    age INT
);
Create new output field: Click +Create New Output Field, fill in the Column and select the Type as prompted. After completing the configuration for the current row, click the
 icon to save.
Mapping
Based on the upstream input and the fields of the target table, you can manually select field mappings. Mapping includes Same Row Mapping and Same Name Mapping.
Same name mapping: Maps fields with the same name.
Same row mapping: Maps fields in the same row when the field names in the source and target tables are inconsistent but the data in the corresponding rows needs to be mapped. Only maps fields in the same row.
Click OK to complete the property configuration of the Amazon RDS for MySQL output component.