By deploying an NGINX server with PROXY protocol v1 or v2 support between clients and backend servers, you can ensure that the real IP addresses of clients are preserved. This is crucial in key scenarios such as log recording and auditing, access control and authentication, security, and performance optimization. Preserving client IP addresses enhances system security, reliability, and user experience.
Scenario
You run an e-commerce website, where the backend services use the Transmission Control Protocol (TCP). To implement access control, precise logging, and geolocation of visitors to your website, you need to retrieve the real IP addresses of the clients on the origin server. NGINX supports the PROXY protocol, which can help in this scenario. To take advantage of this, you need to configure NGINX to enable the PROXY protocol and set up your application to parse the PROXY protocol header that contains the real IP address of a client.
Before you begin
Install NGINX
# Install the dependencies that are required to compile NGINX.
yum -y install gcc gcc-c++ autoconf automake
yum -y install zlib zlib-devel openssl openssl-devel pcre-devel
# Download the installation package.
wget http://nginx.org/download/nginx-1.20.0.tar.gz
# Decompress the source package.
tar -zxvf nginx-1.20.0.tar.gz
# Go to the NGINX directory.
cd nginx-1.20.0
# Configure the settings for NGINX compilation and installation. Make sure that you include --with-stream in the command.
./configure --prefix=/usr/local/nginx --sbin-path=/usr/local/nginx/sbin/nginx --conf-path=/usr/local/nginx/conf/nginx.conf --with-http_stub_status_module --with-http_gzip_static_module --with-stream
# Compile NGINX.
make
# Install NGINX.
make install
Configure NGINX to support PROXY protocol v1/v2
Step 1: Modify the configuration file
To configure NGINX to support the PROXY protocol, you only need to add the proxy_protocol parameter to the listen directive in the server block. For more information, see Accepting the PROXY Protocol. Example:
http {
    log_format combined '$proxy_protocol_addr - $remote_user [$time_local] '
                        '"$request" $status $body_bytes_sent '
                        '"$http_referer" "$http_user_agent"';
    #...

    server {
        server_name localhost;

        listen 80   proxy_protocol;
        listen 443  ssl proxy_protocol;

        ssl_certificate      /etc/nginx/ssl/public.example.com.pem;
        ssl_certificate_key  /etc/nginx/ssl/public.example.com.key;

        location /app/ {
            proxy_pass       http://backend1;
            proxy_set_header Host            $host;
            proxy_set_header X-Real-IP       $proxy_protocol_addr;
            proxy_set_header X-Forwarded-For $proxy_protocol_addr;
        }
    }
}

stream {
    log_format basic '$proxy_protocol_addr - $remote_user [$time_local] '
                     '$protocol $status $bytes_sent $bytes_received '
                     '$session_time';
    #...
    server {
        listen              8080 ssl proxy_protocol;

        ssl_certificate     /etc/nginx/ssl/cert.pem;
        ssl_certificate_key /etc/nginx/ssl/cert.key;

        proxy_pass          esa.example.com:8080;
        proxy_protocol      on;
    }
}
Step 2: Create a TCP/UDP proxied application
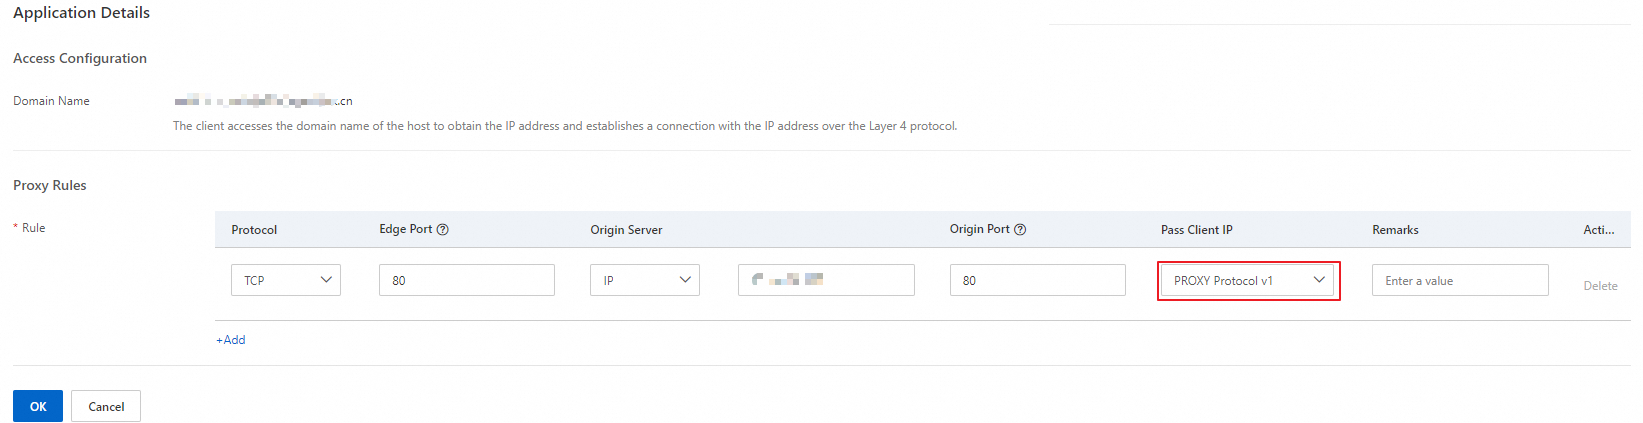
Access the ESA console and go to your website details page. In the left-side navigation tree, choose TCP/UDP > Settings. Then, click Create Application. On the page that appears, select TCP from the Protocol drop-down list and then PROXY Protocol v1 or PROXY Protocol v2 from the Pass Client IP drop-down list. Configure other parameters as needed.
Verify the configuration result
Start an HTTP server to serve files.
python -m SimpleHTTPServer 8080Run the curl command to simulate a TCP request to the HTTP server.
curl -i "https://esa.example.com:8080"View the logs of the NGINX server, where you can get the real IP address of the client.

For information about the support of HAProxy for the PROXY protocol, see Use the Proxy Protocol to Preserve a Client’s IP Address.