csi-secrets-store-provider-alibabacloud allows you to import or synchronize secrets from Key Management Service (KMS) to Kubernetes Secrets in an Container Service for Kubernetes (ACK) cluster to ensure that applications have secure access to sensitive data in your cluster. In addition, the plug-in allows you to directly mount secrets to applications by using CSI inline volumes. This is suitable for applications that obtain sensitive data by calling file system APIs, such as the API to read files. This component allows you to automatically update secrets to reduce the risk of exposing secrets in Kubernetes Secrets. It also helps you resolve compatibility issues between your applications and the Secrets Manager of KMS.

Security notes
By default, reading secrets from volumes involves a compatibility issue with the Secrets Manager of KMS. The csi-secrets-store-provider-alibabacloud plug-in can resolve this compatibility issue. In addition, you can create a secret as a Kubernetes-native Secret in a cluster when mounting environment variables. Before you use the plug-in, assess the following security risks:
When secrets in your cluster are accessible through the file system, attackers can exploit Common Vulnerabilities and Exposures (CVE) vulnerabilities in applications to traverse the directories in the cluster. As a result, the secrets may be leaked.
Debugging breakpoints or improper log permissions may expose secrets in your cluster. We recommend that you do not use environment variables to mount or use secrets because this method poses security risks.
When you enable secret synchronization, strictly follow the least privilege principle to limit access permissions.
If you do not need to persist secrets for your application, we recommend that you refer to Use RRSA to authorize different pods to access different cloud services to grant the least access permissions to pods. Then, obtain the secrets in the application by calling the GetSecretValue operations directly. This reduces the chances of exposing the secrets in the pod file system or Kubernetes Secrets.
Prerequisites
An ACK cluster that meets the following requirements is created. For more information, see Create an ACK managed cluster and Create a registered cluster.
The Kubernetes version of the cluster is 1.20 or later. You can create an ACK managed cluster, ACK dedicated cluster, or registered cluster. ACK Serverless clusters are not supported.
The cluster and your KMS secrets must be in the same region.
Step 1: Configure component authentication information
You must configure authentication information for csi-secrets-store-provider-alibabacloud to ensure that the plug-in has the permissions to obtain secrets from KMS. Otherwise, csi-secrets-store-provider-alibabacloud cannot import or synchronize secrets to the cluster. You can select one of the following authorization methods based on the cluster type.
Grant permissions by using RRSA: This method is applicable to ACK managed clusters that run Kubernetes 1.22 or later.
Grant permissions to the worker RAM role of a cluster: This method is applicable to ACK managed clusters, ACK dedicated clusters, and registered clusters.
Specify an AccessKey pair to assume a specific RAM role: This method is applicable to all types of ACK clusters.
Grant permissions by using RRSA
RAM Roles for Service Accounts (RRSA) is applicable to ACK managed clusters that run Kubernetes 1.22 or later. Compared to other authorization methods, RRSA can isolate permissions on pods and avoid the risk of secret leaks caused by the use of AccessKey IDs and AccessKey secrets.
Enable the RRSA feature for the ACK cluster in the ACK console. For more information, see Enable RRSA.
Create a RAM role for a trusted identity provider (IdP) so that the RAM role can be used by csi-secrets-store-provider-alibabacloud.
Log on to the RAM console by using an Alibaba Cloud account.
NoteAn Alibaba Cloud account has full management permissions on the resources within the account. You can create a RAM user and attach the AdministratorAccess policy to the RAM user. Then, you can use the RAM user as an account administrator to manage all cloud resources that belong to the Alibaba Cloud account. For more information, see Create a RAM user as an account administrator.
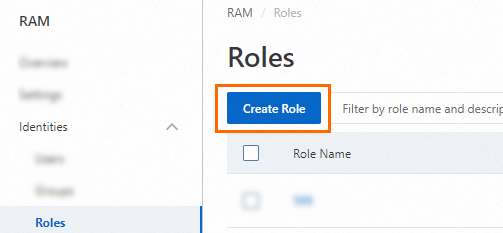
In the left-side navigation pane, choose .
On the Roles page, click Create Role.
In the upper-right corner of the Create Role page, click Switch to Policy Editor.

On the Configure Role page, configure the parameters and click OK. The following table describes the parameters.
Parameter
Description
RAM Role Name
The name of the RAM role.
Note
Optional. The description of the RAM role.
IdP Type
OIDC is selected.
Select IdP
ack-rrsa-<cluster_id>. <cluster_id> indicates the ID of your cluster.
Conditions
oidc:iss: Use the default value.
oidc:aud: Select sts.aliyuncs.com.
oidc:sub: Set the condition operator to StringEquals and the value to system:serviceaccount:<namespace>:<serviceAccountName>.
<namespace>: the namespace to which the application belongs.<serviceAccountName>: the name of the service account.
Based on the information of the test application, enter
system:serviceaccount:kube-system:csi-secrets-store-provider-alibabacloud.NoteWe recommend that you install components in the default
kube-systemnamespace. If you install csi-secrets-store-provider-alibabacloud in other namespaces, replacekube-systemwith the name of the namespace.
Create a custom policy and grant permissions to the RAM role created in the previous step.
Create a policy that is required when you use csi-secrets-store-provider-alibabacloud to import secrets from KMS.
The following code block shows the content of the policy. For more information, see Create custom policies.
{
    "Action": [
       "kms:GetSecretValue",
       "kms:Decrypt"
    ],
    "Resource": [
        "*"
    ],
    "Effect": "Allow"
}
Grant permissions to the RAM role created in the previous step. For more information, see Grant permissions to a RAM role.
Create a Secret named alibaba-credentials in the cluster based on the following configuration template and replace the specified fields.
Create a file named secretstore-rrsa.yaml based on the following content and replace the specified fields:
{rolearn}: Replace the value with the ARN of the RAM role created in Step 2. The ARN must be a Base64-encoded string.{oidcproviderarn}: Replace the value with the provider ARN generated after RRSA is enabled for the cluster. The ARN must be a Base64-encoded string.
apiVersion: v1
data:
  rolearn: {rolearn}
  oidcproviderarn: {oidcproviderarn}
kind: Secret
metadata:
  name: alibaba-credentials
  namespace: kube-system
type: Opaque
Run the following command to deploy the Secret:
kubectl apply -f secretstore-rrsa.yaml
Grant permissions to the worker RAM role of a cluster
This method is applicable to ACK managed clusters, ACK dedicated clusters, and registered clusters.
Create the following custom policy. For more information, see Create custom policies.
{
  "Action": [
    "kms:GetSecretValue",
    "kms:Decrypt"
  ],
  "Resource": [
    "*"
  ],
  "Effect": "Allow"
}
Attach the custom policy created in the previous step to the worker RAM role. For more information, see Grant permissions to the worker RAM role.
Specify an AccessKey pair to assume a specific RAM role
This method is suitable for all types of ACK clusters.
Create a RAM role for a trusted Alibaba Cloud account so that the RAM role can be used by csi-secrets-store-provider-alibabacloud. For more information, see Create a RAM role for a trusted Alibaba Cloud account.
Create a custom policy to grant permissions to the RAM role that is created in the previous step.
Create a policy that is required to access KMS secrets.
The following code block shows the content of the policy. For more information, see Create custom policies.
{
  "Action": [
    "kms:GetSecretValue",
    "kms:Decrypt"
  ],
  "Resource": [
    "*"
  ],
  "Effect": "Allow"
}
Grant permissions to the RAM role that is created in the previous step. For more information, see Grant permissions to a RAM role.
Create a custom policy for the RAM role created in the previous step and grant permissions to the specified RAM user.
Create a custom policy for the RAM role created previously.
The following code block shows the content of the policy. For more information, see Create custom policies.
{
    "Statement": [
        {
            "Action": "sts:AssumeRole",
            "Effect": "Allow",
            "Resource": "acs:ram::***:role/****"  # The ARN of the RAM role that is created in Step 1 of Method 3.
        }
    ],
    "Version": "1"
}
Grant permissions to the specified RAM user. For more information, see Grant permissions to RAM users.
Create a Secret named alibaba-credentials in the cluster based on the following configuration template and replace the specified fields.
Create a file named alibaba-credentials.yaml based on the following content and replace the specified fields:
{rolearn}: Replace the value with the ARN of the RAM role created in Step 1. The ARN must be a Base64-encoded string.{ak}: Replace the value with the AccessKey ID of the RAM user, which must be a Base64-encoded string.{sk}: Replace the value with the AccessKey secret of the RAM user, which must be a Base64-encoded string.apiVersion: v1 data: id: {ak} secret: {sk} rolearn: {rolearn} kind: Secret metadata: name: alibaba-credentials namespace: kube-system type: Opaque
Run the following command to deploy the Secret:
kubectl apply -f alibaba-credentials.yaml
Step 2: Install the csi-secrets-store-provider-alibabacloud component
Log on to the ACK console. In the left-side navigation pane, click Clusters.
On the Clusters page, find the cluster that you want to manage and click its name. In the left-side navigation pane, choose .
On the Helm page, click Deploy. In the Chart section, enter csi-secrets-store-provider-alibabacloud. Keep the default settings for other parameters, and then click Next.
In the dialog box that appears, confirm that the component is installed in the default kube-system namespace and the application is released with the component name. If you want to specify a custom application name and namespace, configure the application name and namespace as prompted.
Set the Chart Version parameter to the latest version. In the Parameters section, configure the parameters based on the authentication method that you selected in Step 1 and click OK.
If you choose to grant permissions by using RRSA, you must set the
rrsa.enableparameter to true to enable RRSA.
The following code block shows other parameters:
envVarsFromSecret:
#  ACCESS_KEY_ID:
#    secretKeyRef: alibaba-credentials
#    key: id
#  SECRET_ACCESS_KEY:
#    secretKeyRef: alibaba-credentials
#    key: secret
  ALICLOUD_ROLE_ARN:
    secretKeyRef: alibaba-credentials
    key: rolearn
#  ALICLOUD_ROLE_SESSION_NAME:
#    secretKeyRef: alibaba-credentials
#    key: rolesessionname
#  ALICLOUD_ROLE_SESSION_EXPIRATION:
#    secretKeyRef: alibaba-credentials
#    key: rolesessionexpiration
  ALICLOUD_OIDC_PROVIDER_ARN:
    secretKeyRef: alibaba-credentials
    key: oidcproviderarn
If you choose to grant permissions to the worker RAM role of a cluster, you can use the default parameter settings to directly install csi-secrets-store-provider-alibabacloud.
If you choose to specify an AccessKey pair to assume a specific RAM role, you must configure the following parameters:
envVarsFromSecret:
  ACCESS_KEY_ID:
    secretKeyRef: alibaba-credentials
    key: id
  SECRET_ACCESS_KEY:
    secretKeyRef: alibaba-credentials
    key: secret
  ALICLOUD_ROLE_ARN:
    secretKeyRef: alibaba-credentials
    key: rolearn
#  ALICLOUD_ROLE_SESSION_NAME:
#    secretKeyRef: alibaba-credentials
#    key: rolesessionname
#  ALICLOUD_ROLE_SESSION_EXPIRATION:
#    secretKeyRef: alibaba-credentials
#    key: rolesessionexpiration
#  ALICLOUD_OIDC_PROVIDER_ARN:
#    secretKeyRef: alibaba-credentials
#    key: oidcproviderarn
To enable the scheduled secrets synchronization feature, you must configure the following parameters:

secrets-store-csi-driver.enableSecretRotation: Specify whether to enable the automatic rotation feature for secrets. Set the value to true to enable the automatic rotation feature for secrets.secrets-store-csi-driver.rotationPollInterval: Specify the frequency at which the secrets are synchronized. In this example, this parameter is set to 120 seconds, which specifies that the secrets are synchronized every 2 minutes. You can adjust the value as needed.
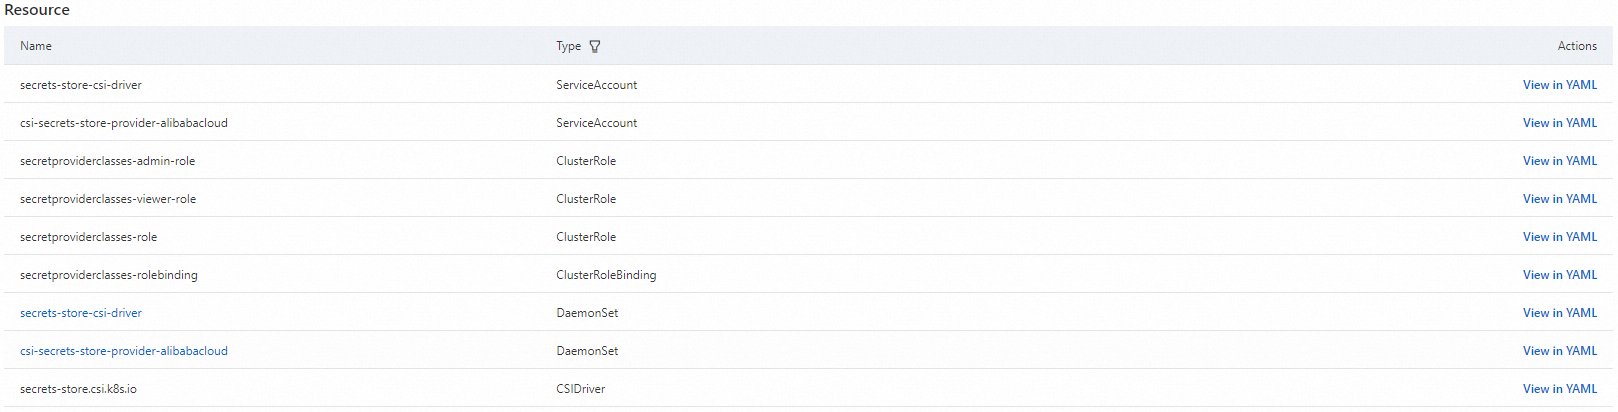
After the creation, you are redirected to the csi-secrets-store-provider-alibabacloud page of the cluster to check the installation result. If all resources in the following figure are created, the component is installed.
Step 3: Configure data synchronization information
After the authentication information is configured, you must configure KMS secrets by using SecretProviderClass.
Configuration template description
The following code block shows the SecretProviderClass template:
apiVersion: secrets-store.csi.x-k8s.io/v1alpha1
kind: SecretProviderClass
metadata:
  name: <NAME>
spec:
  provider: alibabacloud   # Set the value to alibabacloud.
  parameters:
The parameters section usually contains the following request parameters for mounting Kubernetes Secrets.
Parameter | Required | Description |
objects | Yes | The YAML configuration for mounting Kubernetes Secrets. Example: The
|
region | No | Send requests to the Secrets Manager server in the specified region. If you do not specify this parameter, the region of the current node is selected. This may increase performance overhead if your application runs in large numbers of pods. Therefore, we recommend that you configure this parameter to specify a region. |
pathTranslation | No |
|
Configuration example
This example shows how to use the SecretProviderClass to import the secret test from KMS to applications in an ACK managed cluster in the same region.
Create a file named secretstore.yaml and add the following content to the file to define the SecretProviderClass:
apiVersion: secrets-store.csi.x-k8s.io/v1
kind: SecretProviderClass
metadata:
  name: test-secrets
spec:
  provider: alibabacloud   # Set the value to alibabacloud.
  parameters:
    objects: | # objectType: Valid values: oos and kms. Default value: kms.
      - objectName: "test"
      - objectType: "kms"
Run the following command to deploy the SecretProviderClass:
kubectl apply -f secretstore.yamlCreate a file named deploy.yaml and add the following content to the file:
An NGINX Deployment is included, which declares the SecretProviderClass created in the preceding example by using a CSI Inline volume. The secrets are mounted in the
/mnt/secrets-storedirectory of the pod. For more information about Deployments, see Deployment examples.apiVersion: apps/v1 # If the API version is earlier than 1.8.0, use apps/v1beta1. kind: Deployment metadata: name: nginx-deployment-basic labels: app: nginx spec: replicas: 2 selector: matchLabels: app: nginx template: metadata: labels: app: nginx spec: volumes: - name: secrets-store-inline csi: driver: secrets-store.csi.k8s.io readOnly: true volumeAttributes: secretProviderClass: "test-secrets" containers: - name: nginx image: anolis-registry.cn-zhangjiakou.cr.aliyuncs.com/openanolis/nginx:1.14.1-8.6 # Replace this value with the actual image. ports: - containerPort: 80 resources: limits: cpu: "500m" volumeMounts: - name: secrets-store-inline mountPath: "/mnt/secrets-store" readOnly: trueRun the following command to deploy the Deployment:
kubectl apply -f deploy.yamlVerify that the secret is mounted.
Log on to a pod, check whether the secret specified in the SecretProviderClass is created in the mount target
/mnt/secrets-store, and then check whether the secret contains the corresponding ciphertext stored in KMS.
References
For more information about how to import secrets from KMS to applications in ACK Serverless clusters, see Use ack-secret-manager to import secrets from KMS.
To protect the secrets that are read from KMS and cached in the ACK cluster, you can perform one-click encryption. For more information, see Use KMS to encrypt Kubernetes Secrets.