When a frontend application on one origin sends requests to a backend service on a different origin (different domain, protocol, or port), the browser blocks the response unless the backend explicitly allows cross-origin access. Cross-origin resource sharing (CORS) is the standard mechanism for granting this access. In Service Mesh (ASM), you configure CORS through the corsPolicy field in a VirtualService.
How CORS works
CORS uses HTTP headers to negotiate cross-origin access between a browser and a server. The browser classifies each cross-origin request as either a simple request or a preflight request based on the request method, headers, and content type.
Simple requests
The browser sends the cross-origin request directly with an Origin header. The server inspects the origin and, if allowed, returns the appropriate CORS headers in the response. If the origin is not allowed, the browser blocks the response.
# Request
GET /details/2 HTTP/1.1
Host: backend.example.com
Origin: http://frontend.example.com

# Response (origin allowed)
HTTP/1.1 200 OK
Access-Control-Allow-Origin: http://frontend.example.com
Access-Control-Allow-Methods: GET, POST
# Response (origin NOT allowed)
HTTP/1.1 200 OK
Access-Control-Allow-Origin: http://other.example.comIn the second example, the browser blocks the response because the Access-Control-Allow-Origin header does not match the requesting origin.
A request qualifies as simple when it meets all three conditions:
Uses GET, HEAD, or POST.
Sets
Content-Typetotext/plain,application/x-www-form-urlencoded, ormultipart/form-data.Uses only CORS-safelisted headers defined by the Fetch standard:
Accept,Accept-Language,Content-Language, andContent-Type(restricted to the values listed above).
Preflight requests
If the request does not meet all three conditions above, the browser sends an HTTP OPTIONS request before the actual request. This preflight request includes Origin, Access-Control-Request-Method, and Access-Control-Request-Headers headers.
The server responds with headers that specify the allowed origins, methods, headers, and cache duration. If the preflight is accepted, the browser proceeds with the actual cross-origin request.
# Preflight request
OPTIONS /api/data HTTP/1.1
Host: backend.example.com
Origin: http://frontend.example.com
Access-Control-Request-Method: PUT
Access-Control-Request-Headers: X-Custom-Header

# Preflight response (origin allowed)
HTTP/1.1 204 No Content
Access-Control-Allow-Origin: http://frontend.example.com
Access-Control-Allow-Methods: GET, POST, PUT
Access-Control-Allow-Headers: X-Custom-Header
Access-Control-Max-Age: 86400
Configure a CORS policy in a VirtualService
Add the corsPolicy field to a VirtualService definition to allow cross-origin requests to the target service.
corsPolicy parameters
| Parameter | Type | Maps to HTTP header | Description |
|---|---|---|---|
allowOrigins | StringMatch[] | Access-Control-Allow-Origin | Origins allowed to access the service. Each entry supports three matching modes: exact, prefix, and regex. For requests without credentials, set to wildcard (*) to allow all origins. |
allowMethods | string[] | Access-Control-Allow-Methods | HTTP methods allowed for cross-origin requests. |
allowHeaders | string[] | Access-Control-Allow-Headers | Request headers allowed during the actual cross-origin request. |
exposeHeaders | string[] | Access-Control-Expose-Headers | Response headers that browsers are allowed to access. |
maxAge | Duration | Access-Control-Max-Age | How long browsers can cache the preflight response. Example: "24h", "3600s". |
allowCredentials | bool | Access-Control-Allow-Credentials | Whether the browser can include credentials (cookies, authorization headers, or TLS client certificates) in cross-origin requests. |
allowOrigins matching modes:
| Mode | Example | Matches |
|---|---|---|
exact | exact: "https://example.com" | Only https://example.com |
prefix | prefix: "https://example" | Any origin starting with https://example |
regex | regex: "https://.*\\.example\\.com" | Any subdomain of example.com over HTTPS |
Tutorial: enable CORS between two applications
This tutorial walks through deploying a frontend and a backend application in separate namespaces, observing a cross-origin request failure, and resolving it with a CORS policy.
Prerequisites
Before you begin, make sure that you have:
A cluster added to the ASM instance. For more information, see Add a cluster to an ASM instance
The
defaultandfoonamespaces created, with automatic sidecar proxy injection enabled for both. For more information, see Manage global namespaces
Step 1: Deploy the applications
Deploy the backend application
Get the kubeconfig file of the cluster and connect with kubectl. For more information, see Obtain the kubeconfig file of a cluster and use kubectl to connect to the cluster.
Save the following content to a file named
details.yaml:Deploy the application in the
defaultnamespace:kubectl apply -f details.yaml -n default
Deploy the frontend application
Save the following content to a file named
istio-cors-demo.yaml:Deploy the application in the
foonamespace:kubectl apply -f istio-cors-demo.yaml -n foo
Step 2: Deploy ingress gateways
Create two ingress gateways -- one for the backend application and one for the frontend application.
Log on to the ASM console. In the left-side navigation pane, choose Service Mesh > Mesh Management.
On the Mesh Management page, click the name of the ASM instance. In the left-side navigation pane, choose ASM Gateways > Ingress Gateway.
On the Ingress Gateway page, click Create.
Set the Name parameter to
ingressgateway. Select a cluster from the Cluster drop-down list. For CLB Instance Type, select Internet Access. Under Create a CLB Instance, select a Classic Load Balancer (CLB) instance type. Keep the defaults for other parameters and click Create.Repeat steps 3 and 4 to create a second ingress gateway named
ingressgateway2.
Step 3: Create routing rules
Route traffic to the backend application
Create an Istio gateway to associate the
detailsservice with theingressgatewaygateway.In the left-side navigation pane of the ASM instance, choose ASM Gateways > Gateway. Click Create from YAML.
Select default from the Namespace drop-down list, then paste the following YAML and click Create:
apiVersion: networking.istio.io/v1beta1
kind: Gateway
metadata:
  name: bookinfo-gateway
  namespace: default
spec:
  selector:
    istio: ingressgateway
  servers:
    - hosts:
        - '*'
      port:
        name: http
        number: 80
        protocol: HTTP
Create a VirtualService.
In the left-side navigation pane, choose Traffic Management Center > VirtualService. Click Create from YAML.
Select default from the Namespace drop-down list, then paste the following YAML and click Create:
apiVersion: networking.istio.io/v1beta1
kind: VirtualService
metadata:
  name: bookinfo
  namespace: default
spec:
  gateways:
    - bookinfo-gateway
  hosts:
    - '*'
  http:
    - match:
        - uri:
            prefix: /details
      route:
        - destination:
            host: details
            port:
              number: 9080
Verify that the backend application is accessible.
Get the IP address of the
ingressgatewaygateway. For more information, see Create an ingress gateway.Open
http://<ingressgateway-ip>/details/2in a browser. A JSON response confirms that the backend application is running.
Route traffic to the frontend application
Create an Istio gateway to associate the
istio-cors-demoapplication with theingressgateway2gateway.In the left-side navigation pane, choose ASM Gateways > Gateway. Click Create from YAML.
Select foo from the Namespace drop-down list, then paste the following YAML and click Create:
apiVersion: networking.istio.io/v1beta1
kind: Gateway
metadata:
  name: istio-cors-demo-gateway
  namespace: foo
spec:
  selector:
    istio: ingressgateway2
  servers:
    - hosts:
        - '*'
      port:
        name: http
        number: 80
        protocol: HTTP
Create a VirtualService.
In the left-side navigation pane, choose Traffic Management Center > VirtualService. Click Create from YAML.
Select foo from the Namespace drop-down list, then paste the following YAML and click Create:
apiVersion: networking.istio.io/v1beta1
kind: VirtualService
metadata:
  name: istio-cors-demo
  namespace: foo
spec:
  gateways:
    - istio-cors-demo-gateway
  hosts:
    - '*'
  http:
    - route:
        - destination:
            host: istio-cors-demo
            port:
              number: 8000
Observe the cross-origin error
Open
http://<ingressgateway2-ip>in Google Chrome.In the URL field of the demo application, enter
http://<ingressgateway-ip>/details/2and click Send.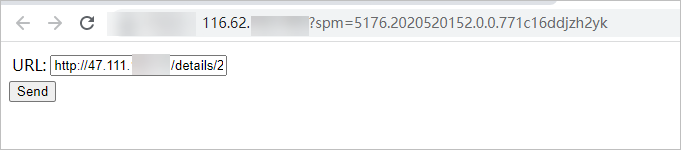
Open Chrome DevTools (press F12 or click the
 icon > More tools > Developer tools). The console shows a CORS error. The frontend on
 ingressgateway2is making a cross-origin request to the backend oningressgateway, but no CORS policy allows it.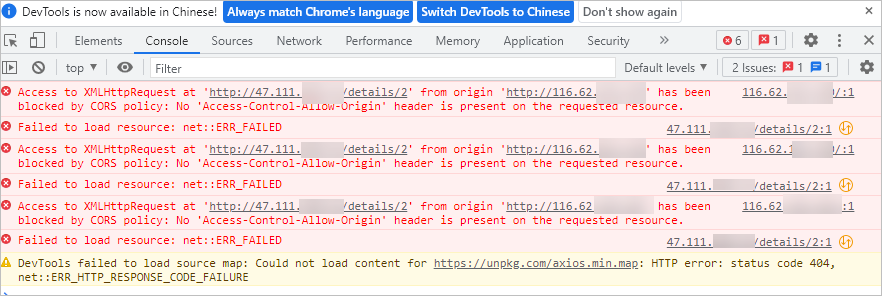
Step 4: Add a CORS policy
Log on to the ASM console. In the left-side navigation pane, choose Service Mesh > Mesh Management.
Click the ASM instance name. In the left-side navigation pane, choose Traffic Management Center > VirtualService.
Find the
bookinfovirtual service and click YAML in the Actions column.In the Edit dialog box, add the following
corsPolicyblock to thehttpfield and click OK: Replace<ingressgateway2-ip>with the actual IP address of theingressgateway2gateway.corsPolicy: allowCredentials: false allowMethods: - POST - GET allowOrigins: - prefix: 'http://<ingressgateway2-ip>' maxAge: 24h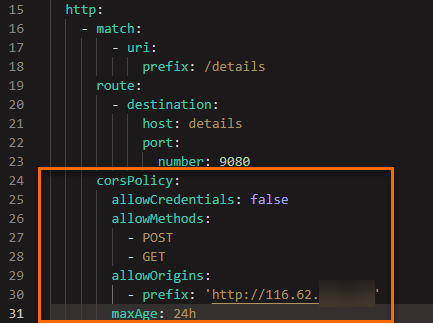
Step 5: Verify the CORS policy
Open
http://<ingressgateway2-ip>in Google Chrome.In the URL field, enter
http://<ingressgateway-ip>/details/2and click Send. The frontend application successfully retrieves data from the backend service. The CORS policy is in effect.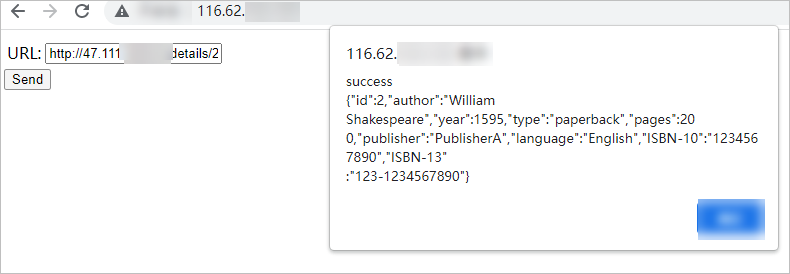
Troubleshooting
CORS errors persist after adding a policy
Check the
allowOriginsvalue. The origin must match the scheme, hostname, and port of the requesting page exactly. For example,http://10.0.0.1does not matchhttp://10.0.0.1:8080.Verify that the VirtualService was saved. Reopen the YAML and confirm that the
corsPolicyblock appears under the correcthttproute.Inspect response headers. In Chrome DevTools, open the Network tab and check the response headers for
Access-Control-Allow-Origin. If this header is missing, the policy is not applied to the route that handled the request.
Preflight fails with 403 or missing CORS headers
Verify that
allowMethodsincludes the HTTP method used in the actual request.If the request sends custom headers, add them to
allowHeaders.
Wildcard origins with credentials
Setting allowOrigins to wildcard (*) while allowCredentials is true violates the CORS specification. Browsers reject this combination. Specify explicit origins when credentials are required.
Cached preflight responses cause stale CORS behavior
If you update a CORS policy but browsers continue to use a previous preflight result, the cached response may be stale. Reduce the maxAge value during testing, or clear the browser cache to force a new preflight request.