Web Application Firewall (WAF) inspects and filters malicious web traffic before it reaches your backend services. By connecting an Alibaba Cloud Service Mesh (ASM) ingress gateway to a WAF instance, you protect your origin servers against common web attacks while preserving service availability.
Two integration methods are available:
| Criteria | Layer 4 CLB (recommended) | CNAME |
|---|---|---|
| Traffic scope | All traffic to the ingress gateway | Traffic for specific domain names only |
| How it works | Routes all CLB traffic through the WAF instance | Points DNS records for selected domains to WAF, which then forwards to the gateway |
| DNS changes | None | Required -- point domain DNS to the WAF-provided CNAME |
| Best for | Full protection of all ingress traffic | Selective protection when only some domains need WAF |
How it works
WAF sits between clients and the ingress gateway. It analyzes incoming requests, blocks malicious traffic, and forwards legitimate requests to your origin servers. WAF can also inject custom headers into forwarded requests so that downstream services and logs can identify WAF-inspected traffic.
Layer 4 CLB method: All traffic of the ingress gateway is routed to the WAF instance. WAF rules are executed for all the requests that reach the CLB instance of the ingress gateway.
CNAME method: Client -> DNS (CNAME) -> WAF -> Ingress Gateway -> Backend services
Prerequisites
Before you begin, make sure that you have:
-
An ingress gateway deployed in your ASM instance. For more information, see Create an ingress gateway
-
A cluster added to the ASM instance. For more information, see Add a cluster to an ASM instance
-
The HTTPBin application deployed and exposed on port 80 of the gateway. For more information, see Deploy the httpbin application
Step 1: Connect the ingress gateway to WAF
Method 1: Use a Layer 4 CLB instance
This method routes all ingress gateway traffic through WAF. A Classic Load Balancer (CLB) instance was formerly known as a Server Load Balancer (SLB) instance.
-
Log on to the Web Application Firewall console. Click Subscription or Pay-As-You-Go based on your billing preference, confirm the region and other settings, and click Buy Now to create a WAF 3.0 instance.
If you already have a WAF instance, skip this step.
-
In the left-side navigation pane, click Website Configuration. On the Website Configuration page, click the Cloud Native tab, click CLB(TCP), and then click Add.
-
In the Configure Instance- Layer 4 CLB Instance panel, find the CLB instance associated with your ingress gateway and click Add Port in the Actions column. Select the port used by the ingress gateway, and then click OK.
This example uses HTTP port 80. To use HTTPS, configure an HTTPS certificate first.
NoteTo find the CLB instance associated with your ingress gateway, log on to the ASM console and check the gateway details page.
-
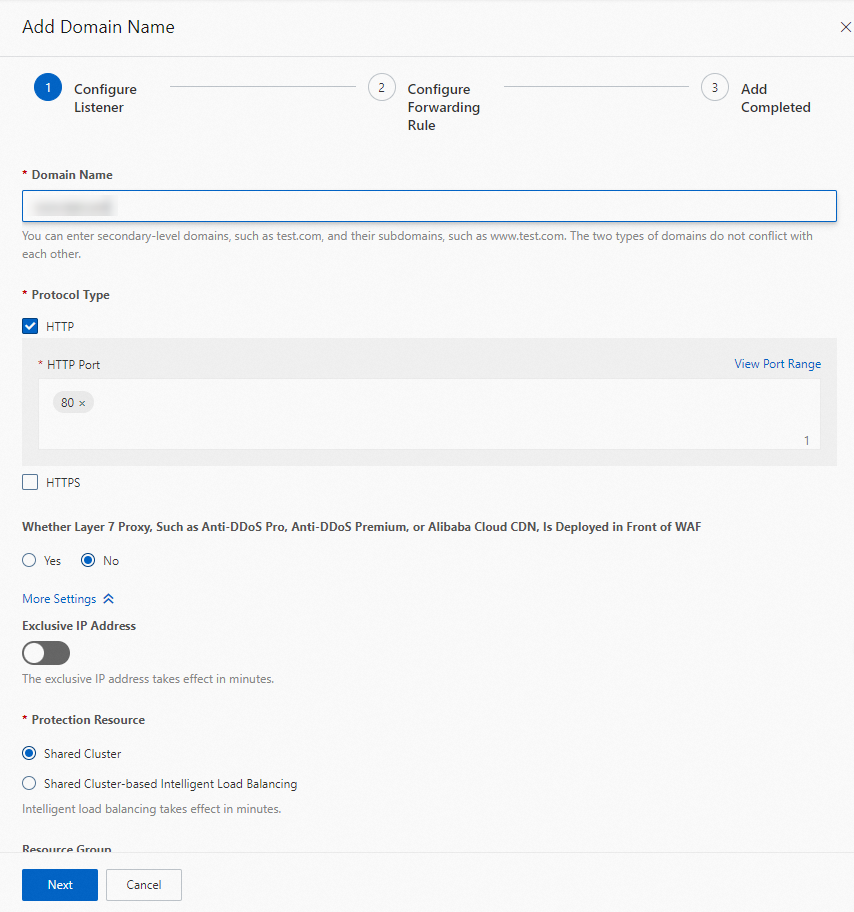
Select Enable Traffic Mark. Add the following three headers and click OK:
Header type Header name Header value Custom Header customwaftagcustomwaftagvalueOriginating IP Address clientrealip(auto-populated) Source Port clientrealport(auto-populated) Requests that pass through WAF carry these headers. Use them to confirm WAF protection and trace client information.
Method 2: Use a CNAME
Use this method to protect specific domain names while leaving other ingress traffic unaffected.
This method requires a DNS change. Point the domain name to the WAF-provided CNAME so that WAF can intercept and forward the traffic to the ingress gateway.
-
Log on to the Web Application Firewall console. Click Subscription or Pay-As-You-Go based on your billing preference, confirm the region and other settings, and click Buy Now to create a WAF 3.0 instance.
If you already have a WAF instance, skip this step.
-
In the left-side navigation pane, click Website Configuration. On the Website Configuration page, click the CNAME Record tab and click Add.
-
In the Configure Listener step, configure the listener parameters and click Next.
The following figure shows a configuration example.
-
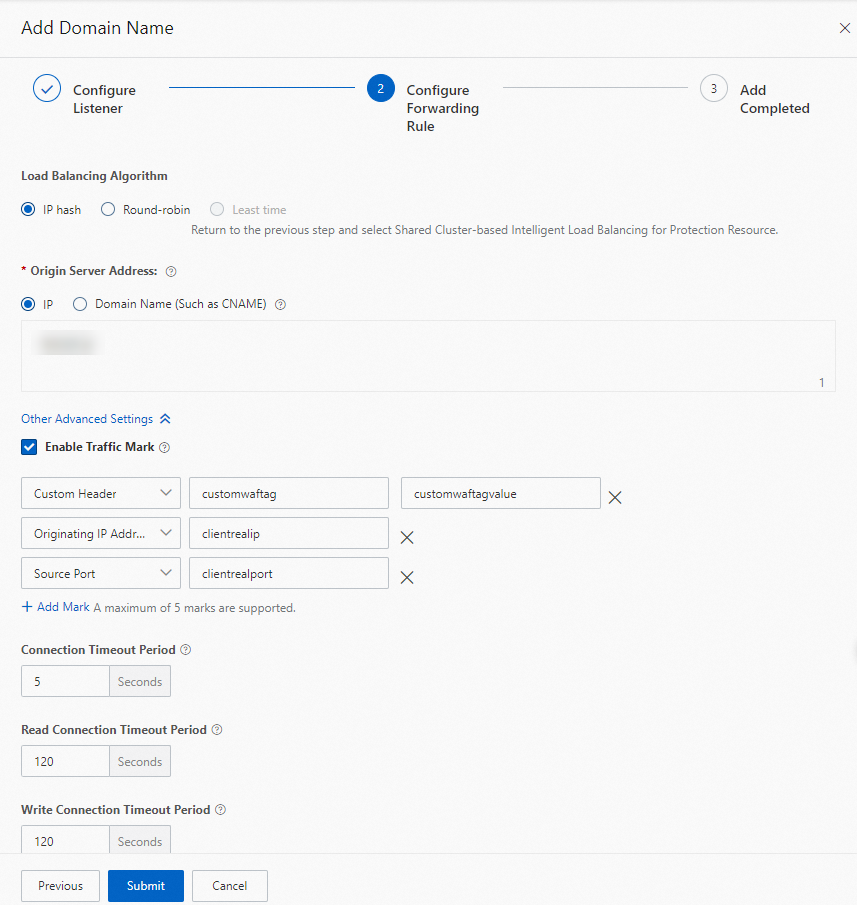
In the Configure Forwarding Rule step, configure the following settings:
-
Set Load Balancing Algorithm to IP hash.
-
Set Origin Server Address to IP and enter the public IP address of the ingress gateway.
-
Select Enable Traffic Mark and add the following three headers:
Header type Header name Header value Custom Header customwaftagcustomwaftagvalueOriginating IP Address clientrealip(auto-populated) Source Port clientrealport(auto-populated) -
Keep the default values for other parameters and click Submit.
-
-
In the Add Completed step, click Copy CNAME to save the WAF-provided CNAME, and then click Complete.
NoteUpdate the DNS record for the domain name configured in this step to point to the WAF-provided CNAME. Until the DNS record is updated, traffic does not flow through WAF.
Step 2: (Optional) Add WAF headers to access logs
After WAF is connected, it injects headers such as customwaftag, clientrealip, and clientrealport into forwarded requests. By default, these headers do not appear in ASM gateway access logs. To include them for debugging and observability, customize the access log fields in the ASM console.
For detailed instructions, see Customize access logs on the data plane.
Step 3: Verify the WAF connection
After completing the integration, verify that traffic flows through WAF.
If you used a Layer 4 CLB instance
Open a browser and go to http://<ingress-gateway-IP>:80/status/418.
Expected output:
-=[ teapot ]=-

       _...._
     .'  _ _ `.
    | ."` ^ `". _,
    \_;`"---"`|//
      |       ;/
      \_     _/
        `"""`
If you used a CNAME
Run the following command. Replace the placeholders with your actual values.
curl -H "Host:<domain-name-configured-on-WAF>" "http://<WAF-provided-CNAME>/status/418" -v| Placeholder | Description | Example |
|---|---|---|
<domain-name-configured-on-WAF> |
The domain name you configured in the WAF console | example.com |
<WAF-provided-CNAME> |
The CNAME that WAF assigned to your domain | geszcfxxxxxxxxxxxxxxxxxxxxppbeiz.aliyunwaf1.com |
Expected output:
*   Trying x.x.x.x:80...
* Connected to geszcfxxxxxxxxxxxxxxxxxxxxppbeiz.aliyunwaf1.com (x.x.x.x) port 80 (#0)
> GET /status/418 HTTP/1.1
> Host:xxxx
> User-Agent: curl/7.84.0
> Accept: */*
>
* Mark bundle as not supporting multiuse
< HTTP/1.1 418 Unknown
< Date: Wed, 22 Feb 2023 05:07:23 GMT
< Content-Length: 135
< Connection: keep-alive
< Set-Cookie: acw_tc=0bc1599a16770424432844282e82xxxxxxxxxxxxxxxxxxx1ad989e7e5245f;path=/;HttpOnly;Max-Age=1800
< server: istio-envoy
< x-more-info: http://tools.ietf.org/html/rfc2324
< access-control-allow-origin: *
< access-control-allow-credentials: true
< x-envoy-upstream-service-time: 1
<
-=[ teapot ]=-

       _...._
     .'  _ _ `.
    | ."` ^ `". _,
    \_;`"---"`|//
      |       ;/
      \_     _/
`"""`This example does not use an actual domain name. To access the service through the real domain name, update DNS resolution to point the domain name to the WAF-provided CNAME.
Troubleshooting
If verification fails, check the following:
| Symptom | Possible cause | Solution |
|---|---|---|
| Teapot response does not appear (CLB method) | WAF instance is not connected to the correct CLB instance or port | In the WAF console, verify the CLB instance and port match the ingress gateway configuration |
| Teapot response does not appear (CNAME method) | DNS record is not updated to point to the WAF-provided CNAME | Update the DNS record for the domain name to point to the WAF-provided CNAME |
| WAF headers are missing from logs | Access log fields are not customized | Complete Step 2 to add WAF headers to the access log format |
Step 4: View WAF headers in gateway logs
After you complete Step 2 to add WAF headers to your access log format, verify that the headers appear in the logs:
-
Log on to the ASM console. In the left-side navigation pane, choose Service Mesh > Mesh Management.
-
On the Mesh Management page, click the name of your ASM instance. In the left-side navigation pane, choose Observability Management Center > Log Center.
-
On the ASM Gateway Logs tab, enter
418in the search box and click Search & Analyze.The log entries show the values of the WAF-injected headers (
customwaftag,clientrealip,clientrealport).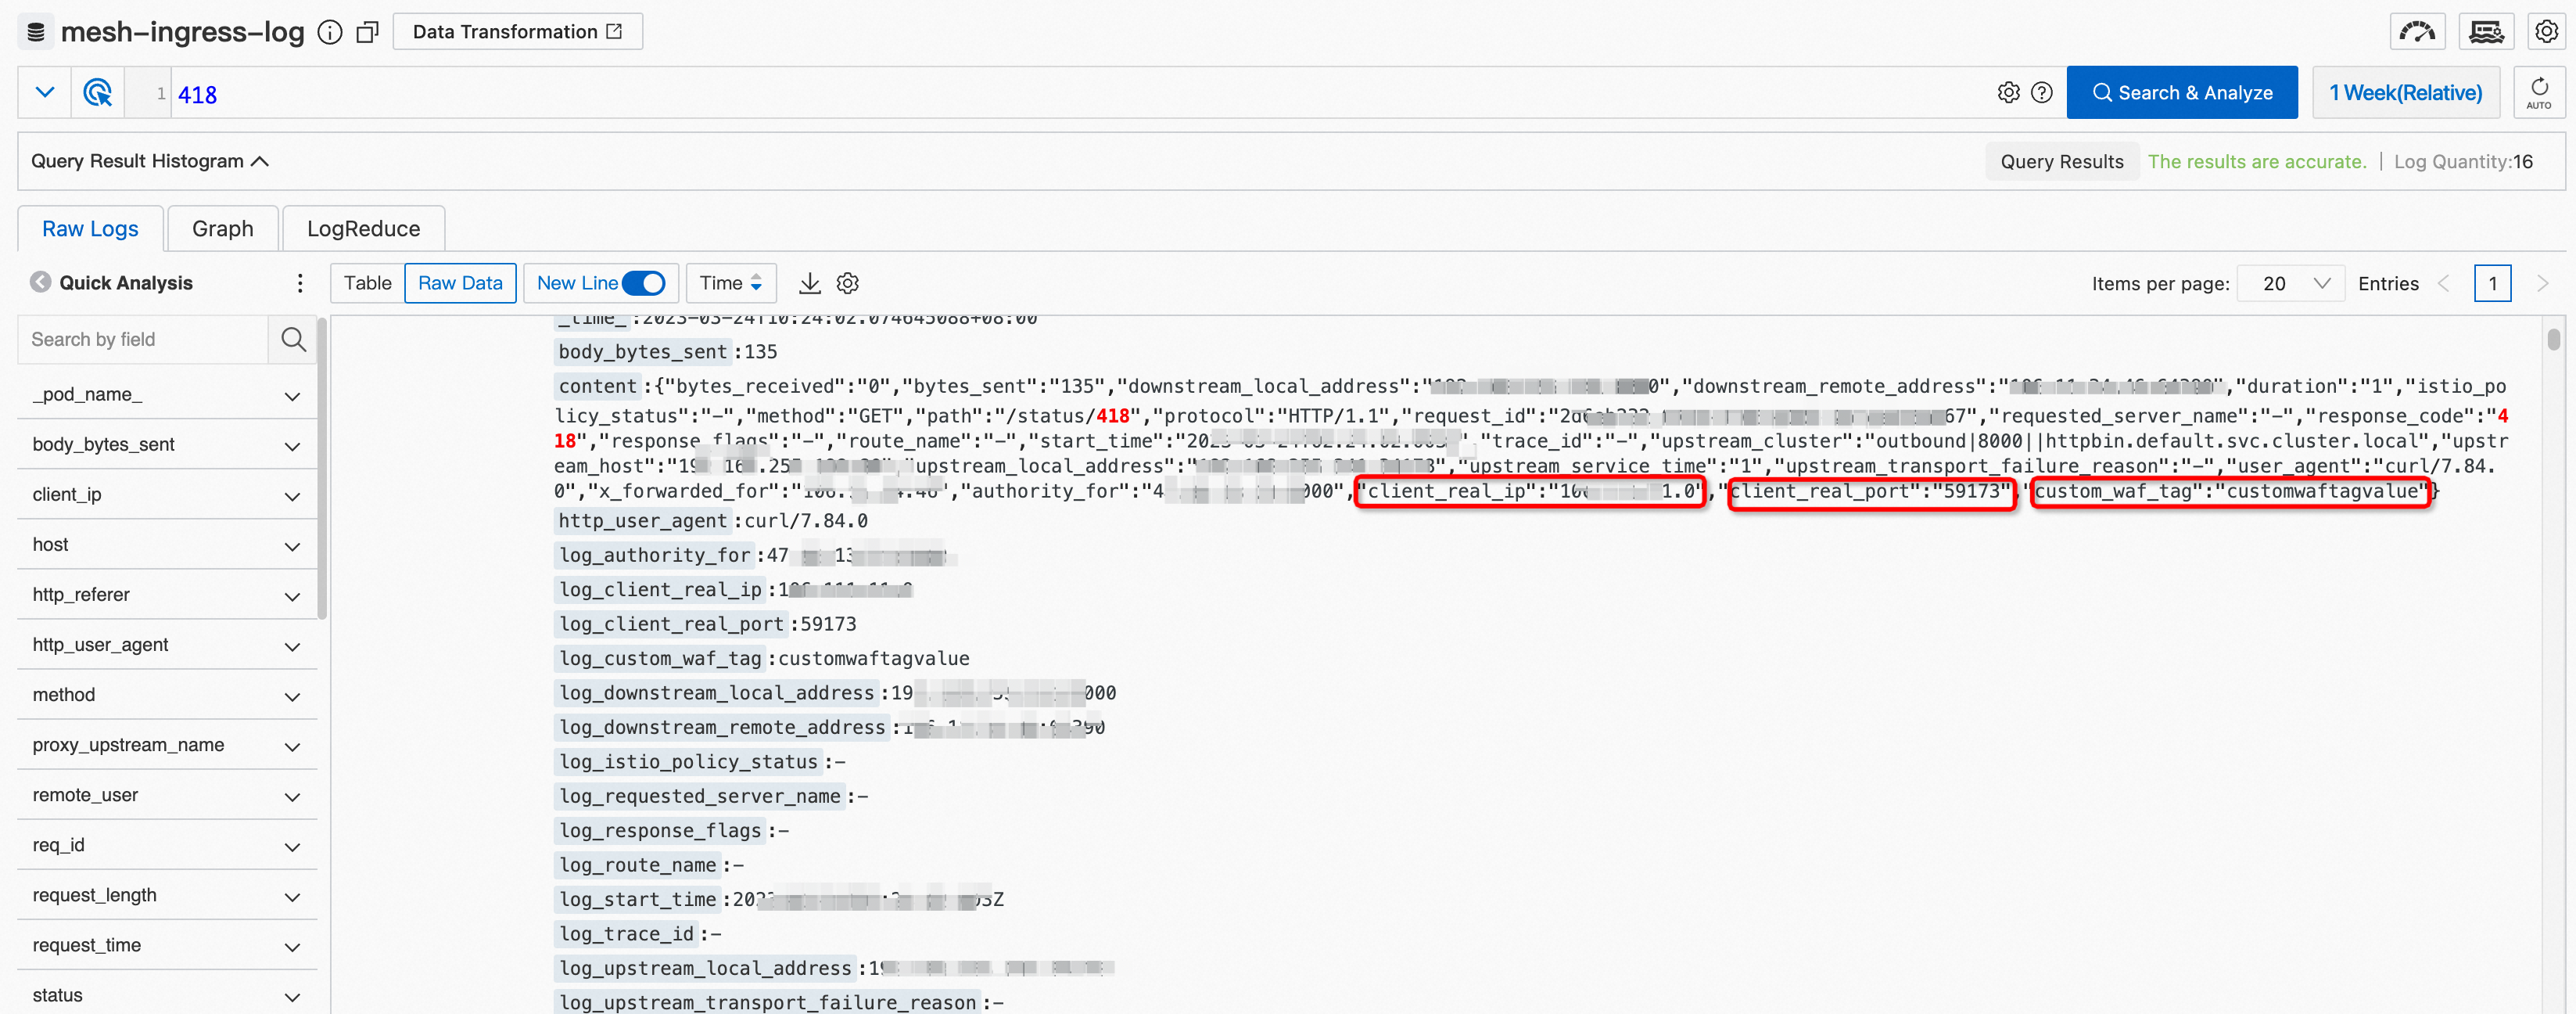
What to do next
-
Configure WAF protection rules. Log on to the WAF console to configure advanced protection capabilities to protect your website from attacks.
-
Monitor additional headers. To track custom headers beyond the three configured above, repeat Step 2 to add them to your access log format.