When multiple alert rules fire across different Prometheus instances and Kubernetes clusters, determining which team member should respond -- and through which channel -- becomes difficult to manage manually. Notification policies solve this by defining matching rules that automatically route alert events to the right recipients through the right channels, grouping related events to reduce noise.
Prerequisites
Before you begin, ensure that you have:
Contacts configured for receiving alert notifications
Create a notification policy
This procedure walks through five configuration stages: matching rules, event grouping, notification objects, repeat/escalation behavior, and action integrations.
Log on to the Managed Service for Prometheus console. In the left-side navigation pane, choose Alert Management > Notification Policies.
In the upper-right corner of the Notification Policies page, click Create Notification Policy.
On the Create Notification Policy page, enter a notification policy name.
Configure a matching rule. A matching rule determines which alert events trigger this notification policy.
Select a data source.
To process only alert events from a specific source, select that data source. ARMS processes alert events of the specified data source and sends alert notifications based on the matching rule.
To process all alert events regardless of source, select No Preset Source. ARMS processes all alert events and sends alert notifications based on the matching rule.
Define one or more filter expressions using tags. Add custom tags or select from existing tags.
Existing tags come from two sources:
Fields defined in alert rule expressions. For details, see Create an alert rule for a Prometheus instance.
Default tags provided by Application Real-Time Monitoring Service (ARMS). See the default tags reference below.
Note: To require multiple conditions at the same time (AND logic), click + condition within the same matching rule. To trigger the policy when any one condition is met (OR logic), click + add rule to add a separate matching rule.Click Next.
Configure event grouping. Grouping controls how alert events are batched into notifications. Click Next.
Option Behavior No grouping All alert events are sent to the contacts in a single alert notification. Group by field Alert events that share the same field value are grouped into a single notification, reducing alert noise. Configure notification objects.
Click + Add Notification Object and select one or more recipients.
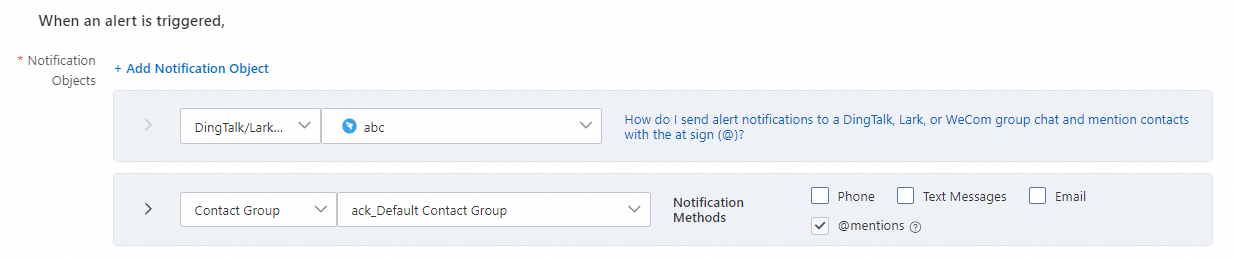
Recipient type Description Contact An individual contact. Select a notification method: phone call, text message, or email. Contact group A group of contacts. Select a notification method: phone call, text message, or email. Shift An on-call schedule. Select a notification method: phone call, text message, or email. IM application A messaging channel: DingTalk, Lark, or WeCom. Webhook A custom webhook endpoint. Specify whether to send clearing notifications after an alert is resolved. When enabled, the alert status automatically changes to Resolved after all related events are handled, and the system sends a clearing notification to the configured recipients.
Select a notification template to customize the alert message format. For details, see Configure a notification template and a webhook template.
Set the time window during which alert notifications are sent.
(Optional) Select a ticket system integration to automatically create tickets from alerts. For details, see Notification integrations.
Click Next.
Configure repeat, escalation, and clearing behavior. This stage controls what happens after the first notification is sent. Click Next.
Option Behavior No repeat or escalation Only one notification is sent before the alert is cleared. Repeat notifications Notifications are resent at a configured interval until the alert is cleared. Escalation policy Notifications are sent to additional recipients based on the escalation policy until the alert is cleared. Manual clearing Alerts must be manually handled and cleared. Configure action integrations. Select action integrations that take effect when alerts are triggered or cleared.
Click Save.
Manage notification policies
After creation, notification policies appear on the Notification Policies page.
| Operation | Steps |
|---|---|
| Edit | Click the policy name, or click Edit in the Actions column. Modify the settings and click Save. |
| Enable or disable | Toggle the Status switch. |
| Delete | Click Delete in the Actions column, then click OK to confirm. |
| Duplicate | Click Copy in the Actions column to create a copy of the policy. |
Default tags reference
ARMS provides the following default tags for use in matching rule expressions.
Common fields
| Tag | Description |
|---|---|
alertname | Name of the alert. |
clustername | Name of the Kubernetes cluster. |
severity | Severity level of the alert. Valid values: P1, P2, P3, P4, Default. |
namespace | Kubernetes namespace. |
pod_name | Kubernetes Pod name. |
Preset system fields
| Tag | Description |
|---|---|
_aliyun_arms_integration_name | Name of the integration specified as the data source. Default: ARMS-DEFAULT. |
_aliyun_arms_involvedObject_id | ID of the object that triggered the alert. |
_aliyun_arms_involvedObject_name | Name of the object that triggered the alert. |
_aliyun_arms_region_id | Region ID of the ARMS instance. |
_aliyun_arms_alert_rule_id | ID of the alert rule. |
_aliyun_arms_alert_type | Type of alert rule. Valid values: 101 (Prometheus alert), 5 (Application Monitoring alert), 4 (Browser Monitoring alert). |