Virtual private cloud (VPC) sharing lets you share vSwitches in non-default VPCs with other Alibaba Cloud accounts using resource sharing. Within a shared vSwitch, both the owner and participants can deploy cloud resources, such as Elastic Compute Service (ECS) and Apsara RDS instances. Participants of a shared vSwitch can only view and manage their own resources. They cannot access, modify, or delete resources created by other accounts.
How it works

After Account A shares a vSwitch with Accounts B, C, and D, each account can independently deploy cloud resources in the shared vSwitch. All resources share the same IP address space and are connected by default. The vSwitch owner (Account A) retains full control over network policies and can use network ACLs or security groups to enforce isolation at the vSwitch or individual resource level.
Typical use cases:
Centralized management
The operations team centrally plans, configures, and manages VPCs.
Business units are granted access to shared vSwitches, where they can create and manage resources such as ECS instances, without needing to manage network infrastructure.
Simplified operations in multi-account environments
Eliminates the need for creating a VPC for each account.
Reduces the total number of VPCs used and simplifies network management and monitoring.
Limits
Default VPCs cannot be shared. To use the VPC sharing feature, you must create a custom VPC. For existing cloud resources in a default VPC, consider migrating them to or recreating them in a non-default VPC.
When using VPC peering connections to connect existing cloud resources, refer to Resource types that can be created in a shared vSwitch and Permissions of vSwitch owners and participants to see if it is applicable. If so, we recommend recreating these resources in the shared VPC. If the resources support cross-VPC migration, migrate them to the shared VPC. If it is not applicable or if recreation or migration is not feasible, use the VPC peering connection or Cloud Enterprise Network (CEN) to enable cross-account network communication.
Resource types that can be created in a shared vSwitch
ECS instances
Server Load Balancer (SLB) instances
ApsaraDB for RDS instances
Terway components
ApsaraDB for MongoDB instances
ApsaraDB for Redis instances
Kafka instances
Elasticsearch clusters
Container Registry instances
PolarDB for MySQL clusters
ApsaraMQ for RocketMQ instances
Microservices Engine (MSE) instances
Permissions of vSwitch owners and participants
The owners and participants of shared vSwitches have the following permissions:
Resource | Owners | Participants |
Cloud resources (such as ECS and RDS) | Each account can only view and manage cloud resources and security groups it creates. It cannot view and manage those created by other accounts. | |
Security groups | ||
Elastic network interfaces (ENIs) | Call DescribeNetworkInterfaces to view ENIs created by participants. Managing ENIs created by participants is not supported. | View and manage ENIs the participant creates. The participant cannot view ENIs of other accounts. |
VPC, vSwitch, route table, network ACL, and secondary CIDR block | All permissions | View only |
Reserved CIDR blocks | All permissions | No permissions |
IPv6 gateway | All permissions |
|
Flow logs |
| Create flow logs at the ENI level, which only apply to participant ENIs. |
NAT gateway, VPN gateway, Cloud Enterprise Network, and VPC peering connection | All permissions | No permissions to view or manage, but can connect to external networks through these resources. |
Tags | Tags configured by the vSwitch owner are not affected. Owners and participants can configure tags for their own resources. These tags are not visible to and do not affect each other. | |
After a vSwitch is unshared:
Resource | Participant permissions |
Cloud resources (ECS or RDS) | Can continue to use, view, modify, and delete existing resources. Cannot create new resources in the unshared vSwitch. |
vSwitch and its associated resources | Cannot view the shared vSwitch or associated resources, such as VPC, route table, private CIDR block, and network ACL. |
Tags | Tags configured by the vSwitch owner are automatically deleted. |
Create cloud resources in a shared vSwitch
The vSwitch owner can share the vSwitch with any Alibaba Cloud account, or limit sharing to accounts within a resource directory. Once sharing is enabled, participants can create cloud resources in the shared vSwitch.
Console
1. Enable sharing
This section only describes how to share a vSwitch with other accounts. See sharing resources within a resource directory for more.
Log on to the owner account and go to the Resource Sharing - Resources I Share page in the Resource Management console. In the upper-left corner of the top menu bar, select the region where the resource to be shared is located, and click Create Resource Share. On the page that appears:
Step 1: Enter a Resource Share Name, and select the vSwitch to be shared.
Step 2: The AliyunRSDefaultPermissionVSwitch permission is selected by default.
Step 3: For Principal Scope, select All Accounts. For Method, select Add Manually. Enter the Alibaba Cloud account ID of the participants, and click Add.
Step 4: Verify the information, and click OK.
Log on to the participant account and accept the sharing invitation:
Go to the Resource Sharing - Resources Shared to Me page.
In the upper-left corner of the top menu bar, select the region where the shared resource is located, and click Accept in the Status column of the target resource share.
After accepting, the participant can access the shared vSwitch, and any new shared resources added to this resource share will be automatically accepted.
Step 2: Create cloud resources in a shared vSwitch
Log on to the principal account:
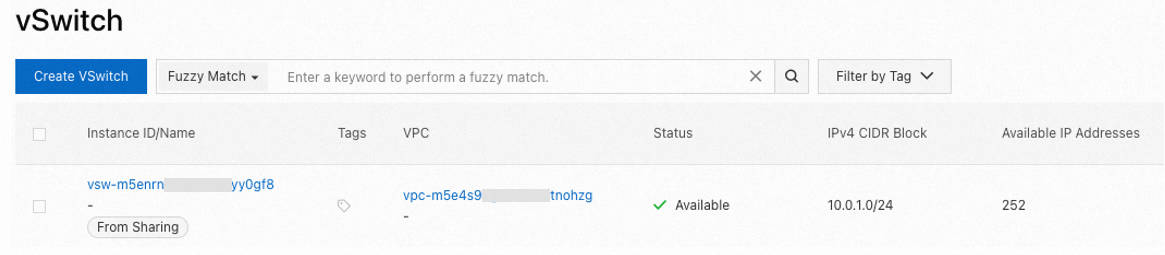
Go to the vSwitch page in the VPC console. Select the region of the shared vSwitch in the top menu bar, and you'll see the shared vSwitch (marked as "from sharing").
To create ECS, RDS, and SLB instances, click Add Cloud Service in the Actions column of the target shared vSwitch.
For other resource types that can be created in shared vSwitches, select the shared vSwitch when you create them.
API
Step 1: Enable sharing
Method 1: Share with any account
Call CreateResourceShare with the owner credentials to create a resource share. Make sure to set the
AllowExternalTargetsparameter toTrue.Use the participant credentials to call ListResourceShareInvitations to query the invitations, and call AcceptResourceShareInvitation to accept the invitation.
Method 2: Share within a resource directory
Call EnableSharingWithResourceDirectory with the owner credential to enable resource directory sharing.
Call CreateResourceShare with the participant credentials to create a resource share. Make sure to set the
AllowExternalTargetsparameter toFalse.
Step 2: Create cloud resources
Log on to the principal account.
Call DescribeVSwitches to get the list of vSwitches.
In the vSwitch list, filter out shared vSwitches (where the
ShareTypefield isSharing).Call the creation operation of the resource (such as RunInstances for ECS) to create cloud resources based on the shared vSwitch.
Terraform
Step 1: Enable sharing
The vSwitch owner creates a resource share:
Currently, Terraform does not support sharing vSwitches with any account. It only supports sharing within a resource directory. Before you perform operations, make sure the vSwitch owner has enabled resource sharing.
Resources: alicloud_resource_manager_resource_share, alicloud_resource_manager_shared_resource, alicloud_resource_manager_shared_target
# Specify the region.
provider "alicloud" {
  region = "cn-hangzhou"
}

# Specify the name of the resource share.
resource "alicloud_resource_manager_resource_share" "example_unit" {
  resource_share_name = "example_unit_name"
}

# Specify the shared vSwitch.
resource "alicloud_resource_manager_shared_resource" "example_vsw" {
  resource_share_id = alicloud_resource_manager_resource_share.example_unit.id
  resource_id       = "vsw-bp1omg98fixldnwcxxxxx" # Replace the value with the ID of the shared vSwitch.
  resource_type     = "VSwitch"                   # The resource type is VSwitch.
}

# Specify the principal of the shared vSwitch.
resource "alicloud_resource_manager_shared_target" "example_target" {
  resource_share_id = alicloud_resource_manager_resource_share.example_unit.id
  target_id         = "10xxxxxxxxxxxxxx" # Replace the value with the UID of the vSwitch principal.
}
Step 2: Create cloud resources in a shared vSwitch
The following example shows how a vSwitch participant creates an ECS instance in a shared vSwitch:
Resources: alicloud_security_group, alicloud_instance
Data sources: alicloud_vswitches
# Specify the region.
provider "alicloud" {
  region = "cn-hangzhou"
}

# Specify the shared vSwitch.
variable "vsw_id" {
  default = "vsw-bp1omg98fixldnwcxxxxx" # Replace the value with the ID of the shared vSwitch.
}

# Obtain information about the target shared vSwitch.
data "alicloud_vswitches" "example_vsw" {
  ids = [var.vsw_id]
}

# Create a security group.
resource "alicloud_security_group" "example_sg" {
  security_group_name = "example_sg_name"
  vpc_id              = data.alicloud_vswitches.example_vsw.vswitches[0].vpc_id
}

# Create an ECS instance.
resource "alicloud_instance" "example_ecs" {
  instance_name        = "example_ecs_name"
  instance_type        = "ecs.e-c1m1.large"
  security_groups      = [alicloud_security_group.example_sg.id]
  vswitch_id           = var.vsw_id
  image_id             = "aliyun_3_x64_20G_alibase_20250117.vhd"
  system_disk_category = "cloud_essd"
}
Manage shared vSwitches and participants
A vSwitch owner can perform the following operations:
View shared vSwitches and participants
Share more vSwitches
Share a vSwitch with other accounts
Console
Go to the Resource Sharing - Resources I Share page. In the upper-left corner of the top menu bar, select the region where the shared resource is located.
On the Shared by Me page, you can:
View shared vSwitches: Click the Shared Resources tab to view them.
View the participants: Click the Principals tab to view them.
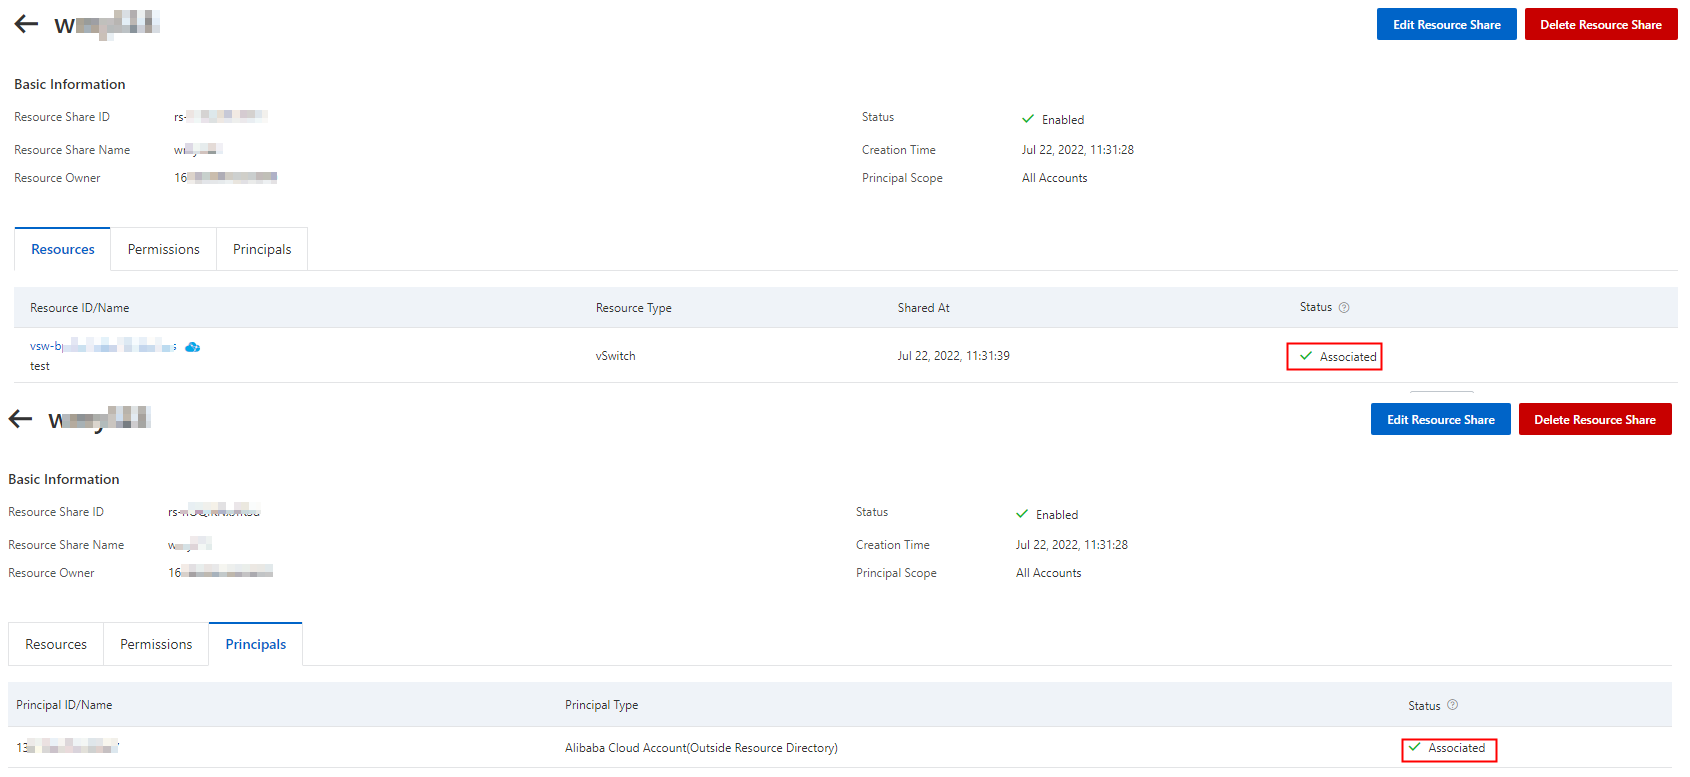
Click the Resource Shares tab, find the target resource share, and click its ID.
You can click the Resources or Principals tab to view the shared vSwitches and participants, respectively.
If the Status in the Resources and Principals tabs is Associated, it indicates that the shared resources and participants have been added:
On the resource share page, click Edit Resource Share in the upper-right corner. You can perform the following operations:
Add or remove shared vSwitches: In Step 1, select or deselect vSwitches.
Add or remove participants: In Step 3, add or remove account UIDs.
Verify the information and click OK in Step 4 of the Edit Resource Share page.
API
The vSwitch owner views shared vSwitches and participants:
Call ListSharedResources to view the list of shared vSwitches.
Call ListSharedTargets to view the list of participants of shared vSwitches.
The vSwitch owner manages shared vSwitches and participants in a resource share:
Call ListResourceShareAssociations to view vSwitches or participants.
Call AssociateResourceShare to add shared vSwitches or participants.
Call DisassociateResourceShare to remove shared vSwitches or participants.
Terraform
View shared vSwitches and participants
The vSwitch owner views resource shares, shared resources, and participants:
Datasources: alicloud_resource_manager_resource_shares, alicloud_resource_manager_shared_resources, alicloud_resource_manager_shared_targets
# Specify the region.
provider "alicloud" {
  region = "cn-hangzhou"
}

# The list of resource shares.
data "alicloud_resource_manager_resource_shares" "example_units" {
  resource_share_owner = "Self" # View the resource shares that you have shared with other accounts.
}
# Output the list.
output "first_resource_manager_resource_share_id" {
  value = data.alicloud_resource_manager_resource_shares.example_units.shares
}

# The list of shared resources.
data "alicloud_resource_manager_shared_resources" "example_resources" {
}
# Output the list.
output "first_resource_manager_shared_resource_id" {
  value = data.alicloud_resource_manager_shared_resources.example_resources.resources
}

# The list of principals of the shared resources.
data "alicloud_resource_manager_shared_targets" "example_targets" {
}
# Output the list.
output "first_resource_manager_shared_target_id" {
  value = data.alicloud_resource_manager_shared_targets.example_targets.targets
}
Add or delete a shared vSwitch
A vSwitch owner can add or delete alicloud_resource_manager_shared_resource in the .tf file to add or delete a shared vSwitch.
Add or delete a principal for a shared vSwitch
A vSwitch owner can add or delete alicloud_resource_manager_shared_target in the .tf file to add or delete a principal for a shared vSwitch.
More information
Billing
While the VPC sharing feature itself is free of charge, resource owners and participants are charged for the cloud resources that they create, such as ECS and RDS instances.
Supported regions
Area | Regions |
Asia Pacific - China | China (Hangzhou), China (Shanghai), China (Qingdao), China (Beijing), China (Zhangjiakou), China (Hohhot), China (Ulanqab), China (Shenzhen), China (Heyuan), China (Guangzhou), China (Chengdu), and China (Hong Kong) |
Asia Pacific - Others | Japan (Tokyo), South Korea (Seoul), Singapore, Malaysia (Kuala Lumpur), Indonesia (Jakarta), Philippines (Manila), and Thailand (Bangkok) |
Europe & Americas | Germany (Frankfurt), UK (London), US (Silicon Valley), and US (Virginia) |
Middle East | SAU (Riyadh - Partner Region) Important The SAU (Riyadh - Partner Region) region is operated by a partner. |
Quotas
Quota name | Description | Default limit | Increase quota |
vpc_quota_sharedvpc_share_user_num_per_vpc | The number of vSwitch principals to which a VPC can be shared. | 50 | Go to the Quota Management page or Quota Center to request a quota increase. |
vpc_quota_sharedvpc_share_user_num_per_vswitch | The number of vSwitch principals to which a vSwitch in a VPC can be shared. | 50 | |
vpc_quota_sharedvpc_accept_shared_vswitch_num | The number of shared vSwitches that a vSwitch principal can accept. | 30 |