This topic describes how to use the Cloud Backup console to migrate a VMware virtual machine (VM) from an on-premises host or storage location to the cloud.
Prerequisites
You must be familiar with the operating system and VMware platform limits for Alibaba Cloud Elastic Compute Service (ECS) instances. For more information, see Limits on VMware VM migration.
Background information
The VMware VM migration service is a non-intrusive, agentless solution for migrating entire VMs from a VMware environment. It performs a full-copy migration using VMware snapshots and reading data directly from the disk, eliminating the need for agents on the source VM.
Step 1: Create a migration gateway
Log on to the Cloud Backup console.
In the navigation pane on the left, choose .
In the top-left corner of the menu bar, select a region.
On the VMware VM Migration page, click Create Migration Gateway.
NoteYou can create only one migration gateway in each region.
In the Create Migration Gateway panel, configure the following parameters and then click Create.
Parameter
Description
Gateway Name
Enter a name for the migration gateway. The name can be up to 64 characters long.
Software Platform
Currently, only vSphere is supported.
Network Type
VPC: Select this option if the gateway transmits migration data over a leased line.
Internet: Select this option in scenarios where a VPC is not available.
Use HTTPS
You can select whether to use HTTPS to transfer data. Using HTTPS provides higher data security. Data is also encrypted at rest in the backup vault. Changes to this setting take effect when the next migration task starts.
On the Migration Gateway tab, click Actions > More to select Download Gateway and Download Certificate.
NoteThe gateway connects to the backup service and the certificate activates the client. You can download both from the client list at any time.
Step 2: Install the client
After you download the client and certificate, you must install the client to perform migration tasks. To install the client, follow these steps:
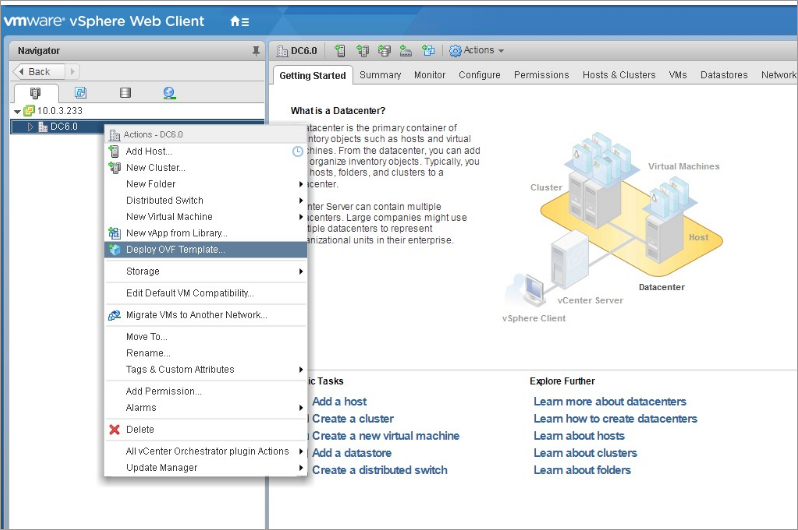
Log on to the vSphere Web Client.
In the navigation pane on the left, select the VM that you want to deploy, right-click the VM, and then select Deploy OVF Template.
 Note
NoteFor more information about how to deploy an Open Virtualization Format (OVF) template, see Deploy an OVF template.
Deploy the OVF template.
On the Deploy OVF Template page, select Local file. Click Browse to select the downloaded gateway installation package, and then click Next.

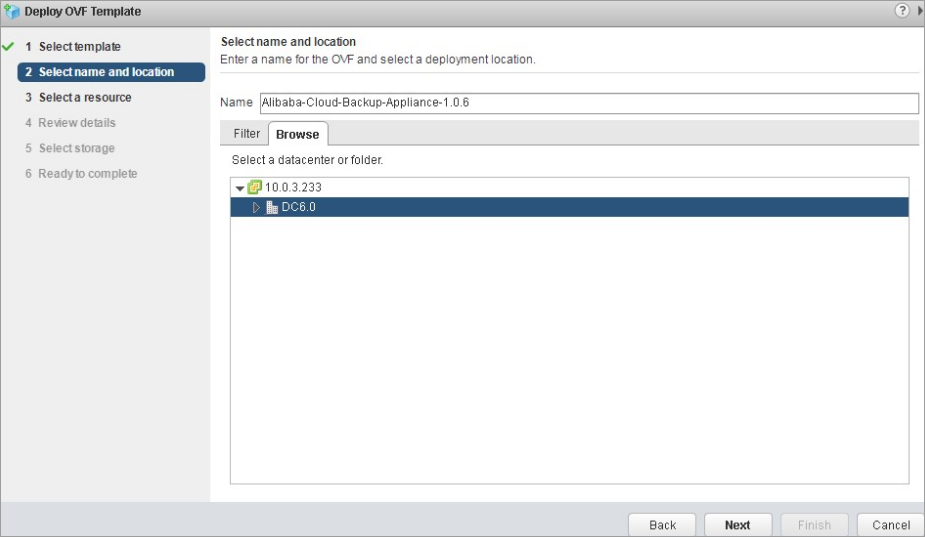
Enter a name for the OVF template, select a deployment location, and then click Next.
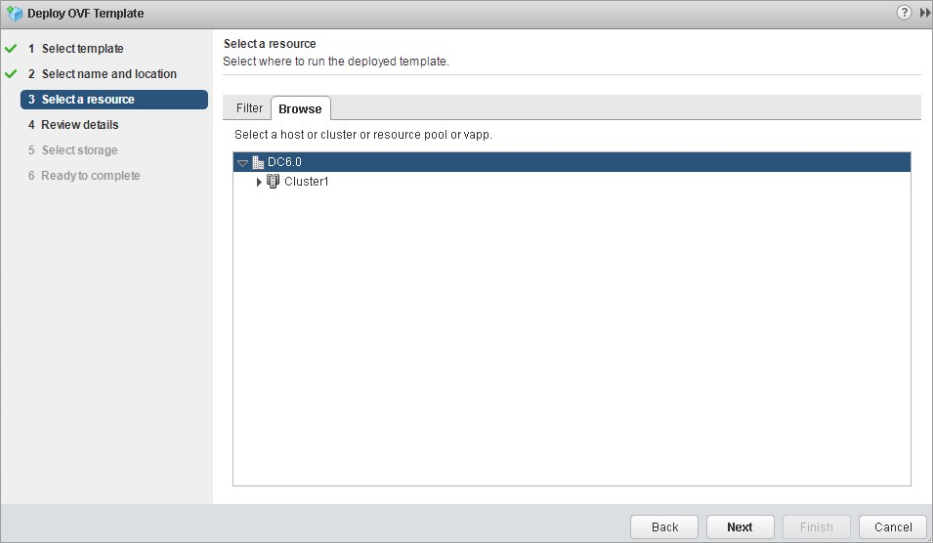
Select the location to run the template, and then click Next.
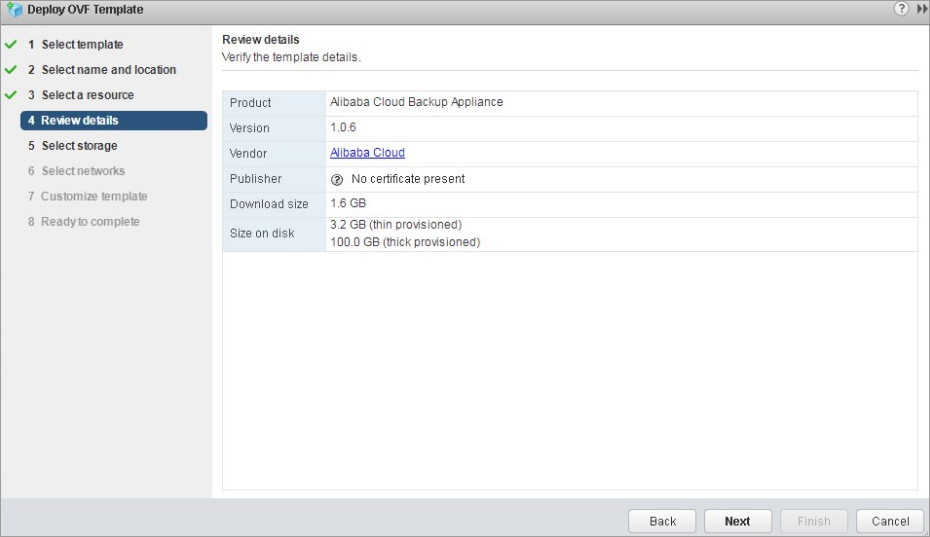
Review the template details and click Next.
Select a virtual disk format and a datastore for the deployed template files, and then click Next.

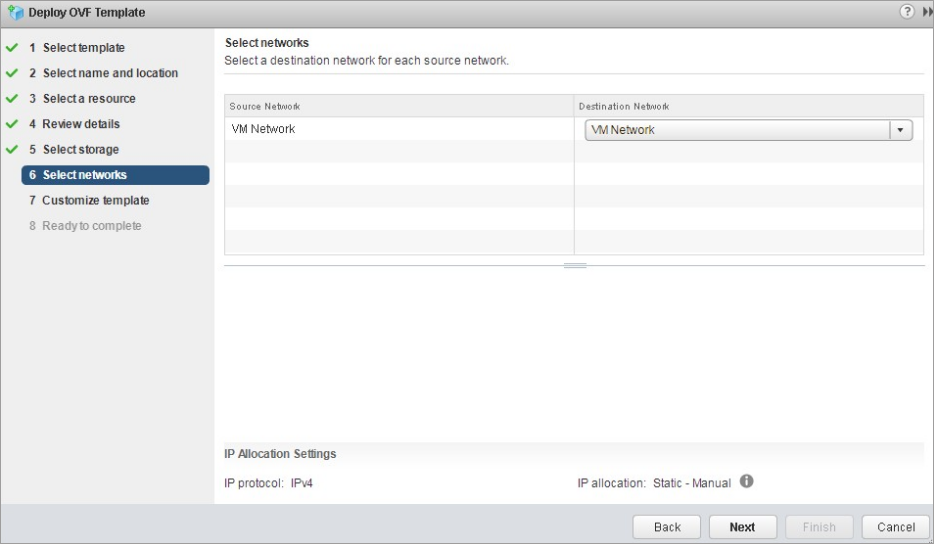
For each source network, select a target network, and then click Next.
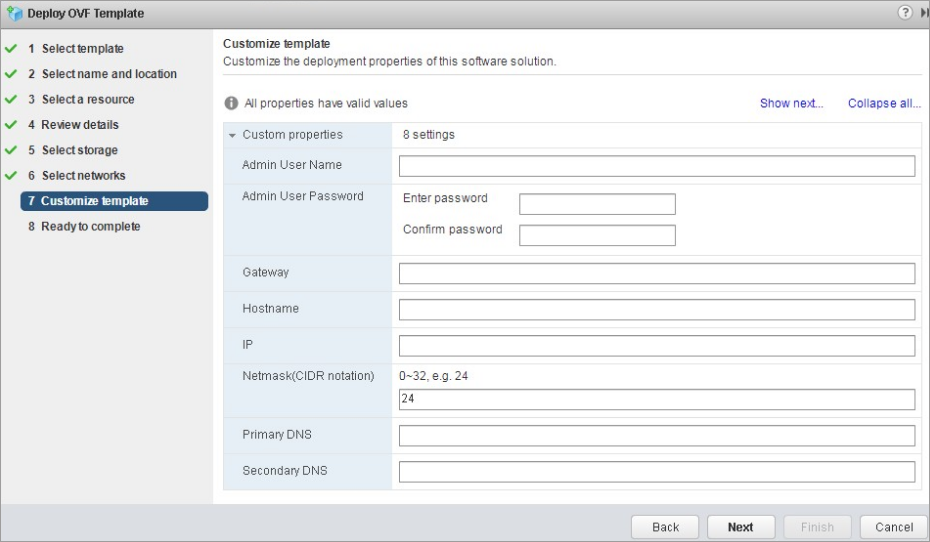
Customize the deployment properties of the software solution and click Next.
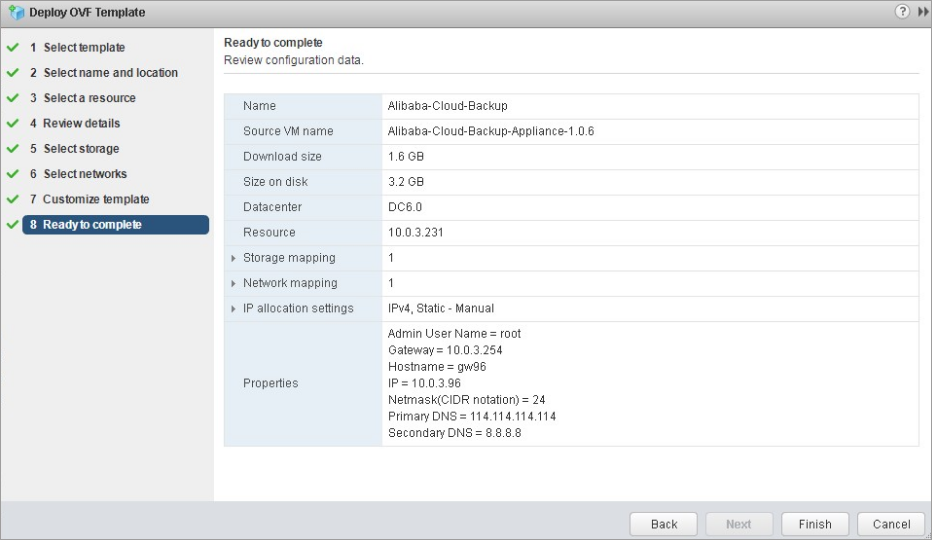
Review your settings, and then click Finish.
In the Recent Tasks pane, view the task status and wait for the task to complete.

After the deployment is complete, start the VM that was deployed from the OVF template. Open a browser and enter
http://hostname:8011in the address bar.Notehostnameis the IP address of the VM that you deployed from the OVF template.On the Activate Gateway page, enter the required parameters and click Register to activate the Cloud Backup gateway. The following table describes the parameters.
Parameter
Description
AccessKey ID
The AccessKey ID and AccessKey secret of an Alibaba Cloud account or a RAM user. We recommend that you use the AccessKey ID and AccessKey secret of a RAM user. For more information, see Create an AccessKey pair for a RAM user.
AccessKey Secret
Certificate File
Select the certificate that you downloaded from the console. If the VM is shut down for more than five days after the certificate is activated, the certificate expires. You must download a new certificate and activate it again.
After successful activation, click OK, and you will be redirected to the Cloud Backup console.
Step 3: Add a vCenter server
Log on to the Cloud Backup console.
In the navigation pane on the left, choose
In the upper-left corner of the top menu bar, select a region.
On the Migration Gateway tab, click View in the Actions column.
Click Add vCenter Server.
In the Add vCenter Server panel, enter the Server IP, Username, and Password, and then click Create.
If the password contains the following special characters, you may be unable to add the vCenter server:
` ^ ~ = ; ! / ( [ ] { } @ $ \ & # % +NoteCreate a dedicated vCenter server account with Administrator permissions for backup. If you want to use special characters in the password, we recommend using a period (.).
Step 4: Migrate the VMware VM
On the Migration Gateway tab, click View in the Actions column.
On the Managed vCenter Servers page, click Migrate in the Actions column.

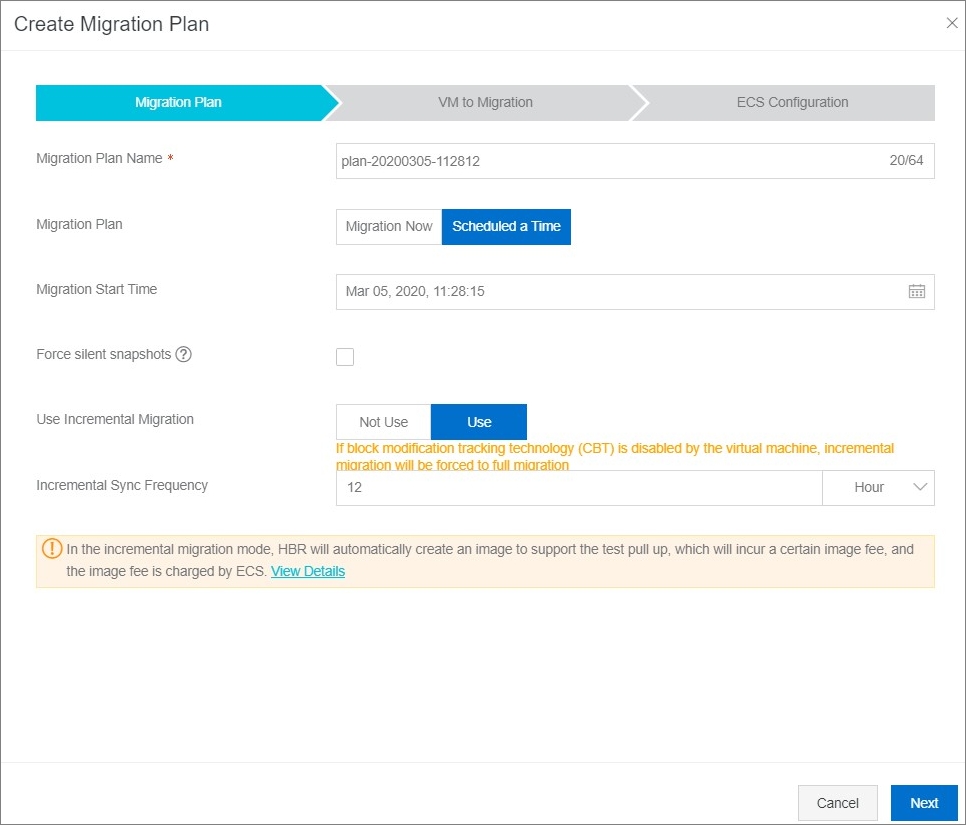
In the Create Migration Plan panel, set the following parameters and click Next.
Parameter
Description
Plan Name
Enter a name for the migration plan. This parameter is optional. If you leave this parameter empty, a name is randomly assigned.
Configure Migration Plan
Select Right Now or On Schedule.
If you select On Schedule, you must specify a Start Time, accurate to the second.
Force Quiesced Snapshot
Selected: Forces the use of quiesced snapshots for backup. If a quiesced snapshot cannot be created, the backup fails.
Not selected (default): The system first attempts to use a quiesced snapshot. If a quiesced snapshot cannot be created, a standard snapshot is used.
Enable Incremental Sync
Select whether to use incremental migration.
When you use incremental migration, you must specify the Incremental Sync Frequency. Valid units: hours, days, and weeks.
NoteIf Changed Block Tracking (CBT) is disabled for the VM, incremental migration is forcibly converted to full migration. For more information, see How to enable CBT mode.
In incremental migration mode, Cloud Backup automatically creates an image to support test failovers. This incurs image fees that are charged by ECS. For more information, see Billing overview.
Select Select VMs to Migrate, and click Next.

In the Configure ECS Instance tab, configure an ECS instance for each source VM.
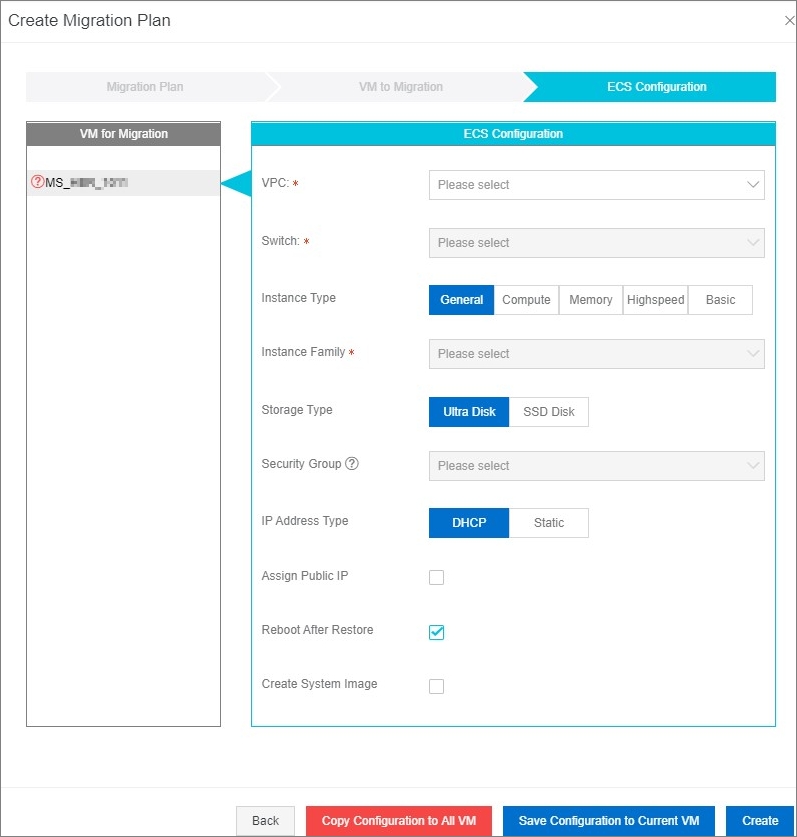
In the pane on the left, click the source VM that you want to configure.
In the pane on the right, configure the ECS instance for the current source VM based on the following table.
ImportantWhen you select a security group, make sure that outbound traffic on TCP ports 80 and 443 and UDP port 53 is allowed.
Parameter
Description
VPC
Select the VPC to use for the recovery from the VPC list.
vSwitch
Select the vSwitch to use for recovery from the vSwitch list.
Instance Family
The instance type of the ECS instance.
Instance Type
The specifications of the ECS instance.
Disk Type
The storage class of the ECS instance.
Ultra Disk
Standard SSD
Security Group
From the Security Group drop-down list, select the security group that you want to use to create the ECS instance.
IP Address Type
The IP address assigned to the ECS instance.
DHCP: Dynamically allocates an IP address.
Static: Manually configure an IP address.
IP Address
This parameter is required only if the IP Address Type parameter is set to Static. You can specify a static IP address for this parameter.
Assign Public IP
Specifies whether to assign a public IP address to the ECS instance.
Reboot After Restoration
Specifies whether to start the ECS instance after the migration is complete.
Create System Image
Specifies whether to create a system image.
To configure the same ECS instance for each source VM, configure the parameters for the current source VM based on the table above and click Apply to Current VM. Then, click Apply to All VMs. Finally, click Create.
On the Migration Plans tab, you can view the migration progress.

If you use incremental migration, you can perform the following operations after the migration is complete.
Click Sync Tasks to view information such as the incremental data size and the migration status.
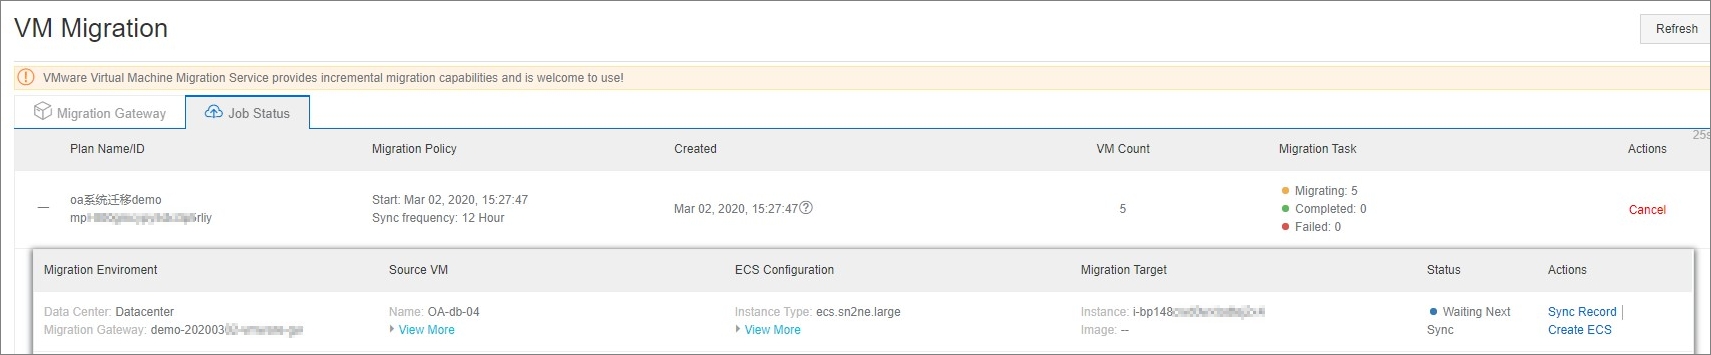
Click Create ECS. In the dialog box that appears, select Verify Migration or Finish Migration.
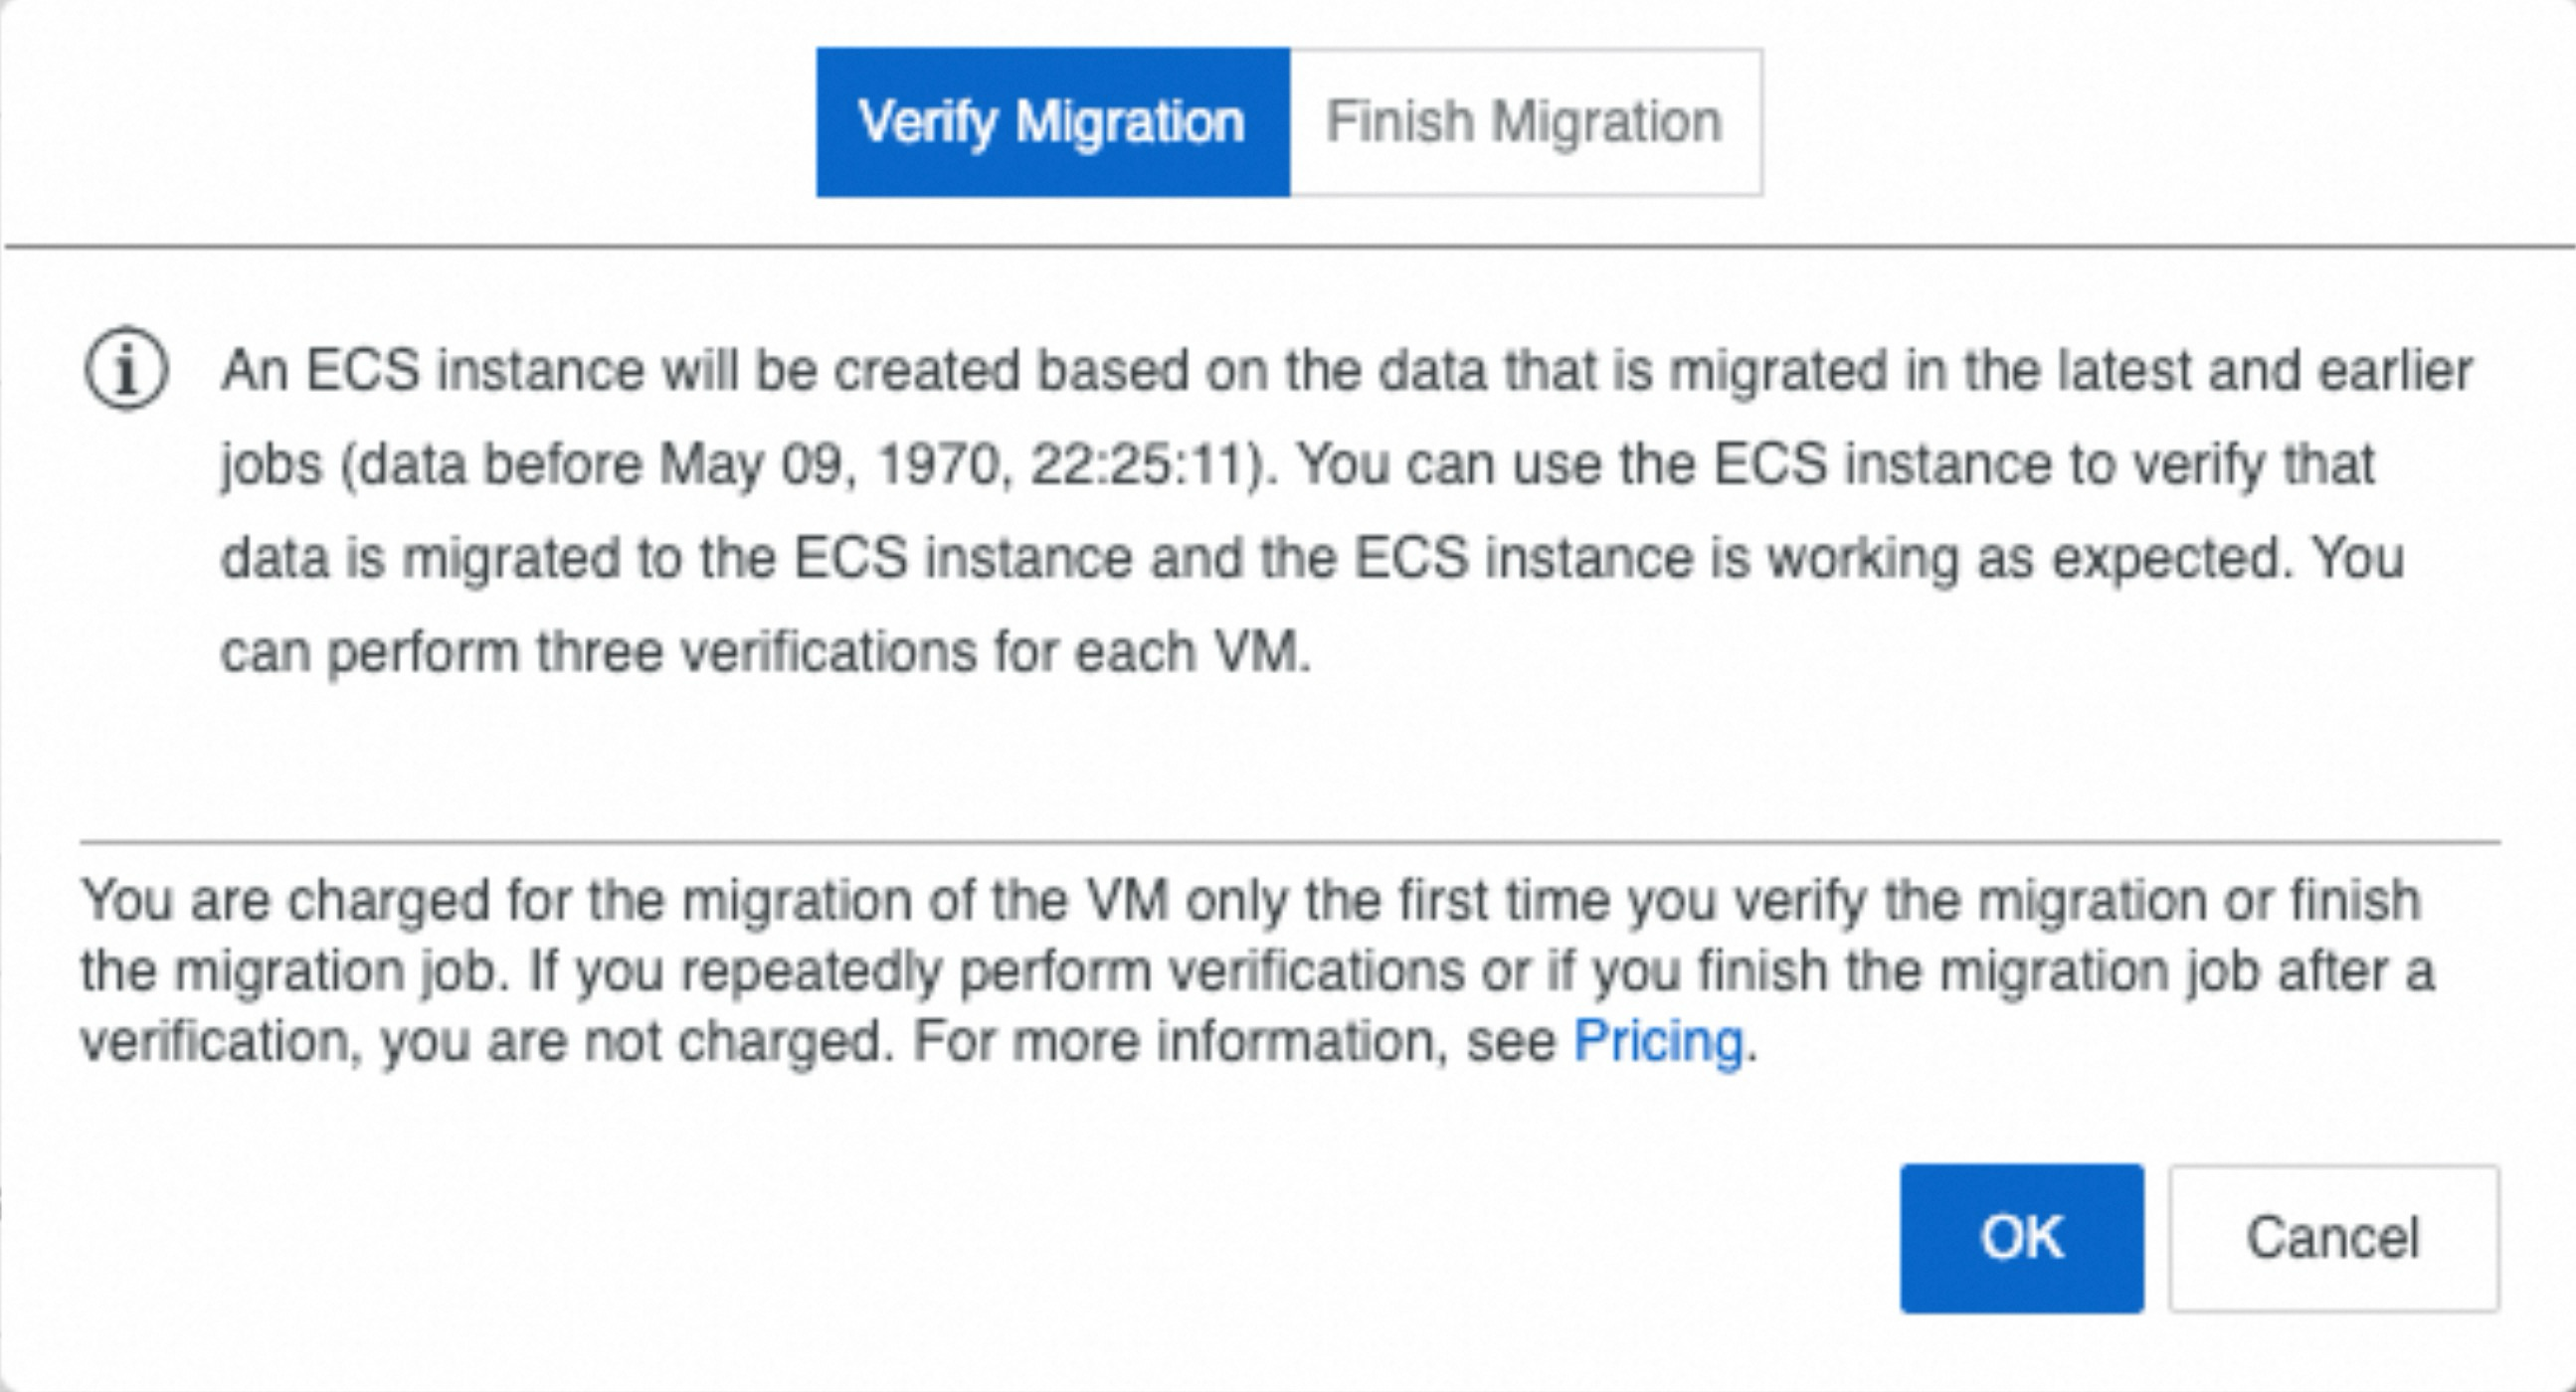
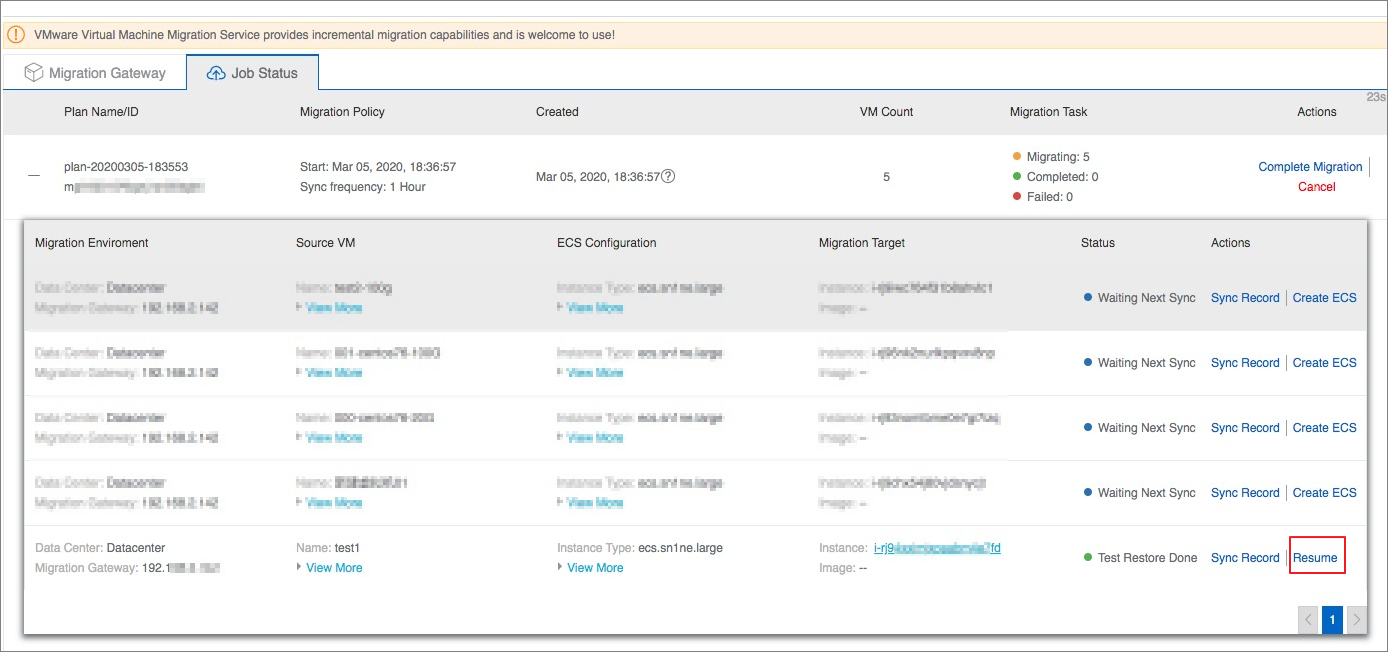
Click Verify Migration. An ECS instance is created using data from the most recent synchronization, such as 2020-02-21 20:21:31, to verify that the migrated virtual machine works as expected. You can verify each virtual machine up to three times. To confirm the migration validation, click OK to start creating the ECS instance. After the ECS instance is created, you can click Resume Migration to purge the instance and continue the migration.
Click Finish Migration to create an ECS instance based on data from the most recent synchronization, such as 2020-02-21 20:21:31, and stop all subsequent synchronization. Alternatively, select Run an incremental synchronization task before finishing the migration job to include data generated since the last synchronization in the new ECS instance.
NoteThe final incremental synchronization increases the time required to complete the migration.
You are charged for a VM migration when the first migration validation or completion operation succeeds. You are not charged for subsequent validation or completion operations on the same VM. For more information about pricing, see Pricing Details
Click Cancel Migration to cancel the current migration job.
Collect logs
You can collect logs from the Cloud Backup gateway without logging on.
If you cannot log on to the Cloud Backup gateway, follow these steps to collect logs:
Open a browser and enter the logon address of the on-premises client in the address bar:
http://<Migration gateway IP>:8011.In the upper-right corner, click Diagnostics.

Choose Log Collection > Download Logs.
