This topic describes how to migrate data of a company between File Storage NAS file systems that are located in different virtual private clouds (VPCs).
Background information
A Shenzhen company is named Company A. As Company A grows and expands, it establishes a subsidiary in Hangzhou. The subsidiary is named Branch B. Branch B stores data in a separate File Storage NAS file system. Branch B must synchronize the data to the File Storage NAS file system of Company A on a daily basis. Each day, Branch B generates about 100,000 files whose size is about 100 GB.
The File Storage NAS file systems of Company A and Branch B are located in different Alibaba Cloud VPCs. The CIDR block of the VPC where the NAS file system of Company A is located is 172.16.1.0/24. The CIDR block of the VPC where the NAS file system of Branch B is located is 10.0.0.0/24.
If you are using a third-party NAS file system, you must use a dedicated leased line to connect your NAS server to an Alibaba Cloud VPC. For more information, see Create and manage a dedicated connection over an Express Connect circuit.
Migration scheme
Use Cloud Enterprise Network (CEN) to establish a connection between the two VPCs of Company A and Branch B and configure permission groups. Make sure that all the addresses within the VPC of Branch B have the following permissions: the read-only access to the NAS file system of Branch B and the read/write access to the NAS file system of Company A.
Create a migration job to synchronize the data of Branch B to Company A on a regular basis.
Step 1: Connect the VPCs of Company A and Branch B by using CEN
Use CEN to connect the VPCs of Company A and Branch B. For more information, see Connect VPCs that are located in multiple regions and owned by different accounts.
Modify the NAS permission groups of Company A and Branch B. This allows all the devices in the 10.0.0.0/24 CIDR block to read data from the NAS file system of Branch B and write data to the NAS file system of Company A. For more information, see Manage permission groups.
Step 2: Create a migration job
Create a Resource Access Management (RAM) user in the Alibaba Cloud Management Console and grant the RAM user the permissions to create migration jobs. For more information, see Create and authorize a RAM user.
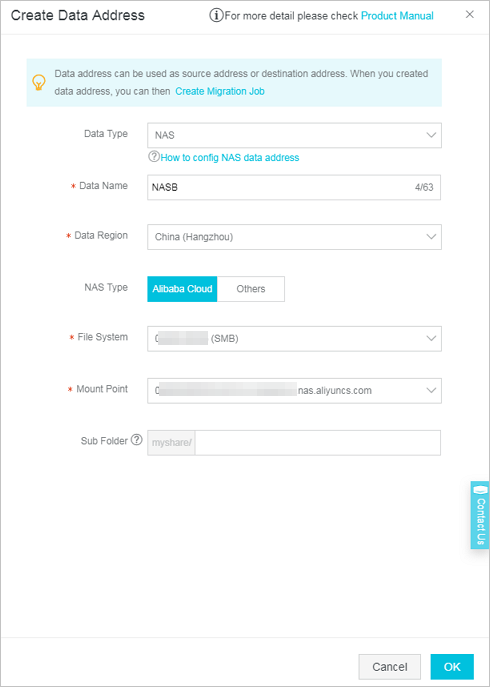
Create a source NAS data address. For more information about the parameters, see Create a source data address. The following figure shows the configuration details.
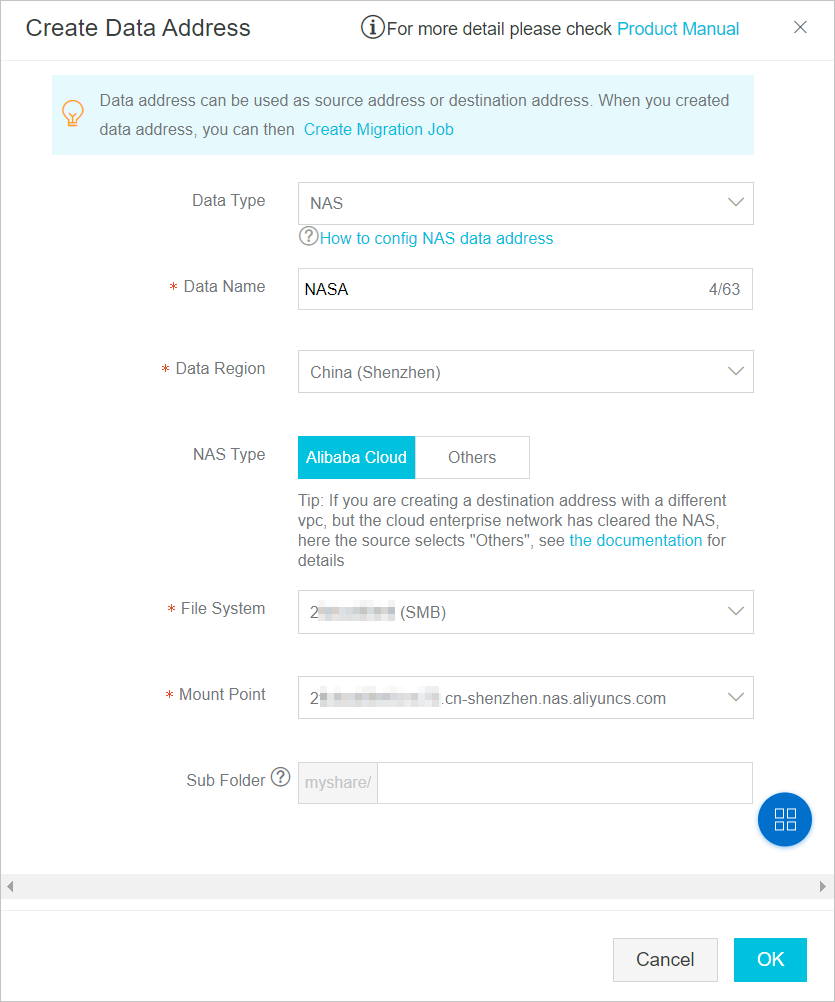
Create a destination NAS data address. For more information about the parameters, see Create a destination data address. The following figure shows the configuration details.
Create a migration job of the Sync type. To ensure business continuity, set the daily start time of a synchronization job to 22:00:00. For more information about the parameters, see Create a migration job. The following figure shows the configuration details.
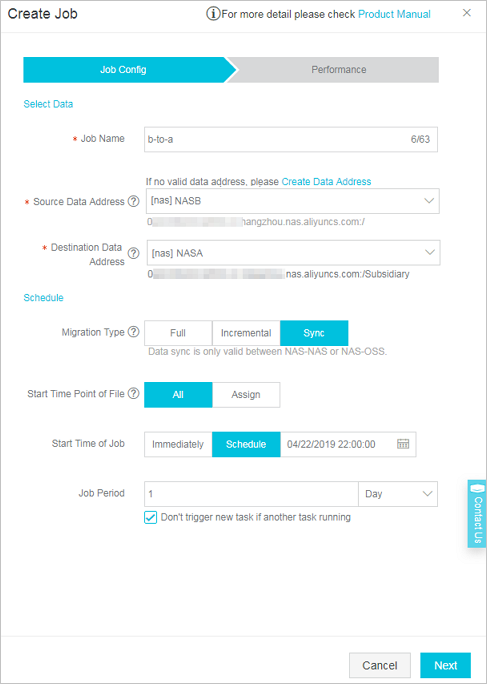 Important
A synchronization job keeps running until you stop the job. Therefore, to synchronize data on a regular basis, you need only to create one synchronization job.
In this example, the default settings in the Performance step are used because the customer synchronizes a small amount of data during off-peak hours. In actual practice, you need to specify appropriate performance parameters based on your needs.
After each synchronization job is completed, you can check the status of the job and compare the data at the source data address and the data at the destination data address. This allows you to verify that all data is migrated. For more information about how to view the status of synchronization jobs, see Manage synchronization jobs.