Use Global Traffic Manager 3.0 to configure a primary/backup disaster recovery solution. When the primary service address fails, GTM automatically fails over to a backup address. After the primary address recovers, GTM fails back based on a predefined policy, ensuring high availability for your services.
Solution architecture
This topic describes a primary/backup disaster recovery scenario with a service deployed across two data centers: a primary for daily traffic and a backup for disaster recovery. If the primary data center becomes unavailable due to network issues or service interruptions, traffic is automatically routed to the backup data center to minimize service downtime.
The workflow is as follows:
-
Health check: GTM continuously performs health checks on the service addresses in the
Primary-DCandBackup-DCaddress pools to determine their availability. -
DNS query: When a user makes a network request, their local DNS queries GTM for the service's domain name.
-
Traffic scheduling:
-
When the primary address pool is healthy, GTM applies the configured Global Availability policy and prioritizes the IP addresses from the primary address pool.
-
If the primary address pool fails, GTM automatically responds with IP addresses from the backup address pool.
-
-
Fault recovery: After the primary address pool recovers, GTM uses the configured Preemptive Mode or Non-Preemptive Mode to decide whether to switch traffic back to the primary address pool or keep it at the backup address pool.
Prerequisites
-
Prepare a domain name: An Access Domain relies on a domain name hosted by Public Zone. Make sure that at least one domain name in Public Zone has a DNS Server IP Address with a status of Available.
-
Deploy services: Deploy your primary and backup services and obtain their service addresses. For example, a Shanghai data center at
121.21.*.*and a Hangzhou data center at139.3.*.*.
Procedure
1. Create Access Domain
-
Go to the Global Traffic Manager console.
-
On the Access Domain tab, click Create Access Domain.
-
In the dialog box that appears, select Custom Scenario.
-
On the Access Domain configuration page, click the access domain icon and select Basic Configuration. Click the edit icon to the right of Basic Configuration to open the configuration form.
-
Complete the form.
-
Access Domain: Enter the access domain, such as
gtm.your-domain.com. If the drop-down list is empty, purchase a domain or go to Public Zone to add a third-party domain. -
Billing Method: For this solution, select Pay-as-you-go.
-
Record Type: Select A. The service addresses in this solution are IPv4 addresses.
-
TTL (Seconds): The default value is 30. A shorter TTL helps speed up DNS failover but increases the number of DNS queries.
-
Enabed State: Leave this disabled for now. You will enable it after completing all configurations.
-
Remarks: Enter a descriptive note.
-
2. Add primary and backup address pools
An address pool is a collection of service addresses. This solution requires you to create a primary and a secondary address pool, which correspond to two data centers.
-
Click the Access Domain icon, and then click Add Address Pool.
-
Complete the form. For more information about the parameters, see Address Pool Configuration.
-
Address Pool Name:
Primary-DC -
Type: IPv4
-
Health Status Conditions: Select At least one address in the address pool is available..
-
Enabed State: Enable
-
-
Follow the same steps to create the backup address pool
Backup-DC.
3. Add Address
-
Click the icon for the address pool you just added, and then click Add Address.
-
Complete the form. For details, see Address Configuration.
-
Address Name:
Primary-Server-01 -
Type: IPv4
-
Type: Enter the public IP address of the server in the primary data center.
-
Health Check: Enable this option and configure the probe protocol (e.g., HTTP/HTTPS), path (e.g.,
/health), and expected response code. This allows GTM to determine if the service is healthy.
For Address Health Status Determination, select At least 1 probe template is normal. Set Enabled State to Enable, and then click Submit Configuration to add the address.
-
-
Follow the same steps to add a service address to the backup address pool
Backup-DC. Once complete, the configuration will look similar to the following figure.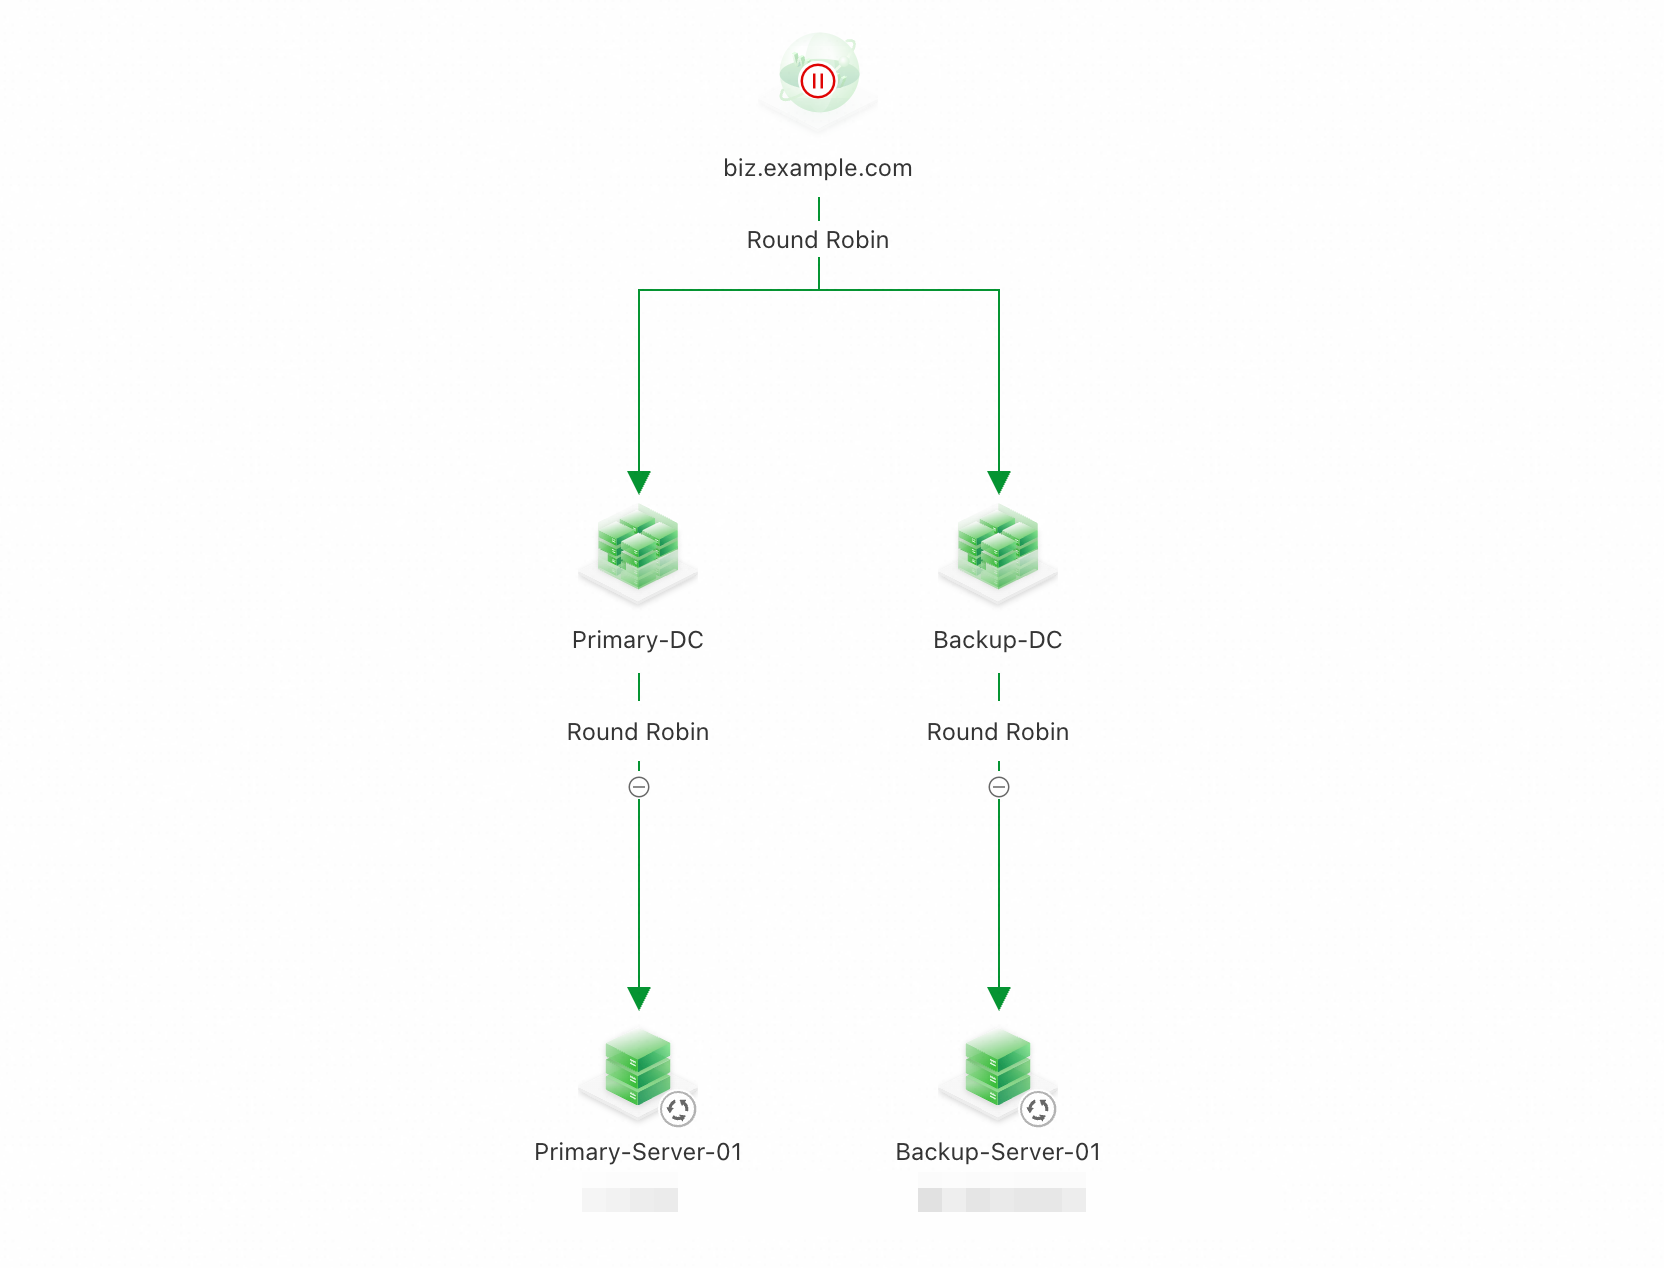
4. Load Balancing Policy
The access policy uses two-level scheduling: first between address pools, and then within each pool. The final DNS response is determined by applying the inter-pool policy first, followed by the intra-pool policy.
-
Configure the load balancing policy between address pools
-
Click the policy icon above the address pools, and then select Load Balancing Policy.
-
Complete the form.
Load Balancing Policy: Global Availability
Preemptive Mode: Preemptive Mode
-
Click Sequence No. > Adjust Sequence Number.
-
Drag the address pools to set their priority. Place the primary address pool first.
-
-
Configure the load balancing policy within address pools
In this solution, each address pool contains only one service address. You can keep the default Round Robin policy for load balancing within the address pool.
5. Enable the Access Domain
By default, an Access Domain instance is disabled and cannot serve traffic. You must enable it manually after completing the configuration.
-
Ensure that the service health status is normal. If you see any red or orange alert icons, troubleshoot the health check issues before you enable the service.


-
Click the access domain icon, and then select Enable.
-
In the confirmation dialog box, submit the configuration.
-
The configuration takes about 10 minutes to take effect. To verify that the DNS response returns the correct IP address, use the Network Probe Tool with your Access Domain or run one of the following commands:
nslookup gtm.your-domain.comdig gtm.your-domain.com
6. Configure a CNAME for traffic steering
Create a CNAME record for your service domain that points to the Access Domain, for example, home.example.com CNAME gtm.your-domain.com.
This topic assumes your service domain is hosted in a Public Zone. If another provider manages your domain's DNS service, create the CNAME record with that provider.
-
Go to the Alibaba Cloud DNS console. Find the target domain and click Settings.
-
Click Add Record.
Record Type: CNAME
Host Record: Enter the host record for which you want to steer traffic.
Record Value: Enter the Access Domain you configured.
ImportantIf other record types (such as A or AAAA) already exist for the host record, adding a
CNAMErecord will cause a conflict. For more information, see DNS record conflict rules. To resolve the conflict:-
When adding the
CNAMErecord, create it in a disabled state.In the list of records, use the switch in the Status column to disable the new CNAME record.
-
During a low-traffic period, disable the existing A or AAAA records for the same host record.
-
Enable the
CNAMErecord.
-
Billing
For details, see Product Billing.
Related topics
-
For answers to common questions, see FAQ.
-
To learn about more use cases, see Best Practices.