by Aaron Berliano Handoko, Solution Architect of Alibaba Cloud Indonesia
In the rapidly evolving landscape of business and technology sectors, the imperative for real-time data processing has become more pronounced than ever. With the dynamic nature of markets, consumer behavior, and external factors influencing decision-making, organizations in Indonesia are recognizing the critical need to process data in real time. Whether it's gaining instant insights into customer preferences, monitoring supply chain dynamics, or responding swiftly to market trends, the ability to process data in real time empowers businesses to make timely and informed decisions.
Apache Flink, with its robust real-time data integration and analytics capabilities, emerges as a strategic ally for enterprises seeking to stay ahead in their respective industries. By leveraging Flink’s advanced tools, organizations can not only adapt to the ever-changing business environment but also proactively capitalize on emerging opportunities, ensuring a competitive edge in the vibrant and dynamic market.
Advantages of Flink includes:
1). Support numerous data sources including postgres, mysql, nosql database, message queue
2). Support ETL processes in real time
3). Auto Scaling Capability
More information can be found here
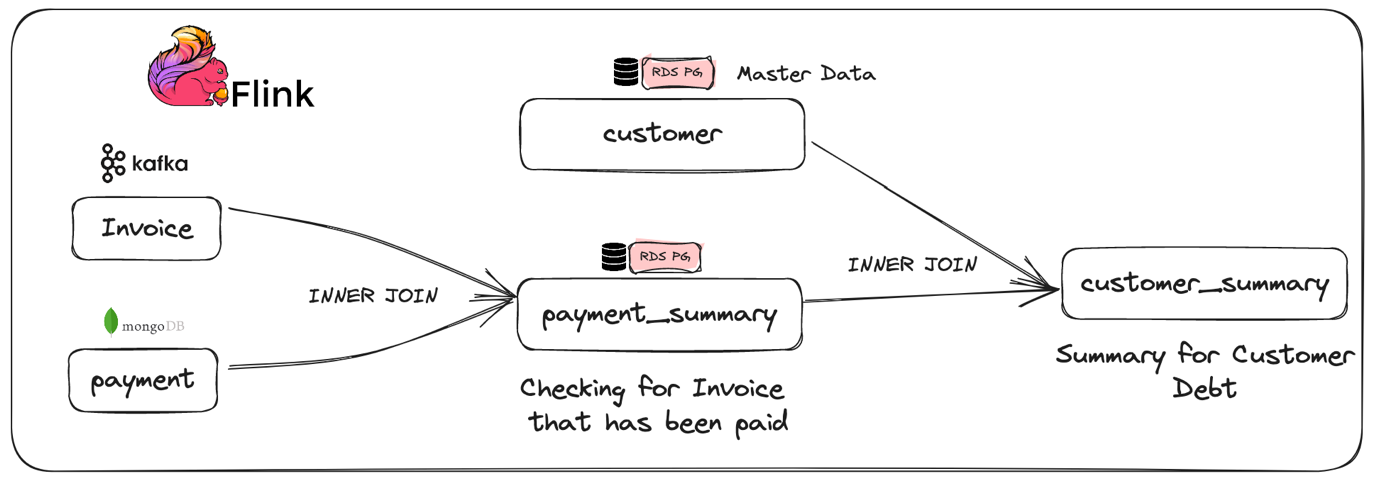
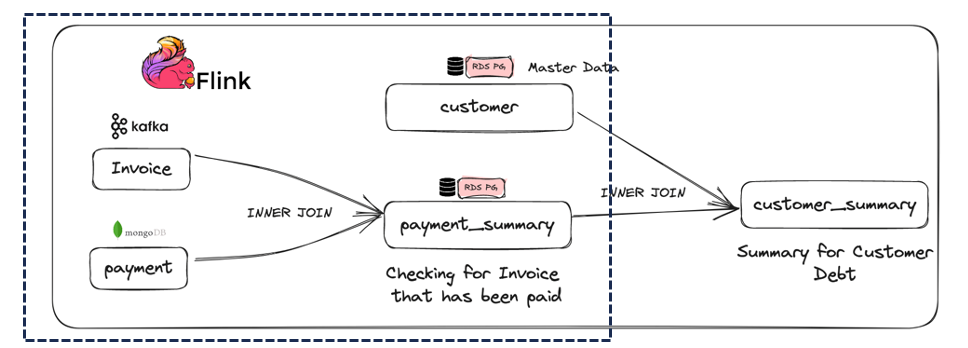
Figure 1. Architecture for Demo Scenario in this Blog
In this blog, there would be 3 data sources used (MQ Kafka [json], MongoDB [NoSQL] and RDS Postgres [SQL]). The objective of this experiment are:
A). Pull data from multiple sources including MQ and noSQL data
B). ETL process between two tables from different sources happening on CDC
C). ETL process between two tables inside PostgresDB happening real time
D). Produce customer summary table inside PostgresDB
1). Alibaba Cloud Account. Click through this link to sign up to Alibaba cloud page.
2). A Fully Managed Kafka in Alibaba Cloud, Managed MongoDB (replica set) in Alibaba Cloud and RDS Postgres in Alibaba Cloud
3). A Fully Managed Flink in Alibaba Cloud
4). Ensure all the permission to manage these data sources including account and database already created. (RDS Postgres, MongoDB Replica Set, Apache Kafka)
5). Ensure all data source already meet Flink data source requirement (MongoDB, Apache Kafka)
1). Inside the Kafka Instance click topics menu on the left hand side of the screen
2). Choose the Create Topic Button to create a new topic

3). Enter the name of the topic. For clarity and simplicity, we use invoice as the name of the topic. We also use 1 partition for the topic
1). After topic has been successfully created, go inside the instance by clicking the topic name, then click Send Message
2). We can send message through kafka using docker, SDK and console. In this blog we will send the message via Console
3). Copy and paste this json message into the message content. Then click OK
{"invoice_id": "1", "invoice_date": "20240215", "item_id": "1", "qty": "10", "price": "2000", "cust_id":"1"}
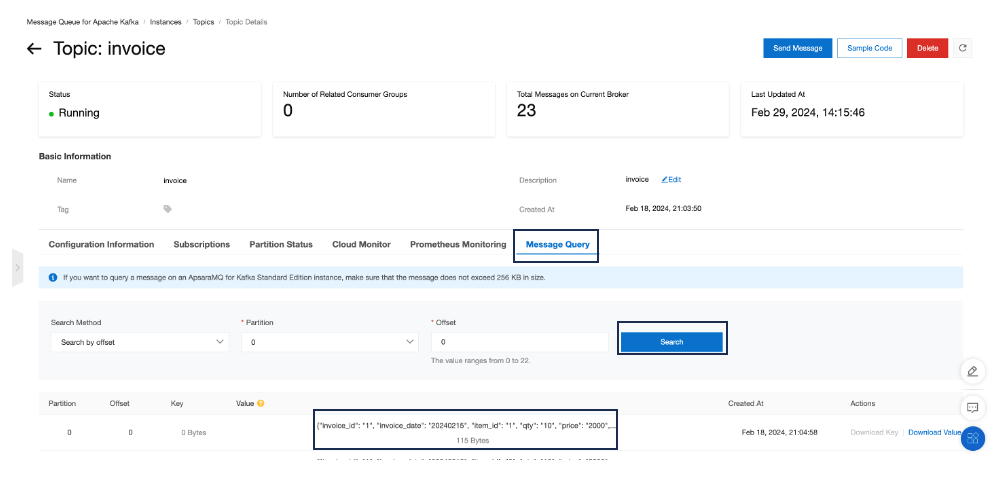
4). To see whether or not the message is sent we can see in the message query then search for the message as shown below
1). Inside the MongoDB instance click Log On then choose Primary to log onto primary instance. There will be new window popup to direct to DMS window.
2). Log into the MongoDB instance by entering the account and password created when creating the MongoDB instance
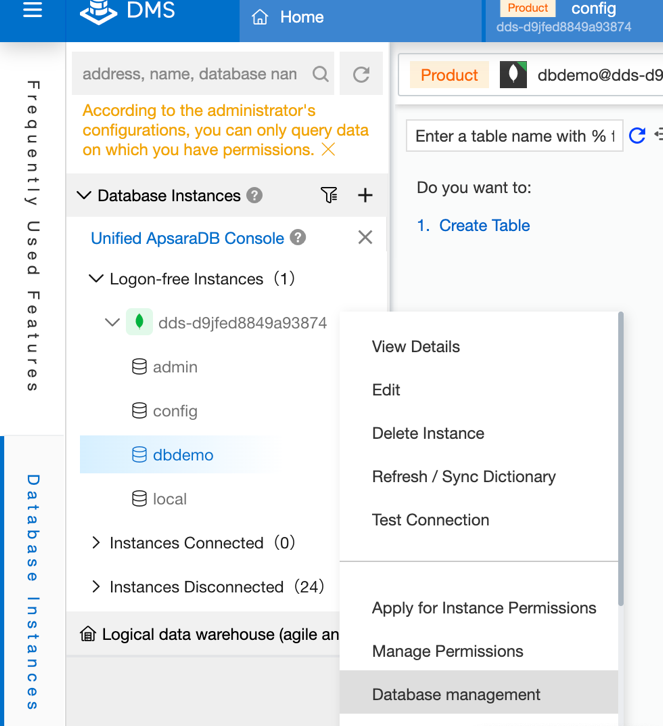
3). After it is connected, on the left-hand side click Database Instance and find the MongoDB instance. After that right click the instance and choose Database Management to create new Database
4). In the Database Management tab click create new Database and provide suitable name for the database. In this example we use dbdemo
1). On the left-hand side, double click on the database that we want to create collection in. It will automatically direct to a new tab to create command inside the database
2).Inside the SQL editor copy and paste this command to create new collection
db.createCollection("payment")
3). Collection named payment is created. The next step we should do is to insert data into the new collection. Copy and paste these commands
db.payment.insertMany([
  {
            "invoice_id":1,
            "payment_amount":14000
  },
  {
            "invoice_id":2,
            "payment_amount":2000
  },
  {
            "invoice_id":3,
            "payment_amount":10000
  },
]);
4). To check whether or not the data is inserted. We can run this command
db.payment.find().limit(20);
1). To connect to flink we need to add the IP of Flink to the whitelist of the data source in this demo we need to add the IP to MongoDB.
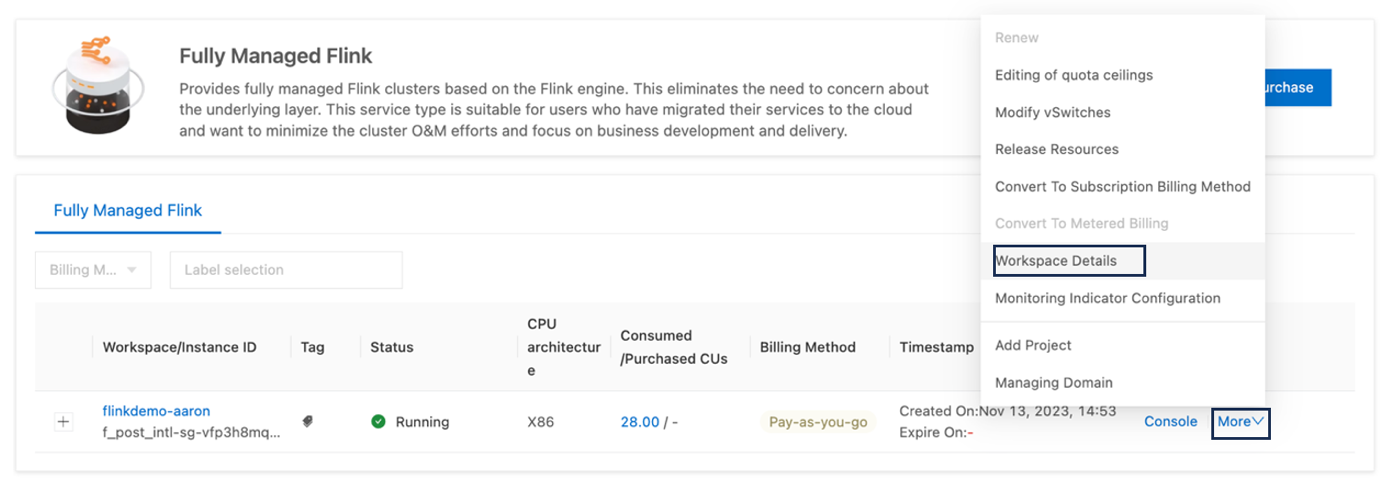
2). To get the IP of Flink, click more and click on the Workspace Details
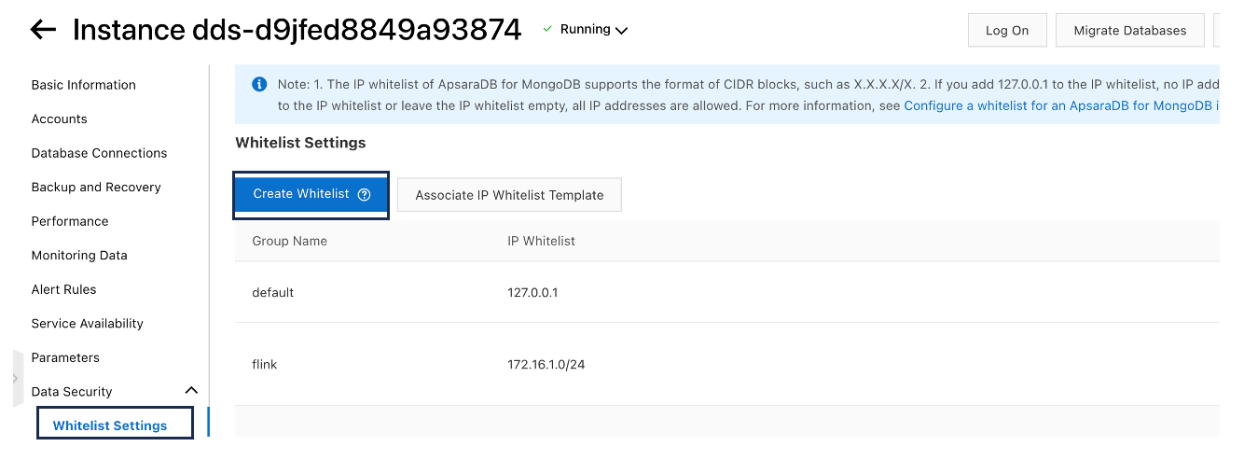
3). Add the IP on the CIDR Block to the MongoDB whitelist. Inside the MongoDB instance click Whitelist Settings under the Data Security menu and then create Whitelist. Add Flink IP to the whitelist.
4). Make sure flink can connect to the data source. Inside the flink click this icon below and put in the MongoDB domain names and port. For Kafka data source we can also check the connection.

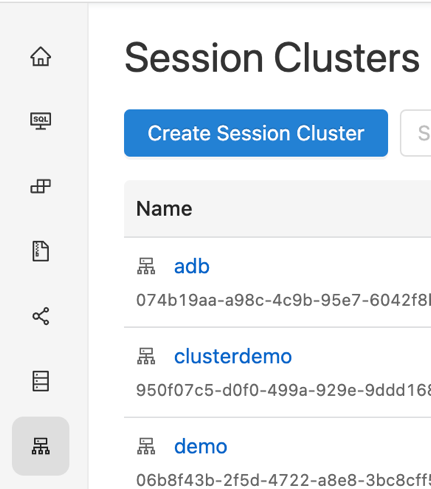
5). Create Session Clusters in order to run the Flink Draft.
1). Inside the Flink instance click on the SQL Editor. Then create a draft under the development folder by hovering above it, right click then create draft.

2). Copy and paste the following code inside the flink draft
CREATE TEMPORARY TABLE flink_invoice
(
    invoice_id    STRING
    ,invoice_date STRING
    ,item_id      STRING
    ,qty          STRING
    ,price        STRING
    ,cust_id      STRING
)
WITH (
    'connector' = 'kafka'
    ,'properties.bootstrap.servers' = '<Kafka Domain>
    ,'topic' = 'invoice'
    ,'scan.startup.mode' = 'earliest-offset'
    ,'value.format' = 'json'
);

SELECT * FROM flink_invoice;
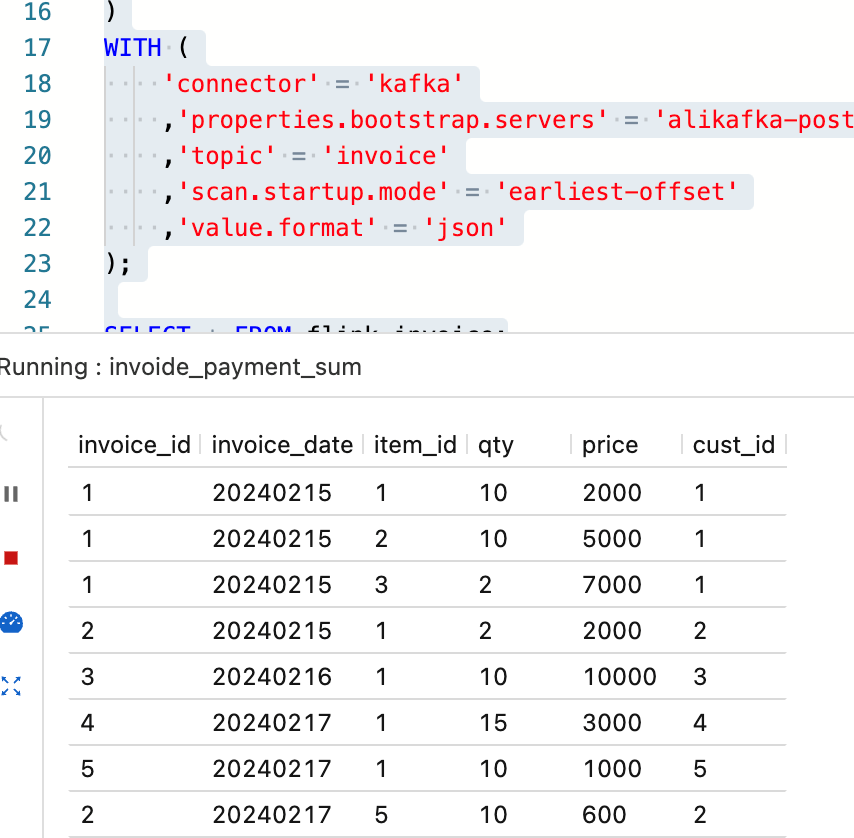
3). Run the abve code, if the topic can be connected and data can be read the data will be displayed below.
4). If error occurs, make sure that the data type and column name is the same as the message sent in the topic. Also make sure that Kafka Domain can be connected inside flink.
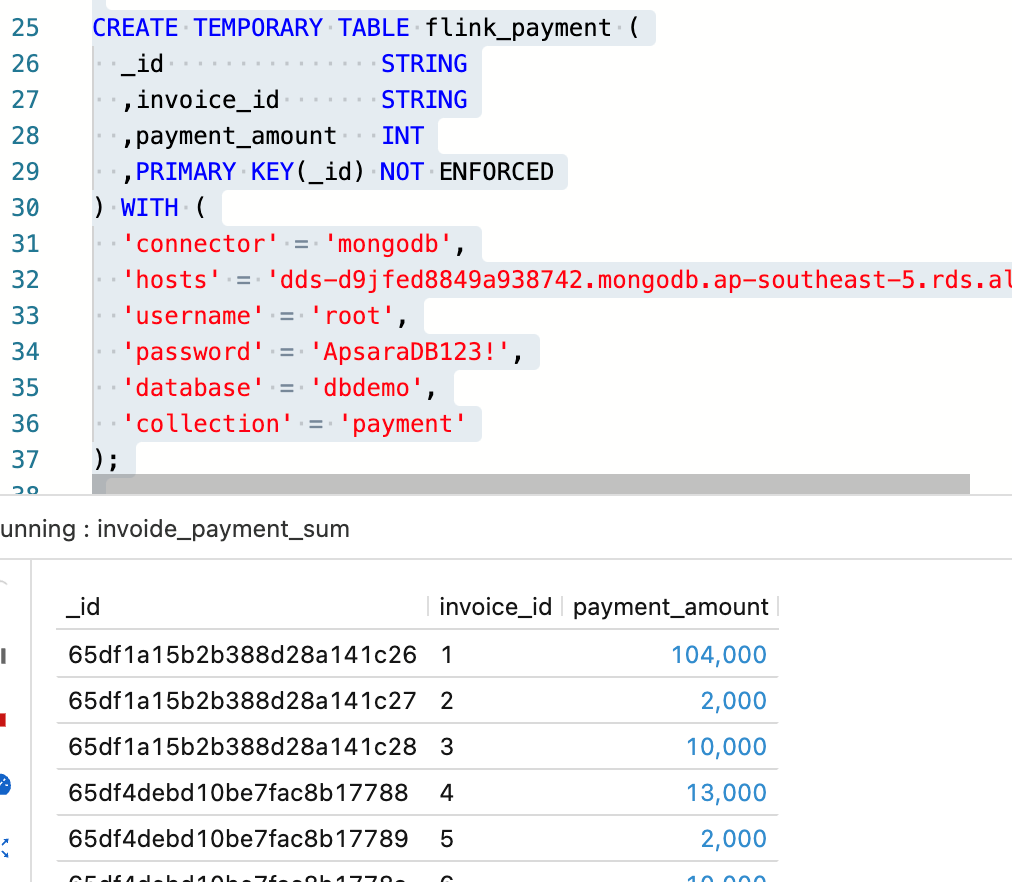
1). Copy and paste the following code inside the flink draft. Domain name for MongoDB can be found in Basic Information and in the Node List section
CREATE TEMPORARY TABLE flink_payment (
  _id               STRING
  ,invoice_id       STRING
  ,payment_amount   INT
  ,PRIMARY KEY(_id) NOT ENFORCED
) WITH (
  'connector' = 'mongodb',
  'hosts' = '<MongoDB primary and secondary domain name>',
  'username' = '<DB Username default = root>',
  'password' = '<DB Password>',
  'database' = 'dbdemo',
  'collection' = 'payment'
);

SELECT * FROM flink_payment;
2). Run the above code by clicking Debug on the right hand side of the draft, if the collection can be connected and data can be read the data will be displayed below. Again, make sure the data type, column name and connection is correct
1). Create a table inside the PostgreSQL. Login into the PostgreSQL instance by using Console (DMS) or third party tool usch as DBeaver. Copy and paste the following SQL
CREATE TABLE payment_summary (
    invoice_id varchar(100) NOT NULL,
    cust_id varchar(100) NULL,
    tot_price int4 NULL,
    payment_id varchar(100) NULL,
    payment_amount int4 NULL,
    status varchar(100) NULL,
    CONSTRAINT payment_summary_pkey PRIMARY KEY (invoice_id)
);
2). Copy and paste the following code inside the flink draft. Run the commands by selecting the commands and click Debug on the right hand side
CREATE TEMPORARY TABLE payment_summary (
  invoice_id        VARCHAR(100),
  cust_id           VARCHAR(100),
  tot_price         INT,
  payment_id        VARCHAR(100),
  payment_amount    INT,
  status            VARCHAR(100),
  PRIMARY KEY (invoice_id) NOT ENFORCED
) WITH (
  'connector' = 'jdbc',
  'url' = 'jdbc:postgresql://<postgres endpoint>:<port>/<database>'
  'table-name' = 'payment_summary',
  'username' = '<username>',
  'password' = '<password>'
);
1). Remove the SELECT statement from the above codes. Your SQL commands should look like this
CREATE TEMPORARY TABLE flink_invoice
(
    invoice_id    STRING
    ,invoice_date STRING
    ,item_id      STRING
    ,qty          STRING
    ,price        STRING
    ,cust_id      STRING
)
WITH (
    'connector' = 'kafka'
    ,'properties.bootstrap.servers' = '<kafka domain>'
    ,'topic' = 'invoice'
    ,'scan.startup.mode' = 'earliest-offset'
    ,'value.format' = 'json'
);

CREATE TEMPORARY TABLE flink_payment (
  _id               STRING
  ,invoice_id       STRING
  ,payment_amount   INT
  ,PRIMARY KEY(_id) NOT ENFORCED
) WITH (
  'connector' = 'mongodb',
  'hosts' = '<mongodb domain>',
  'username' = 'root',
  'password' = '<Database Password>',
  'database' = 'dbdemo',
  'collection' = 'payment'
);

CREATE TEMPORARY TABLE payment_summary (
  invoice_id        VARCHAR(100),
  cust_id           VARCHAR(100),
  tot_price         INT,
  payment_id        VARCHAR(100),
  payment_amount    INT,
  status            VARCHAR(100),
  PRIMARY KEY (invoice_id) NOT ENFORCED
) WITH (
  'connector' = 'jdbc',
  'url' = 'jdbc:postgresql://<postgres endpoint>:<port>/<database>'
  'table-name' = 'payment_summary',
  'username' = '<username>',
  'password' = '<password>'
);

INSERT INTO payment_summary
SELECT
    T1.invoice_id
    ,cust_id
    ,CAST(FLOOR(tot_price) AS INT) as tot_price
    ,_id as payment_id
    ,payment_amount as payment_amount
    ,CASE WHEN (tot_price - payment_amount) >0 THEN 'BELUM LUNAS'
        ELSE 'LUNAS'
    END as status
FROM
flink_payment AS T1
INNER JOIN
(
    SELECT
        invoice_id
        ,MAX(invoice_date) as invoice_date
        ,MAX(cust_id) as cust_id
        ,SUM(qty*price) as tot_price
    FROM flink_invoice
    GROUP BY invoice_id
)as T2 ON T1.invoice_id = T2.invoice_id;
The above SQL statements will collect all the payments for the invoice based on invoice_id and compared to the total price of the invoice. If the payment is less than the total invoice price then the customer is still in DEBT (BELUM LUNAS).
2). Run the above draft by clicking Debug on the right hand side. If there is no error then the processed data will be displayed.
3). If no error occurs click on Deploy to synchronize data into PostgreSQL using CDC method.

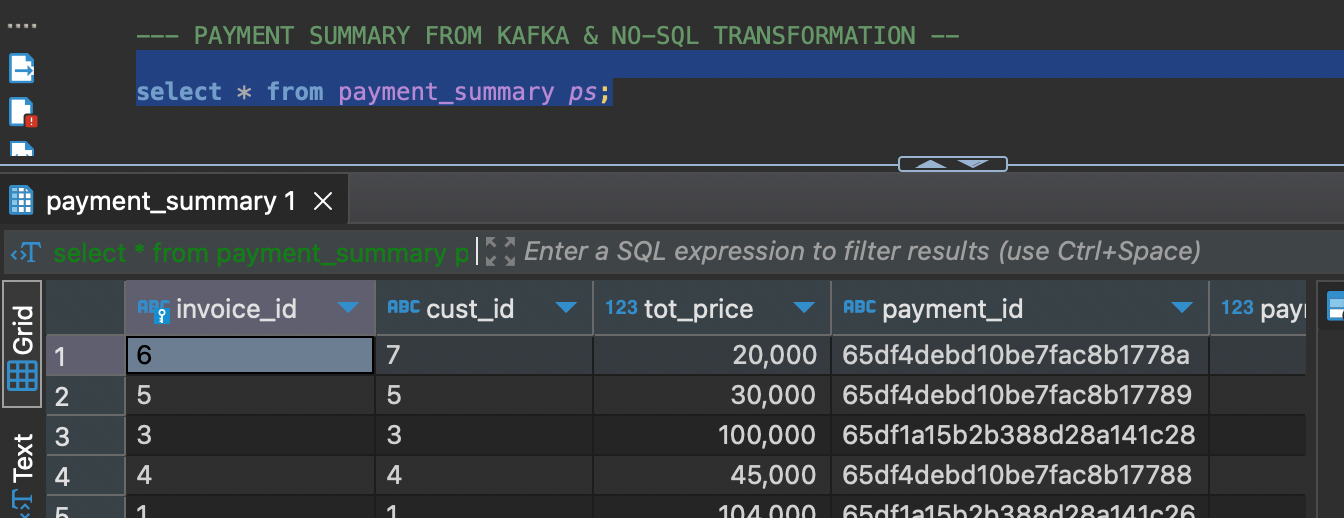
1). In the Deployment tab, start the created deployment. We can monitor the process of each deployment. After the deployment process is in Running status check inside PostgreSQL database if the data has already been integrated.
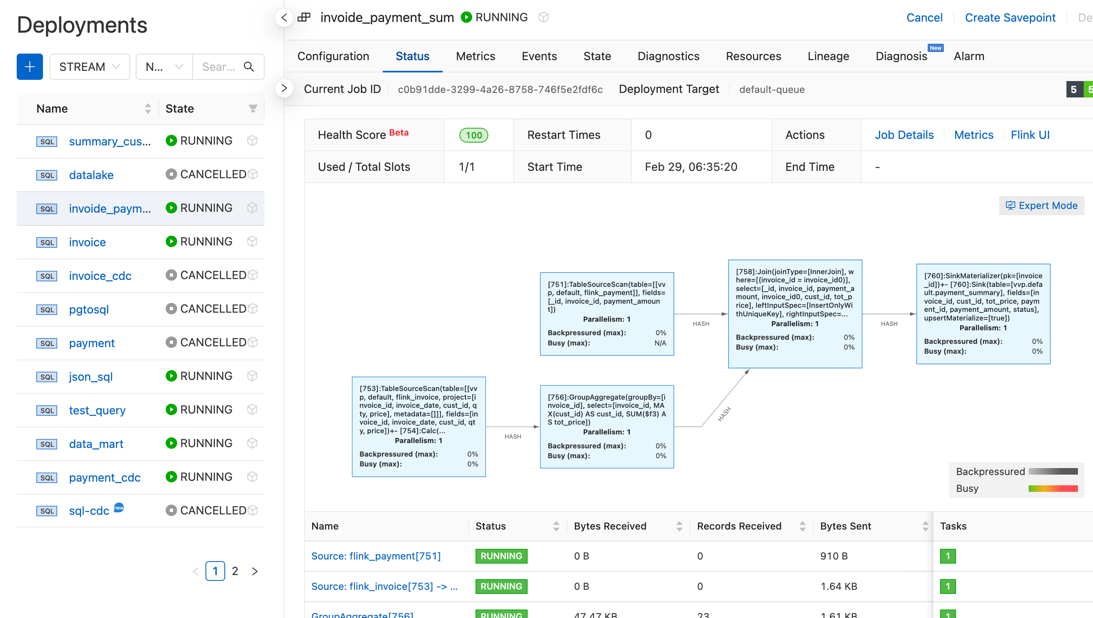
2). Click on one of the deployments, then choose status. In this menu we can see the running status of each processes including CDC data ingestion, Data Aggregration process, Table joining and Data sinking process.
3). The last thing we need to do is to test the CDC capability. Add a message in Kafka under the same topic by following step a (ii) and also new data inside MongoDB by following step b (ii).
4). The second half of the demo will all be inside the PostgreSQL database. Follow the PostgreSQL database requirement found here.
5). Copy and paste the following code to a new draft
CREATE TEMPORARY TABLE customer_detail
(
  cust_id      INT
  ,name        varchar(100)
  ,address     varchar(100)
  ,phone       varchar(100)
  ,country     varchar(100)
) WITH (
  'connector' = 'jdbc',
  'url' = 'jdbc:postgresql://<endpoint>:5432/<database>',
  'table-name' = 'customer_detail',
  'username' = 'adm',
  'password' = '<password>'
);

CREATE TEMPORARY TABLE payment_summary
(
  invoice_id        varchar(100)
  ,cust_id          varchar(100)
  ,tot_price        INT
  ,payment_id       varchar(100)
  ,payment_amount   INT
  ,status           varchar(100)
) WITH (
  'connector' = 'postgres-cdc',
  'hostname' = <endpoint>',
  'port' = '5432',
  'username' = 'adm',
  'password' = '<password>',
  'database-name' = 'db_flink',
  'schema-name' = 'public',
  'table-name' = 'payment_summary',
  'slot.name' = 'flink'
);

CREATE TEMPORARY TABLE customer_summary (
  cust_id       VARCHAR(100),
  name          VARCHAR(100),
  country       VARCHAR(100),
  hutang        INT,
  PRIMARY KEY (cust_id) NOT ENFORCED
) WITH (
  'connector' = 'jdbc',
  'url' = 'jdbc:postgresql://<endpoint>:5432/<database>',
  'table-name' = 'customer_summary',
  'username' = 'adm',
  'password' = 'ApsaraDB123!'
);

INSERT INTO customer_summary
SELECT
    a.cust_id
    ,name
    ,country
    ,hutang
FROM
(
    SELECT
        MAX(invoice_id) as invoice_id
        ,cust_id
        ,SUM(tot_price-payment_amount) as hutang
    FROM payment_summary
    GROUP BY cust_id
) a
INNER JOIN customer_detail b ON a.cust_id = b.cust_id
6). Deploy the draft and then insert new message and data inside kafka and mongodb to see the ETL increment results in real time.
Elevating Your Media Strategy: A Stepwise Guide to MPS Implementation with VOD Insights
Change Data Capture (CDC) Made Easy- A Step-by-Step Guide with Debezium and Kafka
115 posts | 21 followers
Follow5544031433091282 - October 8, 2023
Alibaba Cloud Community - March 8, 2024
Apache Flink Community - August 1, 2025
Alibaba Cloud Community - January 4, 2026
Apache Flink Community - July 28, 2025
Alibaba Cloud Big Data and AI - October 27, 2025
115 posts | 21 followers
Follow Realtime Compute for Apache Flink
Realtime Compute for Apache Flink offers a highly integrated platform for real-time data processing, which optimizes the computing of Apache Flink.
Learn More Auto Scaling
Auto Scaling automatically adjusts computing resources based on your business cycle
Learn More ApsaraDB for MongoDB
A secure, reliable, and elastically scalable cloud database service for automatic monitoring, backup, and recovery by time point
Learn More ApsaraDB for HBase
ApsaraDB for HBase is a NoSQL database engine that is highly optimized and 100% compatible with the community edition of HBase.
Learn MoreMore Posts by Alibaba Cloud Indonesia