By Liptan Biswas, Alibaba Cloud Tech Share Author. Tech Share is Alibaba Cloud's incentive program to encourage the sharing of technical knowledge and best practices within the cloud community.
Matomo is an open-source and free web and mobile analytics platform, formerly known as Piwik. It is a self-hosted and open-source alternative to the Google Analytics, providing nearly similar features. Being a self-hosted application, it provides full ownership of the analytical data to the users.
It is capable of providing a comprehensive report of your website and the visitors, including search engine keywords, referrer, visitor country and language, device and browser used, searches within the site, liked pages, time spent on pages, and conversions. There is no data or user limit on a self-hosted Matomo instance. Setting up tracking on a website is very easy, you just need to add a JavaScript code on every page you want to track. Matomo also has plugins to easily set up the tracking for nearly all popular CMS, blogs or e-commerce platforms. Matomo is a very popular application and more than a million websites are currently using Matomo to get their analytics.
In this article, we will be installing Matomo (Piwik) on an Alibaba Cloud Elastic Compute Service (ECS) instance to perform web and mobile analytics.
You can follow the Quick Start Guide to create the ECS instance and find the steps to connect to your instance. This tutorial assumes that you have already created your Alibaba Cloud ECS instance and configured matomo.example.com to point to your Ubuntu instance. Once you are connected to your instance via SSH, run the following command to update the repository cache and the base system.
apt update && apt -y upgrade && apt -y autoremoveMatomo can be installed on any PHP supported web server. We will install the Matomo app on a lightweight NGINX web server with PHP 7.2. PHP 7.2 is the latest available version of PHP and has a significant advantage over the older versions of PHP. Add the Ubuntu PPA repository for PHP 7.2.
apt -y install software-properties-common
add-apt-repository ppa:ondrej/php –yes
apt update
Install the NGINX web server and PHP 7.2 along with the required PHP modules.
apt -y install nginx php7.2 php7.2-curl php7.2-gd php7.2-cli php7.2-mysql php-xml php7.2-mbstring php7.2-fpm unzipSince we are using the PHP-FPM with NGINX to execute the PHP scripts, edit the PHP configuration file for the PHP-FPM.
nano /etc/php/7.2/fpm/php.iniSet the appropriate time zone and memory limit. If you wish, you can use -1 for the memory limit option, which will remove the limits on the amount of memory a script may consume. Uncomment and set 0 to the value of "cgi.fix_pathinfo". Once you have updated the parameters, the updates should look as shown below.
memory_limit = 512M
...
date.timezone =Asia/Kolkata
...
cgi.fix_pathinfo=0
Once you have done configuring the php.ini file, restart the "PHP-FPM" service and enable it to automatically start at boot time.
systemctl restart php7.2-fpm
systemctl enable php7.2-fpm
Also, start the NGINX web server and enable it to automatically start at boot time.
systemctl restart nginx
systemctl enable nginxSince the developers of Piwik recently changed its name from Piwik to Matomo, the archive is still named as "piwik.zip". Download the Matomo (Piwik) archive.
wget https://builds.matomo.org/piwik.zipIf the above link is expired, you can always find the link to the latest version of the application on the Matomo download page. Extract the downloaded archive into the directory /var/www/piwik.
unzip piwik.zip -d /var/www/Provide the appropriate ownership of the files to the NGINX user.
chown -R www-data:www-data /var/www/At this point, the Matomo files are successfully placed on your ECS instance.
Securing your Matomo instance with the SSL certificates is not mandatory, but a much-recommended step. Since Matomo gathers the data for different websites from a client's computer using JavaScript. The need to encrypt the data being exchanged is very important. Also, if Matomo tracking code is inserted into a website accessible over HTTPS only, many browsers block the content served over the unsecured HTTP connection. If the JavaScript is blocked on the client's computer, Matomo will not be able to gather any kind data.
In this tutorial, we will use the free SSL certificate generated by Let's Encrypt CA. However, business users should consider using the Alibaba Cloud SSL Certificates Service to achieve a very high level of security and reliability.
Certbot is the client application for generating the Let's Encrypt free SSL certificates. Install Certbot:
add-apt-repository ppa:certbot/certbot –yes
apt update
apt -y install certbot
Note: Before requesting SSL certificates, make sure that the domain you are using is pointed towards the IP address of the ECS instance. If not, make an "A" type record in DNS management panel and point the domain or subdomain to the public IP address of ECS instance and wait for the DNS to propagate.
Generate the SSL certificates for your domain.
certbot certonly --webroot -w /var/www/html -d matomo.example.comReplace matomo.example.com with your actual domain name.
Create a cron job to renew the certificates, as Let's Encrypt certificates expire in every three months.
{ crontab -l; echo '36 2 * /usr/bin/certbot renew --post-hook "systemctl reload nginx"'; } | crontab -The above command will run the renewal command every day at 2.36 AM. If the certificates are due for expiry, it will automatically renew them.
Create a new NGINX server block for the virtual hosting of the Matomo application.
nano /etc/nginx/sites-available/matomoPopulate the file with the following configuration. Make sure to replace all occurrences of matomo.example.com with the actual domain name, and verify that the path to the Let's Encrypt SSL certificate as well as the private key is correct.
server {
    listen 80;
    server_name matomo.example.com;
    return 301 https://$server_name$request_uri;
}
server {
    listen 443 ssl;
    server_name matomo.example.com;

    ssl_certificate  /etc/letsencrypt/live/matomo.example.com/fullchain.pem;
    ssl_certificate_key  /etc/letsencrypt/live/matomo.example.com/privkey.pem;

    add_header Strict-Transport-Security "max-age=15768000;
    includeSubDomains; preload;";
    add_header X-Content-Type-Options nosniff;
    add_header X-XSS-Protection "1; mode=block";
    add_header X-Robots-Tag none;
    add_header X-Download-Options noopen;
    add_header X-Permitted-Cross-Domain-Policies none;

    root /var/www/piwik/;
    index index.php;

    access_log /var/log/nginx/matomo.example.com_access.log;
    error_log /var/log/nginx/matomo.example.com_error.log;

    gzip on;
    gzip_vary on;
    gzip_comp_level 4;
    gzip_min_length 256;
    gzip_proxied expired no-cache no-store private no_last_modified no_etag auth;
    gzip_types application/atom+xml application/javascript application/json application/ld+json application/manifest+json application/rss+xml application/vnd.geo+json application/vnd.ms-fontobject application/x-font-ttf application/x-web-app-manifest+json application/xhtml+xml application/xml font/opentype image/bmp image/svg+xml image/x-icon text/cache-manifest text/css text/plain text/vcard text/vnd.rim.location.xloc text/vtt text/x-component text/x-cross-domain-policy;

    location = /index.php {
        fastcgi_pass unix:/run/php/php7.2-fpm.sock;
        fastcgi_param SCRIPT_FILENAME $document_root$fastcgi_script_name;
        include fastcgi_params;
        fastcgi_buffers 256 4k;
        fastcgi_intercept_errors on;
        fastcgi_read_timeout 14400;
        fastcgi_index index.php;
    }
    location = /piwik.php {
        fastcgi_pass unix:/run/php/php7.2-fpm.sock;
        fastcgi_param SCRIPT_FILENAME $document_root$fastcgi_script_name;
        include fastcgi_params;
        fastcgi_buffers 256 4k;
        fastcgi_intercept_errors on;
        fastcgi_read_timeout 14400;
        fastcgi_index index.php;
    }

    location ~* ^.+\.php$ {
        return 403;
    }
    location ~* (?:DESIGN|(?:gpl|README|LICENSE)[^.]*|LEGALNOTICE)(?:\.txt)*$ {
        return 302 /;
    }
    location ~* \.(?:bat|git|ini|sh|svn[^.]*|txt|tpl|xml)$ {
        return 404;
    }
    location ~ ^/(config|core|lang|misc|tmp)/ {
        deny all;
    }
}
Activate the configuration file.
ln -s /etc/nginx/sites-available/matomo /etc/nginx/sites-enabled/matomoRestart the NGINX web server to implement the changes in the configuration.
systemctl restart nginx php7.2-fpmMySQL database can also be installed on the same ECS instance where the Matomo application is installed. However, it is not recommended for websites with a considerable number of visitors. Using an Alibaba Cloud ApsaraDB for RDS instance of MySQL has many benefits over the self-hosted version of MySQL. It is very easy to deploy and provides ease of management with high-performance features.
For each five million page views, nearly 1 Gigabytes of data is gathered and stored by Matomo in the MySQL database. If your website gets a lot of visitors then it is strongly recommended to use the ApsaraDB RDS instance for MySQL. Since the performance of ApsaraDB is significantly faster than the hosted MySQL server, the data is processed swiftly and you will get your reports quickly.
To create a new ApsaraDB MySQL instance, go to your ApsaraDB RDS console and click on the Create Instance button. Choose your payment method, region, and zone. Create the RDS instance in the same region and zone where the ECS instance of Matomo is located. Choose MySQL 5.6 as the database engine. Choose the instance type. For starters, 1GB instance should be enough. For a large website, choose a large instance according to your needs. Choose the required storage space and network type. It is important that you choose the same VPC network and VSwitch in which the ECS instance is running otherwise you will get errors while connecting to the database instance.
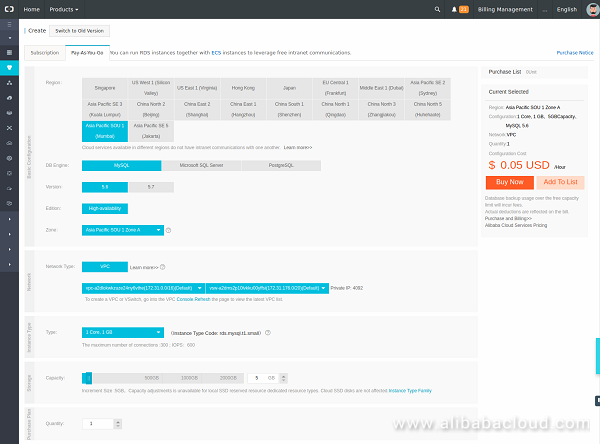
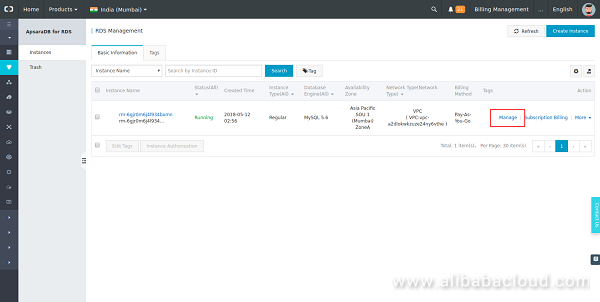
Once, you have created the RDS instance wait for a few minutes to let it start. Once the instance has been successfully started, click on the Manage link to go to the instance's management panel.
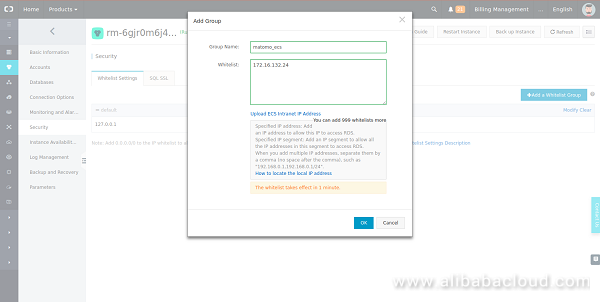
Navigate to the Security tab and click on the Add a Whitelist Group button. Provide a descriptive name for the new whitelist group and put the private IP address or intranet address of the ECS instance on which you are running the Matomo. If you have not taken the note of the intranet IP address of ECS instance, you can also click on the Upload ECS Intranet IP Address link to select the private IP address of ECS instance.
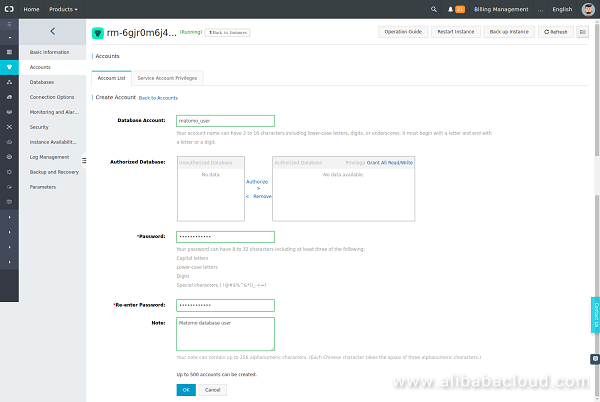
Navigate to the Accounts tab from the sidebar and click on the Create Account button. Provide the database username and a password. Make a note of the username and password as we will require that later in the tutorial.
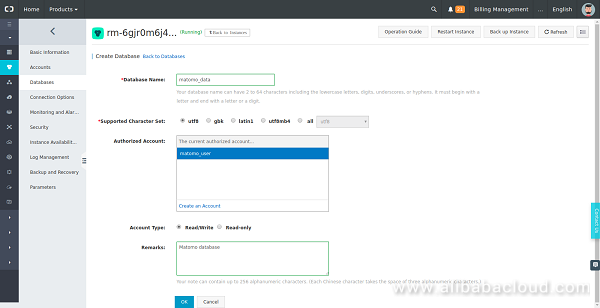
Once the account has been created, navigate to the Databases tab and click on the Create Database button. Provide the name of the database and select the username from the list of accounts. Select the Read/Write access checkbox.
Now, head back to the Basic Information tab from the sidebar and you will see the intranet address of your RDS instance.
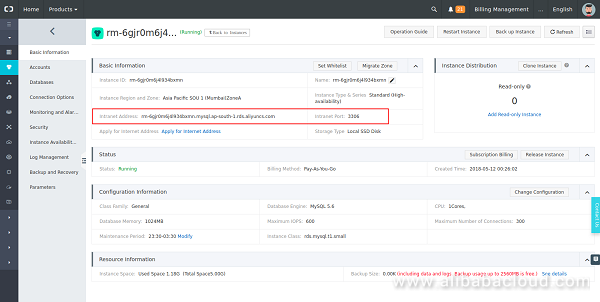
Make a note of the intranet address which is pointing towards your RDS instance. Our MySQL database instance is now ready. We can proceed to the final installation of Matomo using a web browser.
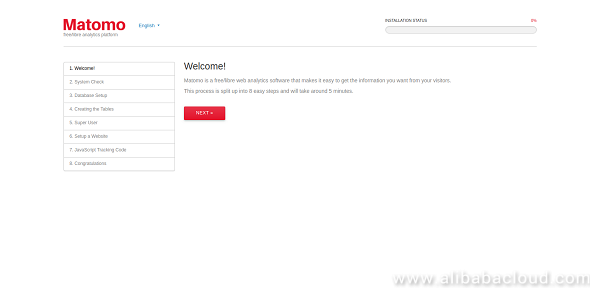
Open your favorite web browser and go to the URL https://matomo.example.com. You will see the welcome screen from the Matomo installation interface.
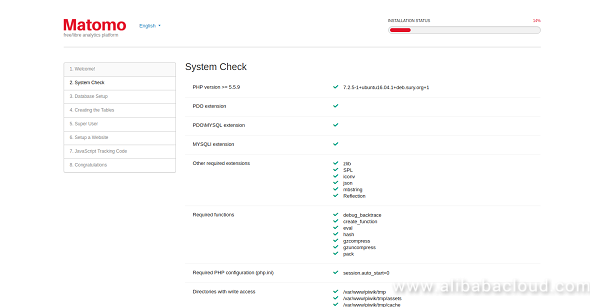
On the next interface, Matomo web installer will verify if the system is ready for the deployment. If you have followed the tutorial accurately, you should see that all the requirements are satisfied.
Further, on the next interface, provide the database server hostname we obtained when we created the ApsaraDB for MySQL instance and also provide the credentials of the database user we have created. Leave the default table prefix and select MYSQLI as the database adapter.
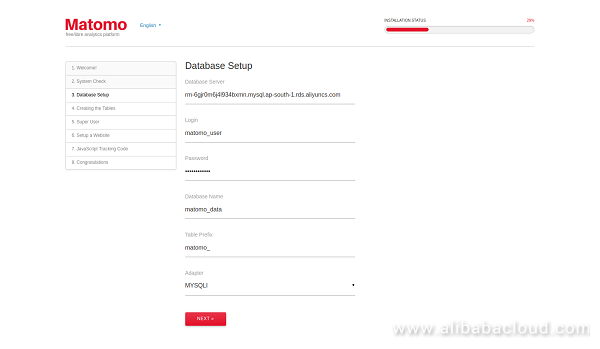
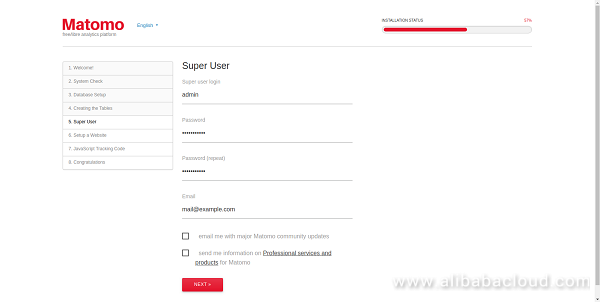
If your Matomo application can successfully connect to the MySQL instance, then it will automatically create the schema and write the initial data into the tables. On the next interface, you will be asked to provide the administrator's details.
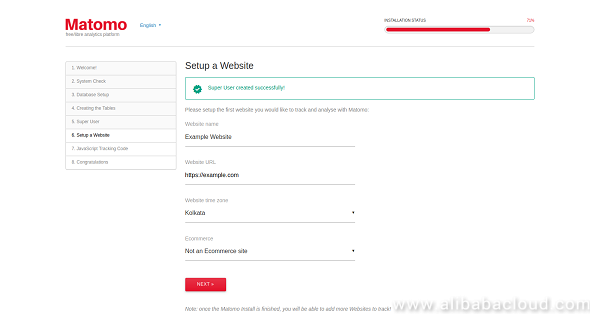
Finally, the installer will ask you to add a website you wish to track. Provide your website's name and URL. URL must include the correct protocol on which the site is accessed, either over http or https.
Matomo is now installed on your ECS instance. The installer will provide you with a JavaScript code which you need to put in every page of the website you want to track with Matomo. We will skip this for now because later in the tutorial, we will learn to track a WordPress website.
Now, login to your Matomo dashboard using the administrator credentials. You will see a message saying that no data has been recorded on your website. Click Don't show this message for the next hour button and you will be taken to your Matomo dashboard.
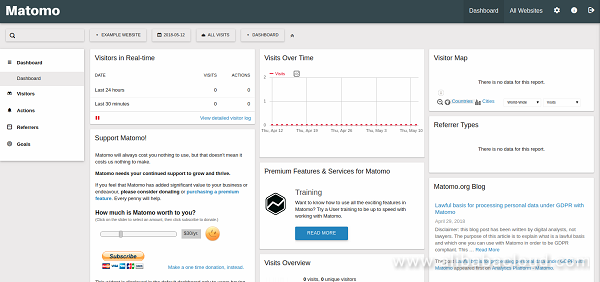
Adding the Matomo tracking code on your website is very easy. For a plain HTML site, you can add the tracking code on every page, just before closing the "body" tag. In this tutorial, we will add our JavaScript tracking code to a WordPress website.
There are two methods of adding the Matomo code into WordPress. First one is by using a plugin, and the second option is by manually editing the theme code. We will briefly look at both the options. You can choose any of these options according to your preferences.
There are several plugins available to connect Matomo with WordPress such as the WP-Matomo plugin. WP-Matomo is easy to set up and along with tracking the users of the website, it can also display graphs right into your WordPress administration dashboard.
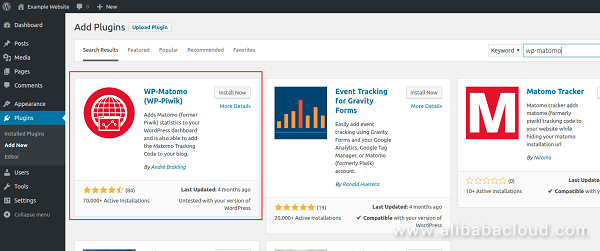
Log in to your WordPress administrator dashboard and navigate to add new plugin option. Search for "wp-matomo" and activate the plugin after installation.
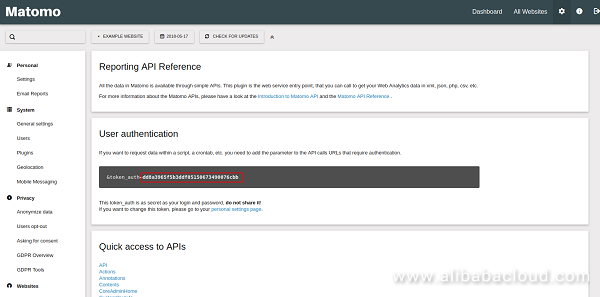
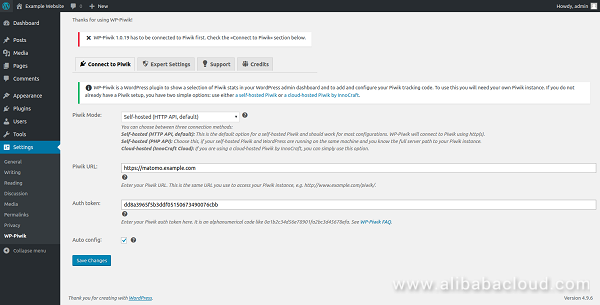
Now, navigate to Settings > WP-Piwik and you will find the settings page of the plugin. Select the Self-hosted, HTTP API mode, and provide the URL of your Matomo or Piwik installation. You will also need to provide a user authentication token. Auth token can be obtained from your Matomo installation by going to the administration dashboard and then navigating to Platform > API.
The configuration page should look like as shown in the next screenshot. Save the changes.
Your WordPress site is now connected to your Matomo instance. To activate tracking on your WordPress site, switch to the Enable Tracking tab and select the Default Tracking option.
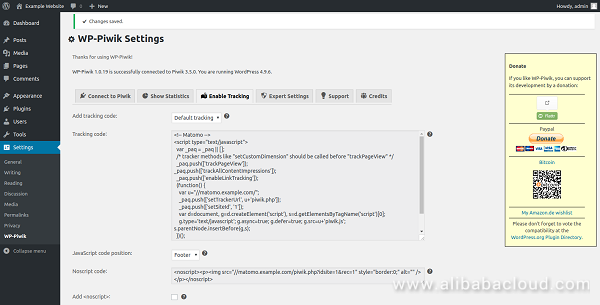
Matomo will now start tracking your WordPress website.
Plugins are easy to configure and use, but they can also create processing overhead affecting the site performance. If you do not want to use a plugin, you can also add the tracking code to your website manually.
Navigate to Appearance > Editor and the theme editor page will open up. Make sure that your active theme is pre-selected. From the right sidebar, load the Theme Footer, footer.php file into the editor. Paste the whole Matomo tracking code just before the closing
Monitoring SSL Certificates with Alibaba Cloud Function Compute

2,593 posts | 791 followers
FollowAlibaba Clouder - April 11, 2018
francisndungu - December 10, 2019
Alibaba Clouder - August 10, 2020
Alibaba Clouder - December 2, 2016
Arslan ud Din Shafiq - May 18, 2020
Alibaba Clouder - January 4, 2019

2,593 posts | 791 followers
Follow ECS(Elastic Compute Service)
Elastic and secure virtual cloud servers to cater all your cloud hosting needs.
Learn MoreLearn More
 Certificate Management Service
You can use Certificate Management Service to issue, deploy, and manage public and private SSL/TLS certificates.
Learn MoreMore Posts by Alibaba Clouder