By Hitesh Jethva, Alibaba Cloud Tech Share Author. Tech Share is Alibaba Cloud's incentive program to encourage the sharing of technical knowledge and best practices within the cloud community.
OrientDB is a free and an open source NoSQL database management system with support for graph and document databases. It is written in Java can run on any operating system. OrientDB includes an integrated web-based graphical user interface to easily handle the database through a web browser. OrientDB is a fully ACID-complaint with help for multi-master replication, allowing uncomplicated crosswise measuring. OrientDB supports schema-less, schema-full and schema-mixed modes. OrientDB is available in two editions Community Edition and Enterprise Edition. OrientDB Community Edition is built upon by a community of developers and is free for any use.
Features
In this tutorial, we will learn how to install and configure OrientDB on an Alibaba Cloud Elastic Compute Service (ECS) instance with Ubuntu 16.04.
First, log in to your https://ecs.console.aliyun.com">Alibaba Cloud ECS Console. Create a new ECS instance, choosing Ubuntu 16.04 as the operating system with at least 2GB RAM. Connect to your ECS instance and log in as the root user.
Once you are logged into your Ubuntu 16.04 instance, run the following command to update your base system with the latest available packages.
apt-get update -yOrientDB is written in Java. So you will need to install Java to your system. You can install it using the following command:
apt-get install default-jre -yOnce the Java is installed, verify the version of the Java by running the following command:
java -versionOutput:
openjdk version "1.8.0_171"
OpenJDK Runtime Environment (build 1.8.0_171-8u171-b11-0ubuntu0.16.04.1-b11)
OpenJDK 64-Bit Server VM (build 25.171-b11, mixed mode)First, you will need to download the latest version of the OrientDB community edition from their official website. You can download it using the following command:
wget https://s3.us-east-2.amazonaws.com/orientdb3/releases/3.0.1/orientdb-3.0.1.tar.gzOnce the download is completed, extract the downloaded file with the following command:
tar -xvzf orientdb-3.0.1.tar.gz Next, copy the extracted directory to the /opt:
cp -r orientdb-3.0.1 /opt/orientdbNext, start the OrientDB server using the following command:
/opt/orientdb/bin/server.shYou will need to specify a password for the root user when starting the server for the first time. Once the server starts successfully you should see the following output:
+---------------------------------------------------------------+
|                WARNING: FIRST RUN CONFIGURATION               |
+---------------------------------------------------------------+
| This is the first time the server is running. Please type a   |
| password of your choice for the 'root' user or leave it blank |
| to auto-generate it.                                          |
|                                                               |
| To avoid this message set the environment variable or JVM     |
| setting ORIENTDB_ROOT_PASSWORD to the root password to use.   |
+---------------------------------------------------------------+

Root password [BLANK=auto generate it]: **********
Please confirm the root password: **********

2018-06-02 09:48:01:860 INFO  Installing dynamic plugin 'orientdb-etl-3.0.1.jar'...
2018-06-02 09:48:01:910 INFO  Installing dynamic plugin 'orientdb-neo4j-importer-plugin-3.0.1-dist.jar'...
2018-06-02 09:48:01:941 INFO  Installing dynamic plugin 'orientdb-teleporter-3.0.1.jar'...
2018-06-02 09:48:02:026 INFO  Installing dynamic plugin 'orientdb-studio-3.0.1.zip'...
2018-06-02 09:48:02:061 INFO  ODefaultPasswordAuthenticator is active
2018-06-02 09:48:02:081 INFO  OServerConfigAuthenticator is active
2018-06-02 09:48:02:091 INFO  OSystemUserAuthenticator is active
2018-06-02 09:48:02:106 INFO  [OVariableParser.resolveVariables] Property not found: distributed
2018-06-02 09:48:02:232 WARNI Authenticated clients can execute any kind of code into the server by using the following allowed languages: [sql]
2018-06-02 09:48:02:253 INFO  OrientDB Studio available at http://192.168.0.103:2480/studio/index.html
2018-06-02 09:48:02:260 INFO  OrientDB Server is active v3.0.1 - Veloce (build d31da1499f29f04af751d0a8ad108152b2593c8b, branch develop).
OrientDB server is now up and listening on port 2424 and 2480. You can verify it using the following command:
netstat -ant | grep -i listenYou should see the following output:
tcp        0      0 127.0.0.1:25            0.0.0.0:*               LISTEN
tcp        0      0 127.0.0.1:3306          0.0.0.0:*               LISTEN
tcp        0      0 0.0.0.0:22              0.0.0.0:*               LISTEN
tcp6       0      0 :::2424                 :::*                    LISTEN
tcp6       0      0 ::1:25                  :::*                    LISTEN
tcp6       0      0 :::2480                 :::*                    LISTEN
tcp6 0 0 :::22 :::* LISTEN You can connect OrientDB console using the command line interface to working with the application. Run the following command to connect OrientDB console.
/opt/orientdb/bin/console.shYou should see the following output:
OrientDB console v.3.0.1 - Veloce (build d31da1499f29f04af751d0a8ad108152b2593c8b, branch develop) https://www.orientdb.com Type 'help' to display all the supported commands.Now, connect to the server instance using the below command:
orientdb> connect remote:127.0.0.1 root
Enter password:
OK
orientdb {server=remote:127.0.0.1}>
You can exit from the OrientDB console any time by pressing Ctrl+C.
Next, you will need to create an OrientDB system service file to run OrientDB as a daemon on the system.
First, create a system user for OrientDB daemon with the following command:
useradd -r orientdb -s /sbin/nologinNext, give proper permissions to the OrientDB directory:
chown -R orientdb:orientdb /opt/orientdbNext, you will need to specify OrientDB path to the orientdb.sh script:
nano /opt/orientdb/bin/orientdb.shMake the following changes:
ORIENTDB_DIR="/opt/orientdb"
ORIENTDB_USER="orientdb"
Save and close the file, when you are finished. Then modify the server configuration file's permissions to prevent unauthorized access.
chmod 640 /opt/orientdb/config/orientdb-server-config.xmlNext, you will need to copy OrientDB default Systemd service file to the /etc/systemd/system directory.
cp /opt/orientdb/bin/orientdb.service /etc/systemd/system/Next, open orientdb.service file and make some changes:
nano /etc/systemd/system/orientdb.serviceMake the following changes under [Service] section:
[Service]
User=orientdb
Group=orientdb
ExecStart=/opt/orientdb/bin/server.sh
Save and close the file, then reload unit file:
systemctl daemon-reloadFinally, start OrientDB service and enable it to start on boot time with the following command:
systemctl start orientdb
systemctl enable orientdb
You can check the status of OrientDB process using the following command:
systemctl status orientdbOutput:
● orientdb.service - OrientDB Server
   Loaded: loaded (/etc/systemd/system/orientdb.service; enabled; vendor preset: enabled)
   Active: active (running) since Sat 2018-06-02 10:44:53 IST; 3s ago
 Main PID: 2922 (java)
   CGroup: /system.slice/orientdb.service
           └─2922 java -server -Xms1G -Xmx1G -Djna.nosys=true -XX:+HeapDumpOnOutOfMemoryError -Djava.awt.headless=true -Dfile.encoding=UTF8 -Dr

Jun 02 10:44:53 Node1 server.sh[2922]:     .,,,,::,,,,,,,:  `: , ,,  :     `   :     :   .:    :::      :::  :::     :::
Jun 02 10:44:53 Node1 server.sh[2922]:       ...,::,,,,::.. `:  .,,  :,    :   :     :   .:    :::::::::::   :::     :::
Jun 02 10:44:53 Node1 server.sh[2922]:            ,::::,,,. `:   ,,   :::::    :     :   .:    :::::::::     ::::::::::
Jun 02 10:44:53 Node1 server.sh[2922]:            ,,:` `,,.
Jun 02 10:44:53 Node1 server.sh[2922]:           ,,,    .,`
Jun 02 10:44:53 Node1 server.sh[2922]:          ,,.     `,                                              VELOCE
Jun 02 10:44:53 Node1 server.sh[2922]:        ``        `.
Jun 02 10:44:53 Node1 server.sh[2922]:                  ``                                       www.orientdb.com
Jun 02 10:44:53 Node1 server.sh[2922]:                  `
Jun 02 10:44:53 Node1 server.sh[2922]: removing old pid file /opt/orientdb/bin/orient.pidOrientDB is now installed and configured, it's time to access OrientDB Web Interface.
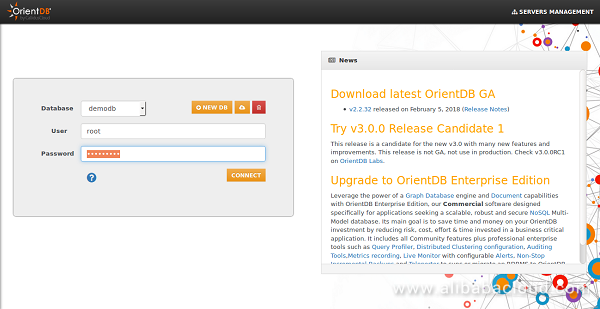
Open your web browser and type the URL http://192.168.0.103:2480/studio/index.html, you will be redirected to the following page:

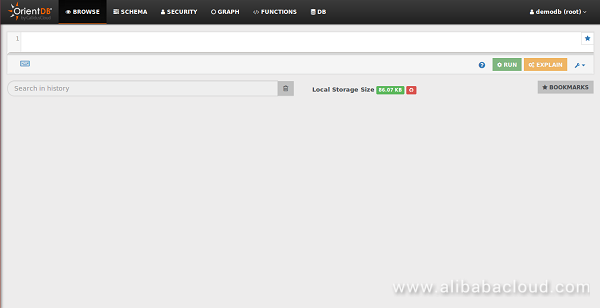
Provide username as root and the password you set earlier, then click on the CONNECT button, you should see the following page:

The default OrientDB installation allows access to OrientDB Studio from the public network. So it is recommended to prevent the access from the Internet to OrientDB Studio and console. You can do this by editing the orientdb-server-config.xml file:
nano /opt/orientdb/config/orientdb-server-config.xmlReplace the following lines from:
<listener protocol="binary" socket="default" port-range="2424-2430" ip-address="0.0.0.0"/>
<listener protocol="http" socket="default" port-range="2480-2490" ip-address="0.0.0.0">
To:
<listener protocol="binary" socket="default" port-range="2424-2430" ip-address="127.0.0.1"/>
<listener protocol="http" socket="default" port-range="2480-2490" ip-address="127.0.0.1">
Save and close the file. Then restart OrientDB service with the following command:
systemctl restart orientdbNow, open your web browser and type the URL http://192.168.0.103:2480/studio/index.html, you will get the connection will be denied message.
Batch Compute is a cloud service for massive simultaneous batch processing. The system automatically manages resources, schedules tasks, loads data, and bills by usage. Batch Compute is already widely used in scenarios such as scientific applications, genetic data analysis, CGI rendering, media transcoding, and financial data analysis.
Function Compute is an event driven, serverless computing platform that enables developers to build and deploy their services without the need to manage any infrastructure. It seamlessly handles the resource management, auto scaling, and load balancing so you can focus on your business logic and increase your development velocity. You can also setup various event sources from other Alibaba services to automatically trigger your code to run. The best part is you only pay for the resources your code actually consumes to the nearest 100 milliseconds.
How to Install and Configure Taiga Project Management Tool on Ubuntu 16.04

2,605 posts | 747 followers
FollowAlibaba Clouder - September 7, 2020
Alibaba Clouder - November 26, 2018
Alibaba Clouder - September 29, 2019
francisndungu - May 29, 2019
francisndungu - October 19, 2018
Alibaba Clouder - June 13, 2019

2,605 posts | 747 followers
FollowLearn More
 ApsaraDB for Redis
A key value database service that offers in-memory caching and high-speed access to applications hosted on the cloud
Learn More ECS(Elastic Compute Service)
Elastic and secure virtual cloud servers to cater all your cloud hosting needs.
Learn MoreMore Posts by Alibaba Clouder