By Alexandru Andrei, Alibaba Cloud Community Blog author.
If you occasionally manage files on your Linux server(s), commands such as cp, mv, rm, mkdir or the more advanced ones like rsync are often enough to get the job done. However, if the work you do on your server constantly requires you to deal with various files and directories, it may be worthwhile to use an utility that can make your job much simpler (and faster).
When you browse your disks on the Windows operating system, you use the file Explorer program, which makes it very easy to visualize the structure of your directories and the files they contain. It also makes it easy to copy or move files around, delete them, create directories, and so on, with a few mouse movements and clicks, or by using keyboard shortcuts such as CTRL+C and CTRL+V. The utility called Midnight Commander runs on any Linux system and can help you in a very similar way. But while Explorer is a GUI (Graphical User Interface) application, Midnight Commander sits somewhere in the middle, between the CLI (Command Line Interface) and a GUI utility. Since it has to work within the constraints of your SSH session, which is text-based, this is a TUI (Text User Interface) program. While the name may sound fancy, it simply means that this utility creates a visual interface out of text elements instead of pixels, pictures, fancy menus with 3D shadows and so on. It does this by using characters that you can usually find on your keyboard, just like the following characters create an image of a rabbit when viewed from a distance.
     / \
    / _ \
   | / \ |
   ||   || _______
   ||   || |\     \
   ||   || ||\     \
   ||   || || \    |
   ||   || ||  \__/
   ||   || ||   ||
    \\_/ \_/ \_//
   /   _     _   \
  /               \
  |    O     O    |
  |   \  ___  /   |
 /     \ \_/ /     \
/  -----  |  -----  \
|     \__/|\__/     |
\       |_|_|       /
 \_____       _____/
       \     /
| |To install Midnight Commander on Ubuntu or Debian, as the root user, run
apt install mc
If you don't usually log in as root for administrative tasks, but instead use a regular user with sudo privileges, then just prefix the command with sudo, for example: sudo apt install mc.
Similarly, if you intend to install Midnight Commander on CentOS or RedHat, run
yum install mc
On a SUSE distribution, install with
zypper install mc
If you don't need root user's privileges to work with your files and directories, it's recommended you log in as a regular user before starting Midnight Commander. This can help you avoid accidentally modifying, moving or removing operating system files and directories.
To launch the utility, enter the following command.
mc
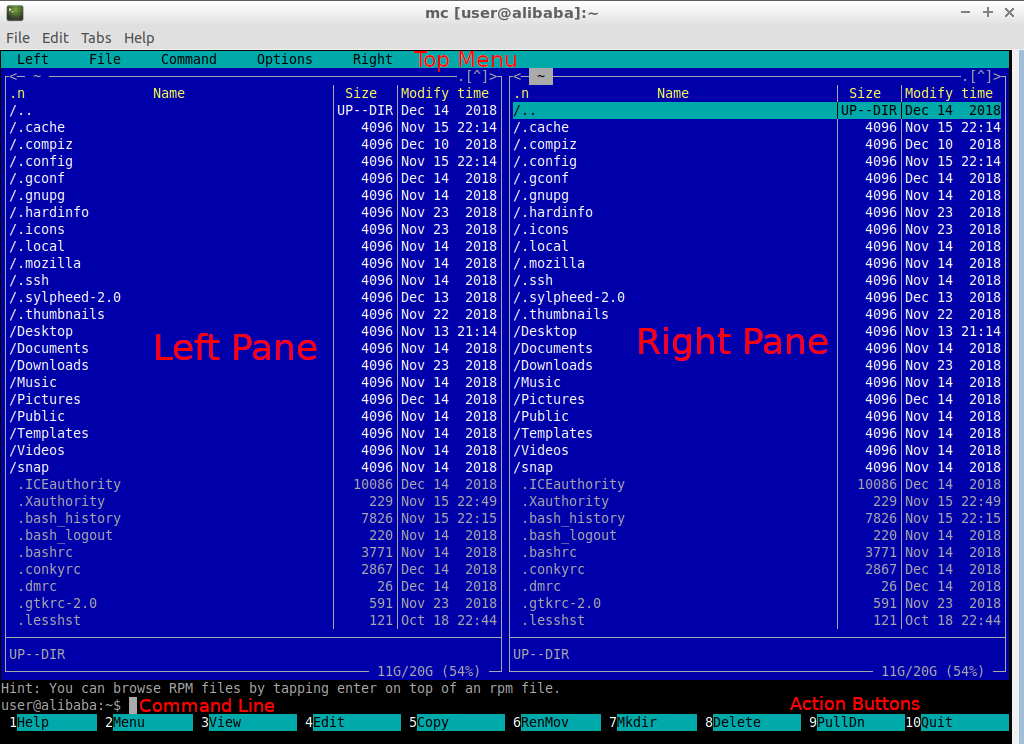
In the next picture, you can see how the program's main window looks like. The text with the red color has been added on top of the screenshot to highlight the main interface elements/areas.

user@alibaba:~$ in the picture above). Here, you can type the same commands you can use in a typical SSH session. They will be executed in the directory that is currently open in the active pane (you can change panes with the TAB key). To see command output, press CTRL+o (the letter "o", not the digit zero). When you do this, it may seem that Midnight Commander has quit, but it's still running; to get back to its interface, press CTRL+o again.Depending on what SSH client you use to connect to your Linux (or BSD) ECS instance, you may be able to use your mouse to interact with interface elements in Midnight Commander. For example, if you connect from Windows, using PuTTY, then you can click on the bottom menu buttons, menu items in the top, dialog options (for example, OK buttons), files/directories you can see in the left and right panes, and so on. The same is true if you connect from Linux, using the preinstalled OpenSSH client.
Using your mouse to interact with the file browsing utility also makes it easier to select multiple files/directories you want to work with. You can right click on a bunch of files to select them, which will highlight them in yellow. Then, by pressing F5, you can copy all the selected entries to another location. Of course, you can also press F6 to move them, F8 to delete them or go through the menu to perform another action on your selections.
If the files/directories you want to select are next to each other, you can hold the right mouse button and drag down or up to highlight them.
The first thing you usually do in any of the panes is navigate to your desired directory. By using the arrow keys, select the directory you wish to "enter" and press the ENTER key. If you have mouse support, just double-click on the entry you wish to navigate to. Besides going into a directory, you can also get "out" of it, going one level up. To do so, select the first entry /.. and press ENTER (or double click it). If, for example, you are currently in the directory /home/user/webapp, this will take you into /home/user/.
To switch from the right pane to the left pane, or vice versa, press TAB.
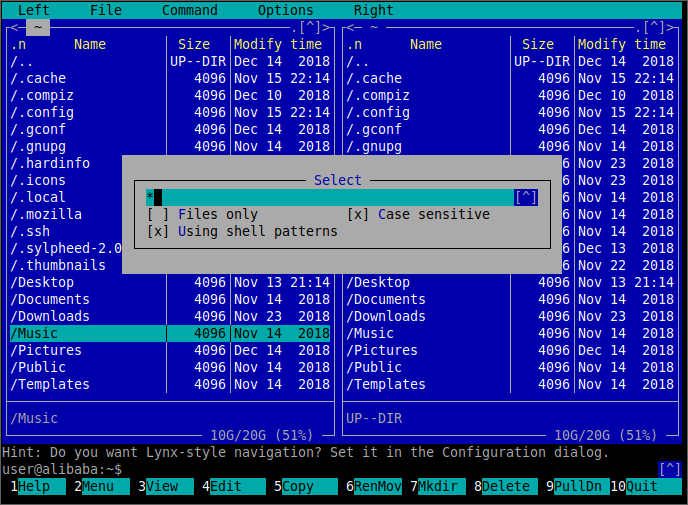
If you intend to work with a single entry (file or directory), just navigate to it with the up and down arrow keys and then select the desired action (e.g., copy, move, delete). Sometimes, however, you will want to act on multiple entries at once. You can select multiple files and directories with the mouse, as instructed in the "Mouse Support" section above. Otherwise, with your keyboard, you have the following options to make selections:
* and press ENTER. To deselect, just press - instead and then type your pattern.The * character in a pattern is a wildcard that replaces zero or more characters. For example *.html will match all files/directories that end in ".html" and file* will match all files and directories that begin with the string of characters "file" like "file1", "file2", "file1234" but also "file". Finally, something such as *mm* will match entries like "command" or "mmemory" or "himemm" or even "mm" itself.
Another special symbol is ? which is a wildcard for a single character. For example, "file?" will match "file1", "file2", "file9", "files", but will not match "file" or "file12".

* to invert selection. If you initially have nothing selected, this will add all files and directories to the selection in your active pane. This is often useful when you want to exclude something from the entries you want to group. Say you want to select all files, from 1 to 100, except 7 and 8. It would be tedious to press INSERT on all files, from 1 to 6 and then from 9 to 100. So what you do instead is select 7 and 8 with your INSERT key and then press * on your keyboard to invert selection. Now all files will be selected, with the exception of 7 and 8.Most of the times, you will want to view and edit files, copy, move or rename them, create directories, delete entries and so on. Since these actions are used most often, you have them mapped to your function keys, from F3 to F8, as you can see in the bottom of the screen.
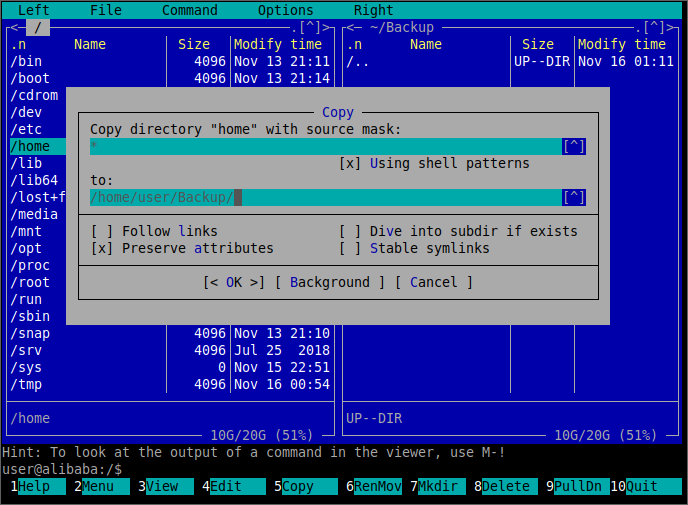
Here's an example where an entry has been selected in the left pane and then F5 was pressed to copy the directory.

A prompt appears in case you want to change some copy parameters. Usually, you just go with the defaults and simply press ENTER at this prompt to start the copy operation. However, if you do want to change something, here's how you can interact with these interface elements.
Navigating Dialog Options:
[x] or [ ])F1 - will show you contextual help. What this means is that it displays a different help dialog, depending on the context that is currently open. For example, if you're using Midnight Commander's editor and press F1, it will show you the help page for the editor. If you have a dialog window open that shows you some parameters for a copy operation, like in the image above, and press F1, it will display a help page that explains the options in that dialog box. Exit help with the ESC key (press ESC twice if it doesn't work when pressing once).
F2 - displays a contextual menu (like a right click in the Windows operating system). Depending on what kind of file or directory you select, it will show a different menu, with actions that are appropriate for that type of entry/entries. These are usually short scripts (chain of commands and/or conditions) that you can execute on entries. Some actions from this menu may not work, if your distribution doesn't include necessary packages (for example, 7zip utility not included, so you can't create .7z archives) or Midnight Commander has been packaged with some bugs/quirks. Test the desired action on unimportant files/directories first to see if they work as intended.
Midnight Commander has an integrated file viewer. Press F3 to view any text file. Afterwards, press F10 to quit. In some cases, depending on your SSH client, F10 might be mapped to some other action. Instead of sending the action key input to Midnight Commander, it might be caught by your SSH client, which might display its menu or do some other action mapped to the F10 key. In such a case, you can also quit the viewer by pressing ESC (press twice if once doesn't work).
The F6 and F7 action keys may not be immediately obvious as to what they do. F6, titled "RenMov" is used to rename or move a file to a different location. F7, "Mkdir" is used to create (make) a directory.
The file editor can be accessed with F4. In most cases, this will invoke the system default editor on your system (separate utility from Midnight Commander). In the case of Debian or Ubuntu, this will be the "nano" utility. To quit this, press CTRL+X. If you modified the file open in the editor and want to save it, press CTRL+X and then release the CTRL key, press y, followed by ENTER.
If you're presented with the following output the first time you edit a file,
Select an editor.  To change later, run 'select-editor'.
  1. /bin/nano        <---- easiest
  2. /usr/bin/mcedit
  3. /usr/bin/vim.tiny
  4. /bin/ed

Choose 1-4 [1]:
You can choose the mcedit editor if you want to, which is the built-in editor from Midnight Commander, that you may find easier to use than nano. If you've been presented with this choice menu in the past and already picked nano, you can change your choice by first deleting this file (enter this command):
rm ~/.selected_editor
Next, press F4 in Midnight Commander to edit a file. You will be shown the menu above, once again, and you can pick a different option.
In the mcedit editor, you can also access the top menu, which is hidden by default, by pressing F9. To learn how to navigate this menu, read the next section below, since the same rules apply, even if it's a different menu.
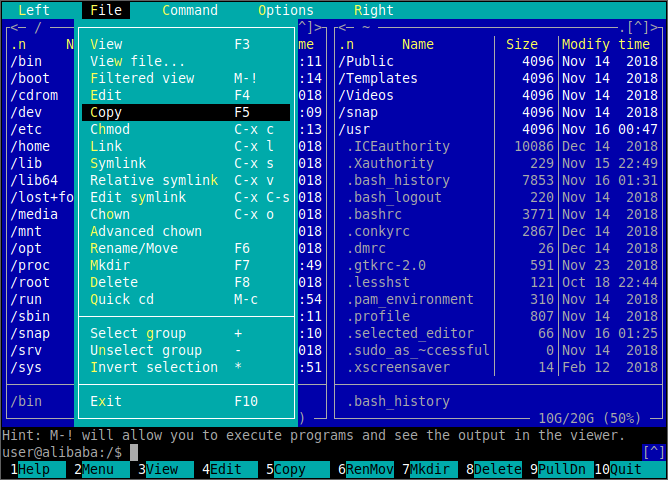
While you can access the most common actions with your F3 to F8 keys, more complex or special actions will have to be accessed through the top menu. To enter the top menu, or rather, "pull down", as it's called in the file utility, press F9. Afterwards, press the DOWN arrow key to display the highlighted menu option. With the UP, DOWN, LEFT and RIGHT arrow keys you can navigate through all menu entries. Just as instructed in the previous section about navigating dialog options, you can quickly access menu entries by pressing ALT and the corresponding highlighted letter. For example, as seen in the next image, by pressing ALT+h, you can access the "Chmod" option from the menu to change file permissions.

Next to the "Chmod" menu entry you can see a string of characters, "C-x c". This indicates a sequence of keys that you can press to quickly access the option without having to even open the menu. "C-" indicates the CTRL key. So, by pressing CTRL+X, releasing the CTRL key and then pressing c, you can open the Chmod dialog option to change file permissions.
On other menu entries, you will see something like "M-c". "M" stands for meta key, in this case, it is the ALT key on your keyboard. So, by pressing ALT+c, you can open up a "quick change directory" dialog option.
It's worth mentioning that this utility supports browsing some types of archives. Press enter on such a file, and if MC can open it, it will show up just as a regular directory, allowing you to extract one or more files/directories, or read them in the integrated viewer.
We hope that with the knowledge from this article you can make Midnight Commander your own. Don't be intimidated by the multitude of options the program has. You only have to learn the parts that you need for your usual work.

2,593 posts | 791 followers
FollowApache Flink Community - March 13, 2025
Alibaba Clouder - September 29, 2018
francisndungu - October 26, 2018
Aliware - April 10, 2020
Alibaba Cloud Community - December 29, 2021
Alibaba Clouder - October 2, 2018

2,593 posts | 791 followers
Follow ECS(Elastic Compute Service)
Elastic and secure virtual cloud servers to cater all your cloud hosting needs.
Learn More OSS(Object Storage Service)
An encrypted and secure cloud storage service which stores, processes and accesses massive amounts of data from anywhere in the world
Learn MoreMore Posts by Alibaba Clouder