By Sheng Dong, Alibaba Cloud After-Sales Technical Expert
As an important feature of Kubernetes clusters, Alibaba Cloud allows to dynamically increase or decrease the number of nodes in a cluster. With this feature, user adds nodes to a cluster when computing resources are insufficient, and releases to save costs when resource utilization is low.
This article describes how to scale up and release Alibaba Cloud Kubernetes clusters. With an understanding of the implementation principle, it becomes easy to efficiently locate and troubleshoot issues. For the purpose of analysis in this article, we use the 1.12.6 version.
You can add nodes to an Alibaba Cloud Kubernetes cluster by adding existing nodes, scaling out the cluster, or auto-scaling. Alibaba Cloud Kubernetes cluster allows adding nodes manually or automatically. The components for adding nodes include node preparation, Elastic Scaling Service (ESS), control, Cluster Autoscaler, and scheduler.

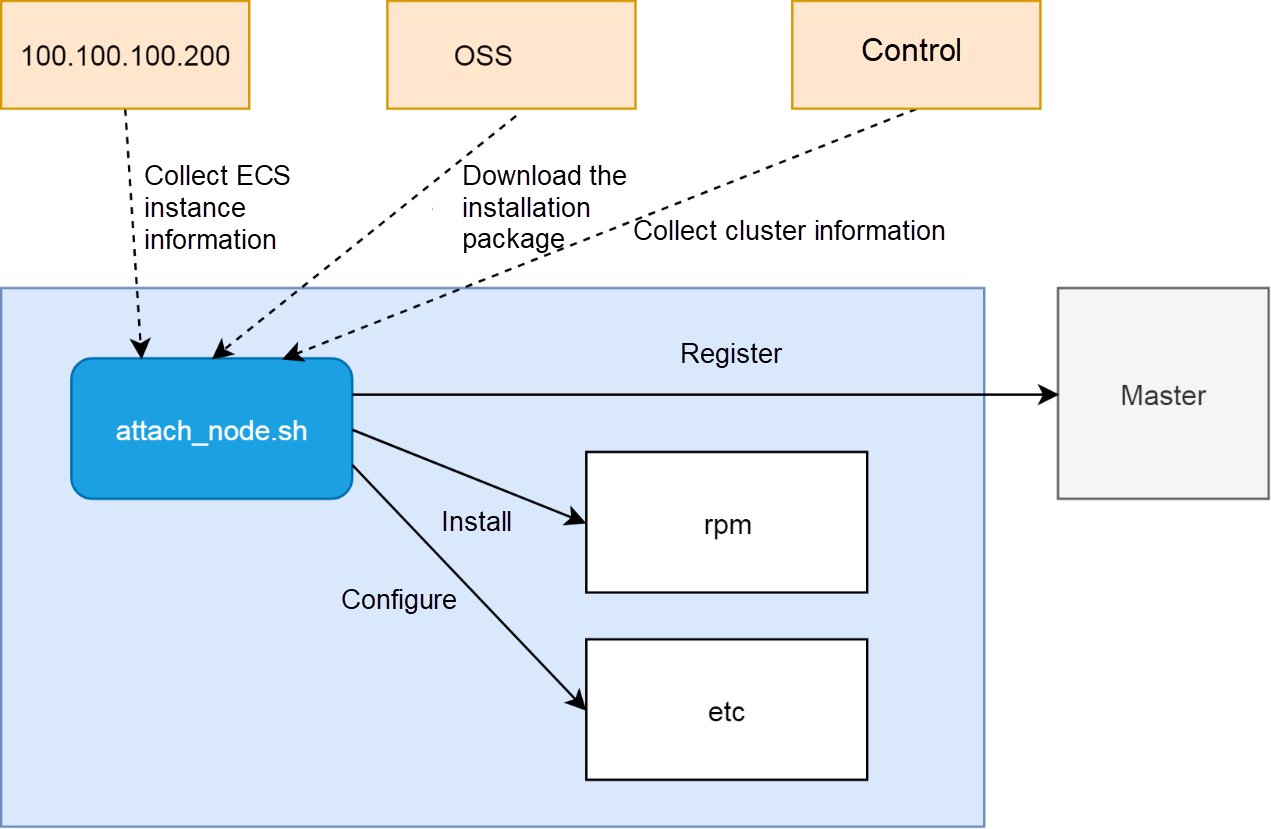
Node preparation is a process of installing and configuring a common Elastic Compute Service (ECS) instance as a Kubernetes cluster node. Run the following command to complete the process. This command uses cURL to download the attach_node.sh script, and then uses openapi token as a parameter to run the script on the ECS instance.
Curl http:///public/pkg/run/attach//attach_node.sh | bash -s -- --openapi-token In the command, a token is the key of a pair and its value is the basic information about the current cluster. The control component of an Alibaba Cloud Kubernetes cluster generates this pair while receiving a request to manually add an existing node, and returns the key as a token to the user.
The token (key) allows the attach_node.sh script to index the basic cluster information (value) on the ECS instance as an anonymous identity, which is essential for node preparation.
Generally, node preparation only involves read and write operations. The reading indicates data collection while writing indicates node configuration.

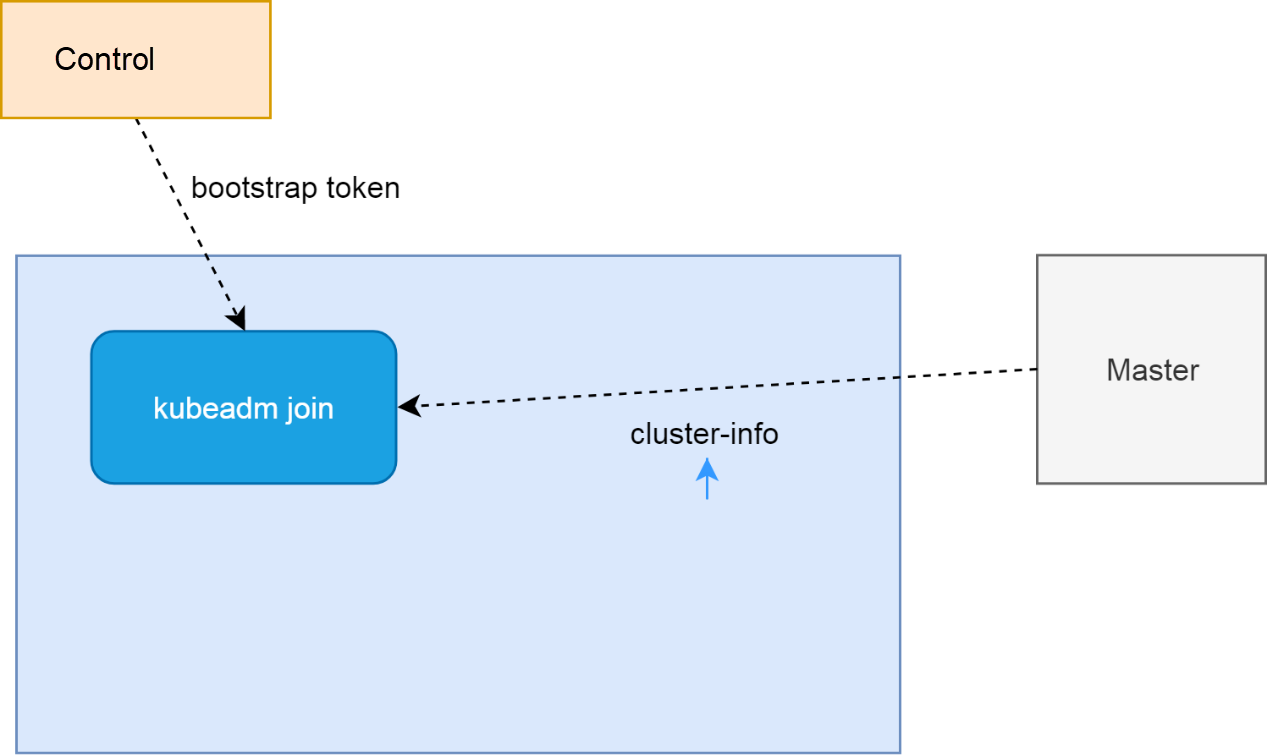
Most of the reading and writing processes in this scenario are basic. Note the process for kubeadm join to register a node to the master node. This process requires mutual trust between the new node and the master node of the cluster.
The bootstrap token obtained by the new node from the control component is actually obtained by the control component from the master node of the cluster in a trusted way. Unlike the openapi token, the bootstrap token is a part of the value.
The new node uses the bootstrap token to connect to the master node, and the master node trusts the new node by verifying the bootstrap token.
On the other hand, the new node obtains cluster-info from the kube-public namespace of the master node as an anonymous identity. cluster-info includes the cluster CA certificate and the CA certificate signature made by using the bootstrap token. The new node uses the bootstrap token obtained from the control component to generate the new signature for the CA certificate and then compares this signature with that of cluster-info. If the two signatures are the same, it implies that the bootstrap token and cluster-info are from the same cluster. The new node establishes trust in the master node since it trusts the control component.

There is no need to manually copy and paste scripts to the ECS command line to complete the process of node preparation. The control component uses features of ECS UserData to write the scripts similar to those of node preparation to ECS UserData, restarts the ECS instance, and replaces the system disk. After the ECS instance restarts, scripts in UserData automatically executes to add nodes. Check UserData of nodes to confirm the content.
mkdir -p /var/log/acs
curl http:///public/pkg/run/attach/1.12.6-aliyun.1/attach_node.sh | bash -s -- --docker-version --token --endpoint --cluster-dns > /var/log/acs/init.log
Parameters in the attach_node.sh script are very different from those in the preceding section. The parameters are the values in the preceding section. Thus, the basic cluster information is created and maintained by the control component. The process of obtaining values from keys is omitted during the automatic addition of existing nodes.
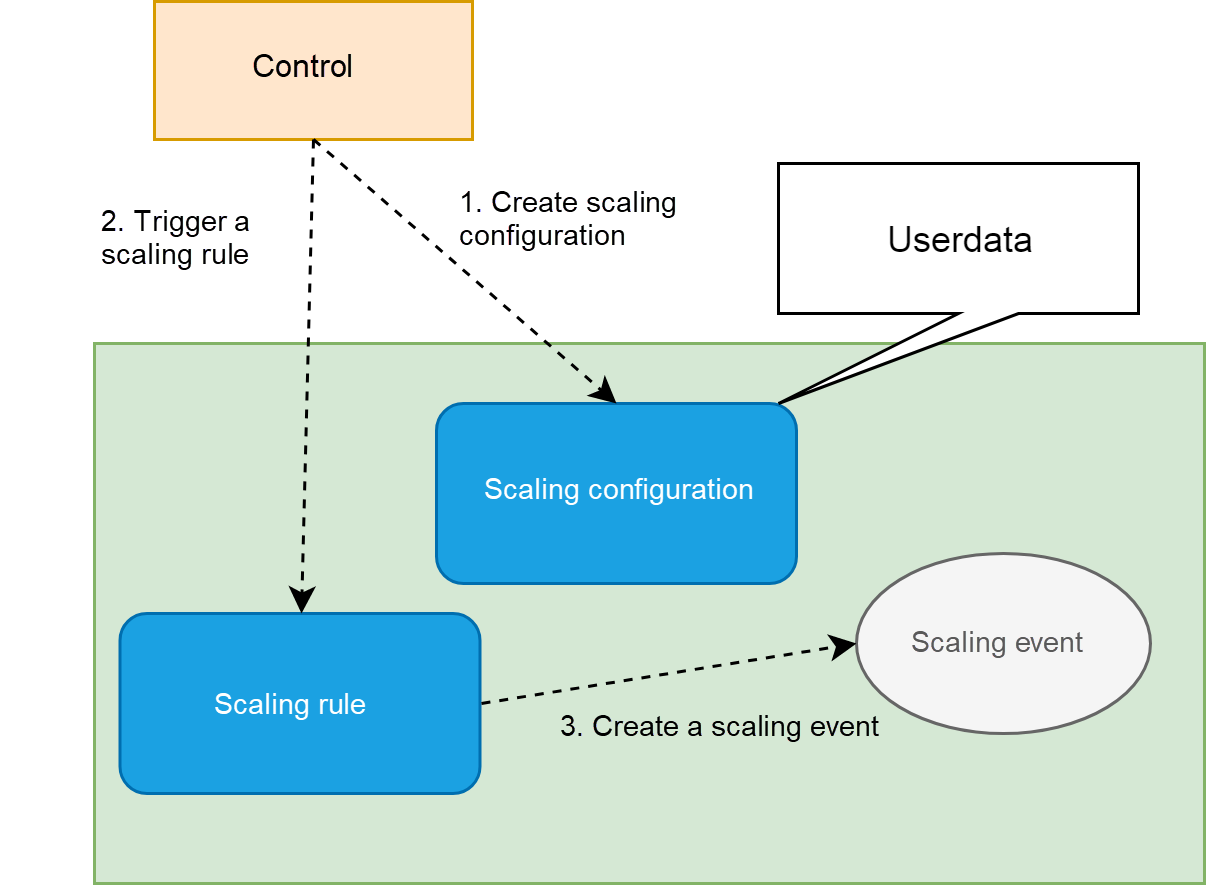
Scale-out of clusters is different from the addition of existing nodes. This function is applicable to the scenario which require the purchase new nodes. ESS is introduced to scale-out clusters based on the addition of existing nodes. ESS is responsible for handling the process from scratch, and the rest of the process is similar to the process of adding an existing node. Hence, it requires to complete the process of node preparation depending on the ECS UserData script.
The following figure shows the process for the control component to create an ECS instance from scratch through ESS.

The preceding scaling methods require manual intervention, while auto-scaling automatically creates ECS instances and add them to clusters during growing business demands. To implement auto-scaling, Cluster Autoscaler is introduced. The auto-scaling of a cluster includes two independent processes.

The first process configures specification attributes of a node, including setting user data for the node. The user data is similar to the script for manually adding an existing node. The difference is that the user data contains some special flags for auto-scaling. The attach_node.sh script sets node attributes based on these flags.
curl http:///public/pkg/run/attach/1.12.6-aliyun.1/attach_node.sh | bash -s -- --openapi-token --ess true --labelsThe second process is the key to automatically add nodes. Autoscaler is introduced, which runs in a Kubernetes cluster as a pod. Theoretically, you can use Autoscaler as a controller because it monitors the pod status and modifies ESS scaling rules to add nodes when the pod cannot be scheduled due to insufficient resources, which is similar to the controller function.
Note that the standard for cluster schedulers to measure whether resources are sufficient is the reservation rate rather than the usage rate. The difference between them is similar to that between the hotel room reservation rate and the actual check-in rate. It is possible that someone books a hotel room but does not check-in.
Before enabling auto-scaling, set the scale-in threshold, or in simple words, the lower limit of the reservation rate. There is no need to set the scale-out threshold because Autoscaler scales out a cluster according to the pod scheduling status. When pod scheduling fails due to the high reservation rate of node resources, Autoscaler scales out the cluster.
Unlike node addition, you can remove cluster nodes through only one portal. However, the methods for removing nodes that are added in different ways are slightly different.
Follow the steps below to remove a node added to a cluster by adding an existing node:
Follow the steps below to remove a node added to a cluster by scale-out of the cluster,

The nodes added by Cluster Autoscaler are automatically removed and released by Cluster Autoscaler when the reservation rate of cluster CPU resources decreases. The trigger point is the reservation rate of CPU resources, which is the reason for Metrics in the preceding figure.
Adding and removing Kubernetes cluster nodes involves four components: Cluster Autoscaler, ESS, control, and node (node preparation or node cleaning). You must check different components in different scenarios. Cluster Autoscaler is a common pod, and the acquisition of its logs is similar to that of other pods.
ESS has its dedicated console and allows to check the logs and status of sub-instances in the console, including scaling configuration and rules. For the control component, use the log viewing function to view its logs.
For node preparation and node cleaning, troubleshoot the execution processes of the corresponding scripts.

2,603 posts | 747 followers
FollowAlibaba Clouder - December 19, 2019
Alibaba Clouder - December 19, 2019
Alibaba Clouder - December 19, 2019
Alibaba Clouder - December 19, 2019
Alibaba Clouder - December 19, 2019
Alibaba Clouder - December 19, 2019

2,603 posts | 747 followers
FollowLearn More
 Container Service for Kubernetes
Alibaba Cloud Container Service for Kubernetes is a fully managed cloud container management service that supports native Kubernetes and integrates with other Alibaba Cloud products.
Learn More ECS(Elastic Compute Service)
Elastic and secure virtual cloud servers to cater all your cloud hosting needs.
Learn MoreMore Posts by Alibaba Clouder