By Nadaraj Prabhu, Alibaba Cloud Community Blog author.
In this tutorial, you are going to deploy an image using DevOps tools and provision a corresponding infrastructure. The image will consist of Tomcat, Java, MySQL and will be running on an Alibaba Cloud Elastic Compute Service (ECS) instance. As an Infrastructure-as-Code (IaC) tool Ansible and an open-source Continuous Integration and Continuous Delivery (CICD) Tool Jenkins are being used to for previsioning.
Before we get any further, let's discuss Jenkins a bit more. Well, you may ask, what exactly is it?
Jenkins is an open-source automation server that can help you to reliably build, test, and deploy software as well the infrastructure behind an application. Jenkins is a continuous integration build tool that builds and releases application code after any change is made to the code and, pushed to the code base. It saves development time by running automated testing against the code at every change pushed to the repos.
First, you'll require few prerequisites to be established to achieve the environment.
1. You need at least one Jenkins Server (for a Master only or a Master/Slave setup).
Then, once you've got the Jenkins server master/slave (agent) environment set up, make sure the agents are up and running fine by checking the status of the server. In my setup, in particular, I'm using a master node as Jenkins server and an agent machine for Ansible. If you prefer, you can have only one machine by installing Ansible on the master itself.
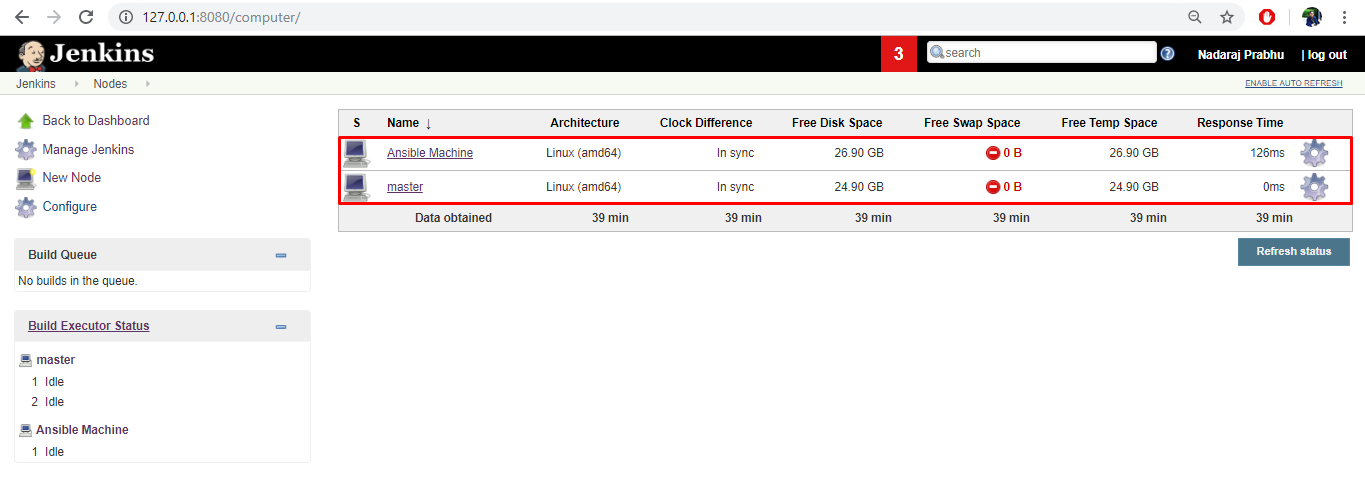
2. After that you'll want to install Ansible Tool in the master and agent machines.
It helps if you perform the same set of tasks across different servers/environment from the centralized location where Ansible is installed. Ansible is completely agentless, which is an advantage over other Infrastructure-as-Code (IaC) tools like Chef or Puppet. With Ansible, you do not need to have an agent be installed on client systems where the automation is taken through provided SSH communication between the client and server. All the automation will be easier when there are hundreds of instances in the specified region. Ansible playbooks are written are YAML/YML language.
When comes to Ansible, you'll also need to be familiar with the following:
First of all, you'll want to install the Ansible plugin on Jenkins. To do so, follow these steps:
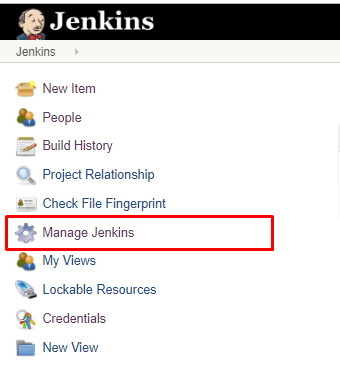
1. Click Manage Jenkins in the Dashboard.
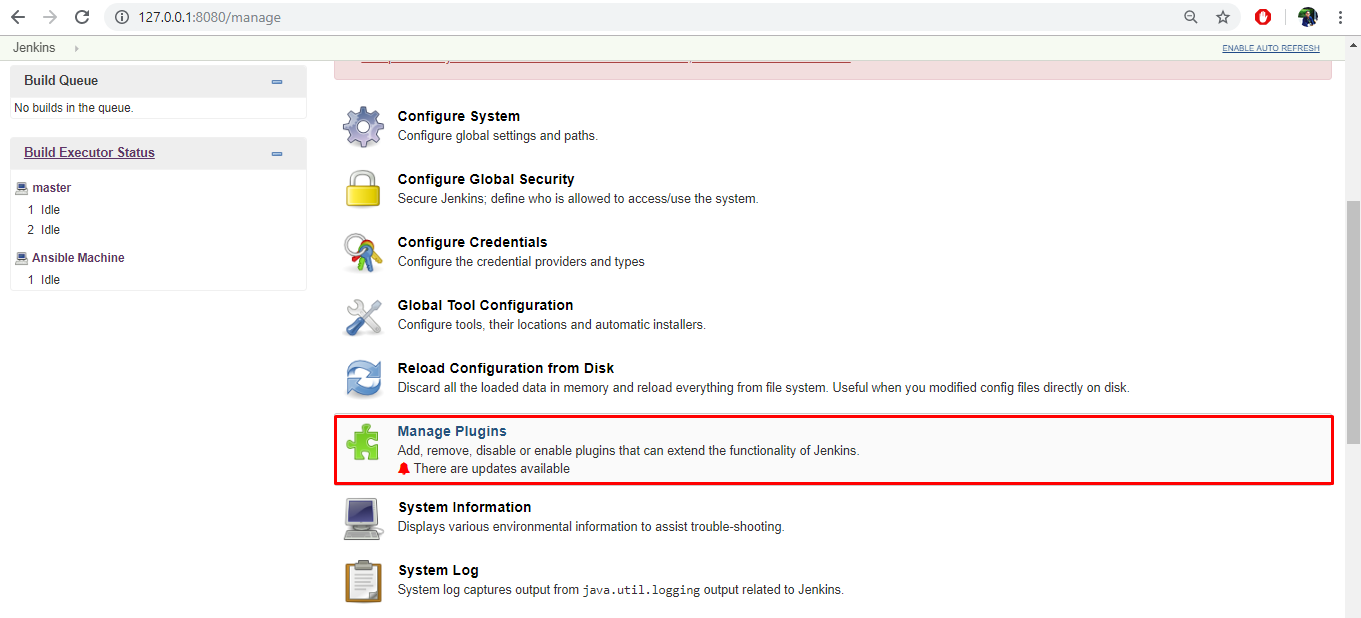
2. Click Manage Plugins and look for the Ansible plugin on the search bar which is on the top right of the page.
3. Select Ansible and click Download now and install after restart.
Note: Don't install the Ansible Tower, which is not required for current setup you are doing in this tutorial.
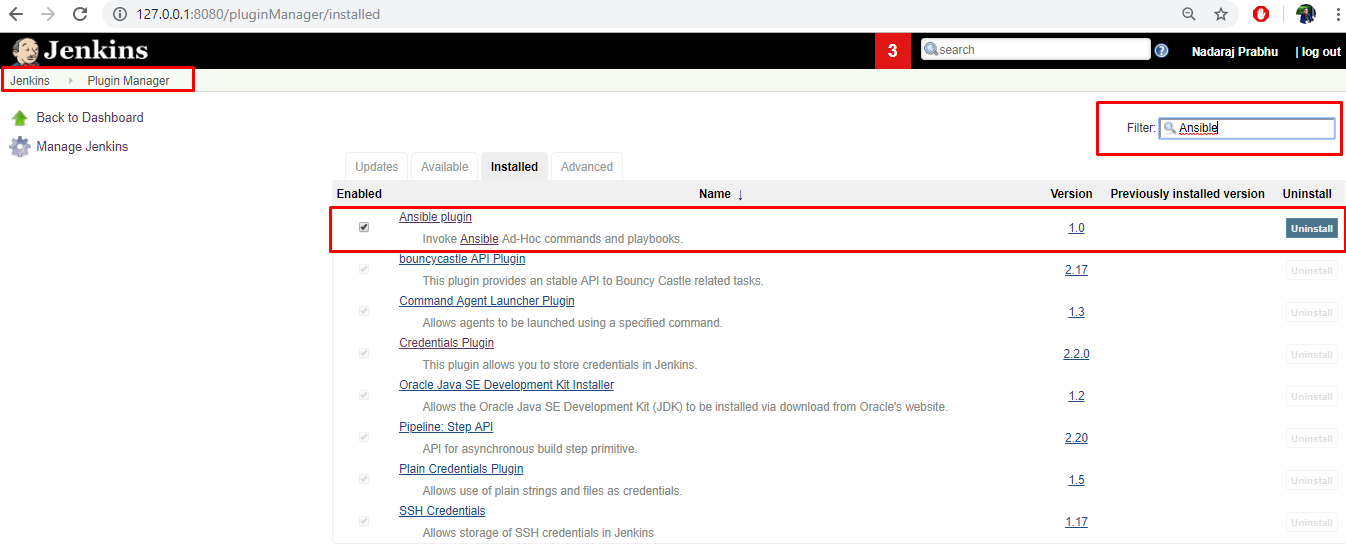

After the Ansible plugin is installed in Jenkins, you'll want to go on to the next steps for installing Ansible in the Client/Agent machine.
Alibaba Ansible Modules are frequently updated, hence I recommend that you refer to the GitHub link for the most up-to-date version.
1. Open a terminal window in the agent machine and execute below commands.
sudo yum check-update; sudo yum install -y gcc libffi-devel python-devel openssl-devel epel-release
sudo yum install -y python-pip python-wheelsudo apt-get update && sudo apt-get install -y libssl-dev libffi-dev python-dev python-pip2. Enter the following commands to install the required packages Ansible for Alibaba:
sudo pip install ansible

sudo pip install ansible_alicloud

sudo pip install ansible_alicloud_module_utilsI have created an Ansible playbook script to provision an Alibaba ECS, which you can find here. You can fork the source code and modify the parameters values as per your environment.
    alicloud_access_key: <Alibaba Access Key>
    alicloud_secret_key: <Alibaba Secret Key>
    alicloud_region: <Alibaba Region for your resource> e.g. - ap-south-1
    alicloud_zone: <Alibaba Zone for your resource> e.g. ap-south-1a
    password: <New VM Password>
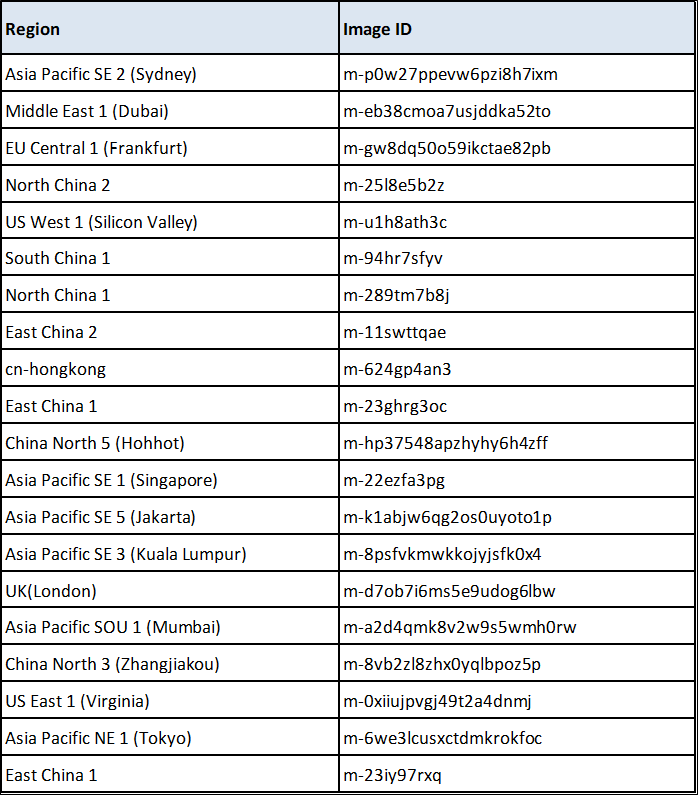
image: "m-a2d4qmk8v2w9s5wmh0rw" Note: I'm importing an image from Alibaba Application Stacks provided by Zhuyun, which you can find here. It consists of Linux, Nginx, MySQL and Jdk-Tomcat (Nginx1.6-jdk1.7-tomcat7-mysql5.5-vsFTPd2.2.2).
Now, it's time to generate an access key and secret. To do this, you'll want to follow these steps below:
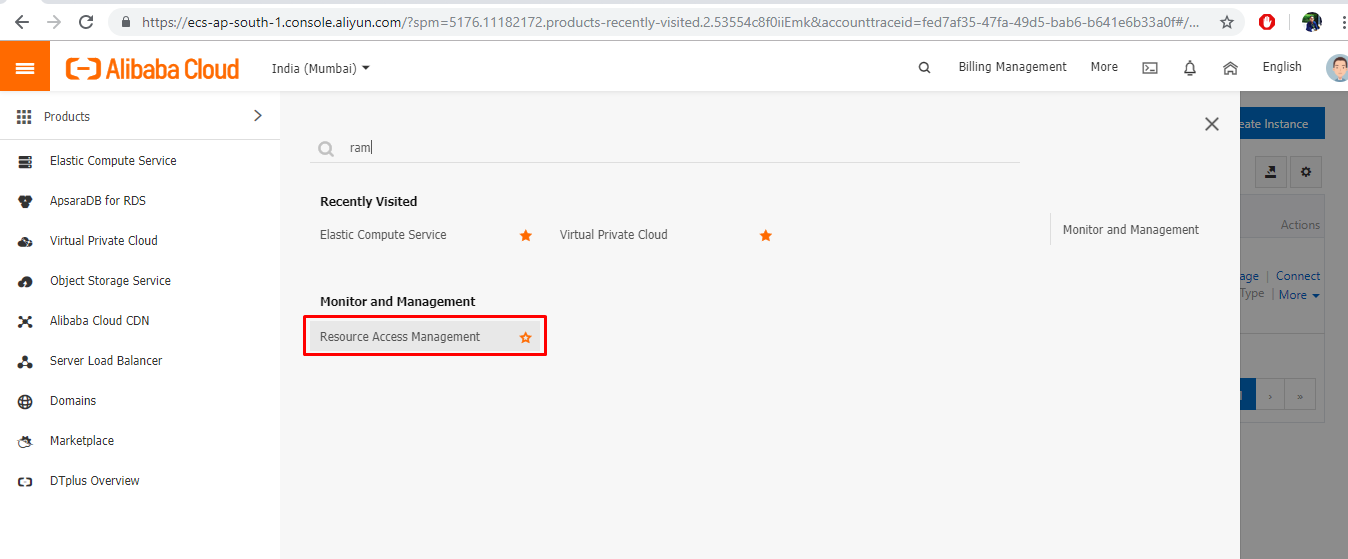
1. To obtain an access_key and secret_key, you'll want to go to the Alibaba Cloud console and select Resource Access Management (RAM) in the Product menu
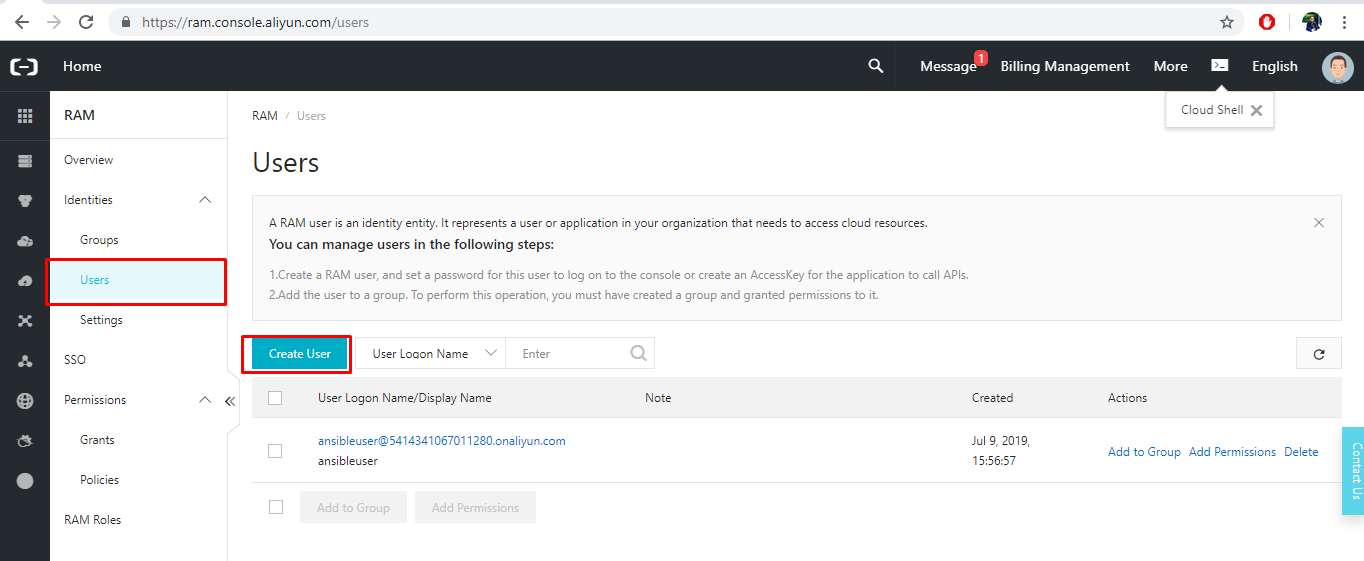
2. Click the Users option on the left navigation pane, and then select Create User.
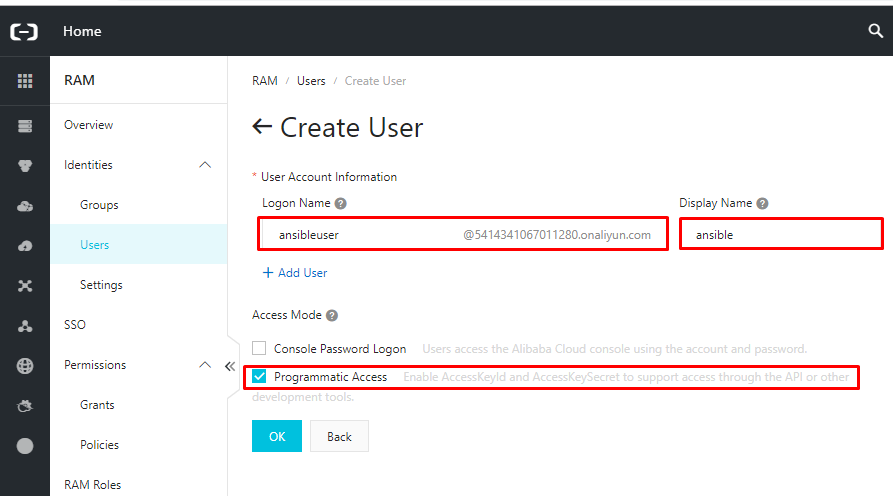
3. Create a new user, providing a login name and display name. Then, under Access Mode, check Programmatic Access. Note that you are not required to provide Console Password Logon access to this user.
4. Copy the AccessKeyId and AccessKeySecret, which will be your alicloud_access_key and alicloud_secret_key value in the playbook.
Note: The AccessKey information will not be available again after the dialog box is closed. Therefore, it is important that you copy and save this information before you close the dialog box.

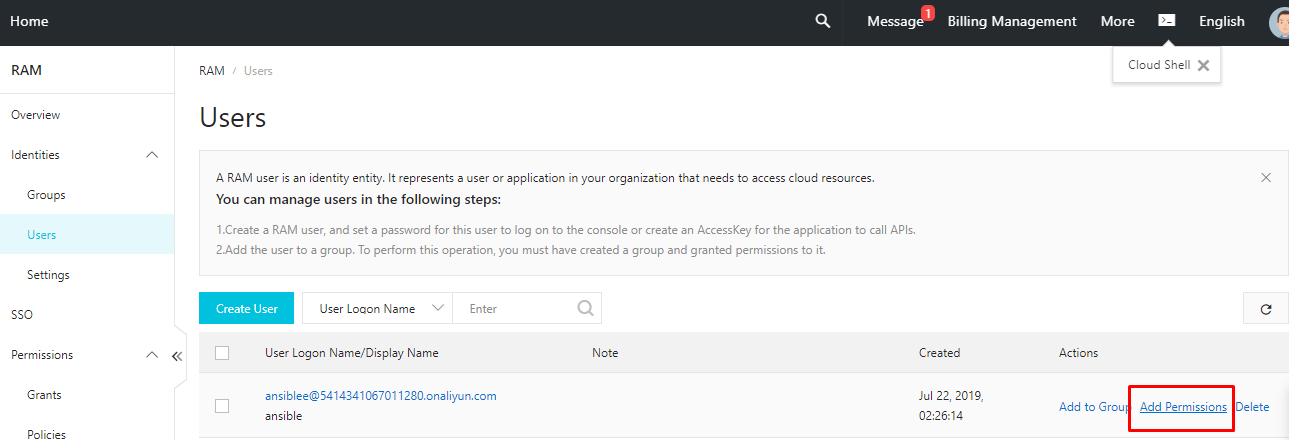
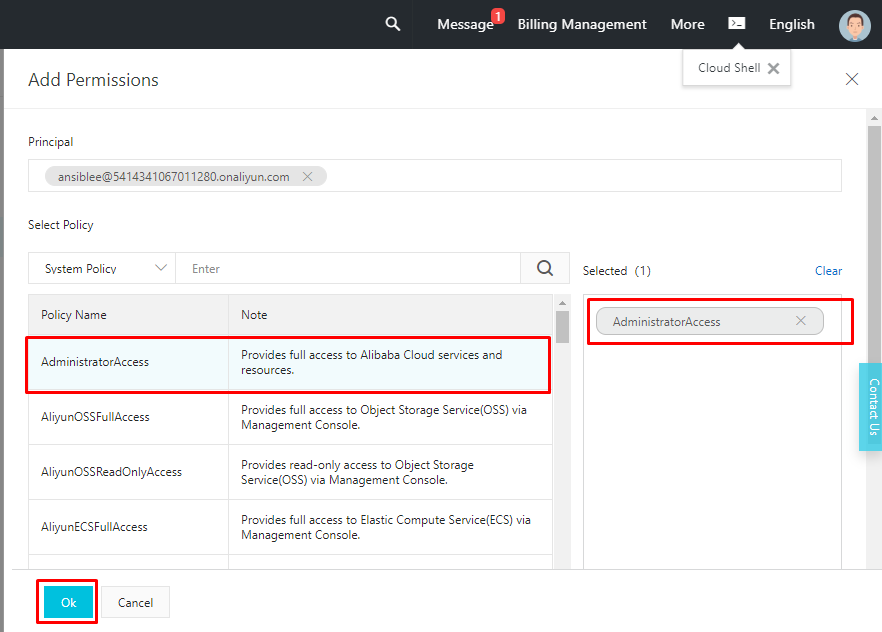
5. Provide the appropriate permissions to provision resources like VPCs, V-Switchs, Security groups or an ECS instance. I have provided AdministratorAccess, which happens to provide full access to Alibaba Cloud services and resources.


Note:
1. To get the full list, you can use the Alibaba Cloud Cloud CLI tool. It will spit out a wall of JSON, so it is also helpful to be on *nix and have the jq tool available. Given all that, all you need is this short shell script:
#!/usr/bin/env bash

for region in $( aliyun ecs DescribeRegions | jq '.Regions.Region[].RegionId' )
do
    echo $region
    reg=$( echo $region | sed s/\"//g )
    echo '---'
    for zone in $( aliyun ecs DescribeZones --RegionId $reg | jq '.Zones.Zone[].ZoneId' | sort )
    do
        echo $zone
    done
    echo ''
done
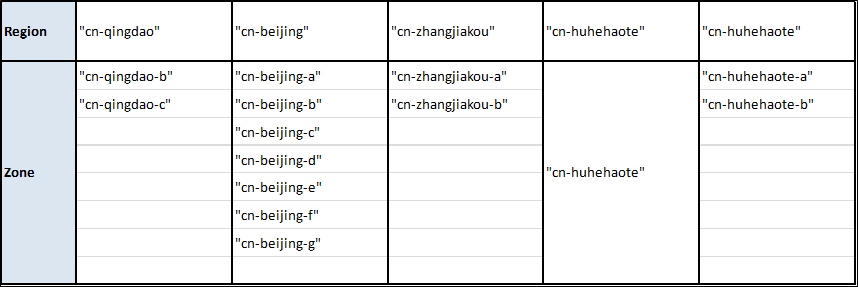
2. If you want to provision resource in below region/zone, then you'll need to complete real name registration, which you can do at this Link.
alicloud_region: cn-beijing
alicloud_zone: cn-beijing-a
Shown below is the Image ID of each region (for the Linux, Nginx, MySQL and Jdk-Tomcat Image). For this, of course, you'll want to change the image ID according to your region.
To create and deploy an Alibaba VM using Jenkins job, follow these steps:
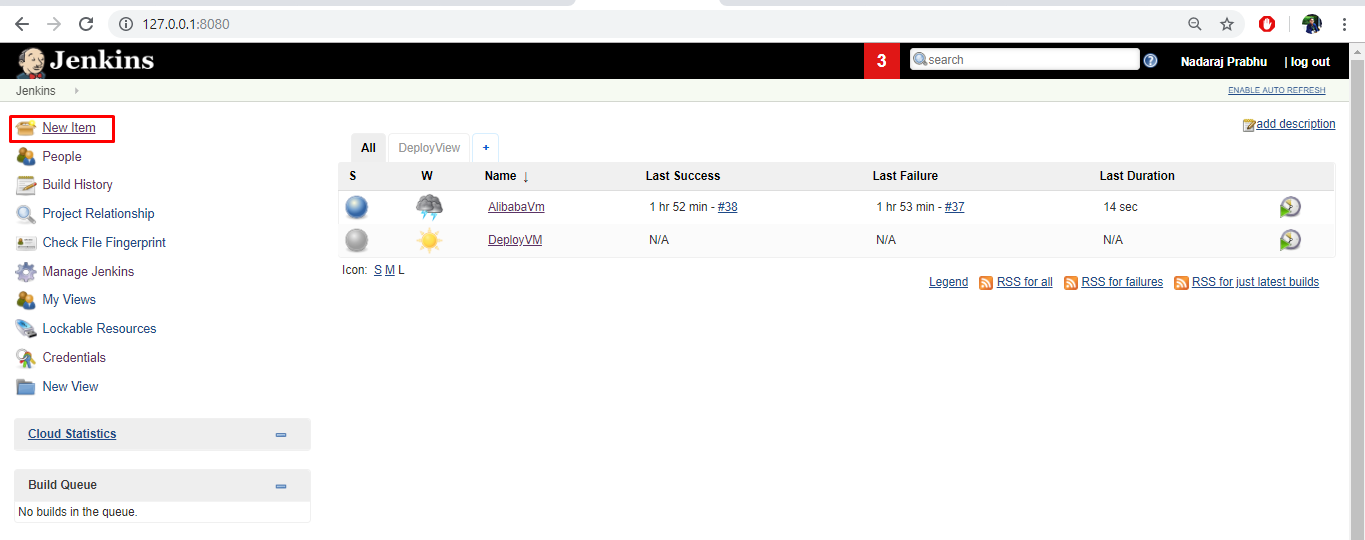
1. From Jenkins dashboard, select New Item.
2. Enter a name, select Freestyle project, and then click OK.
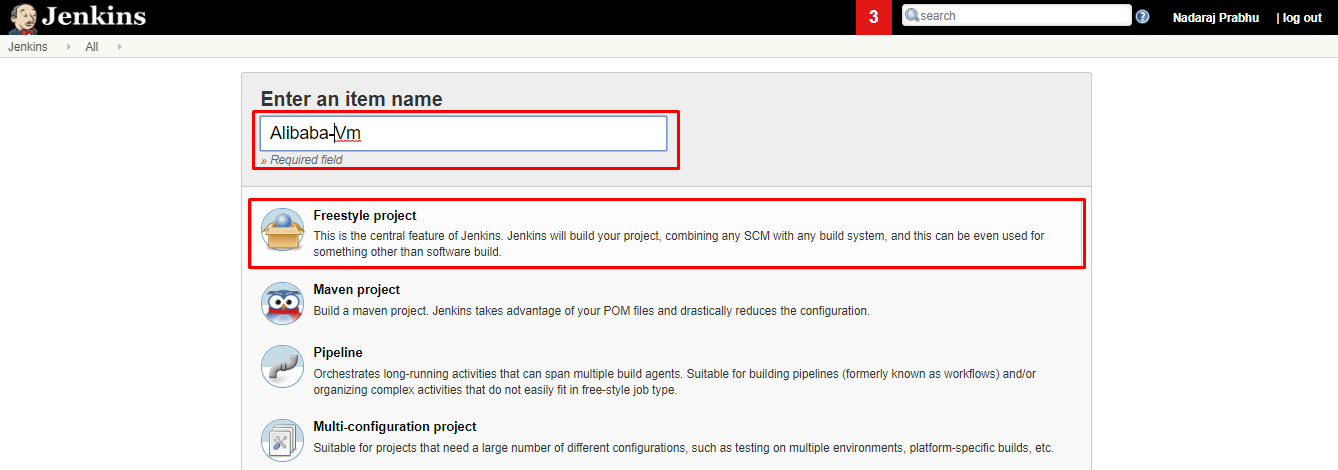
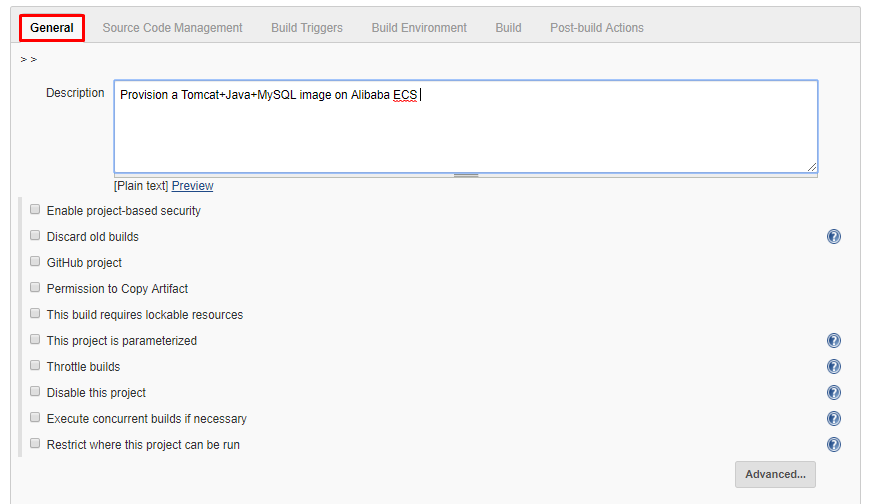
3. (Optional) Under General, provide a brief description for your reference.
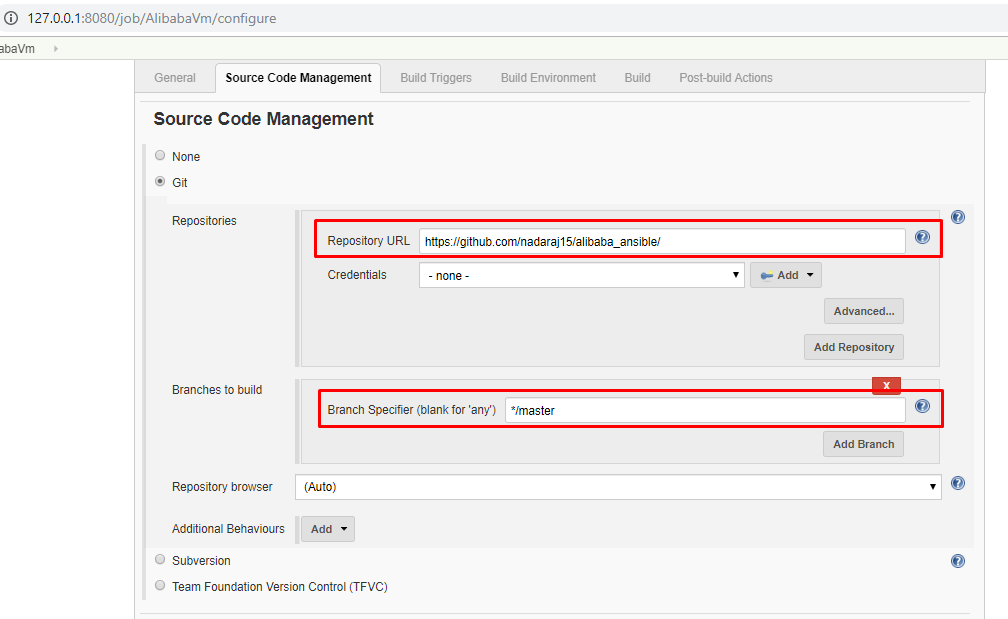
4. Select the Source Code Management (SCM) tab on the top or scroll down and enter the following information:
SCM: - Git
Repository URL: - your GitHub link with modified parameter
e.g. https://github.com/nadaraj15/alibaba_ansible/
Credentials: - none (since it's a public repository, if private then store your credentials in Jenkins)
Branch Specifier (blank for 'any'): - */master
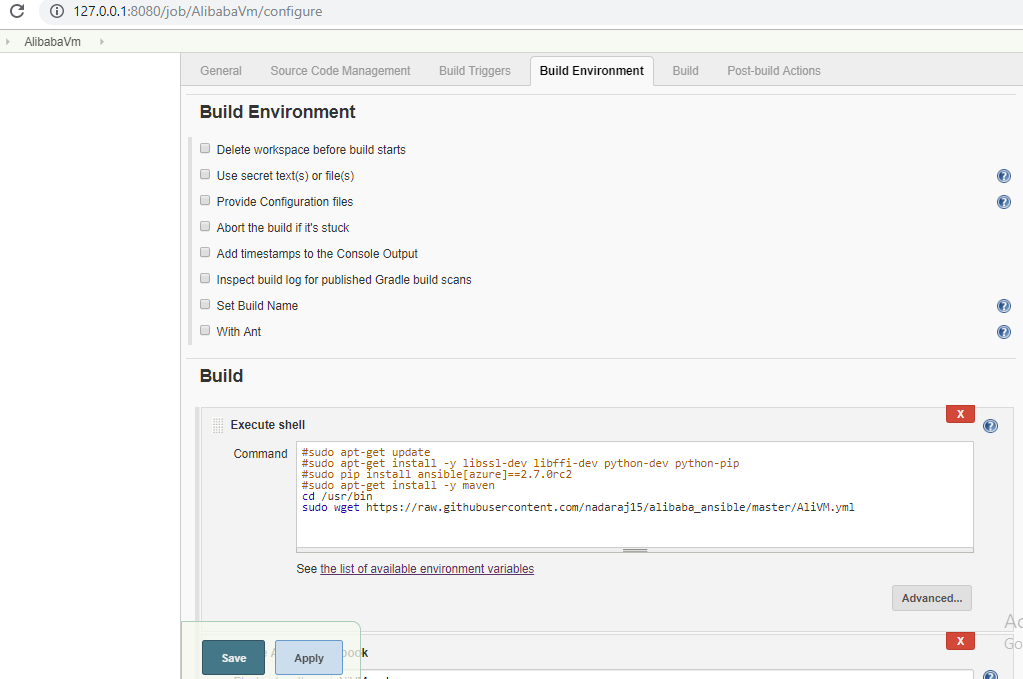
5. Next, skip build trigger for now and go to build environment. There are number of settings available when you create a new project. On this configuration page, you also have the option to Add build step to perform extra actions like running scripts. Rather, I will execute a shell script, which will download the Ansible Playbook file from GitHub. You can use the following commands:
sudo apt-get update  (Optional)
sudo apt-get install -y libssl-dev libffi-dev python-dev python-pip (Optional)
sudo pip install ansible[azure]==2.7.0rc2 (Optional)
sudo apt-get install -y maven (Optional)
cd /usr/bin
sudo wget https://raw.githubusercontent.com/nadaraj15/alibaba_ansible/master/AliVM.yml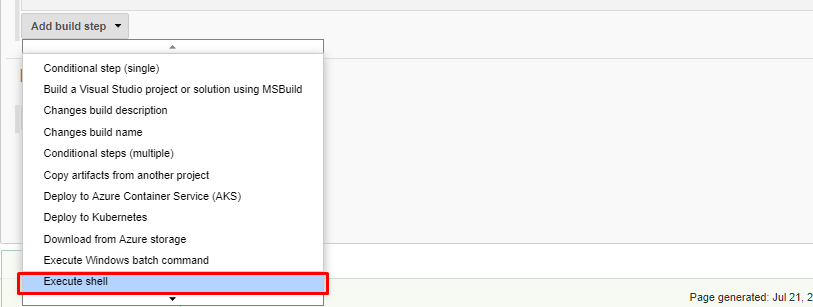
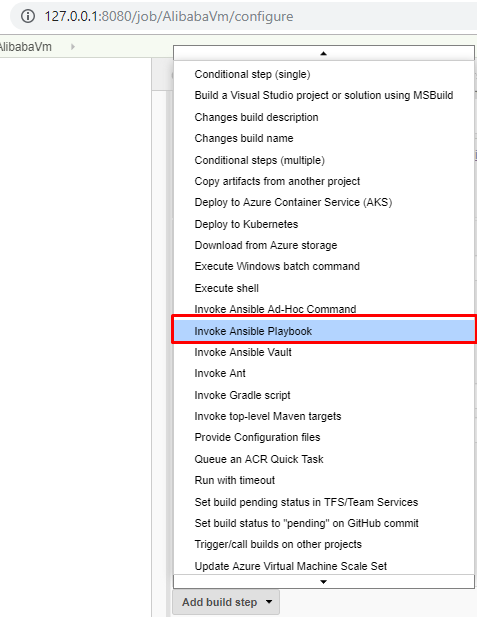
6. You'll want to invoke ansible playbook by adding a build step. This step will execute ansible playbook. You'll want to enter the following information:
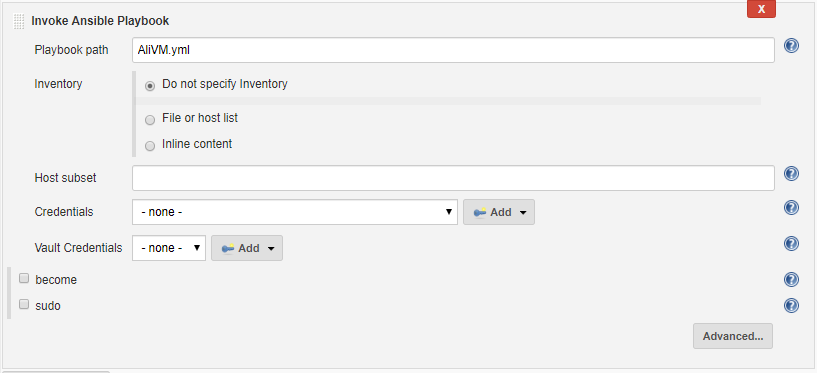
7. Cleanup the workspace after the deployment, and add an execute a shell script step with the following command.
Note: If jenkins_home is your location, then the default path is set to /var/jenkins_home. However, if you have a custom location, then you can use that one instead.
sudo rm -rf /var/jenkins_home/workspaces/<workspace_name>
8. Add a Post-built Action if you'd like. Last, click Save once all the steps are configured.

9. Navigate to the Jenkins project dashboard and trigger your build manually by clicking Build now.

10. Go to console output to check triggered build status. Once all the resources have been provisioned successfully, you can see a success status on the output.
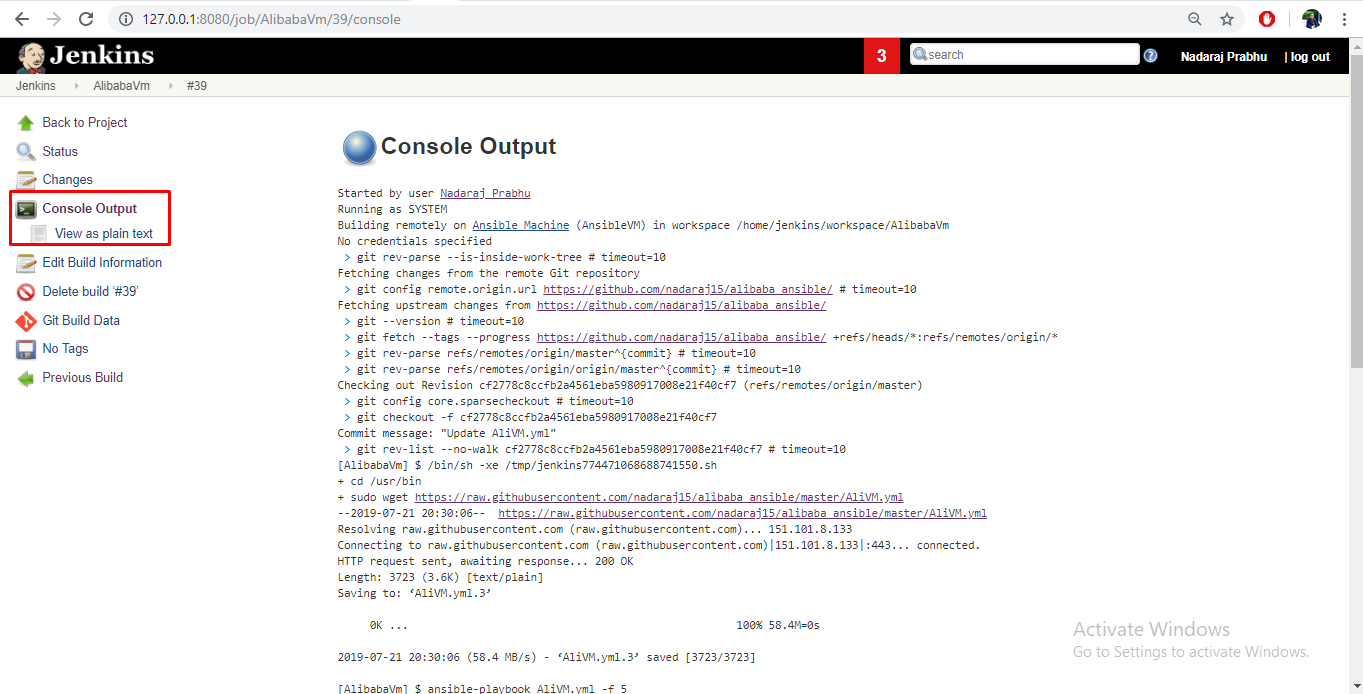
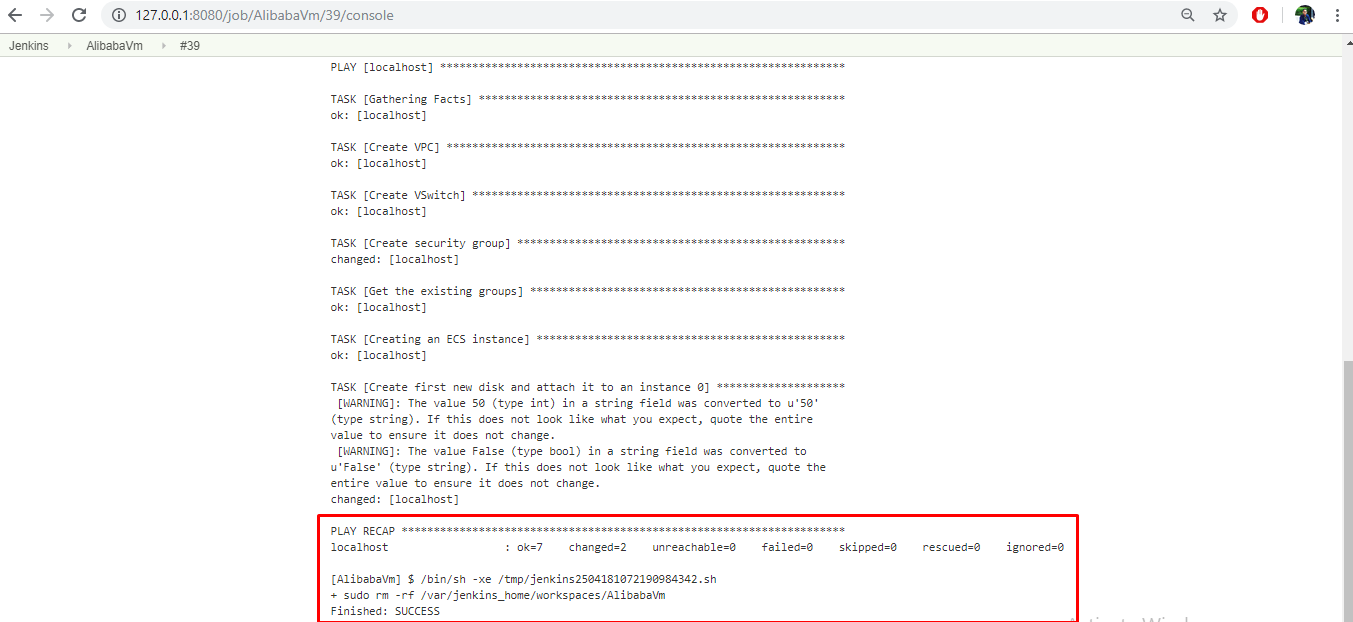
11. Go to Alibaba Console to check the provisioned Alibaba ECS and the configuration.
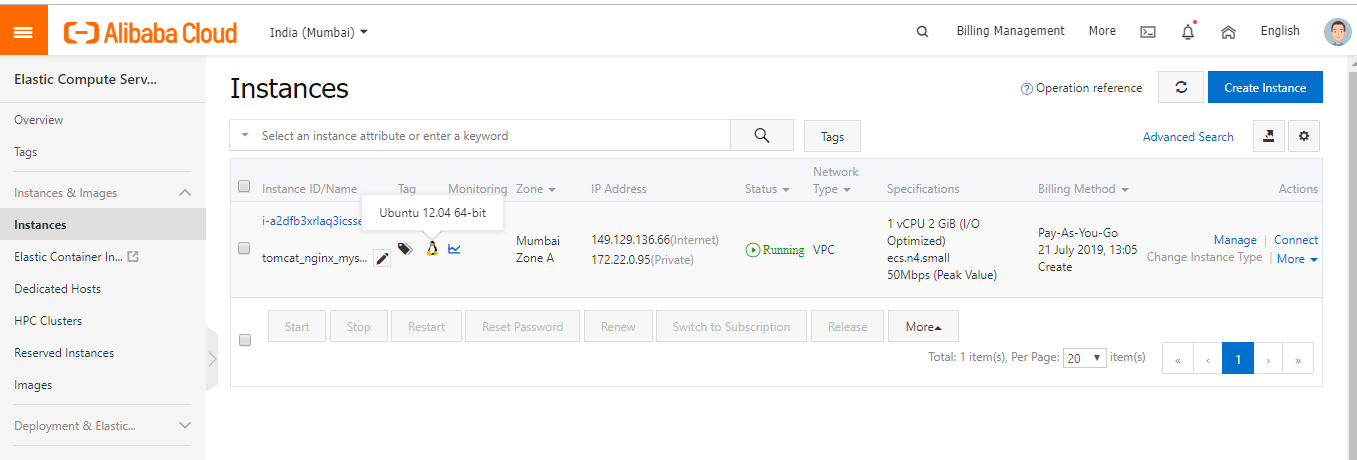
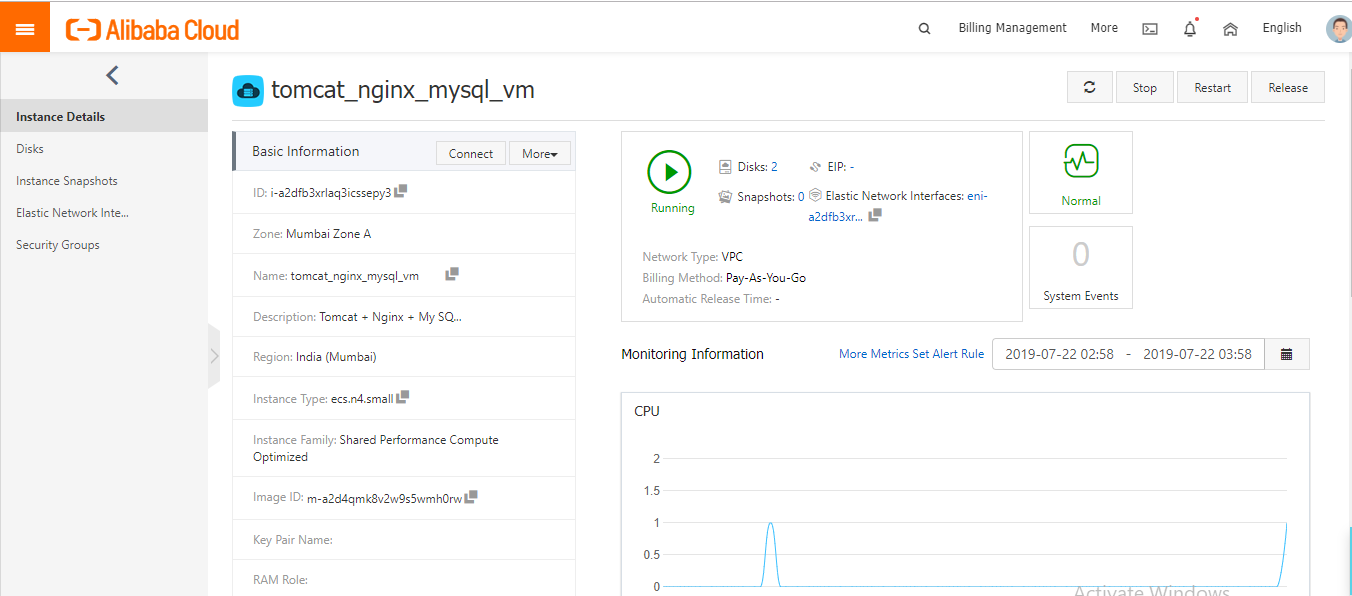
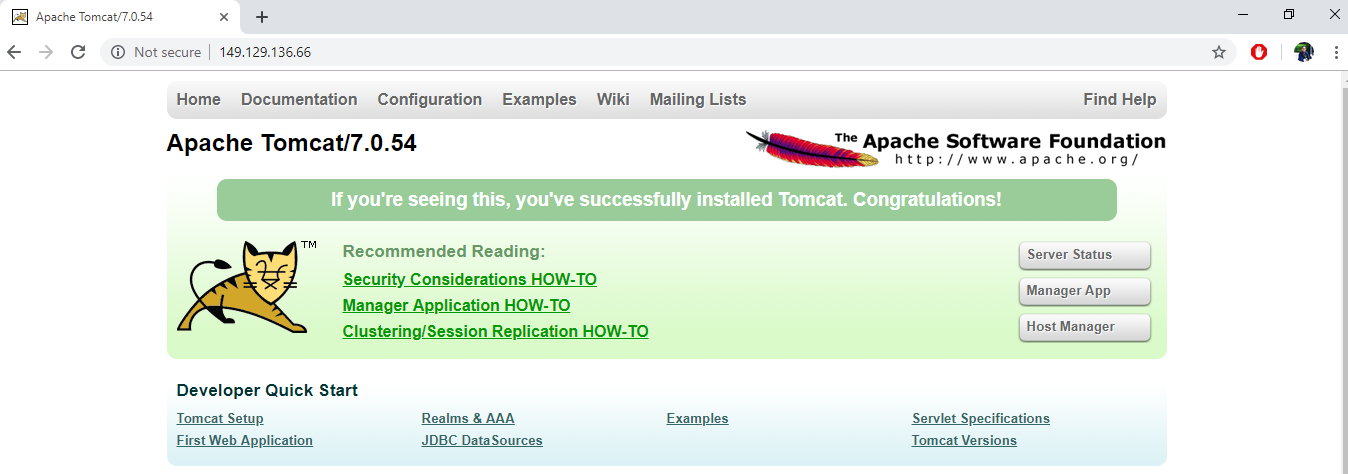
Now we have deployed an instance with Tomcat, Java, MySQL installed. Enter the corresponding public IP address in the browser, and you will be able to see the Apache Tomcat page running, since the webserver is exposed through port 80 on the Public IP of the VM.

2,593 posts | 791 followers
FollowAlibaba Clouder - January 9, 2019
Alibaba Clouder - June 3, 2020
JDP - July 31, 2020
Alibaba Clouder - January 11, 2021
Alibaba Clouder - April 2, 2019
Alibaba Cloud Native Community - May 18, 2022

2,593 posts | 791 followers
Follow ECS(Elastic Compute Service)
Elastic and secure virtual cloud servers to cater all your cloud hosting needs.
Learn More Marketplace
Marketplace is an online market for users to search and quickly use the software as image for Alibaba Cloud products.
Learn MoreMore Posts by Alibaba Clouder